
Popular categories
Looking for a yarn?


































Comments / Questions (52)
 Stephanie wrote:
Bonjour je ne comprends pas comment faire la séparation dos/devant et manche. Pour la taille xl on a 412 mailles on doit mettre en attente 8 mailles monter 12 m et tricoter 120 mailles. À partir d’où doit on commencer?
21.10.2026 - 21:44DROPS Design answered:
Bonjour Stéphanie, suivez bien toutes les étapes indiquées car la division ne va pas se faire au niveau des raglans, en taille XL, glissez les 8 premières mailles du tour sur un fil ou un arrêt de mailles et montez 12 mailles pour le côté sous la manche, tricotez les 120 m suivantes, glissez les 86 m suivantes en attente pour la manche et montez 12 m puis tricotez les 120 m suivantes pour le devant, il reste 78 m sur l'aiguille, mettez les en attente avec les 8 premières mailles du tour (78+8=86 m pour la 2ème manche). Retrouvez cette étape en photos ici, même si la division se fait aux raglans, le principe sera le même: mailles en attente, mailes montée et mailles tricotées. Bon tricot!
22.10.2026 - 09:31
 Mirka wrote:
Moje pytanie dotyczy zamykania oczek w warkoczach. W którym rzędzie schematów zamykać male warkocze. Raz są to dwa oczka a raz trzy i potem to ma wpływ na liczbę oczek podczas podziału robótki na przód tył i rękawy. Z góry dziękuję za odpowiedź.
07.08.2026 - 14:09DROPS Design answered:
Witaj Mirko, patrząc na schematy A.1B i A.2B wnioskuję, że małe warkocze są zawsze liczone jako 2 oczka (całe schematy mają 26 o.). Zamykaj oczka w warkoczach w tych rzędach schematu, w których faktycznie mały warkocz ma 2 oczka (czyli 4, 8, 12, 16 lub 20). Pozdrawiamy!
11.08.2026 - 09:22
 Emilia MIRABELLA wrote:
Vorrei lavorare questa maglia dal basso verso l’alto, e rimettere poi le parti su ferri e lavorare insieme dall’inizio della raglan. Come posso fare? Grazie
13.01.2026 - 08:19DROPS Design answered:
Buonasera Emilia, questo modello è stato pensato per essere lavorato dall'alto in basso. Provi a cercare nel nostro sito, ci sono tanti altri modelli lavorati dal basso verso l'alto. Buon lavoro!
13.01.2026 - 19:07
 Alma wrote:
Ref til spm 23.05. jeg strikker i str M. Litt vanskelig å forstå denne oppskrift 🙈skal jeg også dele masker til bakstykke,forstykke,ermer?Eller holder det bare med 1 merke?
27.05.2025 - 15:25DROPS Design answered:
Hej Alma, du har 132 m i M efter halsen. starter med A.1A hvor 20 m bliver til 26 m, 24m glatstrik (bakstykke), A.2A (20 m bliver til 26m), 2m glat midt på ærmet, A.1A (20m bliver til 26m) 24m glatstrik (forstykke), A.2A (20m bliver til 26m), 2m glat midt på ærmet. Nu har du 156m. Nu tager du ud til raglan ved at slå om på hver side af de fire A.2 og A.1 = 8 udtagninger for hver 2.omgang :)
28.05.2025 - 08:19
Alma wrote:
Hei.Jeg forstår ikke masker mellom 1 og 2 rad i A1/2 diagram.Hvis jeg følger oppskrift,da mangler jeg 3 masker foran a1a diagram og a2a diagram.skal jeg øke 3 masker før jeg starter A1a diagram og A2a diagram?Har prøvd både meg og uten økning og det blir feil hver gang.Hva gjør jeg feil?Takk
23.05.2025 - 12:10DROPS Design answered:
Hej Alma, Husk at du starter nederst i diagrammerne. Når du strikker første pind i A.2A og A.1A tager du 6 masker ud ifølge diagrammet. Hvilken størrelse strikker du, så skal vi prøve at forklare første omgang :)
27.05.2025 - 09:58
 Emma wrote:
Jag stickar stl L och har 136 m när oket ska börja. Enligt instruktionen för oket ska jag ha 160m. Jag har ökat en gång a 12 maskor. Har jag missat någon ökning innan oket påbörjas? Instruktion: Sticka A.1A (= 20 maskor), sticka 26 maskor sticka A.2A (= 20 maskor), sticka 2 maskor (= mitt på ärmen), sticka A.1A (= 20 maskor), sticka 26 maskor, sticka A.2A (= 20 maskor), och avsluta med 2 maskor slätstickning. Det är nu 160 maskor på
06.02.2025 - 20:44DROPS Design answered:
Hej Emma, på første pind i A.1A og A.2A tager du 6 masker ud i hvert diagram, har du talt dem med?
12.02.2025 - 13:39
 Anne wrote:
Ohjeessa lukee "Tee kavennukset siten, että kavennat piirrosten A.1B ja A.2B jokaisessa mallikerrassa 6 silmukkaa (kavenna neulomalla itse palmikoiden silmukat pareittain oikein yhteen) = 304." Yhdessä mallikerrassa on yksi palmikko, jossa on kahdeksan silmukkaa. Jos ne silmukat neulotaan pareittain yhteen, siinä kaventuu neljä silmukkaa? Missä kohdassa kavennetaan vielä kaksi, jotta saadaan kavennettua tarvittavat kuusi silmukkaa?
25.01.2025 - 08:59DROPS Design answered:
Hei, voit tehdä muut kavennukset nurjien silmukoiden kohdalla, eli neulot 2 silmukkaa nurin yhteen. Tekisin nämä kavennukset piirroksen kummankin reunan reunimmaisen nurjan raidan kohdalla.
28.01.2025 - 19:30
Anne wrote:
Raglalisäyksiä tehdessä ihmettelen, onko ohjeessa virhe? Ohjeessa kerrotaan että lisäyksiä tulee yhteensä 8 mutta kun ohjeen lukee niin siellä on paikat vain seitsemälle lisäykselle. Toiseen olekaan lisätään vain yksi silmukka kierroksella vaikka toiseen lisätään kaksi?
19.01.2025 - 20:03DROPS Design answered:
Hei, työhön lisätään 8 silmukkaa. Ohjeesta puuttui yksi raglanlisäys, mutta se on nyt lisätty ohjeeseen.
20.01.2025 - 17:23
 Kay wrote:
I still don't understand this text "Continue the pattern like this and increase every other round 17-24-27-32-33-37 times in total, and then every 4th round 5-3-3-2-3-3 times in total (work the increased stitches twisted and in stocking stitch)." Since I already done with the increase of 24 rows how am I going to work with the 4th round of 3 times in total?
05.09.2024 - 14:05DROPS Design answered:
Dear Kay, in 2nd time you increase first 24 times on every other round (48 rounds worked), then you increase as before but on every 4th round a total of 3 times (1 round with increases as before, 3 rounds without increase). So you will work 12 more rounds increasing 3 times. Happy knitting!
06.09.2024 - 07:57
|
|||||||||||||||||||||||||
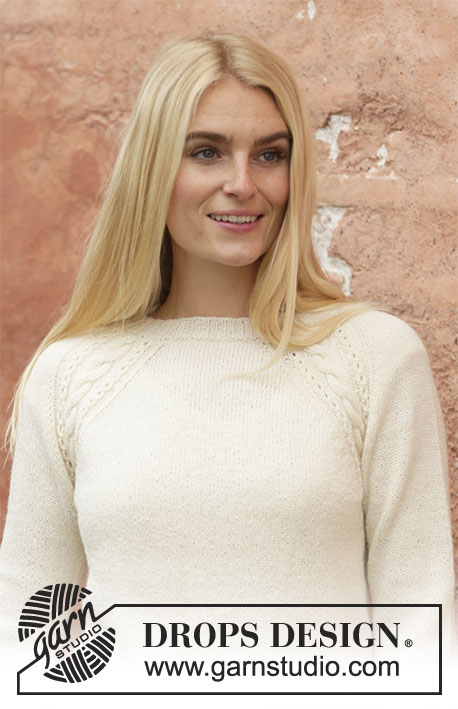
White Rose#whiterosesweater |
|||||||||||||||||||||||||
 |
 |
||||||||||||||||||||||||
Knitted jumper in DROPS Nord. Piece is knitted top down with cables in raglan. Size: S - XXXL
DROPS 206-30 |
|||||||||||||||||||||||||
|
---------------------------------------------------------- EXPLANATION FOR THE PATTERN: ---------------------------------------------------------- INCREASE TIP-1 (evenly): To calculate how to increase evenly, use the total number of stitches on row (e.g. 116 stitches) and divide stitches by number of increases to be done (e.g. 12) = 9.7. In this example increase by making 1 yarn over after alternately approx. every 9th and 10th stitch. On next round work yarn overs twisted to avoid holes. PATTERN: See diagrams A.1 and A.2. RAGLAN: Increase 1 stitch in each side of pattern borders along each raglan line, i.e. increase 1 stitch on each side of A.1B and A.2B (= 8 stitches increased on round). Increase 1 stitch by making 1 yarn over. On next round knit yarn overs twisted to avoid holes. Then work the new stitches in stocking stitch. INCREASE TIP-2 (applies to sides on body and mid under sleeves): Work until 2 stitches remain before marker thread, make 1 yarn over, knit 4 (marker thread is in the middle of these 4 stitches), make 1 yarn over (= 2 stitches increased at marker thread). On next round knit yarn overs twisted to avoid holes. Then work the new stitches in stocking stitch. DECREASE TIP (applies to mid under sleeves): Work until 3 stitches remain before marker thread, knit 2 together, knit 2 stitches (marker thread is between these 2 stitches), slip 1 stitch knitwise, knit 1, pass slipped stitch over stitch worked (= 2 stitches decreased). ---------------------------------------------------------- START THE PIECE HERE: ---------------------------------------------------------- JUMPER - SHORT OVERVIEW OF THE PIECE: Neck edge and yoke are worked in the round on circular needle, top down. Now divide yoke for body and sleeves. Work body in the round on circular needle, top down. Work sleeves in the round on double pointed needles/short circular needle, top down. NECK EDGE: Cast on 116-120-124-128-136-140 stitches on circular needle size 2.5 mm with Nord. Knit 1 round. Then work rib in the round (= knit 2/purl 2) for 3 cm. Knit 1 round while increasing 12 stitches evenly - read INCREASE TIP-1 = 128-132-136-140-148-152 stitches. Knit 1 round without increase. Insert 1 marker on round. THEN MEASURE PIECE FROM MARKER. Work yoke as explained below. YOKE: Switch to circular needle size 3 mm. Work next round as follows (from left raglan line at the back when garment is worn): Work A.1A (= 20 stitches), work 22-24-26-28-32-34 stitches in stocking stitch (= back piece), work A.2A (= 20 stitches), work 2 stitches in stocking stitch (= mid on top of sleeve), work A.1A (= 20 stitches), work 22-24-26-28-32-34 stitches in stocking stitch (= front piece), work A.2A (= 20 stitches), and finish with 2 stitches in stocking stitch (= mid on top of sleeve). There are now 152-156-160-164-172-176 stitches on needle. Work next round as shown in diagrams - REMEMBER KNITTING TENSION! Then work pattern as explained below - AT THE SAME TIME begin increase for RAGLAN - read explanation above. Work first round as follows: Work A.1B (= 26 stitches), increase 1 stitch for raglan, work 22-24-26-28-32-34 stitches in stocking stitch (= back piece), increase 1 stitch for raglan, work A.2B (= 26 stitches), increase 1 stitch for raglan, work 2 stitches in stocking stitch (= mid on top of sleeve), increase 1 stitch for raglan, work A.1B (= 26 stitches), increase 1 stitch for raglan, work 22-24-26-28-32-34 (= front piece), increase 1 stitch for raglan, work A.2B (= 26 stitches), increase 1 stitch for raglan, work 2 stitches in stocking stitch (= mid on top of sleeve), and increase 1 stitch for raglan (= 8 stitches increased on round). Continue the pattern like this and increase every other round 17-24-27-32-33-37 times in total, and then every 4th round 5-3-3-2-3-3 times in total (work the increased stitches twisted and in stocking stitch). After last increase there are 328-372-400-436-460-496 stitches on needle. Work without increase until yoke measures 18-20-22-24-26-28 cm from marker in the neck. On next round decrease 24 stitches. This is done to decrease the stitches added as compensation to make the cables contract the work in the raglan lines. Distribute the decrease so that 6 stitches are decreased in A.1B and A.2B (it is best to decrease by knitting the stitches over the cable together 2 by 2) = 304-348-376-412-436-472 stitches remain on needle. Cut the yarn. Now divide the piece for body and sleeves, i.e. work next round as follows: Slip the first 8-9-9-8-6-5 stitches on 1 stitch holder for sleeve, cast on 10-10-12-12-14-16 new stitches on needle (= in the side under sleeve), work in stocking stitch over the next 90-100-108-120-132-144 stitches (= back piece), slip the next 62-74-80-86-86-92 stitches on 1 stitch holder for sleeve, cast on 10-10-12-12-14-16 new stitches on needle (= in the side under sleeve), work in stocking stitch over the next 90-100-108-120-132-144 stitches (= front piece) and slip the remaining 54-65-71-78-80-87 stitches on to same stitch holder as first part of sleeve at the beginning of round, for sleeve. BODY: = 200-220-240-264-292-320 stitches. Work in stocking stitch over the first 5-5-6-6-7-8 stitches that were cast on under sleeve. Now round begins here. Insert 1 marker thread at the beginning of round and insert 1 marker thread in the middle of the 10-10-12-12-14-16 stitches were cast on under sleeve in the other side. Move the marker threads upwards when working; they should be used for increase later in the sides. Work in stocking stitch in the round. When piece measures 2 cm from division, increase 1 stitch on each side of both marker threads - read INCREASE TIP-2. Increase like this every 6 cm 5 times in total in each side = 220-240-260-284-312-340 stitches. Work until body measures 27 cm from division. On next round increase 56-60-64-68-76-84 stitches evenly = 276-300-324-352-388-424 stitches. Switch to circular needle size 2.5 mm. Work rib in the round = knit 2/purl 2 for 4 cm. Loosely cast off stitches with knit over knit and purl over purl. Jumper measures approx. 52-54-56-58-60 cm from shoulder and down. SLEEVE: Slip the 62-74-80-86-86-92 stitches from stitch holder in one side of piece on double pointed needles/short circular needle size 3 mm and pick in addition up 1 stitch in each of the 10-10-12-12-14-16 stitches cast on under sleeve = 72-84-92-98-100-108 stitches. Insert 1 marker thread in the middle of the 10-10-12-12-14-16 stitches under sleeve and move the marker thread upwards when working. Use marker later when decreasing mid under sleeve. Begin round at the marker thread and work stocking stitch in the round. When piece measures 2 cm from division, decrease 2 stitches mid under sleeve - read DECREASE TIP. Decrease like this every 2½-1½-2-2½-0-0 cm 5-7-6-5-1-1 times in total = 62-70-80-88-98-106 stitches. When piece measures 16 cm from division, increase 2 stitches mid under sleeve - read INCREASE TIP-2. Increase like this every 1 cm 24-23-20-18-16-14 times in total = 110-116-120-124-130-134 stitches. Work until sleeve measures 41-39-38-36-35-33 cm from division (approx. 6 cm remain until finished measurements, try the jumper on and work to desired length). NOTE! Shorter measurements in the larger sizes because of wider neck and longer yoke. Knit 1 round while decreasing 6-12-8-12-10-6 stitches evenly = 104-104-112-112-120-128 stitches. On next round knit all stitches together 2 by 2 = 52-52-56-56-60-64 stitches. Switch to double pointed needles size 2.5 mm. Work rib in the round = knit 2/purl 2 for 5 cm. Loosely cast off stitches with knit over knit and purl over purl. Sleeve measures approx. 47-45-44-42-41-39 cm from division. Work the other sleeve the same way. |
|||||||||||||||||||||||||
Diagram explanations |
|||||||||||||||||||||||||
|
|||||||||||||||||||||||||
 |
|||||||||||||||||||||||||
 |
|||||||||||||||||||||||||
Have you finished this pattern?Tag your pictures with #dropspattern #whiterosesweater or submit them to the #dropsfan gallery. Do you need help with this pattern?You'll find 17 tutorial videos, a Comments/Questions area and more by visiting the pattern on garnstudio.com. © 1982-2026 DROPS Design A/S. We reserve all rights. This document, including all its sub-sections, has copyrights. Read more about what you can do with our patterns at the bottom of each pattern on our site. |
|||||||||||||||||||||||||






With over 40 years in knitting and crochet design, DROPS Design offers one of the most extensive collections of free patterns on the internet - translated to 17 languages. As of today we count 333 catalogues and 12525 patterns translated into English (UK/cm). 12525
We work hard to bring you the best knitting and crochet have to offer, inspiration and advice as well as great quality yarns at incredible prices! Would you like to use our patterns for other than personal use? You can read what you are allowed to do in the Copyright text at the bottom of all our patterns. Happy crafting!
Post a comment to pattern DROPS 206-30
We would love to hear what you have to say about this pattern!
If you want to leave a question, please make sure you select the correct category in the form below, to speed up the answering process. Required fields are marked *.