
Popular categories
Looking for a yarn?


Comments / Questions (26)
![]() Joan wrote:
Joan wrote:
Jeg kan kun se,jeg får huller,ikke snoninger?Mvh.
04.12.2018 - 14:12DROPS Design answered:
Hei Joan. Det er symbolet ta 1 maske løst av, strikk 2 masker, trekk den løse masken over (=1 maske felt), og økingen midt mellom de 2 maskene som er igjen etter fellingen som skaper et slags flettemønster: den masken som blir trukket over ser ut som den er flettet. Det blir tydeligere når du har strikket flere rapporter i høyden. God fornøyelse
05.12.2018 - 09:05
![]() Zaida wrote:
Zaida wrote:
Para complementar las instrucciones, deberían hacer un video a partir del cierre del punto agregado en la primera mitad de la banda y el inicio de la segunda mitad hasta despues de la primera fila de la segunda parte, pues esa parte en las instrucciones no se entiende. Incluso, podrían ponerlo hasta finalizar la segunda parte e iniciar la union de las partes.
10.11.2018 - 19:09
![]() Zaida wrote:
Zaida wrote:
Buenos días, ahorita estoy detenida al trabajar la segunda parte luego de dividir tejido (25 puntos que se transforman en 27). Pero no sé cómo pasar el hilo de los 2 puntos montados al inicio a los 25+2 para iniciar nuevamente las 16 filas del diagrama A1. Cómo se hace esto?
01.11.2018 - 04:01DROPS Design answered:
Hola Zaida. Primero tienes que asegurarte de que antes de dividir la labor te toque trabajar la fila 1 de A.1. Tienes que montar 2 puntos nuevos y pasar los 25 puntos del gancho auxiliar a la aguja (sin trabajarlos primero). Ya estás preparada para trabajar la primera fila de A.1
04.11.2018 - 19:22
![]() Zaida wrote:
Zaida wrote:
Qué es el Pliegue? En el patrón no explica cómo se hace. Podrían explicar qué es?
06.10.2018 - 15:53DROPS Design answered:
Hola Zaida, ha sido un fallo al publicar el patrón. Ya está corregido con las explicaciones del pliegue.
12.10.2018 - 13:41
![]() Ida wrote:
Ida wrote:
Räknas första varvet i mönstret A1 som rätsida? Alltså, görs omslaget från avigsidan?
04.10.2018 - 11:01DROPS Design answered:
Hei Ida. Ja, det stemmer: fellingen gjøres fra rettsiden og kastene lages på vrangsiden. God fornøyelse
04.10.2018 - 13:13
![]() Tanja wrote:
Tanja wrote:
"tag 1 maske løs af pinden som om den skulle strikkes ret, strik 2 masker ret, løft den løse maske over (= 1 maske taget ind)" Er det ikke i alt 2 masker man tager ind her? Skal vrang siden strikkes som vrangstrik?
04.09.2018 - 00:31DROPS Design answered:
Hei Tanja. Det er kun den masken som tas løst av og siden trekkes over som blir felt. De to andre maskene strikkes vanlig rett (ikke rett sammen) = 3 masker blir til 2. Diagrammet viser alle pinner sett fra retten, så når du strikker fra vrangsiden må du strikke motsatt av det som diagrammet viser. Det står også forklart i symbolforklaringen (hvit rute = rett fra retten, vrang fra vrangen. Kryss = vrang fra retten, rett fra vrangen). God fornøyelse
04.09.2018 - 08:14
|
||||||||||||||||
The Winter Way#thewinterwayset |
||||||||||||||||
 |
 |
|||||||||||||||
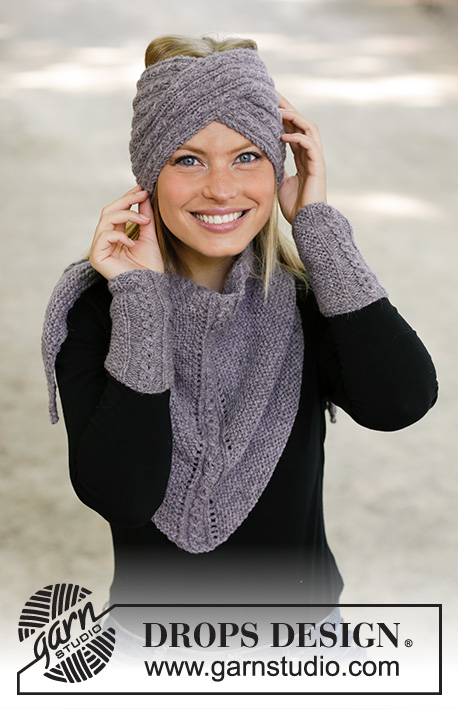
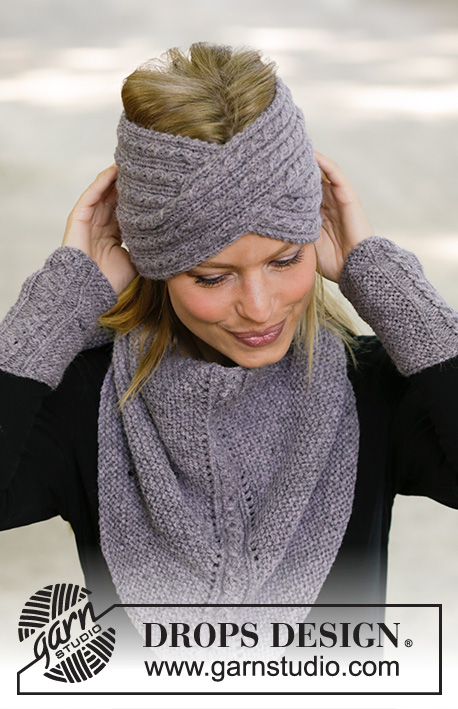
Knitted head band in DROPS Sky. The piece is worked back and forth with cables. Knitted shawl in DROPS Sky. The piece is worked back and forth with cables and garter stitch. Knitted wrist warmers in DROPS Sky. The piece is worked back and forth with cables and garter stitch.
DROPS 197-13 |
||||||||||||||||
|
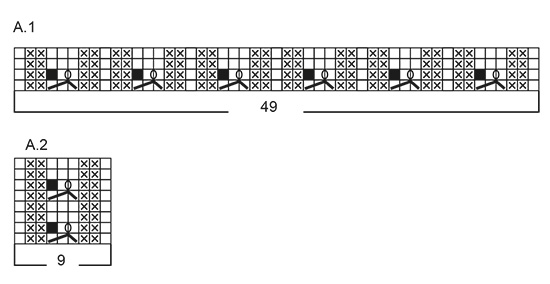
EXPLANATIONS FOR THE PATTERN: ------------------------------------------------------- RIDGE/GARTER STITCH (worked back and forth): 1 ridge = Knit 2 rows. PATTERN: Head band: See diagram A.1. Shawl: See diagram A.2 Wrist warmers: See diagram A.2. The diagrams show all the rows in the pattern seen from the right side. INCREASE TIP (for wrist warmers): Increase by making 1 yarn over. On the next round knit the yarn over twisted to avoid a hole. Then work the new stitch in garter stitch. ------------------------------------------------------- START THE PIECE HERE: ------------------------------------------------------- HEAD BAND - SHORT OVERVIEW OF THE PIECE: The piece is worked back and forth and sewn together mid back to finish. HEAD BAND: Cast on 51 stitches with needle size 4 mm and Sky. Work 1 RIDGE – read description above. Now work pattern A.1 (= 49 stitches) with 1 edge stitch in garter stitch in each side. Continue back and forth like this until the piece measures approx. 21 cm – adjust so that the next row is the first row in A.1. REMEMBER THE KNITTING TENSION! Place the last 25 stitches on a thread and work the first 26 stitches as follows: Work pattern as before over these 26 stitches and cast on 1 new stitch at the end of the row = 27 stitches. Turn and continue the pattern back and forth with 1 edge stitch in garter stitch in each side until you have worked 16 rows (= 4 repeats of A.1 in height) from the division, but on the last row from the wrong side cast off the last stitch on the row = 26 stitches. Cut the strand. Place these stitches on a new thread. Cast on 2 new stitches on the needles, place the 25 stitches from the first thread back on the needles and then work pattern as before from the right side = 27 stitches. Continue back and forth with pattern as before inside the 1 edge stitch in garter stitch in each side until you have worked 16 rows (= 4 repeats of A.1 in height) from the division, but on the last row cast off the 2 first stitches on the row before the remaining stitches are worked = 25 stitches. Now you plait the head band mid front. Work from the right side as follows: Turn and work the 25 stitches in pattern as before, then lay the first piece in front of the second piece and the 26 stitches are worked in pattern as before = 51 stitches on the needle. Insert a marker thread here. THE PIECE IS NOW MEASURED FROM HERE! Continue pattern A.1 with 1 edge stitch in garter stitch in each side until the head band measures approx. 21 cm – adjust so that you finish after row 2 in A.1. Work 1 ridge. Cast off. Sew the head band together mid back in each and every stitch inside the cast-on and cast-off edges. Cut and fasten the strand. ------------------------------------------------------- SHAWL - SHORT OVERVIEW OF THE PIECE: The piece is worked back and forth with circular needle. SHAWL: All stitches and yarn overs are knitted. Cast on 15 stitches with circular needle size 4.5 mm and Sky. ROW 1 (= right side): Knit 1, 1 yarn over, knit 2, 1 yarn over, A.2 (= 9 stitches), 1 yarn over, knit 2, 1 yarn over, knit 1 = 4 stitches increased. ROW 2 (= wrong side): Knit 1, 1 yarn over, knit as far as A.2, work A.2 over the next 9 stitches, knit until there is 1 stitch left, 1 yarn over, knit 1 = 2 stitches increased. ROW 3: Knit 1, 1 yarn over, knit as far as A.2, 1 yarn over, work A.2 over the next 9 stitches, 1 yarn over, knit until there is 1 stitch left, 1 yarn over, knit 1 = 4 stitches increased. REMEMBER THE KNITTING TENSION! Repeat rows 2 and 3 until the piece measures approx. 36 cm measured along A.2 in middle of shawl – adjust so that you finish after row 1 or 5 in A.2. Loosely cast off with knit from the wrong side. Cut and fasten the strand. ------------------------------------------------------- WRIST WARMERS - SHORT OVERVIEW OF THE PIECE: The piece is worked back and forth and sewn together at the end. WRIST WARMERS: Cast on 35-39-41 stitches with needle size 3.5 mm and Sky. Work pattern as follows: 13-15-16 stitches GARTER STITCH - read description above, A.2 (= 9 stitches), 13-15-16 stitches in garter stitch. Continue back and forth like this. REMEMBER THE KNITTING TENSION! When the piece measures 10-11-12 cm increase 1 stitch inside the 1 edge stitch in garter stitch in each side - read INCREASE TIP = 37-41-43 stitches. The increased stitch is worked in garter stitch. Continue until the piece measures approx. 15-16-17 cm - adjust so that you finish after row 1 or 5 in diagram A.2. Cast off with knit from the wrong side, but to avoid the cast-off edge being tight, make 1 yarn over after each 4th stitch (yarn overs cast off as normal stitches). Cut the strand but leave a length of approx. 25 cm for assembly. Sew the wrist warmer together, sewing inside the 1 edge stitch in garter stitch. Fasten the strand. Work another wrist warmer in the same way. |
||||||||||||||||
Diagram explanations |
||||||||||||||||
|
||||||||||||||||
 |
||||||||||||||||
 |
||||||||||||||||
Have you finished this pattern?Tag your pictures with #dropspattern #thewinterwayset or submit them to the #dropsfan gallery. Do you need help with this pattern?You'll find 19 tutorial videos, a Comments/Questions area and more by visiting the pattern on garnstudio.com. © 1982-2026 DROPS Design A/S. We reserve all rights. This document, including all its sub-sections, has copyrights. Read more about what you can do with our patterns at the bottom of each pattern on our site. |
||||||||||||||||


With over 40 years in knitting and crochet design, DROPS Design offers one of the most extensive collections of free patterns on the internet - translated to 17 languages. As of today we count 324 catalogues and 12290 patterns translated into English (UK/cm). 12290
We work hard to bring you the best knitting and crochet have to offer, inspiration and advice as well as great quality yarns at incredible prices! Would you like to use our patterns for other than personal use? You can read what you are allowed to do in the Copyright text at the bottom of all our patterns. Happy crafting!
Post a comment to pattern DROPS 197-13
We would love to hear what you have to say about this pattern!
If you want to leave a question, please make sure you select the correct category in the form below, to speed up the answering process. Required fields are marked *.