
Popular categories
Looking for a yarn?


Comments / Questions (42)
![]() Lisa Lebrija wrote:
Lisa Lebrija wrote:
Hej. Jeg har valgt at trevle det hele op. Bærestykket var forstort. Og underdelen bliver for vid med alle de masker der bliver på 33 cm, når jeg har 34 p på 10 cm. Så jeg tror jeg må finde en anden opskrift. For ellers skal jeg strikke bærestykket på p 3,5 og underdelen (det glatte) på p 4,5. Det bliver noget rod.
29.05.2018 - 16:43
![]() Lisa Lebrija wrote:
Lisa Lebrija wrote:
Hej igen. Uanset hvad så skal I have 12 masker mere i str. L end de 335 m. 33 cm giver 105,6 p. Der tages ud på hver 4 p, det giver 26,4 gange á 4 masker, det bliver 104 + 243 fra inden udtagningerne. Desværre havde jeg læst forkert og har 25,5 m X 34 p på 10 cm. Jeg strikker endda på p 4. Så jeg må jo bare trævle de hele op igen.
29.05.2018 - 15:18DROPS Design answered:
Hej Lisa, hvis ellers målene stemmer ifølge måleskitsen, så tror jeg ikke du kan se om du stopper udtagningerne lidt tidligere end du ellers havde gjort. Så prøve lige at måle igen inden du trevler det hele op. Held og lykke!
29.05.2018 - 16:08
![]() Lisa Lebrija wrote:
Lisa Lebrija wrote:
Hej. Jeg er ved at strikke denne model i str. L. Jeg er nået 23 cm efter jeg har sat masker af til ærmer. Stykket skal være 33 cm og have ca. 335 m. Når jeg regner efter passer det maskeantal langt fra på 33 cm. Der bliver taget ud på hver 4. p 4 masker, det giver ialt 351 masker.
24.05.2018 - 23:00DROPS Design answered:
Hej Lisa, det lyder til at du har flere pinde på 10 cm end hvad vi har beregnet strikkefastheden efter i opskriften. Sørg for at du har 335 m når arbejdet måler 33 cm, så stemmer også det sidste af opskriften. God fornøjelse!
29.05.2018 - 14:33
![]() Anita N Myhre wrote:
Anita N Myhre wrote:
Hei. Jeg sliter med å forstå hvordan man skal strikke de 3 ulike mønstrene og samtidig øke masker. Da vil jo f eks mønster 1a endre maske antall til mer enn 12 som opprinnelig. Jeg startet med inndeling i 3 deler, men ved økning vil jo mønsteret forskyves. Hva er tenkt fremgangsmåte ved økning? Har det noe for seg å dele arbeidet i 3 deler?
04.05.2018 - 11:39DROPS Design answered:
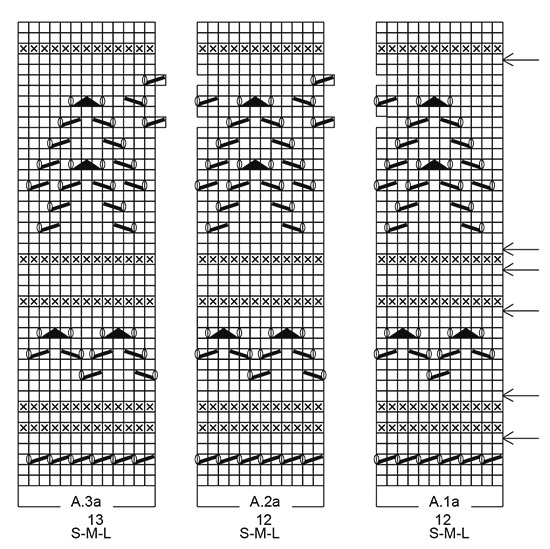
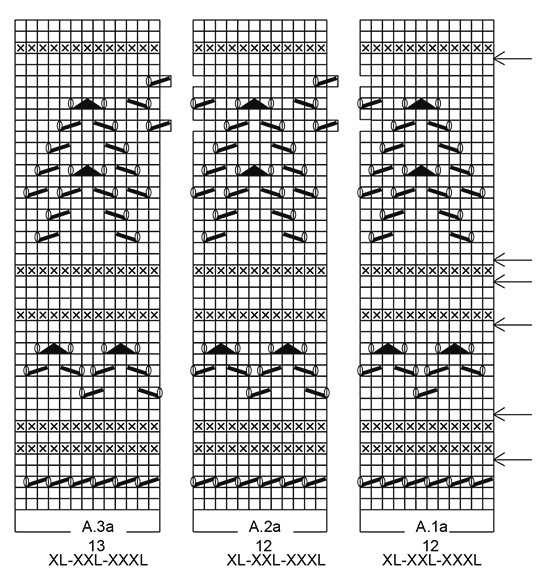
Hei Anita. Det står i oppskriften at når det økes skal det strikkes fler rapporter av A.2a. Det økes jevnt fordelt på omganger med glattstrikk, og neste omgang strikkes diagrammet som før, men med 1, 2 eller 3 rapporter mer av A.2a. Det strikkes fortsatt kun 1 rapport av A.1a (12 masker) og A.3a (13 masker). God fornøyelse.
07.05.2018 - 14:34
![]() Ilovedogs wrote:
Ilovedogs wrote:
Vorrei fare questo delizioso cardigan . Vorrei sapere se gli schemi devono essere letti dall\'alto verso il basso o viceversa; inoltre non rilevo differenze tra gli schemi, ad esempio tra A3b, A2b o A1b. Come si interpretano? E le indicazioni per fare gli aumenti mi sembrano poche. Di solito io per fare un top down aumento ogni 6 ferri, cominciando da un aumento ogni 3 punti, poi ogni 4 e in seguito ogni 5...e così\' via. Potete aiutarmi per favore?r
03.04.2018 - 10:36DROPS Design answered:
Buongiorno Ilovedogs. I diagrammi si leggono dal basso verso l’alto e da destra verso sinistra per i ferri di andata e da sinistra verso destra per quelli di ritorno. Deve lavorare i diagrammi come segue: le prime 5 m a legaccio, A.1a sulle 12 m successive, ripete il diagramma A.2a sul numero di maglie indicato per la sua taglia, diagramma A.3a sulle 13 maglie successive e finisce con 5 m a legaccio. Analogamente per i diagrammi A.1b, A.2b e A.3b. Gli aumenti sono indicati dalle frecce nel diagramma e sono distribuiti in modo da poter lavorare correttamente il motivo. Buon lavoro!
03.04.2018 - 11:04
![]() Robert Pennington wrote:
Robert Pennington wrote:
My wife has 450g of Schachenmayr Catania, 100% cotton, 50g = 125m and is looking for a pattern to use it on - she likes this one - and the yarn appears suitable at first sight... ...what do you think?
15.03.2018 - 16:48DROPS Design answered:
Hi Robert, The yarn will be suitable, but due to the different thickness of the yarn you will need to adjust the number of stitches to get the right knitting tension. Your wife will need to work a trial patch of 10 x 10 cm to find out the number of stitches and rows needed, compare it to the tension given in the pattern - 26 stitches x 34 rows gives a 10 x 10 cm patch and adjust the number of stitches and rows accordingly. Can be a bit complicated, but is doable. Happy knitting!
16.03.2018 - 07:59
![]() Elisabeth wrote:
Elisabeth wrote:
Bonsoir, Je suis en cours de réalisation de ce magnifique gilet. Mais pour le 35ème rang du diagramme A2, je ne comprends pas comment décaler la première maille. Dois-je ne tricoter que 11 mailles de A1 et prendre la 12ème maille de A1 avec la première de A2 ? Cela supposerait que le diagramme soit inexact et que le "blanc" du 36ème rang (A1) devrait se trouver juste en dessous c'est-à-dire au 35ème rang ? Merci de m'aider à éclaircir ce point.
19.02.2018 - 21:49DROPS Design answered:
Bonjour Elisabeth, tricotez la dernière m de A.1a enseemble à l'endroit avec la 1ère m de A.2a, puis la dernière m de A.2a avec la 1ère m du A.2a suivant et la dernière m du dernier A.2a avec la 1ère m de A.3a, en même temps, placez vos marqueurs entre chaque diagramme pour toujours avoir le bon nombre de mailles (= 12 m dans A.1a et chaque A.2a et 13 m dans A.3a). Bon tricot!
20.02.2018 - 08:30
![]() Andrea Koglin wrote:
Andrea Koglin wrote:
Vielen Dank für die schnelle Antwort. Lieben Gruß
15.02.2018 - 17:06
![]() Andrea Koglin wrote:
Andrea Koglin wrote:
Sehr geehrte Damen und Herren, ich habe eine Fragen zu dieser Anleitung. Müssen zu den 126 M (für meine Größe) noch die jeweils 5 Maschen dazu angeschlagen werden? 2. Verstehe ich die Zunahmen am Anfang nicht. was heißt ( in meiner Größe) 1 M. verteilt bei diesen Maschen zunehmen? Besonders bei der letzten Zunahme bis 143 Maschen erreicht sind. Vielen Dank im Voraus Liebe Grüße Andrea Koglin
15.02.2018 - 10:50DROPS Design answered:
Liebe Frau Koglin, die Blendemaschen sind in den 126 M inbegriffen, die brauchen Sie nicht zusätlich anzuschlagen. Bei der nächsten Hinreihe stricken Sie die nächsten 22 M rechts gleichzeitig nehmen Sie 1 M zu = es sind jetzt 23 M. Viel Spaß beim stricken!
15.02.2018 - 15:58
![]() Brittinger wrote:
Brittinger wrote:
Så snygg, blir mitt nästa projekt. Väntar med spänning på mönstret.
18.01.2018 - 21:30
|
||||||||||||||||||||||
Taormina#taorminacardigan |
||||||||||||||||||||||
|
|
||||||||||||||||||||||
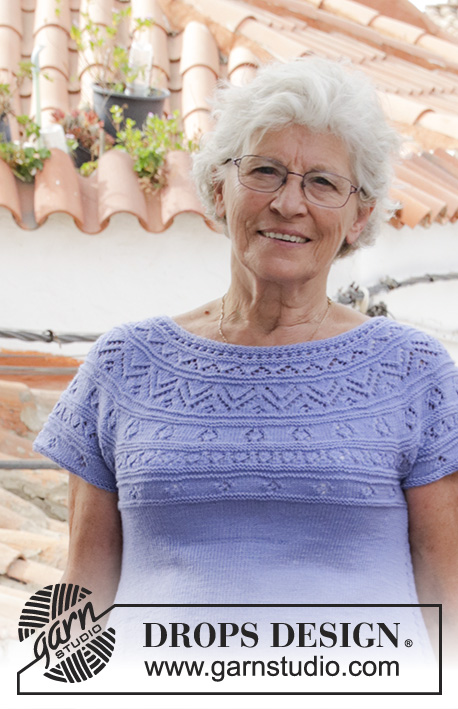
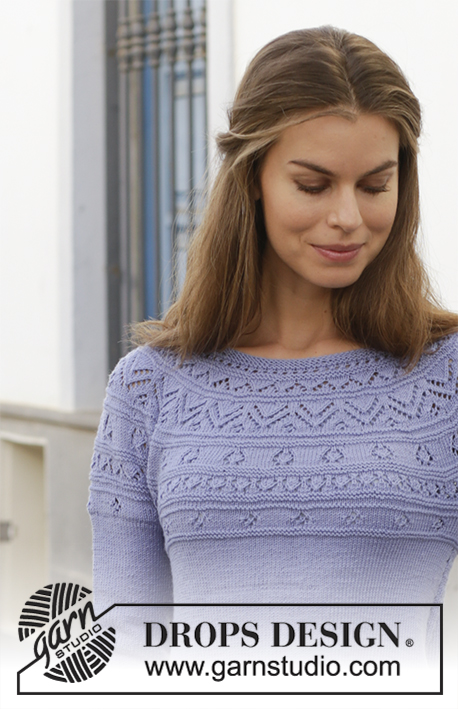
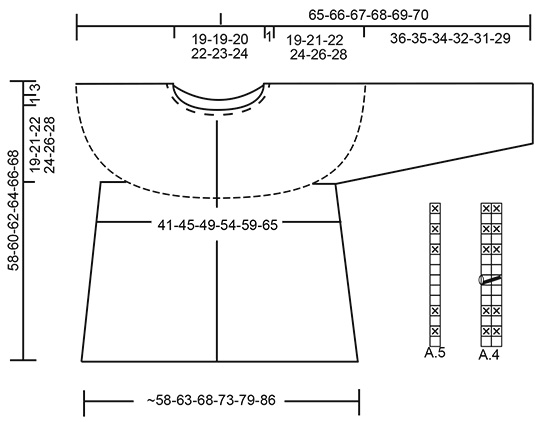
Jacket with lace pattern and round yoke, knitted top down. Size: S - XXXL Piece is knitted in DROPS BabyMerino.
DROPS 186-18 |
||||||||||||||||||||||
|
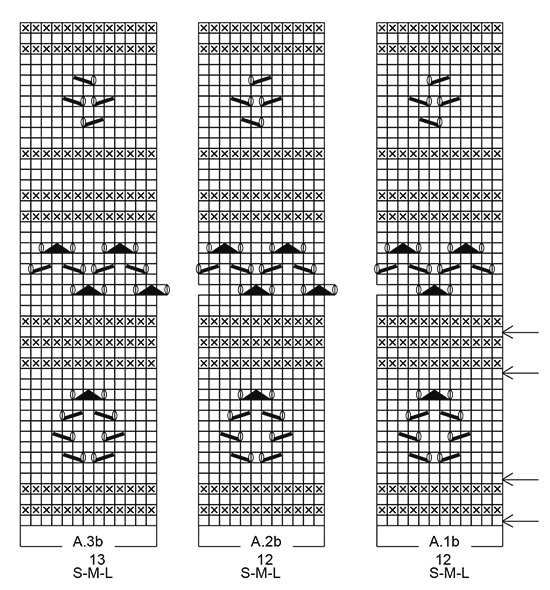
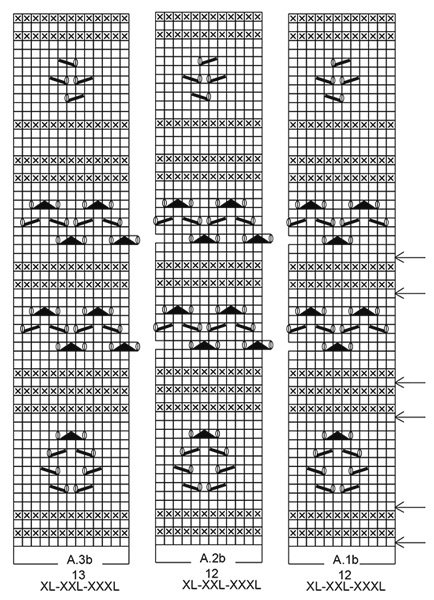
INFORMATION FOR PATTERN: GARTER STITCH (back and forth): 1 ridge = knit 2 rows. PATTERN: See diagrams A.1 to A.5. Choose diagram for your size (applies to A.1 to A.3). Diagrams show all rows in pattern seen from the right side. INCREASE TIP-1 (applies to increase on yoke): To calculate how to increase evenly, use the total number of stitches on row (e.g. 143 stitches), minus bands (e.g. 10 stitches = 133 stitches) and divide the remaining stitches by number of increases to be done (e.g. 24) = 5.54. I.e. in this example increase by making 1 yarn over after alternately approx. every 5th and 6th stitch. On next row work yarn over twisted to avoid hole. INCREASE TIP-2 (applies to increase on body): Work until 2 stitches remain before marker thread, 1 yarn over, knit 4 (marker thread is in the middle of these stitches), 1 yarn over (= 2 stitches increased), increase like this at both marker threads (= 4 stitches increased on row). Do not work yarn overs twisted on next row, they should make holes. DECREASE TIP (applies to mid under sleeve): Begin 3 stitches before marker and knit 2 together, knit 2 (marker is between these 2 stitches), slip 1 stitch knitwise, knit 1, pass slipped stitch over stitch worked (= 2 stitches decreased). BUTTONHOLES: Decrease for buttonholes on right band (when garment is worn): Work from right side until 3 stitches remain at the end of row, make 1 yarn over, knit the next 2 stitches together and knit last stitch. On next row knit yarn over to make holes. Decrease first buttonhole when piece measures approx. 1½-2 cm. Then decrease the next 5-5-5-6-6-6 buttonholes, approx. 8½ cm apart. ---------------------------------------------------------- JACKET: Yoke and body are worked back and forth, top down. Sleeves are worked in the round on double pointed needles. YOKE: Cast on 126-130-136-142-149-154 stitches (including 5 band stitches in each side towards mid front) on circular needle size 2.5 mm with BabyMerino. Work 2 ridges in GARTER STITCH - see explanation above. Work next row as follows from right side: Work 5 stitches in garter stitch (= band), knit 22-23-25-26-27-29 and increase 1-3-1-2-3-2 stitches evenly over these stitches – read INCREASE TIP-1, * 1 yarn over, knit 2-2-1-1-1-1 *, work from *-* over the next 14 stitches (= 7-7-14-14-14-14 stitches increased), knit 44-46-48-52-57-58 and increase 1-5-1-5-8-5 stitches evenly over these stitches, * 1 yarn over, knit 2-2-1-1-1-1 *, work from *-* over the next 14 stitches (= 7-7-14-14-14-14 stitches increased), knit 22-23-25-26-27-29 and increase 1-3-1-2-3-2 stitches evenly over these stitches and finish with 5 stitches in garter stitch (= band) = 143-155-167-179-191-191 stitches. Knit 1 row from wrong side but knit the yarn overs twisted to avoid holes. REMEMBER THE KNITTING TENSION! Remember BUTTONHOLES - see explanation above. Switch to circular needle size 3 mm. Work next row as follows from right side: Work 5 stitches in garter stitch (= band), A.1a (= 12 stitches), work A.2a (= 12 stitches) over the next 108-120-132-144-156-156 stitches (= 9-10-11-12-13-13 times in width), A.3a (= 13 stitches) and finish with 5 stitches in garter stitch (= band). Continue pattern like this AT THE SAME TIME increase evenly on every row marked with increase arrow in diagram A.1 as follows: Every time 12 stitches are increased work A.2 1 more time in total in width. Every time 24 stitches are increased work A.2 2 more times in total in width. Every time 36 stitches are increased work A.2 3 more times in total in width. 1ST INCREASE: Increase 24-24-24-24-24-36 stitches = 167-179-191-203-215-227 stitches. 2ND INCREASE: Increase 24-24-24-24-24-36 stitches = 191-203-215-227-239-263 stitches. 3RD INCREASE: Increase 24 stitches = 215-227-239-251-263-287 stitches. 4TH INCREASE: Increase 24 stitches = 239-251-263-275-287-311 stitches. 5TH INCREASE: Increase 24 stitches = 263-275-287-299-311-335 stitches. 6TH INCREASE: Increase 24 stitches = 287-299-311-323-335-359 stitches. When A.1a to A.3a have been worked 1 time vertically, piece measures approx. 14 cm from neck edge. Now work A.1b over A.1a, A.2b over A.2a and A.3b over A.3a and continue increases as follows: 7TH INCREASE: Increase 12-24-24-24-24-24 stitches = 299-323-335-347-359-383 stitches. 8TH INCREASE: Increase 12-12-24-24-24-24 stitches = 311-335-359-371-383-407 stitches. 9TH INCREASE: Increase 12-12-24-24-24-24 stitches = 323-347-383-395-407-431 stitches. 10TH INCREASE: Increase 12-12-12-12-24-24 stitches = 335-359-395-407-431-455 stitches. Increase is now done in size S, M and L, but continues in XL, XXL and XXXL as follows: 11TH INCREASE: Increase 12-24-24 stitches = 419-455-479 stitches. 12TH INCREASE: Increase 12-12-24 stitches = 431-467-503 stitches. ALL SIZES: = 335-359-395-431-467-503 stitches (repeat A.2b 25-27-30-33-36-39 times in width). Work pattern until piece measures 20-22-23-25-27-29 cm from cast-on edge. Now divide piece for body and sleeves from right side as follows: (Work stitches that do not fit the pattern as first stitch in A.1b) Work 5 stitches in garter stitch (= band), pattern as before over the next 44-49-53-60-66-73 stitches (= front piece), slip the next 74-76-86-90-96-100 stitches on a stitch holder for sleeve, cast on 10 new stitches on row (= in the side under sleeve), work pattern as before over the next 89-99-107-121-133-147 stitches (= back piece), slip the next 74-76-86-90-96-100 stitches on a stitch holder for sleeve, cast on 10 new stitches on row (= in the side under sleeve) and work pattern as before over the next 44-49-53-60-66-73 stitches and finish with 5 stitches in garter stitch (= band = front piece). Now finish body and sleeves separately. NOW MEASURE PIECE FROM HERE! BODY: = 207-227-243-271-295-323 stitches. Work pattern with 5 band stitches in garter stitch in each side of piece, work the stitches that do not fit the pattern in each of the sides (i.e. under sleeves) as first stitch in A.1b. When A.1b to A.3b have been worked 1 time vertically, piece measures approx. 27-27-27-30-30-30 cm. Then work in stocking stitch with 5 band stitches in garter stitch in each side of piece. Insert 1 marker thread 54-59-63-70-76-83 stitches in from each side (= front pieces = 99-109-117-131-143-157 stitches on back piece). On next row from right side, increase 1 stitch on each side of every marker thread - read INCREASE TIP-2! Increase like this every 4th row until piece measures 32-32-33-33-33-33 cm from where body was divided from sleeves = approx. 287-311-335-359-391-423 stitches. Switch to circular needle size 2.5 mm. Work next row as follows from right side: Work 5 stitches in garter stitch, work A.4 until 6 stitches remain, work A.5 over next stitch and 5 stitches in garter stitch. When A.4 and A.5 have been worked 1 time vertically, piece measures approx. 35-35-36-36-36-36 cm from where body was divided from sleeves and approx. 55-57-59-61-63-65 cm from neck edge. Cast off (make sure to cast off loosely, cast off with 1 needle size bigger if needed). SLEEVE: Worked in the round on double pointed needles. Slip the 74-76-86-90-96-100 stitches from stitch holder in one side of piece on double pointed needles size 3 mm and pick up 1 new stitch in each of the 10 stitches cast on under sleeve = 84-86-96-100-106-110 stitches. Insert 1 marker thread in the middle of the new stitches. Work A.2b over the stitches that fit the pattern, purl the stitches that do not fit the pattern under sleeve when stitches are purled and knit them when stitches are knitted. When A.2b has been worked vertically, sleeve measures approx. 7-5-4-5-3-1 cm from where sleeve was divided from body. On next row decrease 1 stitch on each side of marker thread - read DECREASE TIP! Decrease like this every 1½-1½-1-1-1-1 cm 14-15-19-20-22-23 times in total = 56-56-58-60-62-64 stitches. Continue until sleeve measures 33-32-31-29-28-26 cm from division (shorter measurements in the larger sizes because of longer yoke). Switch to double pointed needles size 2.5 mm and work A.4 over all stitches. When A.4 has been worked 1 time vertically, cast off all stitches (make sure to cast off loosely, cast off with 1 needle size bigger if needed). Sleeve measures approx. 36-35-34-32-31-29 cm from where sleeve was divided from body. Work the other sleeve the same way. ASSEMBLY: Sew the buttons on to the left band. |
||||||||||||||||||||||
Diagram explanations |
||||||||||||||||||||||
|
||||||||||||||||||||||
 |
||||||||||||||||||||||
 |
||||||||||||||||||||||
 |
||||||||||||||||||||||
 |
||||||||||||||||||||||
 |
||||||||||||||||||||||
Have you finished this pattern?Tag your pictures with #dropspattern #taorminacardigan or submit them to the #dropsfan gallery. Do you need help with this pattern?You'll find 25 tutorial videos, a Comments/Questions area and more by visiting the pattern on garnstudio.com. © 1982-2026 DROPS Design A/S. We reserve all rights. This document, including all its sub-sections, has copyrights. Read more about what you can do with our patterns at the bottom of each pattern on our site. |
||||||||||||||||||||||


With over 40 years in knitting and crochet design, DROPS Design offers one of the most extensive collections of free patterns on the internet - translated to 17 languages. As of today we count 324 catalogues and 12290 patterns translated into English (UK/cm). 12290
We work hard to bring you the best knitting and crochet have to offer, inspiration and advice as well as great quality yarns at incredible prices! Would you like to use our patterns for other than personal use? You can read what you are allowed to do in the Copyright text at the bottom of all our patterns. Happy crafting!
Post a comment to pattern DROPS 186-18
We would love to hear what you have to say about this pattern!
If you want to leave a question, please make sure you select the correct category in the form below, to speed up the answering process. Required fields are marked *.