
Popular categories
Looking for a yarn?


Comments / Questions (42)
![]() Corrie wrote:
Corrie wrote:
Vraag over het meerderen in het LIJF. Wanneer start ik met meerderen in het lijf, is dat vanaf het moment dat ik de steken voor de mouw op hulpdraad heb gezet of vanaf het moment dat het hele patroon is gebreid en ik met tricotsteek verder ga dus de 27cm (maat M) graag uw reactie, zodat ik weer verder kan. Groet Corrie
30.04.2020 - 16:13DROPS Design answered:
Dag Corrie,
Op het moment dat het patroon klaar is en je verder breit in alleen tricotsteek met de voorbiessteken aan elke kant, begint het meerderen in de zijnaden.
05.05.2020 - 12:51
![]() Véro GOUTAGNY wrote:
Véro GOUTAGNY wrote:
Bonsoir, sur le diagramme des taille De,M,L, la sixième augmentation ne me semble pas être placée au bon endroit. Il me paraît plus judicieux de la faire au rang endroit suivant comme indiqué sur les tailles XL. Je ne sais pas si c'est une erreur du placement de la flèche ou pas...
25.02.2020 - 22:36DROPS Design answered:
Bonjour Mme Goutagny, effectivement, cette flèche va probablement être modifiée par nos stylistes, merci pour votre retour, elles vont vérifier le diagramme. Bon tricot!
26.02.2020 - 09:42
![]() Sarah wrote:
Sarah wrote:
Hallo - ich habe eine Frage zu den Zunahmen im Diagramm A1-3a Teil. Werden die Zunahmemaschen in der Reihe mit dem Pfeil einearbeitet und erst in der Folgereihe das Diagramm A2a dann 1 oder 2 mal mehr gestrickt? Ich verstehe leider nicht wir man in einer Reihe Maschen gleichmäßig verteilt zunehmen und gleichzeitig A2a öfter stricken soll wenn die zusätzlichen Maschen noch nicht vorhanden sind. Für eine schnelle Hilfe wäre ich sehr dankbar! Liebe Grüße Sarah
04.08.2019 - 09:09DROPS Design answered:
Liebe Sarah, wenn Sie bei den Reihen mit einem Pfeil zunehmen, stricken Sie (zuerst) 1 x A.2 a-c mehr (= 12 Zunahmen = 1 x A.1b) in der Breite bei der nächsten Reihe, dh, Sie stricken immer: A.1 x 1, dann wiederholen Sie A.2 einmal mehr (bei 12 Zunahmen), dann mit A.3. Das Lochmuster wird nicht übereinander wie im Diagram aussehen, aber das Muster passt immer die neuen Maschenanzahl. Viel Spaß beim stricken!
06.08.2019 - 16:29
![]() Nicole Almaraz wrote:
Nicole Almaraz wrote:
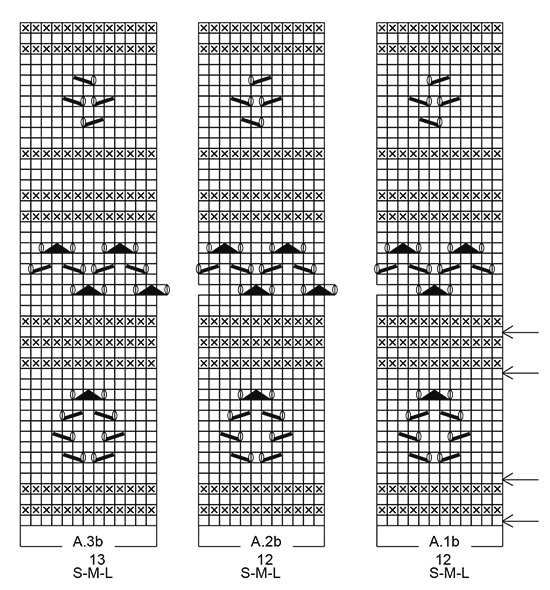
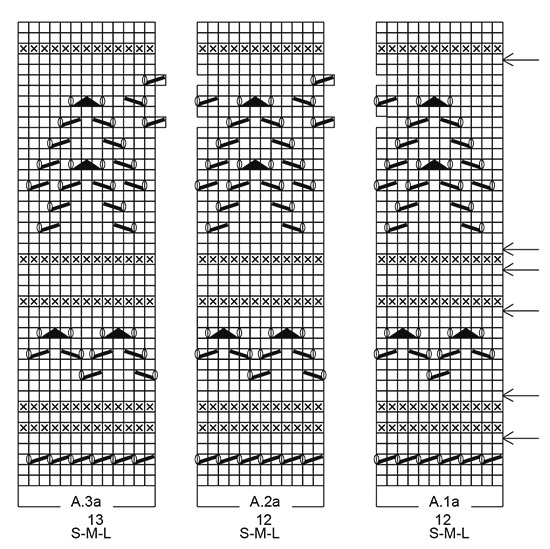
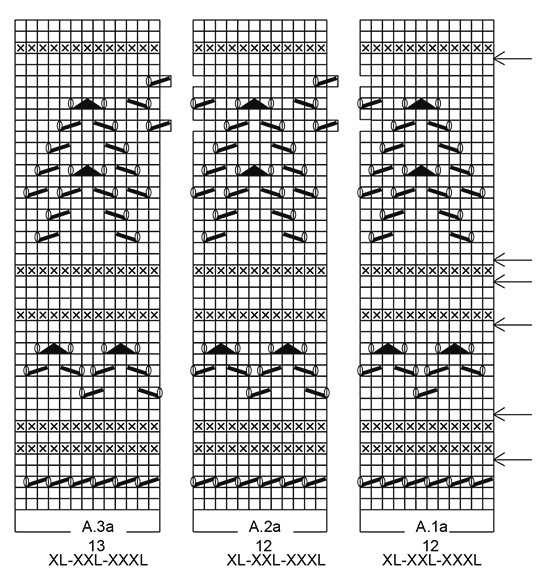
Why do I only see four increase arrows for the first set of charts but in the instructions it says I will increase six times?
10.07.2019 - 17:17DROPS Design answered:
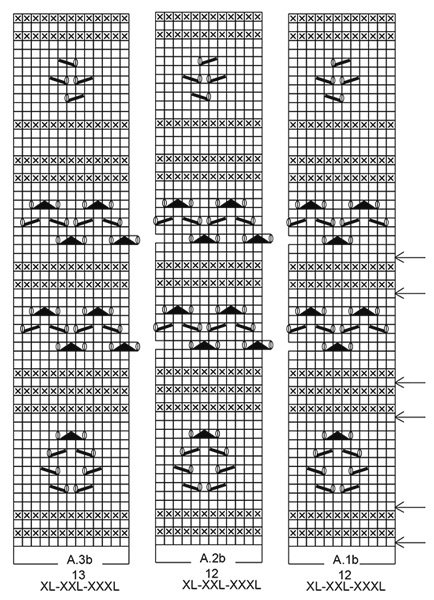
Dear Mrs Almaraz, in the diagrams A.1a, A.2a, A.3a all sizes there are 6 arrows (= 6 rows with increases), then in the diagrams A.1b, A.2b, A.3b there are only 4 arrows (= 4 rows with increases) in the first 3 sizes and 6 arrows (= 6 rows with increases in the 3 larger sizes). Happy knitting!
11.07.2019 - 08:19
![]() Mamatea wrote:
Mamatea wrote:
Werden die Zunahmen der Passe nur im Teil A.2a durchgeführt? D.h. werden 12M A.1a gestrickt, dann X Mal A.2a und dann 13M A.3a? Oder wird auch in den äußeren rechten und linken Teilbereichen ,(A.1a und A.3a) zugenommen? Vielen Dank für die Info!
30.05.2019 - 14:16DROPS Design answered:
Liebe Mamatea, die 12 (oder 24) Maschen werden bei der Reihe mit einem Pfeil in A.1 regelmäßig verteilt zugenomen, diese Maschen werden aber durch die ganze Reihe zugenommen (außerdem die Blendemaschen) - siehe ZUNAHMETIPP-1 (gilt für die Passe). Viel Spaß beim stricken!
31.05.2019 - 09:34
![]() Linda Floer wrote:
Linda Floer wrote:
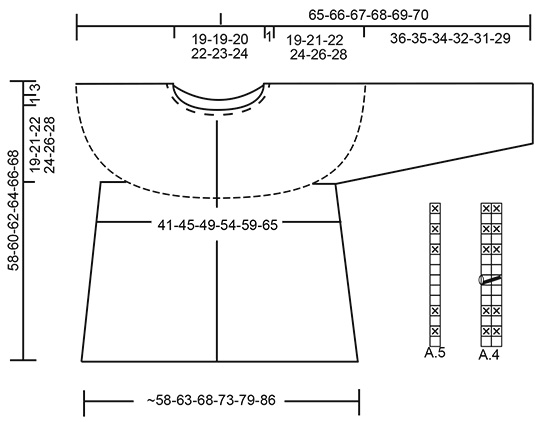
Jeg fant A.4 og A.5 tilslutt 😀 ved siden av diagrammet
22.03.2019 - 09:43
![]() Linda Floer wrote:
Linda Floer wrote:
Hei, jeg holder på å strikke denne oppskriften. Skal det være et diagram til A.4 og A.5? Jeg finner ikke dette, eller noen beskrivelse av det.
22.03.2019 - 08:06DROPS Design answered:
Hi Linda. Ja, A.4 og A.5 ligger helt nederst ved siden av målskissen. De er kanske små (henholdsvis 1 og 2 masker x 14 rader), så fort gjort å overse. God fornøyelse
25.03.2019 - 08:21
![]() Sibill Kowcz wrote:
Sibill Kowcz wrote:
De onderkant van het vest krult heel erg. Is dit weg als het geperst is?
10.11.2018 - 11:01DROPS Design answered:
Dag Sibill,
Het krullen gaat inderdaad weg als je de rand opgeperst hebt.
11.11.2018 - 12:45
![]() Ilovedogs wrote:
Ilovedogs wrote:
Scusatemi: ho provato a lavorare questo cardigan adattandone le misure per la mia nipotina di 4 anni, e mi sono accorta di aver sbagliato tutto...probabilmente non ho capito la spiegazione data per gli aumenti: cosa significano quelle "stringhe" di numeri, per esempio 24-24-24-24-24-36 maglie? Potete aiutarmi, per favore?
19.07.2018 - 12:22DROPS Design answered:
Buongiorno Ilovedogs, le stringhe di numeri indicano le maglie per le diverse taglie, dalla S alla XXXL. Se sta ad esempio lavorando la taglia S, deve far sempre riferimento al primo numero della stringa e così via. Buon lavoro!
19.07.2018 - 12:30
![]() ANNA wrote:
ANNA wrote:
Buongiorno,vorrei fare questo cardigan in drops safran quanti gomitoli dovrei comprare per una taglia M?10 gomitoli basteranno visto il metraggio piu' corto rispetto a questa lana?Grazie per la risposta!
01.07.2018 - 10:40DROPS Design answered:
Buongiorno Anna. Deve calcolare la lunghezza complessiva del filato indicato (quindi 175 metri x 9 gomitoli = 1575 m) e dividerli per i metri di safran in un gomitolo: 1575 : 160 = 9,84. Può eventualmente decidere di acquistare un gomitolo in più di scorta. Buon lavoro!
01.07.2018 - 11:16
|
||||||||||||||||||||||
Taormina#taorminacardigan |
||||||||||||||||||||||
|
|
||||||||||||||||||||||
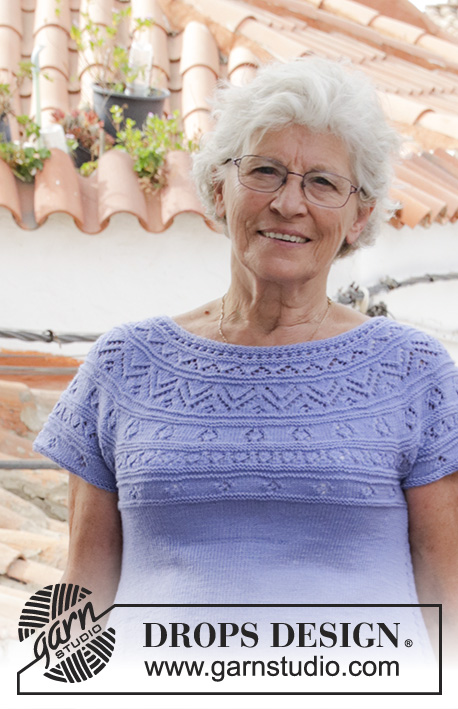
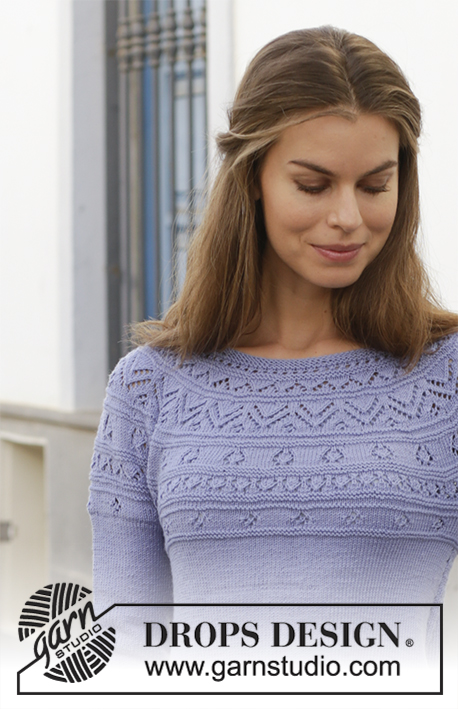
Jacket with lace pattern and round yoke, knitted top down. Size: S - XXXL Piece is knitted in DROPS BabyMerino.
DROPS 186-18 |
||||||||||||||||||||||
|
INFORMATION FOR PATTERN: GARTER STITCH (back and forth): 1 ridge = knit 2 rows. PATTERN: See diagrams A.1 to A.5. Choose diagram for your size (applies to A.1 to A.3). Diagrams show all rows in pattern seen from the right side. INCREASE TIP-1 (applies to increase on yoke): To calculate how to increase evenly, use the total number of stitches on row (e.g. 143 stitches), minus bands (e.g. 10 stitches = 133 stitches) and divide the remaining stitches by number of increases to be done (e.g. 24) = 5.54. I.e. in this example increase by making 1 yarn over after alternately approx. every 5th and 6th stitch. On next row work yarn over twisted to avoid hole. INCREASE TIP-2 (applies to increase on body): Work until 2 stitches remain before marker thread, 1 yarn over, knit 4 (marker thread is in the middle of these stitches), 1 yarn over (= 2 stitches increased), increase like this at both marker threads (= 4 stitches increased on row). Do not work yarn overs twisted on next row, they should make holes. DECREASE TIP (applies to mid under sleeve): Begin 3 stitches before marker and knit 2 together, knit 2 (marker is between these 2 stitches), slip 1 stitch knitwise, knit 1, pass slipped stitch over stitch worked (= 2 stitches decreased). BUTTONHOLES: Decrease for buttonholes on right band (when garment is worn): Work from right side until 3 stitches remain at the end of row, make 1 yarn over, knit the next 2 stitches together and knit last stitch. On next row knit yarn over to make holes. Decrease first buttonhole when piece measures approx. 1½-2 cm. Then decrease the next 5-5-5-6-6-6 buttonholes, approx. 8½ cm apart. ---------------------------------------------------------- JACKET: Yoke and body are worked back and forth, top down. Sleeves are worked in the round on double pointed needles. YOKE: Cast on 126-130-136-142-149-154 stitches (including 5 band stitches in each side towards mid front) on circular needle size 2.5 mm with BabyMerino. Work 2 ridges in GARTER STITCH - see explanation above. Work next row as follows from right side: Work 5 stitches in garter stitch (= band), knit 22-23-25-26-27-29 and increase 1-3-1-2-3-2 stitches evenly over these stitches – read INCREASE TIP-1, * 1 yarn over, knit 2-2-1-1-1-1 *, work from *-* over the next 14 stitches (= 7-7-14-14-14-14 stitches increased), knit 44-46-48-52-57-58 and increase 1-5-1-5-8-5 stitches evenly over these stitches, * 1 yarn over, knit 2-2-1-1-1-1 *, work from *-* over the next 14 stitches (= 7-7-14-14-14-14 stitches increased), knit 22-23-25-26-27-29 and increase 1-3-1-2-3-2 stitches evenly over these stitches and finish with 5 stitches in garter stitch (= band) = 143-155-167-179-191-191 stitches. Knit 1 row from wrong side but knit the yarn overs twisted to avoid holes. REMEMBER THE KNITTING TENSION! Remember BUTTONHOLES - see explanation above. Switch to circular needle size 3 mm. Work next row as follows from right side: Work 5 stitches in garter stitch (= band), A.1a (= 12 stitches), work A.2a (= 12 stitches) over the next 108-120-132-144-156-156 stitches (= 9-10-11-12-13-13 times in width), A.3a (= 13 stitches) and finish with 5 stitches in garter stitch (= band). Continue pattern like this AT THE SAME TIME increase evenly on every row marked with increase arrow in diagram A.1 as follows: Every time 12 stitches are increased work A.2 1 more time in total in width. Every time 24 stitches are increased work A.2 2 more times in total in width. Every time 36 stitches are increased work A.2 3 more times in total in width. 1ST INCREASE: Increase 24-24-24-24-24-36 stitches = 167-179-191-203-215-227 stitches. 2ND INCREASE: Increase 24-24-24-24-24-36 stitches = 191-203-215-227-239-263 stitches. 3RD INCREASE: Increase 24 stitches = 215-227-239-251-263-287 stitches. 4TH INCREASE: Increase 24 stitches = 239-251-263-275-287-311 stitches. 5TH INCREASE: Increase 24 stitches = 263-275-287-299-311-335 stitches. 6TH INCREASE: Increase 24 stitches = 287-299-311-323-335-359 stitches. When A.1a to A.3a have been worked 1 time vertically, piece measures approx. 14 cm from neck edge. Now work A.1b over A.1a, A.2b over A.2a and A.3b over A.3a and continue increases as follows: 7TH INCREASE: Increase 12-24-24-24-24-24 stitches = 299-323-335-347-359-383 stitches. 8TH INCREASE: Increase 12-12-24-24-24-24 stitches = 311-335-359-371-383-407 stitches. 9TH INCREASE: Increase 12-12-24-24-24-24 stitches = 323-347-383-395-407-431 stitches. 10TH INCREASE: Increase 12-12-12-12-24-24 stitches = 335-359-395-407-431-455 stitches. Increase is now done in size S, M and L, but continues in XL, XXL and XXXL as follows: 11TH INCREASE: Increase 12-24-24 stitches = 419-455-479 stitches. 12TH INCREASE: Increase 12-12-24 stitches = 431-467-503 stitches. ALL SIZES: = 335-359-395-431-467-503 stitches (repeat A.2b 25-27-30-33-36-39 times in width). Work pattern until piece measures 20-22-23-25-27-29 cm from cast-on edge. Now divide piece for body and sleeves from right side as follows: (Work stitches that do not fit the pattern as first stitch in A.1b) Work 5 stitches in garter stitch (= band), pattern as before over the next 44-49-53-60-66-73 stitches (= front piece), slip the next 74-76-86-90-96-100 stitches on a stitch holder for sleeve, cast on 10 new stitches on row (= in the side under sleeve), work pattern as before over the next 89-99-107-121-133-147 stitches (= back piece), slip the next 74-76-86-90-96-100 stitches on a stitch holder for sleeve, cast on 10 new stitches on row (= in the side under sleeve) and work pattern as before over the next 44-49-53-60-66-73 stitches and finish with 5 stitches in garter stitch (= band = front piece). Now finish body and sleeves separately. NOW MEASURE PIECE FROM HERE! BODY: = 207-227-243-271-295-323 stitches. Work pattern with 5 band stitches in garter stitch in each side of piece, work the stitches that do not fit the pattern in each of the sides (i.e. under sleeves) as first stitch in A.1b. When A.1b to A.3b have been worked 1 time vertically, piece measures approx. 27-27-27-30-30-30 cm. Then work in stocking stitch with 5 band stitches in garter stitch in each side of piece. Insert 1 marker thread 54-59-63-70-76-83 stitches in from each side (= front pieces = 99-109-117-131-143-157 stitches on back piece). On next row from right side, increase 1 stitch on each side of every marker thread - read INCREASE TIP-2! Increase like this every 4th row until piece measures 32-32-33-33-33-33 cm from where body was divided from sleeves = approx. 287-311-335-359-391-423 stitches. Switch to circular needle size 2.5 mm. Work next row as follows from right side: Work 5 stitches in garter stitch, work A.4 until 6 stitches remain, work A.5 over next stitch and 5 stitches in garter stitch. When A.4 and A.5 have been worked 1 time vertically, piece measures approx. 35-35-36-36-36-36 cm from where body was divided from sleeves and approx. 55-57-59-61-63-65 cm from neck edge. Cast off (make sure to cast off loosely, cast off with 1 needle size bigger if needed). SLEEVE: Worked in the round on double pointed needles. Slip the 74-76-86-90-96-100 stitches from stitch holder in one side of piece on double pointed needles size 3 mm and pick up 1 new stitch in each of the 10 stitches cast on under sleeve = 84-86-96-100-106-110 stitches. Insert 1 marker thread in the middle of the new stitches. Work A.2b over the stitches that fit the pattern, purl the stitches that do not fit the pattern under sleeve when stitches are purled and knit them when stitches are knitted. When A.2b has been worked vertically, sleeve measures approx. 7-5-4-5-3-1 cm from where sleeve was divided from body. On next row decrease 1 stitch on each side of marker thread - read DECREASE TIP! Decrease like this every 1½-1½-1-1-1-1 cm 14-15-19-20-22-23 times in total = 56-56-58-60-62-64 stitches. Continue until sleeve measures 33-32-31-29-28-26 cm from division (shorter measurements in the larger sizes because of longer yoke). Switch to double pointed needles size 2.5 mm and work A.4 over all stitches. When A.4 has been worked 1 time vertically, cast off all stitches (make sure to cast off loosely, cast off with 1 needle size bigger if needed). Sleeve measures approx. 36-35-34-32-31-29 cm from where sleeve was divided from body. Work the other sleeve the same way. ASSEMBLY: Sew the buttons on to the left band. |
||||||||||||||||||||||
Diagram explanations |
||||||||||||||||||||||
|
||||||||||||||||||||||
 |
||||||||||||||||||||||
 |
||||||||||||||||||||||
 |
||||||||||||||||||||||
 |
||||||||||||||||||||||
 |
||||||||||||||||||||||
Have you finished this pattern?Tag your pictures with #dropspattern #taorminacardigan or submit them to the #dropsfan gallery. Do you need help with this pattern?You'll find 25 tutorial videos, a Comments/Questions area and more by visiting the pattern on garnstudio.com. © 1982-2026 DROPS Design A/S. We reserve all rights. This document, including all its sub-sections, has copyrights. Read more about what you can do with our patterns at the bottom of each pattern on our site. |
||||||||||||||||||||||


With over 40 years in knitting and crochet design, DROPS Design offers one of the most extensive collections of free patterns on the internet - translated to 17 languages. As of today we count 324 catalogues and 12290 patterns translated into English (UK/cm). 12290
We work hard to bring you the best knitting and crochet have to offer, inspiration and advice as well as great quality yarns at incredible prices! Would you like to use our patterns for other than personal use? You can read what you are allowed to do in the Copyright text at the bottom of all our patterns. Happy crafting!
Post a comment to pattern DROPS 186-18
We would love to hear what you have to say about this pattern!
If you want to leave a question, please make sure you select the correct category in the form below, to speed up the answering process. Required fields are marked *.