
Popular categories
Looking for a yarn?


Comments / Questions (45)
![]() Irène wrote:
Irène wrote:
Bonjour et merci beaucoup pour vos réponses ! La torsade est facile et rend très bien.J'ai un petit doute sur "Quand toutes les augmentations sont faites, on a 212-224-236-248-252-264 mailles. Continuer comme avant...", on continue les torsades ? et quand on ajoute les mailles qui iront sous les aisselles, on tricote ces 6 ou 8 mailles en jersey et on continue les torsades jusqu'au bas du pull ? Merci par avance et bravo pour tous ces modèles !
29.04.2018 - 14:01
![]() Dorte Cohrt wrote:
Dorte Cohrt wrote:
Har spurgt på et problem vedr en opskrift og får ingen feedback, det syntes jeg ikke er i orden. I skriver at i vil give hurtige svar, jeg har købt garn og har problemer med opskriften men kan ikke komme videre.....
20.04.2018 - 19:52
![]() Irène wrote:
Irène wrote:
Oups, j'ai oublié de changer le pays... Je crois que j'ai trouvé en regardant le diagramme de la jupe Sunny hug ; le schéma correspondant à "glisser une maille, tricoter une maille, passer la maille glissée sur la maille tricotée" n'est pas le même que celui de Cherry Cuddler, donc ici, il doit falloir passer la maille glissée sur les deux mailles tricotées !
19.04.2018 - 13:48DROPS Design answered:
Bonjour Irène, effectivement, le pluriel va être ajouté pour corriger la légende. Merci, bon tricot!
19.04.2018 - 15:54
![]() Dorte Cohrt wrote:
Dorte Cohrt wrote:
Mønster A.1 er der en sort firkant = ingen maske, spring over denne rude ? Hvad menes der med det? Vh Dorte
17.04.2018 - 16:15DROPS Design answered:
Hei Dorte Beklager sent svar. Den sorte ruten skal du bare hoppe over, den er der for at mønsteret ikke skal forskyves og at de vrange maskene på starten og slutten av A.1 blir på samme sted oppover. Fordi det ble felt en maske på omgangen før mangler det en maske på denne omgangen. Økningen skjer rett etter den sorte ruten, og gjør at masketallet blir slik det var før felling. God fornøyelse
25.04.2018 - 14:05
![]() Selena Güntensperger wrote:
Selena Güntensperger wrote:
Liebes Drops Team , ich bin nun mit den Zunahmen an der Passe fertig ( allerdings nicht ganz nach Anleitung ) . Wie muss ich bitte die Maschen der Raglanlinie für Ärmel und Körper aufteilen beim Stilllegen ? \\r\\nVielen Dank schon mal und liebe Grüße Selena
30.03.2018 - 10:35
![]() Wendy wrote:
Wendy wrote:
Ahaaaaa! Van onder naar boven lezen, ipv van boven naar onder. Nu snap ik het! Nu gaat het lukken, bedankt!!
23.01.2018 - 21:22DROPS Design answered:
Och, had ik gelijk even moeten zeggen, gelukkig kun je nu verder :) Veel breiplezier!
26.01.2018 - 19:17
![]() Wendy wrote:
Wendy wrote:
Hoi! Ja volgens mij ook 🙂. Mijn probleem is dat ik dat zwarte vlakje in telpatroon A1 niet begrijp. Ik heb daar gewoon een steek zitten en ik weet dus niet wat ik daarmee moet. In eerdere uitleg schreef u, dat er daar geen steek zit, omdat er in de toer ervoor 1 steek geminderd was. Vandaar mijn vraag. Ik zie inderdaad nergens in het patroon minderingen staan, dus blijf ik met een extra steek in de derde toer in A1 zitten ( het zwarte vlak).
21.01.2018 - 12:02DROPS Design answered:
Hoi Wendy, A.1 brei je als volgt: In de eerste naald: 1 averecht, 1 steek recht afhalen, 2 recht, haal de afgehaalde steek over de gebreide steken, 1 averecht. In de tweede naald: 1 averecht, 1 recht, 1 omslag, 1 recht, 1 averecht. Derde en vierde naald: 1 averecht, 3 recht, 1 averecht. Door het te doen zie je vanzelf wat er bedoeld wordt met het zwarte vlakje.
23.01.2018 - 09:40
![]() Wendy wrote:
Wendy wrote:
Hallo, De meerderingen snap ik. In uw uitleg schreef u dat in de 2e toer vh telpatroon a1 een steek geminderd wordt om in de 3e toer het zwarte vlak over te kunnen slaan. Die geminderde steek vind ik nog altijd niet. Waar zit ie? Groet, Wendy
18.01.2018 - 22:58DROPS Design answered:
Hallo Wendy, Kun je aangeven welke mindering je precies bedoelt? Er zijn namelijk helemaal geen minderingen in de raglan en ook niet in het telpatroon. Waar in de tekst is die mindering aangegeven in het patroon? (Ik heb het gevoel dat we bij elkaar langs zitten te praten :) )
20.01.2018 - 12:32
![]() Wendy wrote:
Wendy wrote:
Aha! Dank voor de uitleg; 1 probleem (ribbelsteek)opgelost. Ik kan toch niet goed vinden waar de minderingen moeten komen, anders dan voor de mouwen; dus kom ik nog niet uit telpatroon A1; wat zie ik over het hoofd? Dank alvast!
10.01.2018 - 21:31DROPS Design answered:
Hoi Wendy, De meerderingen voor de raglanlijnen maak je naast A.1 en in A.1 zelf zitten geen meerderingen. (Je breit van boven naar beneden, dus je maakt meerderingen in de raglanlijnen en geen minderingen.) Bovenaan het patroon staat beschreven hoe je meerdert op iedere andere naald en op iedere vierde naald, voor zowel voor als je vóor A.1 bent en als je na A.1 bent. Door de meerderingen in de raglan ontstaan er ook gaatjes in het patroon.
12.01.2018 - 18:53
![]() Wendy wrote:
Wendy wrote:
Goedenavond, Ik begrijp niet hoe ik het zwarte vlakje in A1 moet lezen: geen steek, sla dit vierkant over. Wat doe ik dan met de 3e steek, overhalen? Groetjes!
06.01.2018 - 16:04DROPS Design answered:
Hoi Wendy, Op de vorige toer heb je 1 steek geminderd in het patroon, waardoor daar geen steek zit. Het is niet zo dat je een steek van de vorige toer overslaat, maar in het telpatroon is er geen steek en dit wordt als een zwart vakje aangegeven. (En door een omslag te maken komt er weer een steek bij.)
08.01.2018 - 09:53
|
||||||||||||||||
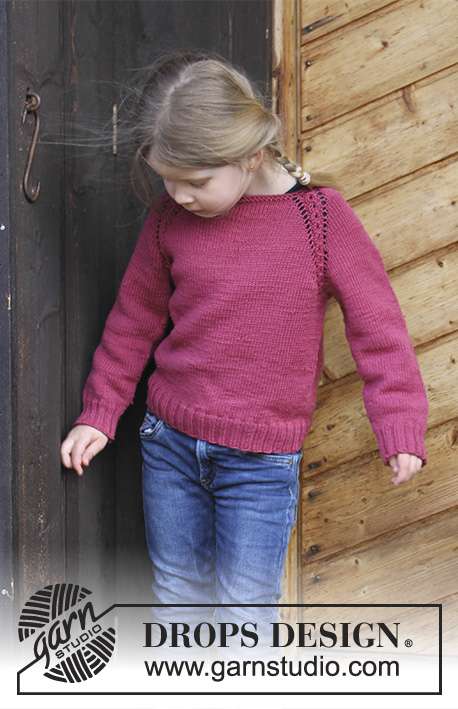
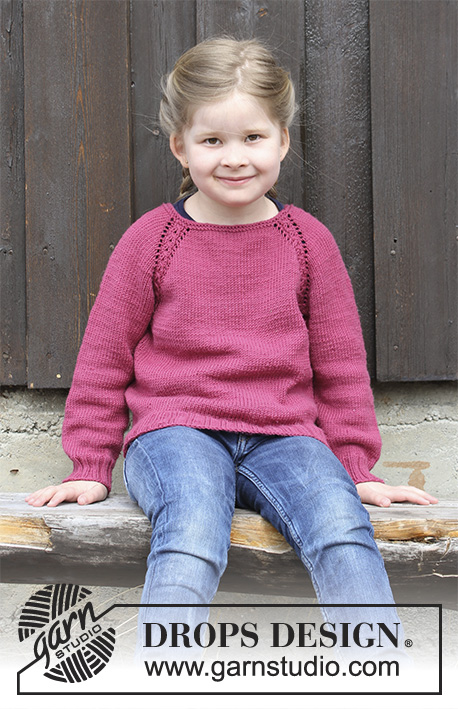
Cherry Cuddler#cherrycuddlersweater |
||||||||||||||||
 |
 |
|||||||||||||||
Jumper with raglan and cables, worked top down for kids. Size 2 - 12 years Piece is knitted in DROPS Merino Extra Fine.
DROPS Children 30-14 |
||||||||||||||||
|
INFORMATION FOR PATTERN: GARTER STITCH (worked in the round): 1 ridge = 2 rounds. Knit 1 round and purl 1 round. PATTERN: See diagram A.1. RAGLAN: Increase for raglan on each side of A.1 in every transition between sleeves and body. INCREASE 1 STITCH BEFORE A.1 every other round: Work until A.1: Make 1 yarn over, work A.1. Knit yarn over on next round to make a hole. Work the increased stitches in stocking stitch. Repeat these 2 rounds. INCREASE 1 STITCH AFTER A.1 every other round: Work A.1, make 1 yarn over. Knit yarn over on next round to make a hole. Work the increased stitches in stocking stitch. Repeat these 2 rounds. INCREASE 1 STITCH BEFORE A.1 every 4th round: ROUND 1: Work until A.1. Make 1 yarn over, work A.1. ROUND 2: Knit yarn over to make a hole. ROUND 3: Work until 2 stitches remain before A.1: Knit 2 together, make 1 yarn over, work A.1. ROUND 4: Knit yarn over to make a hole. Repeat these 4 rounds. INCREASE 1 STITCH AFTER A.1 every 4th round: ROUND 1: Work A.1, make 1 yarn over. ROUND 2: Knit yarn over to make a hole. ROUND 3: Work A.1, make 1 yarn over, slip 1 stitch knitwise, knit 1 and pass slipped stitch over stitch worked ROUND 4: Knit yarn over to make a hole. Repeat these 4 rounds. DECREASE TIP (applies to sleeves): Decrease 1 stitch on each side of marker thread as follows: Work until 2 stitches remain before marker thread, knit 2 together (marker thread), slip 1 stitch knitwise, knit 1, pass slipped stitch over stitch worked (= 2 stitches decreased). ---------------------------------------------------------- JUMPER: Worked in the round on circular needle from mid back. Work top down. Work sleeves in the round on double pointed needles/a short circular needle, top down. YOKE: Cast on 72-76-80-80-84-84 stitches on a short circular needle size 4 mm with Merino Extra Fine. Work 2 ridges in GARTER STITCH - see explanation above. Then work as follows from mid back: Work 9-10-11-11-12-12 stitches in stocking stitch (= half back piece), A.1 (= 5 stitches), 8 stitches in stocking stitch (= sleeve), A.1, 18-20-22-22-24-24 stitches in stocking stitch (= front piece), A.1, 8 stitches in stocking stitch (= sleeve), A.1, 9-10-11-11-12-12 stitches in stocking stitch (= half back piece). REMEMBER THE KNITTING TENSION! Continue this pattern, AT THE SAME TIME begin increases for RAGLAN – see explanation above. NOTE! Increase differently on body and sleeves. INCREASE AS FOLLOWS ON FRONT/BACK PIECE: Increase 2 stitches on back piece and 2 stitches on front piece (= 1 stitch before/after A.1): Increase every other round 20-21-22-24-24-26 times in total. INCREASE AS FOLLOWS ON SLEEVES: Increase 2 stitches on each sleeve (= 1 stitch after/before A.1): Increase every other round 10-11-12-12-12-12 times, then increase every 4th round 5-5-5-6-6-7 times (15-16-17-18-18-19 times in total). After all increases are done there are 212-224-236-248-252-264 stitches on round. Work pattern as before until piece measures 15-16-16-18-18-19 cm from mid back. Work next round as follows: Work the first 31-33-35-37-38-40 stitches (= half back piece), slip the next 44-46-48-50-50-52 stitches on a stitch holder for sleeve, cast on 6-6-6-6-8-8 new stitches (= in the side under sleeve), work the next 62-66-70-74-76-80 stitches (= front piece), slip the next 44-46-48-50-50-52 stitches on a stitch holder for sleeve, cast on 6-6-6-6-8-8 new stitches (= in the side under sleeve), work the last 31-33-35-37-38-40 stitches (= half back piece). Finish body and sleeves separately. NOW MEASURE THE PIECE FROM HERE! BODY: = 136-144-152-160-168-176 stitches. Continue working in stocking stitch in the round over all stitches. When piece measures 14-17-21-23-27-30 cm from division, knit 1 round while increasing 28-28-32-32-36-36 stitches evenly = 164-172-184-192-204-212 stitches. Switch to circular needle size 3.5 mm. Work rib = knit 2/purl 2 for 4 cm. Cast off stitches with knit over knit and purl over purl. Jumper measures approx. 36-40-44-48-52-56 cm from shoulder and down. SLEEVE: Slip the stitches from stitch holder in one side of piece on double pointed needles/a short circular needle size 4 mm and pick in addition up 1 stitch in each of the 6-6-6-6-8-8 new stitches cast on under sleeve = 50-52-54-56-58-60 stitches. Insert 1 marker thread mid under sleeve. Work in stocking stitch in the round. When piece measures 3 cm, decrease 1 stitch on each side of marker thread - read DECREASE TIP. Decrease like this every 2-3-3-3½-3½-4 cm 7-7-8-8-9-9 times in total = 36-38-38-40-40-42 stitches. Continue in stocking stitch until sleeve measures 19-24-28-31-36-40 cm. Knit 1 round while increasing 8-6-6-8-8-10 stitches evenly = 44-44-44-48-48-52 stitches. Switch to circular needle size 3.5 mm. Work rib = knit 2/purl 2 for 4 cm. Cast off stitches with knit over knit and purl over purl. Sleeve measures approx. 23-28-32-35-40-44 cm from division. Work the other sleeve the same way. |
||||||||||||||||
Diagram explanations |
||||||||||||||||
|
||||||||||||||||
 |
||||||||||||||||
Have you finished this pattern?Tag your pictures with #dropspattern #cherrycuddlersweater or submit them to the #dropsfan gallery. Do you need help with this pattern?You'll find 25 tutorial videos, a Comments/Questions area and more by visiting the pattern on garnstudio.com. © 1982-2026 DROPS Design A/S. We reserve all rights. This document, including all its sub-sections, has copyrights. Read more about what you can do with our patterns at the bottom of each pattern on our site. |
||||||||||||||||


With over 40 years in knitting and crochet design, DROPS Design offers one of the most extensive collections of free patterns on the internet - translated to 17 languages. As of today we count 324 catalogues and 12290 patterns translated into English (UK/cm). 12290
We work hard to bring you the best knitting and crochet have to offer, inspiration and advice as well as great quality yarns at incredible prices! Would you like to use our patterns for other than personal use? You can read what you are allowed to do in the Copyright text at the bottom of all our patterns. Happy crafting!
Post a comment to pattern DROPS Children 30-14
We would love to hear what you have to say about this pattern!
If you want to leave a question, please make sure you select the correct category in the form below, to speed up the answering process. Required fields are marked *.