
Popular categories
Looking for a yarn?


Comments / Questions (60)
![]() Sabine wrote:
Sabine wrote:
Hallo Drops, ich bin Strickanfängerin, dies ist mein erster Pullover (Gr. S). Ich stricke mit zwei Alpaca- und einem Kid-Silk-Faden. Ich habe die ersten beiden 50 gr Knäule (zus. mit dem KidSilk) verstrickt (Rumpfteil) und denke, dass ich mit den weiteren 150 gr pro Farbe den Pulli nicht beenden kann. Ich liege jetzt bei ca. 21 cm in der Höhe. Reichen die (rechnerisch) später verbleibenden 70 gr je Alpaca-Farbe für beide Ärmel? Hab ich mich verrechnet? LG S.
27.10.2019 - 10:32DROPS Design answered:
Liebe Sabine, stimmt Ihre Maschenprobe in der Breite sowie in der Höhe? hier lesen Sie mehr. Viel Spaß beim stricken!
05.11.2019 - 09:51
![]() Petra wrote:
Petra wrote:
Dobrý den, má dotaz k pletení př.d. Pletla jsem trup do výšky 37cm, 66 ok jsem odložila na pomocnou jehlici a druhou polovinu jsem dopletla do výšky 46 cm. Ale ten druhý díl kde mám také 66 ok je vlastně o 9 cm kratší a má se plést také jako přední díl a pak se teda sešijí ?Nebo co s těmi 66 oky co jsem odložila na pomocnou jehlici a začala jsem plést jen půlku svetru ? Co s těmi druhými 66 oky? Děkuju moc za odpověd. Pletu svetr poprvé.:) Petra
22.09.2019 - 21:30DROPS Design answered:
Dobrý den, Petro, těch druhých 66 ok je zadní díl. Ten upletete stejně, jakodíl přední - tj. odložených 66 ok vrátíte z pomocné jehlice zpět na jehlici a postupujete stejně, jako když jste pletla přední díl. Až budou přední i zadní díl stejně vysoké, oka uzavřete a svetr na ramenou sešijete. Hodně zdaru! Hana
23.09.2019 - 21:21
![]() Mznina wrote:
Mznina wrote:
Are DROPS Pattern no. z-786 "Bente" and Pattern ml-031 "Summer Sailing" the same pattern, with exception of the stripes on ml-031?
03.07.2019 - 08:57DROPS Design answered:
Dear Mznina, yes, this patterns are very similar, the main difference is given by the yarn combination. Happy knitting!
03.07.2019 - 10:21
![]() Paulina wrote:
Paulina wrote:
Dzień dobry, czy jest jakaś szansa na filmik instruktażowy na wykonanie góry sweterka. Nie do końca rozumię jak to wykonać a opisy pod komentarzami niewiele mi rozjaśniają. Pzdr i dziękuję, PAulina
06.02.2019 - 23:29DROPS Design answered:
Witaj Paulino, trzymaj się dokładnie opisu, a wszystko się uda. Zdejmujesz oczka środkowe na dekolt, a następnie pozostają ci tak jakby 2 ramiona, przerabiasz 2 rzędy ponad oczkami obu ramion i zamykasz 1 oczko od strony dekoltu (z każdej strony). Później bierzesz z powrotem wszystkie oczka na drut, a w przejściu między ramionami i dekoltem dodajesz z każdej strony 2 oczka (aby zrównoważyć uskok powstały z zamknięcia 1 o.). Dalej przerabiasz wszystkie oczka razem. Powodzenia!
07.02.2019 - 17:04
![]() Stephanie wrote:
Stephanie wrote:
Hoi, hoe lang moet de breinaald zonder knop zijn? 20cm of langer? Hoor dat 20cm niet zo fijn is.
24.11.2018 - 14:46DROPS Design answered:
Dag Stephanie,
Standaard maat voor naalden zonder knop is ongeveer 40 cm, Deze kun je prima gebruiken. 20 cm zou ook wel kunnen, maar dat is misschien net wat te krap en dan moet je heel erg opletten dat er geen steken per ongeluk af schuiven.
25.11.2018 - 16:04
![]() Henneton wrote:
Henneton wrote:
Bonjour, je suis surprise de voir que les côtes de l’encolure sont à tricoter avec des aiguilles 7 alors que celles des bas de dos/devant et des manches sont tricotées en 6. Ne vont-elles pas être trop lâches ? Merci de votre réponse,cordialement
04.11.2018 - 19:35DROPS Design answered:
Bonjour Mme Henneton, on va effectivement reprendre l'aiguille circulaire 6 pour tricoter les côtes, la correction a été faite, merci. Bon tricot!
05.11.2018 - 13:19
![]() Henneton wrote:
Henneton wrote:
Bonjour, Je suis étonnée que les côtes de l’encolure soient tricotées avec les aiguilles 7 alors que celles du bas des dos/devant et des manches sont tricotées avec des aiguilles 6? Merci de votre réponse! Cordialement
04.11.2018 - 19:30
![]() Laura wrote:
Laura wrote:
Hallo, moet de boordsteek bovenaan het voor- en achterpand ook met een naald van 6mm gebreid worden zoals bij de boordsteek aan de onderkant? Of moet je daar gewoon doorgaan met de 7mm naald? Alvast bedankt.
02.10.2018 - 20:49DROPS Design answered:
Dag Laura, Voor de boordsteek bovenaan kun je inderdaad gewoon verder gaan met naald 7 mm.
04.10.2018 - 12:16
![]() Laura wrote:
Laura wrote:
Hallo, moet de boordsteek bovenaan het voor- en achterpand ook met een naald van 6mm gebreid worden zoals bij de boordsteek aan de onderkant? Of moet je daar gewoon doorgaan met de 7mm naald? Alvast bedankt.
02.10.2018 - 20:48
![]() Maria wrote:
Maria wrote:
La ringrazio, è stata gentilissima, buona giornata
20.09.2018 - 13:40
|
|
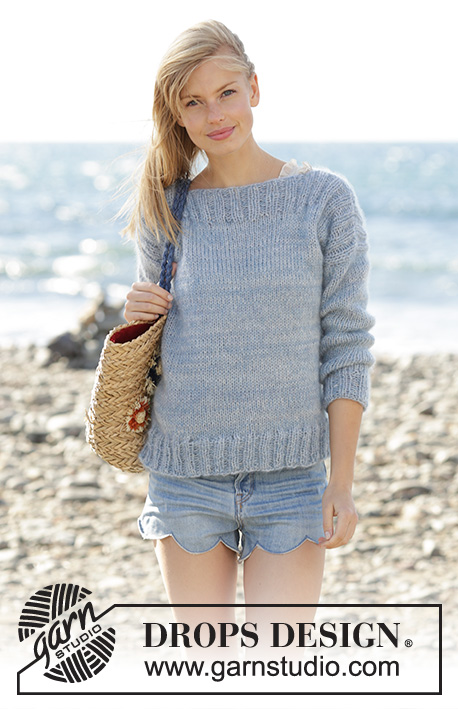
Bente#bentesweater |
|
 |
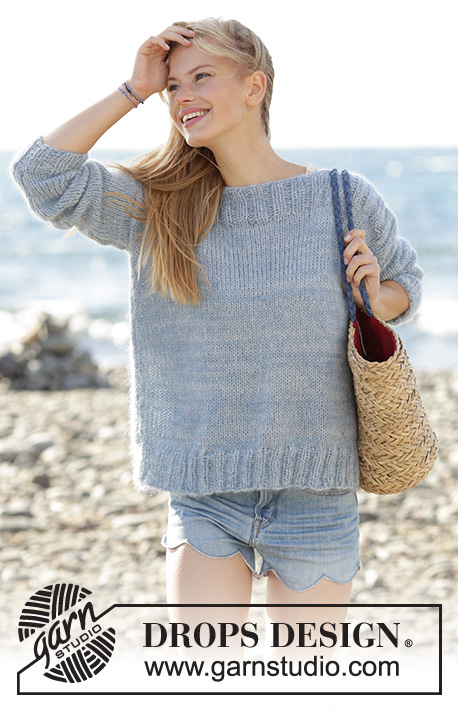 |
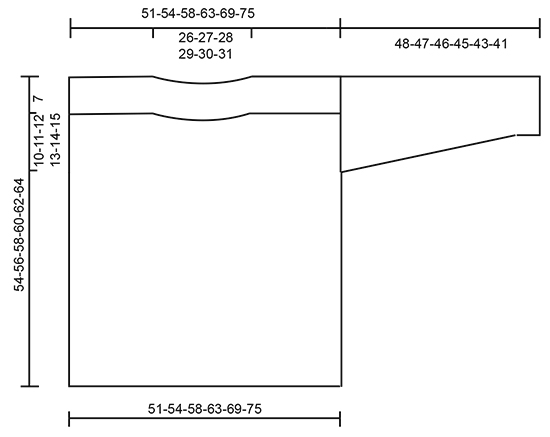
Jumper in stocking stitch and rib with 1 strand DROPS Alpaca and 2 strands DROPS Kid-Silk. Sizes S - XXXL.
DROPS 177-2 |
|
|
INCREASE TIP: Increase as follows mid under sleeve – start 1 stitch before the marker thread: Make 1 yarn over, knit 2 (the marker thread sits between these 2 stitches), 1 yarn over. On the next round work the yarn overs twisted knit to prevent holes. ---------------------------------------------------------- JUMPER: The jumper is worked in the round with circular needle up to the armholes, then the back and front pieces are worked separately back and forth. BODY: Cast on 144-152-164-176-192-208 stitches with circular needle size 6 mm and 1 strand Alpaca, 1 strand off white Kid-Silk and 1 strand light steel blue Kid-Silk (= 3 strands). Knit 1 round, then work rib (knit 2/ purl 2). Work rib for 7 cm. Change to circular needle size 7 mm and work 1 round stocking stitch where you decrease 12-12-12-12-12-12 stitches evenly along the round = 132-140-152-164-180-196 stitches. Continue with stocking stitch. When the piece measures 37-38-39-40-41-42 cm work only across the first 66-70-76-82-90-98 stitches on the needle, the last 66-70-76-82-90-98 stitches are placed on a thread. FRONT PIECE: = 66-70-76-82-90-98 stitches. Continue with stocking stitch. When the piece measures 46-48-50-52-54-56 cm place the middle 32-32-34-34-36-36 stitches on a thread for the neck. Knit 1 row from the right side across the first 17-19-21-24-27-31 stitches (to the thread), turn, purl the first 2 stitches together and purl to end of the needle. Place the stitches on a thread. Knit 1 row from the right side across the last 17-19-21-24-27-31 stitches on the needle, turn and purl 1 row from the wrong side, at the end of the row purl the last 2 stitches together. Place all the stitches back on the needle and knit 1 row from the right side and knit up 2 stitches in each side (between the stitches for the neck and the stitches on the shoulder) towards the neck = 68-72-78-84-92-100 stitches. Purl 1 row from the wrong side where you increase 6-6-4-6-6-6 stitches evenly along the row = 74-78-82-90-98-106 stitches. Change circular needle size 6 and work as follows – from the right side: knit 2 * purl 2, knit 2 *, repeat from *-* the complete row. Work rib for 7 cm, the piece measures approx. 54-56-58-60-62-64 cm, then cast off with knit over knit and purl over purl. BACK PIECE: Worked in the same way as the front piece. SLEEVE: The piece is worked in the round with double pointed needles. Use a short circular needle when there are enough stitches. Cast on 32-32-36-36-40-40 stitches with double pointed needle size 6 mm and 1 strand Alpaca, 1 strand off white Kid-Silk and 1 strand light steel blue Kid-Silk (= 3 strands). Work 1 round stocking stitch, then work rib (knit 2/ purl 2). Work rib for 5 cm. Change to double pointed needle size 7 mm, work 1 round stocking stitch where you decrease 4-4-6-6-8-6 stitches evenly along the round = 28-28-30-30-32-34 stitches. Insert 1 marker thread at the beginning of the round = mid under sleeve. Work stocking stitch, when the piece measures 7 cm increase 1 stitch on each side of the marker thread – READ INCREASE TIP. Increase every 5½-4½-4½-4-4-4 cm in total 8-9-9-10-10-10 times = 44-46-48-50-52-54 stitches. Cast off when the piece measures 48-47-46-45-43-41 cm. NOTE! shorter measurements in the larger sizes due to broader shoulder measurements. ASSEMBLY: Sew the shoulder seams, leave approx. 26-27-28-29-30-31 cm for the neck. Sew in the sleeves. |
|
 |
|
Have you finished this pattern?Tag your pictures with #dropspattern #bentesweater or submit them to the #dropsfan gallery. Do you need help with this pattern?You'll find 24 tutorial videos, a Comments/Questions area and more by visiting the pattern on garnstudio.com. © 1982-2026 DROPS Design A/S. We reserve all rights. This document, including all its sub-sections, has copyrights. Read more about what you can do with our patterns at the bottom of each pattern on our site. |
|


With over 40 years in knitting and crochet design, DROPS Design offers one of the most extensive collections of free patterns on the internet - translated to 17 languages. As of today we count 324 catalogues and 12290 patterns translated into English (UK/cm). 12290
We work hard to bring you the best knitting and crochet have to offer, inspiration and advice as well as great quality yarns at incredible prices! Would you like to use our patterns for other than personal use? You can read what you are allowed to do in the Copyright text at the bottom of all our patterns. Happy crafting!
Post a comment to pattern DROPS 177-2
We would love to hear what you have to say about this pattern!
If you want to leave a question, please make sure you select the correct category in the form below, to speed up the answering process. Required fields are marked *.