
Popular categories
Looking for a yarn?


Comments / Questions (22)
![]() Terese wrote:
Terese wrote:
Mönstret är ju helt obegripligt! Hur många maskor är det kvar i A3A, B och C efter 3:e hålraden och sista minskningen? Det vill säga i vilken del av dessa gör man ökningar/minskningar och hur många? Jag gör stl M och den enda infon man får är att det ska vara 131 maskor på varvet när A3 stickats klart.
08.06.2025 - 21:45DROPS Design answered:
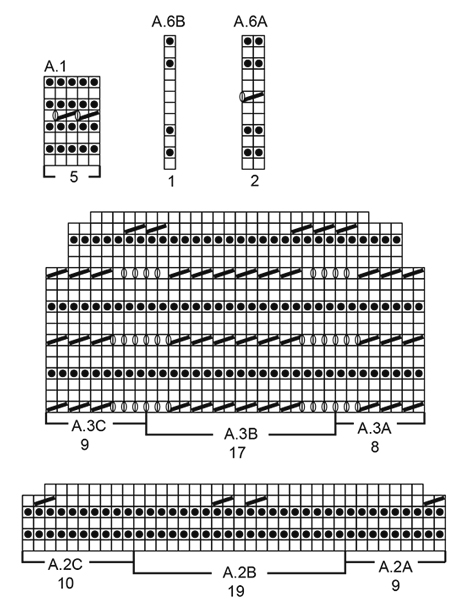
Hei Terese. Først vil du felle 1 maske i A.3a, 2 masker hver gang A.3B strikkes og 1 maske i A.3C (rad 13). Så vil du felle 1 maske A.3A, 3 masker hver gang A.3B strikkes og 1 maske i A.3C (rad 17). Til slutt vil du da ha 6 masker i A.3A, 12 masker i A.3B (9 rapporter x 12 masker) og 7 masker i A.3C + 5 masker i hver side (A.1) = 5+6+108+7+5= 131 masker. mvh DROPS Design
16.06.2025 - 07:54
![]() Linda McKnight wrote:
Linda McKnight wrote:
The pattern sizes range from small to 3X, however there are no measurements for what those sizes mean. Even the schematic on the last page doesn't indicate inches or cm and the only measurements listed in the pattern are for the width of the knitting and not an actual size. So, what are the size measurements?
28.01.2023 - 20:15DROPS Design answered:
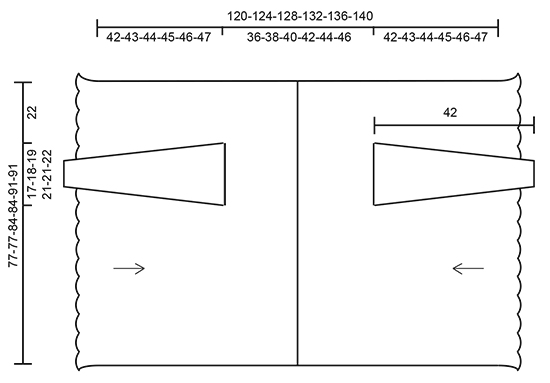
Dear Linda, the measurements in the schematic are always in cm. You can see the total length and width of the garment in the schematic; each number of each sequence is for a specific size. Take into account that, when measuring the total width, it indicates the width of the back, so you may use that to check which size you want to work. Happy knitting!
29.01.2023 - 20:21
![]() Carla wrote:
Carla wrote:
I have a question. I don't understand how to do the increase of the sleeve. It says that I should increase in the mid under sleeve. Is that the middle of the sleeve? Ag the beginning of the sleeve? I don't get it. It also says to bind off 6 stitches in the mid under sleeve. Same problem. Please I need help. Also I don't understand the same instructions on the pattern in Spanish.
21.05.2021 - 04:15DROPS Design answered:
Dear Carla, sleeve is worked in the round, to increase work the round until 1 stitch remain before the marker at the end of the round, make 1 yarn over, knit 2 stitches (the marker is between these 2 stitches), make 1 yarn over and continue working all stitches as before. When measurements are right, work to the last 3 sts on the round, cast off these 3 sts + the first 3 sts at the beg of next round and continue now working in rows. Happy knitting!
21.05.2021 - 07:55
![]() Gerda wrote:
Gerda wrote:
Klopt het dat de patronen allemaal heel erg groot uitvallen? Ik heb 4 patronen gebreid van drops d esign. Ik begin nu bij voorbaat met de kleinste maat maar nog steeds is het model veel te groot. En als ik kleinere naalden pak wordt het breiwerk heel strak ...
28.03.2021 - 08:50DROPS Design answered:
Dag Gerda,
Als de stekenverhouding klopt, kun je gewoon het patroon volgen en dan worden de maten zoals aangegeven in de matentekening onderaan het patroon. Heb je van te voren een proeflapje gebreid om te controleren of de stekenverhouding klopt? Wellicht heb je dunnere naalden nodig om tot dezelfde stekenverhouding te komen.
01.04.2021 - 20:16
![]() Sandra Topke wrote:
Sandra Topke wrote:
Ich bin am Verzweifeln. Nach mehreren Versuchen komme ich nach A 3 nicht auf 143, sondern 147 Maschen. Ich finde meinen Fehler nicht. Was ist jeweils die erste und die letzte Masche des Rapport A 3B? Bin unsicher wegen der Umschläge.
21.05.2018 - 11:29DROPS Design answered:
Liebe Frau Topke, es wird zuerst 1 M in A.3A, 2 M in jedem A.3.B und 1 M in A.3C abgenommen (= insgesamt 22 M abgenommen). Dann wird es 1 M in A.3A, 3 M in jedem A.3B und 1 M in A.3C abgenommen (= insgesamt 32 M abgenommen), es waren 197 M - 54 Abnahme = 143 M. Viel Spaß beim stricken!
22.05.2018 - 09:29
![]() Doris wrote:
Doris wrote:
Hallo! Stricke ich die Umschläge bei Vorder- und Rückenteil verschränkt (ohne Löcher) oder so, dass es Löcher gibt? Es steht nur bei den AERMELN, dass man Löcher vermeiden soll.
05.04.2018 - 19:19DROPS Design answered:
Liebe Doris, die Umschläge bei Vorder- und Rückenteil werden wie im Diagram gestrickt, dh es soll Löcher enstehen, nur bei den Aufnahmen für die Ärmel werden die Umschläge verschränkt gestrickt. Viel Spaß beim stricken!
06.04.2018 - 08:34
![]() Doris Doshi wrote:
Doris Doshi wrote:
Ich verstehe nicht, weshalb ich hier RUNDNADELN benötige, wenn steht, dass ich in Hin- und Rückreihen stricken muss? Zudem ist das Stück ja nicht in einem Schlauch gestrickt? Wo mache ich den Überlegungsfehler?
28.03.2018 - 12:58DROPS Design answered:
Liebe Doris, wir geben in der Regel die Verwendung von Rundnadeln an, auch wenn in Hin- und Rück-Reihen gestrickt wird, da es bequemer ist, mit einer großen Maschenzahl wie in dieser Anleitung auf einer Rundnadel statt mit Paarnadeln zu stricken. Die Maschen und auch das Gewicht des Strickstücks verteilen sich auf dem Seil der Rundnadel besser. Viel Spaß beim Stricken!
28.03.2018 - 13:37
![]() Angela wrote:
Angela wrote:
Hi, I'm having trouble with this once I get to row 20 of the pattern as a hole (row 14 of pattern A3), Row 19 I have 160 sts, Row 20-22 I would have 176 sts,Row 23 147 sts, Row 24 171 sts. It says I should be ending this row with 131 sts according to the directions. How is this possible when A3B shows P 17 repeated 9 times. This would be 153 stitches and that doesn't include A3A, A3C or the A1 in the ends. I'm obviously missing something... can you please help? Thanks!
27.06.2017 - 13:55DROPS Design answered:
Dear Angela, you will dec first 1 st in A.3A, then 2 sts in each A.3B and 1 st in A.3C, then dec 1 st in A.3A, 3 sts in each A.3B and 1 st in A.3C = remaining: 6 sts in A.3A, 12 sts in A.3B and 7 sts in A.3C, so that you have 6+12x9 + 7 + (2 x 5 sts = A.1 on each side ) = 131 sts. Happy knitting!
28.06.2017 - 10:09
![]() Janny wrote:
Janny wrote:
Hallo, als je 5st. a1-5st.a3-10x14st.b3=140st.-6st.3c-5st.a1 doet heb je 161 st. over ipv. 143st. ik heb nu 5st.a1-5st.recht en 1 mindering A3- 2x1mindering, 9 recht,1mindering en dit 10x in 3b-1mindering ,6recht in 3c-5st a1. is 143 st. Nu loopt het volgende patroon mooi door boven het golven patroon.
15.05.2017 - 17:06
![]() Janny wrote:
Janny wrote:
Ik ben dit mooie patronen aan het breien maar kom niet uit met naald 17 van patroon 3. Het patroon loopt niet recht boven elkaar en het aantal steken klopt ook niet.
04.05.2017 - 11:18DROPS Design answered:
Hally Janny, In telpatroon A.3 brei je eerst A.3A (waar 1 mindering in zit), dan, afhankelijk van je maat, een aantal herhalingen van A.3B (waar 3 minderingen in zitten en op het eind brei je A.3C waar 1 mindering in zit. Het klopt dat de minderingen niet recht boven de gaatjes van 4 naalden daaronder zitten. Kun je aangeven waar in het patroon het aantal steken volgens jou niet kloppen?
12.05.2017 - 19:48
|
||||||||||||||||||||||
Hummingbird#hummingbirdcardigan |
||||||||||||||||||||||
 |
 |
|||||||||||||||||||||
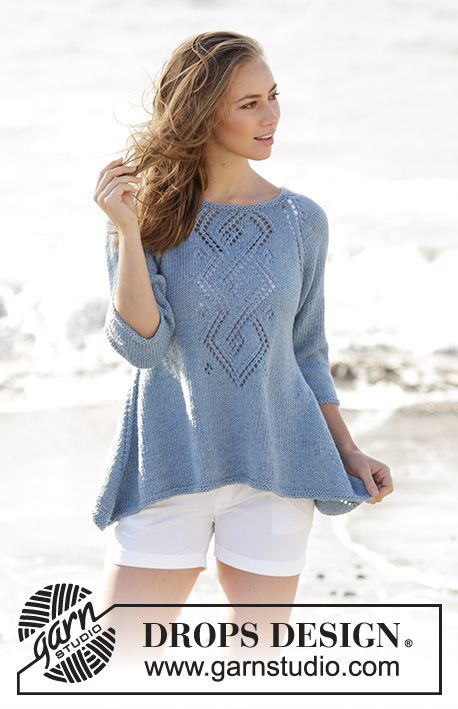
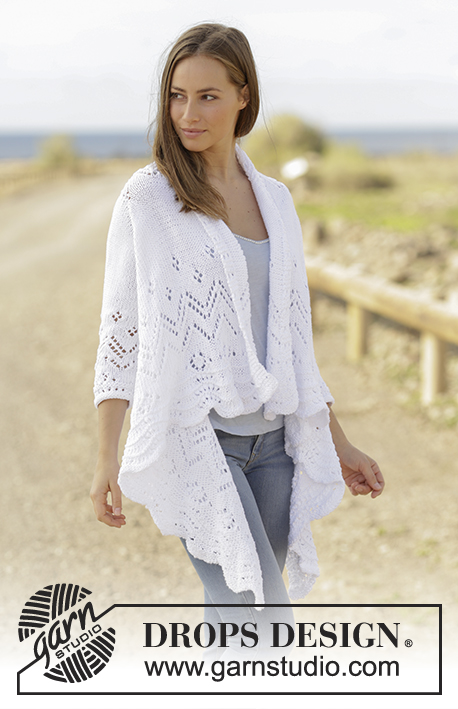
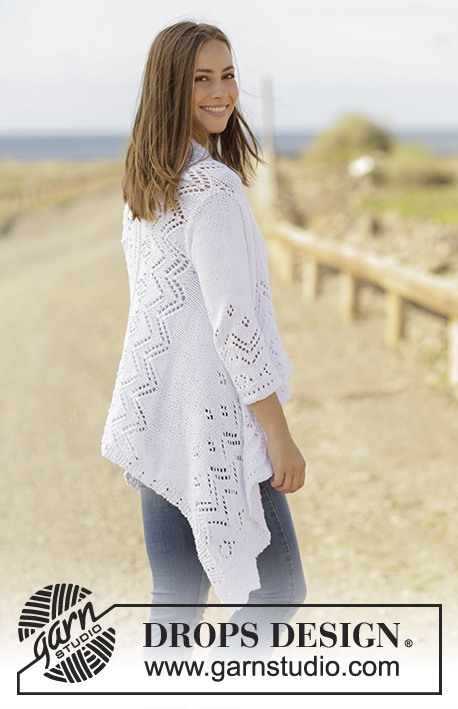
Jacket knitted sideways with lace pattern and ¾ sleeves in DROPS Paris. Size: S - XXXL
DROPS 177-3 |
||||||||||||||||||||||
|
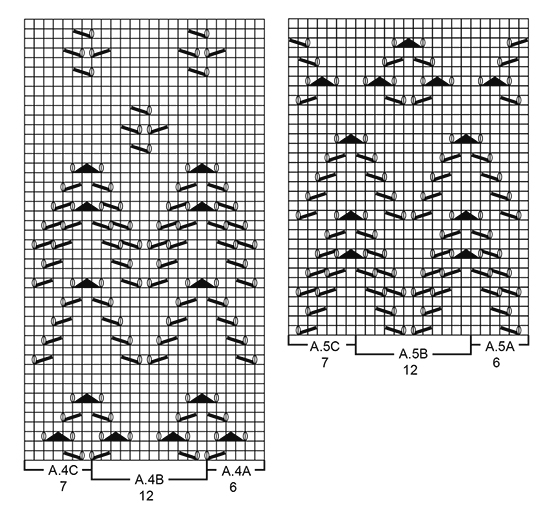
PATTERN: See diagrams A.1 to A.6. Diagrams show all rows in pattern seen from the right side. KNITTING TIP: If the lace pattern is done before correct measurements work stocking stitch with A.1 in each side as before to get the correct measurements. INCREASE TIP (applies to sleeves): Begin 1 stitch before marker, make 1 yarn-over, knit 2, 1 yarn-over. On next round knit yarn-over twisted to avoid holes. Work the increased stitches in the pattern. ---------------------------------------------------------- JACKET: Worked back and forth on circular needle from mid front to mid back in 2 parts. Work sleeves in the round on double pointed needles. RIGHT FRONT AND BACK PIECE: Cast on 200-200-219-219-238-238 stitches on circular needle size 5 mm with Paris. Work first row as follows from right side: A.1 (= 5 stitches), A.2A (= 9 stitches), A.2B over the next 171-171-190-190-209-209 stitches (= 9-9-10-10-11-11 repetitions of 19 stitches), A.2C (= 10 stitches) and A.1 (= 5 stitches). Continue pattern like this. When A.2 has been worked 1 time vertically, there are 180-180-197-197-214-214 stitches on needle. Work next row as follows from the right side: Continue A.1 as before, work A.3A (= 8 stitches), A.3B over the next 153-153-170-170-187-187 stitches (= 9-9-10-10-11-11 repetitions of 17 stitches), A.3C (= 9 stitches) and finish with A.1 as before. Continue pattern like this. When A.3 has been worked 1 time vertically, there are 131-131-143-143-155-155 stitches on needle. Work next row as follows from the right side: Continue A.1 as before, work A.4A (= 6 stitches), A.4B over the next 108-108-120-120-132-132 stitches (= 9-9-10-10-11-11 repetitions of 12 stitches), A.4C (= 7 stitches) and finish with A.1 as before. Continue pattern like this. REMEMBER THE KNITTING TENSION When A.4 has been worked, piece measures approx. 31 cm measured from the cast on edge (measure from the middle of the wave pattern). Then work in stocking stitch with A.1 over the 5 outermost stitches in each side as before. When piece measures 42-43-44-45-46-47 cm, cast off for armhole as follows from right side: Work the first 38 stitches, cast off the next 29-31-33-35-35-37 stitches and work as before over the last 64-62-72-70-82-80 stitches. On next row cast on 29-31-33-35-35-37 stitches over the cast off stitches and continue in stocking stitch and A.1 in each side as before When piece measures 44-46-48-50-52-54 cm (i.e. 2-3-4-5-6-7 cm from armhole), work next row as follows from right side: Continue A.1 as before, work A.5A (= 6 stitches), A.5B over the next 108-108-120-120-132-132 stitches (= 9-9-10-10-11-11 repetitions of 12 stitches), A.5C (= 7 stitches) and finish with A.1 as before. Continue pattern like this. When A.5 has been worked, piece measures approx. 59-61-63-65-67-69 cm measured from the cast on edge (measure from the middle of the wave pattern). - READ KNITTING TIP. Switch to circular needle size 4 mm. Knit 1 row from wrong side, knit 1 row from right side and knit 1 row from wrong side. Then cast off by knitting from right side - cast-off edge = make sure to avoid a tight cast-off edge. LEFT FRONT AND BACK PIECE: Cast on and work as on right front and back piece until piece measures 42-43-44-45-46-47 cm. Now cast off for armhole as follows from right side: Work the first 64-62-72-70-82-80 stitches, cast off the next 29-31-33-35-35-37 stitches and work as before over the last 38 stitches. On next row cast on 29-31-33-35-35-37 stitches over the cast off stitches and continue the same way as on right front and back piece. SLEEVE: Cast on 37-37-39-41-43-45 stitches on double pointed needles size 4 mm. Work A.6A until 1 stitch remain on round, work A.6B (= 1 stitch). When A.6 has been worked 1 time vertically, switch to double pointed needles size 5 mm. Insert 1 marker at beginning of round and move the marker upwards when working. Work next round as follows: 0-0-1-2-3-4 stitches in stocking stitch, A.4A (= 6 stitches), A.4B over the next 24 stitches, A.4C (= 7 stitches) and 0-0-1-2-3-4 stitches in stocking stitch. Continue pattern like this. AT THE SAME TIME when piece measures 8-6-8-6-6-8 cm, increase 2 stitches mid under sleeve - READ INCREASE TIP. Increase like this every 3-3-2½-2½-2½-2 cm 10-11-12-13-13-14 times in total = 57-59-63-67-69-73 stitches. When A.4 has been worked, work in stocking stitch over all stitches until piece measures 38 cm in all sizes. On next round cast off the middle 6 stitches mid under sleeve and finish sleeve cap back and forth on circular needle. Work in stocking stitch and cast off the first 4 stitches at beginning of every row 4 times in total in each side = 19-21-25-29-31-35 stitches remain on needle. Cast off the remaining stitches, piece measures approx. 42 cm in all sizes. Knit another sleeve the same way. ASSEMBLY: Graft/sew the 2 parts together mid back inside cast-off edge. Sew in sleeves. |
||||||||||||||||||||||
Diagram explanations |
||||||||||||||||||||||
|
||||||||||||||||||||||
 |
||||||||||||||||||||||
 |
||||||||||||||||||||||
 |
||||||||||||||||||||||
Have you finished this pattern?Tag your pictures with #dropspattern #hummingbirdcardigan or submit them to the #dropsfan gallery. Do you need help with this pattern?You'll find 28 tutorial videos, a Comments/Questions area and more by visiting the pattern on garnstudio.com. © 1982-2026 DROPS Design A/S. We reserve all rights. This document, including all its sub-sections, has copyrights. Read more about what you can do with our patterns at the bottom of each pattern on our site. |
||||||||||||||||||||||


With over 40 years in knitting and crochet design, DROPS Design offers one of the most extensive collections of free patterns on the internet - translated to 17 languages. As of today we count 324 catalogues and 12290 patterns translated into English (UK/cm). 12290
We work hard to bring you the best knitting and crochet have to offer, inspiration and advice as well as great quality yarns at incredible prices! Would you like to use our patterns for other than personal use? You can read what you are allowed to do in the Copyright text at the bottom of all our patterns. Happy crafting!
Post a comment to pattern DROPS 177-3
We would love to hear what you have to say about this pattern!
If you want to leave a question, please make sure you select the correct category in the form below, to speed up the answering process. Required fields are marked *.