
Popular categories
Looking for a yarn?


Comments / Questions (50)
![]() L. Briggs wrote:
L. Briggs wrote:
I can't locate sizing information. What are the finished bust measurements for the sizes given? Thank you.
06.04.2016 - 00:26DROPS Design answered:
Dear L. Briggs, you'll find a measurement chart scrolling down the page: you can compare the measures given with one of your garment and find the right size. Happy knitting!
07.04.2016 - 10:30
![]() Caroline wrote:
Caroline wrote:
On page two where you say 'where piece measures 4 3/4" from cast on edge", is that the cast on from the strap where we cast on 17 stitches or from the neck? Thank you
31.03.2016 - 04:04DROPS Design answered:
Dear Caroline, measure from cast on the first 17 sts cast on at the beg of the shoulder. Happy knitting!
31.03.2016 - 08:48
![]() Lucia wrote:
Lucia wrote:
Necesitaría , si puede ser, aclarar cuantos puntos se deben aumentar para la sisa, desde ya, muchas gracias.
25.03.2016 - 19:53DROPS Design answered:
Hola Lucia. Todos los modelos de Drops están publicados para varias tallas. Cuando la labor mida 13-12-12-10-10-7 cm (una medida corresponde a cada talla) desde el borde de montaje, aumentamos 1 pt dentro de los 3 pts en pt musgo a cada lado para la sisa. Repetir los aumentos en cada fila del LD 2-4-6-9-11-16 vcs (según la talla) más y así nos quedarán 75-81-87-95-105-115 pts. (es decir, 1 pt a cada lado y, dependiendo de la talla, el nº de veces indicado) con lo cual obtenemos el nº de pts q se indica al final.
30.03.2016 - 10:13
![]() Anja Dekker wrote:
Anja Dekker wrote:
Ik moet na 12 cm vanaf de schouder gaan meerderen voor het armsgat. Ik vraag me af of dit niet te vroeg is. Op de tekening bij dit patroon staat voor maat M dat het armsgat 16 cm is dus in totaal 32 cm. Op de foto van dit patroon loopt het armsgat duidelijk dieper dan 16 cm. Is er een vergissing gemaakt in centimeters?
22.02.2016 - 17:04DROPS Design answered:
Hoi Anja. Je begint met meerderen bij ca. 12 cm en herhaald nog 4 keer voor je maat in elke nld op de goede kant (elke 2e nld), dus je bent 8 verder voordat je klaar bent meerderen en dan moet je nog 1 nld av breien = 9 nld. Met de juiste stekenverhouding zou je op ongeveer 16 zitten als je klaar bent.
23.02.2016 - 14:21
![]() Gunda Poll wrote:
Gunda Poll wrote:
Einfach fantastisch, diese Kollektion, wo soll ich nur anfangen, eins schöner als das andere, herrlich, danke, tausendmal danke!!!
10.02.2016 - 09:08
![]() Janne Yde wrote:
Janne Yde wrote:
Fin og feminin
14.01.2016 - 22:23
![]() Susan M McKinney wrote:
Susan M McKinney wrote:
Swing Into Summer!
11.01.2016 - 23:33
![]() Ellis wrote:
Ellis wrote:
Lace, fine for summer not only for sjawls but for 'airy' garments ;-) We need modern / contempery lace patterns, no squares but flowerforms, to ad to shirts so women look charming chique
08.01.2016 - 12:10
![]() Sophia wrote:
Sophia wrote:
Very beautiful summer blouse
03.01.2016 - 13:25
![]() Ann Carey wrote:
Ann Carey wrote:
Love love love this. Would love this.
30.12.2015 - 14:05
|
|||||||||||||||||||
Woodstock#woodstocktop |
|||||||||||||||||||
 |
 |
||||||||||||||||||
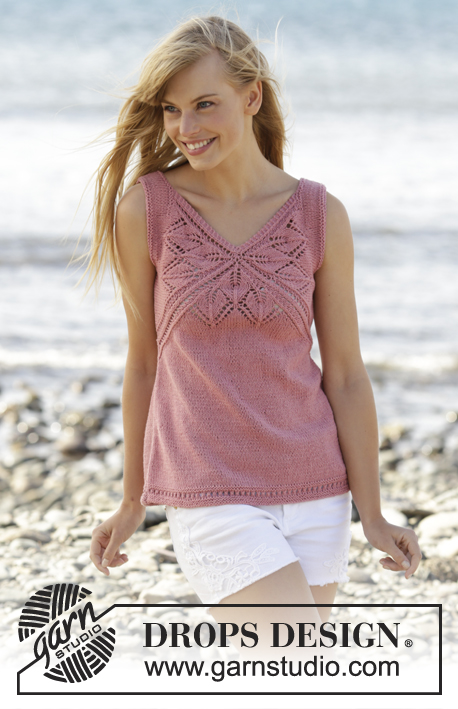
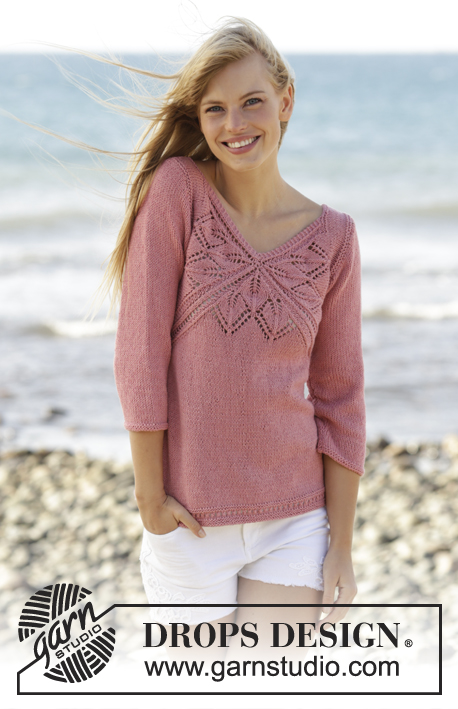
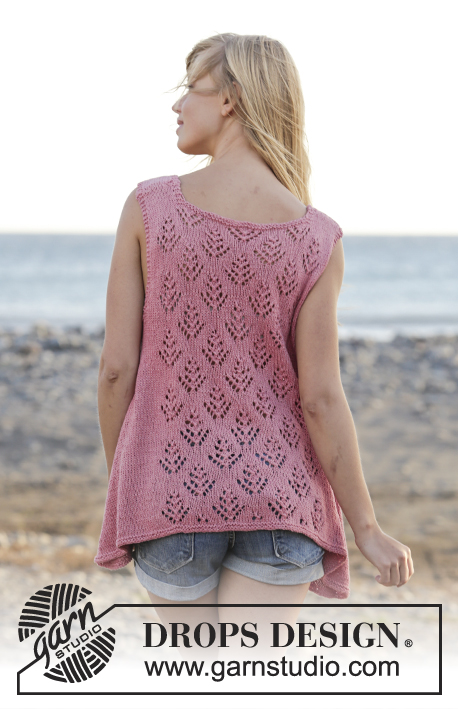
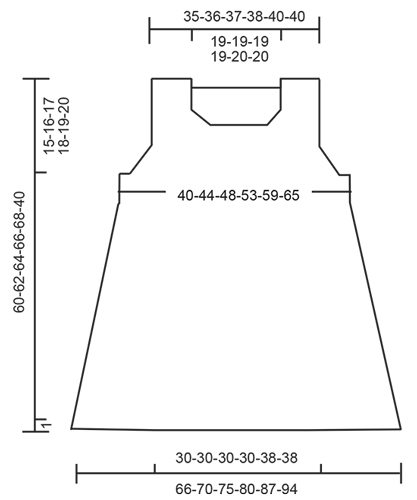
Knitted DROPS top with lace pattern and A-shape, worked top down in ”Belle”. Size: S - XXXL.
DROPS 167-6 |
|||||||||||||||||||
|
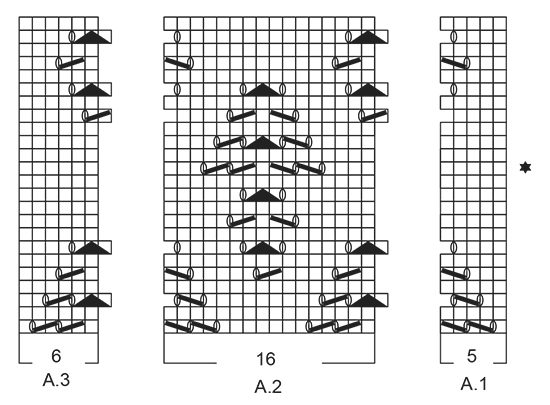
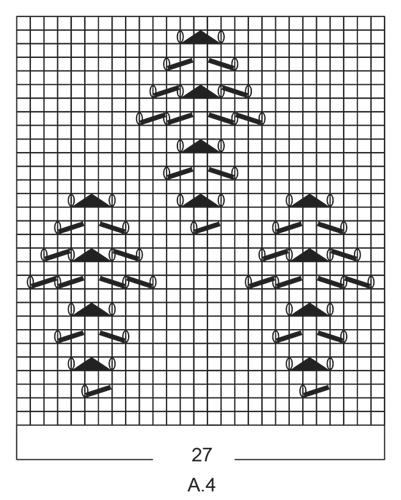
GARTER ST (worked in the round): 1 ridge = 2 rounds. * K 1 round and P 1 round *, repeat from *-*. GARTER ST (back and forth): K all rows. 1 ridge = 2 rows K. PATTERN: See diagrams A.1 to A.4. The diagrams show all rounds/rows in pattern seen from RS. INCREASE TIP 1: All inc are done from RS. Inc 1 st by making a YO. On next row P YO twisted (i.e. work in back loop of YO instead of front) to avoid holes. NOTE: Work the new sts in stocking st. INCREASE TIP 2: Work until 1 st remains before marker in the side, 1 YO, 2 sts in stocking st, 1 YO. Repeat in the other side. On next round K the YOs. They should make holes. ---------------------------------------------------------- TOP: The piece is worked top down. Work first front and back piece separately, back and forth down to armholes, then work in the round. BACK PIECE: Work right shoulder as follows: Cast on 16-17-17-18-20-20 sts on circular needle size 4.5 mm with Belle. Work as follows (1st row = from RS): 3 sts in GARTER ST - see explanation above (= towards the neck), work 10-11-11-12-14-14 sts in stocking st, 3 sts in garter st (= towards armhole). Continue like this until 4 rows in stocking st have been work inside the 3 sts in garter st in each side. On next row inc 1 st inside the 3 sts in garter st towards the neck - READ INCREASE TIP 1 = 17-18-18-19-21-21 sts. Work 1 row from WS and put piece aside. Work left shoulder as follows: Cast on and work as right shoulder but reversed. I.e. inc 1 st before the 3 sts in garter st towards the neck on 5th row in stocking st. Work 1 row from WS. Turn and work as before over all sts. At the end of row cast on 35-35-37-37-39-39 new sts for neck and then work the 17-18-18-19-21-21 sts from right shoulder on to needle = 69-71-73-75-81-81 sts. Work the new sts cast on for neck in garter st. When 2 ridges have been worked over these sts, continue with 2 rows in stocking st inside the 3 sts in garter st in each side. REMEMBER THE KNITTING TENSION Now work pattern as follows on next row from RS (NOTE: Beg on 13th row in A.1- A.3, see star in diagram): Work 3 sts in garter st, 2-3-4-5-0-0 sts in stocking st, A.1 (= 5 sts), A.2 (= 16 sts) 3-3-3-3-4-4 times in width, A.3 (= 6 sts), 2-3-4-5-0-0 sts in stocking st, 3 sts in garter st. Repeat A.1-A.3 vertically until finished measurements. When piece measures 13-12-12-10-10-7 cm from cast-on edge, inc 1 st inside the 3 sts in garter st in each side for armhole. Repeat inc on every row from RS 2-4-6-9-11-16 more times = 75-81-87-95-105-115 sts. Work 1 row from WS after last inc and put piece aside. FRONT PIECE: Work right shoulder as follows: Cast on 16-17-17-18-20-20 sts on circular needle size 4.5 mm with Belle. Work as follows (1st row = from RS): 3 sts in garter st (= towards armhole), work 10-11-11-12-14-14 sts in stocking st, 3 sts in garter st (= towards the neck). READ ALL OF THE FOLLOWING SECTION BEFORE CONTINUING! Continue like this, AT THE SAME TIME when piece measures 7-8-7-8-8-9 cm, inc for neck and when piece measures 13-12-12-10-10-7 cm inc for armholes the same way as on back piece. NOTE: In size XXXL beg inc for armholes before inc for neck. INCREASE NECK: Inc 1 st inside the 3 sts in garter st towards the neck. Repeat inc on every row from RS 4-4-5-5-6-6 more times = 5-5-6-6-7-7 sts inc for neck. When all inc are done, work 1 row from WS. Put piece aside. Work left shoulder as follows: Cast on and work as right shoulder but reversed. I.e. inc 1 st before the 3 sts in garter st towards the neck. When all inc for neck are done, work 1 row from WS. Turn and work as before over all sts. At the end of row cast on 27 new sts in all sizes for neck, then work all sts from right shoulder on to needle. Continue back and forth like this (continue inc for armholes) until 2 ridges have been worked over the new sts for neck. On next row from RS work pattern A.4 (= 27 sts) over the middle 27 sts on needle. NOTE: Work A.4 1 time vertically but the repetition will not be finished vertically before front and back pieces are put tog and you are working in the round on body. When all inc for armholes are done, there are 75-81-87-95-105-115 sts on needle. After last inc work 1 row from WS. Turn and work over all sts on front piece, cast on 4-6-8-10-12-14 new sts for armhole, insert a marker in the middle of these new sts (= 2-3-4-5-6-7 sts on each side of marker), work 75-81-87-95-105-115 sts from back piece on to same circular needle and cast on 4-6-8-10-12-14 new sts for armhole, insert a marker in the middle of these new sts (= 2-3-4-5-6-7 sts on each side of marker) = 158-174-190-210-234-258 sts on round. Beg of round is after the last 4-6-8-10-12-14 new sts cast on. BODY: Then work in the round on circular needle. NOW MEASURE THE PIECE FROM HERE. Now continue with pattern as follows: Work 3 sts in garter st, continue in stocking st with pattern as before over the next 69-75-81-89-99-109 sts - NOTE: Continue pattern A.4 until entire repetition has been worked 1 time vertically, then work in stocking st over all sts on front piece, 10-12-14-16-18-20 sts in garter st, stocking st over the next 5-8-11-15-12-17 sts, continue pattern A.1-A.3 as before over the next 59-59-59-59-75-75 sts, 5-8-11-15-12-17 sts in stocking st, 7-9-11-13-15-17 sts in garter st. When 2 ridges have been worked over the new sts for armholes, continue these sts in stocking st until finished measurements. When piece measures 4 cm, inc 2 st in each side of piece - READ INCREASE TIP 2! Repeat inc every 4th round until finished measurements. When piece measures 44-45-46-47-48-49 cm – adjust to finish after 10th or 20th round in A.1-A.3 - work 1 round in stocking st. There are now approx. 262-278-298-318-346-374 sts on round depending on where the pattern is finished. Then work 2 ridges. Cast off. ASSEMBLY: Sew the shoulder seams tog. Make sure that to avoid a tight seam. |
|||||||||||||||||||
Diagram explanations |
|||||||||||||||||||
|
|||||||||||||||||||
 |
|||||||||||||||||||
 |
|||||||||||||||||||
 |
|||||||||||||||||||
Have you finished this pattern?Tag your pictures with #dropspattern #woodstocktop or submit them to the #dropsfan gallery. Do you need help with this pattern?You'll find 22 tutorial videos, a Comments/Questions area and more by visiting the pattern on garnstudio.com. © 1982-2026 DROPS Design A/S. We reserve all rights. This document, including all its sub-sections, has copyrights. Read more about what you can do with our patterns at the bottom of each pattern on our site. |
|||||||||||||||||||


With over 40 years in knitting and crochet design, DROPS Design offers one of the most extensive collections of free patterns on the internet - translated to 17 languages. As of today we count 324 catalogues and 12290 patterns translated into English (UK/cm). 12290
We work hard to bring you the best knitting and crochet have to offer, inspiration and advice as well as great quality yarns at incredible prices! Would you like to use our patterns for other than personal use? You can read what you are allowed to do in the Copyright text at the bottom of all our patterns. Happy crafting!
Post a comment to pattern DROPS 167-6
We would love to hear what you have to say about this pattern!
If you want to leave a question, please make sure you select the correct category in the form below, to speed up the answering process. Required fields are marked *.