
Popular categories
Looking for a yarn?


Comments / Questions (50)
![]() Diana wrote:
Diana wrote:
Zodra alle steken op de rondbreinaald staan en er verder alleen nog in de rondte gebreid wordt, hoe brei ik dan het ajourpatroon? Er zijn dan geen averechtse naalden meer. Brei ik dan steeds de 2e naald de omslagen gewoon rechts zoals ze voorkomen? Ik heb het idee dat mijn gaatjes niet hetzelfde zijn als toen ik de omslagen averechts breidde? Alvast bedankt .
11.04.2022 - 22:46DROPS Design answered:
Dag Diana,
Als je in de rondte breit, dan brei je inderdaad steeds de tweede naald recht. De spanning op de draad kan inderdaad soms wat anders zijn als je in de rondte breit. Dit is van persoon tot persoon verschillend. Dit zou je even in de gaten kunnen hebben. Voor de rest heeft het rondbreien verder geen invloed op het patroon (behalve dan dat je de steken recht aan de goede kant breit in plaats van averecht aan de verkeerde kant).
14.04.2022 - 11:45
![]() Isabelle wrote:
Isabelle wrote:
Bonjour, Je suis en train de tricoter le devant, j'ai tricote les deux epaules, droite en premier, puis gauche, conformement aux instructions, mais il me semble que le patron devrait etre inverse par rapport au dos; c'est a dire tricoter l'epaule GAUCHE en premier, laisser un fil en attente cote encolure, tricoter l'epaule DROITE et faire les 27 augmentations de l'encolure a partir de l'epaule droite et continuer a tricoter vers l'epaule gauche. Merci de preciser.
18.08.2019 - 23:50DROPS Design answered:
Bonjour Isabelle, votre commentaire a été transmis à nos stylistes qui vont l'étudier, merci pour votre retour. Si une correction doit être faite, vous la retrouverez en ligne. Bon tricot!
19.08.2019 - 10:48
![]() Isabelle wrote:
Isabelle wrote:
Bonjour, Dans les explications du dos: "À 13-12-12-10-10-7 cm depuis le rang de montage, augmenter pour les emmanchures ...", s'agit-il du rang de montage initial (le haut des epaules) ou bien le rang des augmentations de l'encolure? Les jetes des augmentations doivent-ils etre tricotes en mailles torses sur l'envers? Merci!
17.07.2019 - 08:40DROPS Design answered:
Bonjour Isabelle, on mesure depuis les mailles de l'épaule pour que l'emmanchure soit juste en hauteur. Tout à fait, les augmentations doivent se tricoter torse - cf AUGMENTATIONS-1. Bon tricot!
17.07.2019 - 11:14
![]() Lise Tamara Sand wrote:
Lise Tamara Sand wrote:
Jeg strikker str xxl og med 81 m før økning til ermehull så blir 11 økninger *2 , 11 for hver ermhull, så blir 81+22= 103m ikke 105
13.06.2019 - 00:03DROPS Design answered:
Hei Lise. Du øker 11 ganger TIL - altså i tillegg til den første gangen som blir forklart. Dvs det økes totalt 12 ganger = 105 masker etter økningene til ermhull. God fornøyelse
13.06.2019 - 09:24
![]() Valerie wrote:
Valerie wrote:
I am at the increase neck section. I have increased the appropriate number of stitches and am increasing for the armhole as well. Do I stop when the stitches for the neck are finished or continue until all the stitches for the armhole are finished?
19.08.2018 - 02:47DROPS Design answered:
Hi Valerie, You work each shoulder separately, so increase for neck on the right shoulder and then work the left shoulder. Once you have worked both shoulders you cast on stitches for the neck and work the shoulders together. I hope this helps and happy knitting!
21.08.2018 - 07:54
![]() Susanna wrote:
Susanna wrote:
These patterns are great, but I really wish they would be edited better. I couldn't tell which "cast on edge" to measure from when beginning the back armhole increases. I chose the neck cast on, and only after happening to read a comment here did I learn it was supposed to be the shoulders. Also, there is a mistake in the pattern for the front shoulders--the left shoulder should be knitted first, then the right, neck cast on to right shoulder, then left shoulder joined.
03.07.2018 - 20:38
![]() Natalie Hall wrote:
Natalie Hall wrote:
All the keys in every knitting chart are blank on all my devices so I don’t know if I am supposed to k2tog or sl k1 psso. Is there a key chart which is in a different format?
22.05.2018 - 11:41DROPS Design answered:
Dear Mrs Hall, the dec are symbols 2 , 3 and 5, ie either diagonal line over 2 sts/squares (2nd and 3rd symbol) or black triangle over 3 sts (5th symbol). Happy knitting!
22.05.2018 - 12:47
![]() Margrethe Fauske wrote:
Margrethe Fauske wrote:
Hei! Jeg har kommet til der jeg legger opp 27 masker til hals. Jeg strikker str. S. Jeg har strikket høyre skulder: legg opp 16 masker, øk 5 masker til hals, øk 3 masker til ermehull = 24 masker. Jeg har gjort det samme med venstre skulder = 48 masker. Pluss de 27 maskene til hals har jeg da 75 masker. Men oppskriften sier at jeg skal fortsette å øke til ermehull til jeg har 75 masker, men det har jeg allerede? Hva har jeg gjort feil?
11.05.2018 - 11:58KATE ROBINSON wrote:
Hi, When the pattern says "When piece measures 13-12-12-10-10-7 cm / 5"-4 3/4"-4 3/4"-4"-4"-2 3/4'' from cast-on edge, inc 1 st inside the 3 sts in garter st in each side for armhole." what is meant by "inside the 3 sts in garter st"? Where are those stitches to made exactly? Between the last stockinette stitch and the first garter stitch? And how many stitches are we increasing by? Is that one stitch for each garter st border, ie 4 stitches? Thank you!
17.04.2018 - 22:23DROPS Design answered:
Dear Mrs Robinson, you increase from RS after the first 3 sts in garter st and before the last 3 sts in garter st. These new sts will be worked in stockinette stitch= you will increase 2 sts on each inc row = every RS row. Happy knitting!
18.04.2018 - 09:37
![]() Yvonne wrote:
Yvonne wrote:
Der Abschlussrand rollt sich trotz den 2 Reihen kraus rechts immer hoch. Hat jemand ein Tipp???
20.01.2018 - 12:44DROPS Design answered:
Liebe Yvonne, Sie können das Top mit Stecknadeln auf einer geeigneten Unterlage spannen, anfeuchten (z.B. mit einer Sprühflasche für Blumen) und trocknen lassen, danach entfernen Sie die Stecknadeln, dann sollte sich der Rand nicht mehr rollen. Viel Spaß beim fertigstellen!
22.01.2018 - 09:08
|
|||||||||||||||||||
Woodstock#woodstocktop |
|||||||||||||||||||
 |
 |
||||||||||||||||||
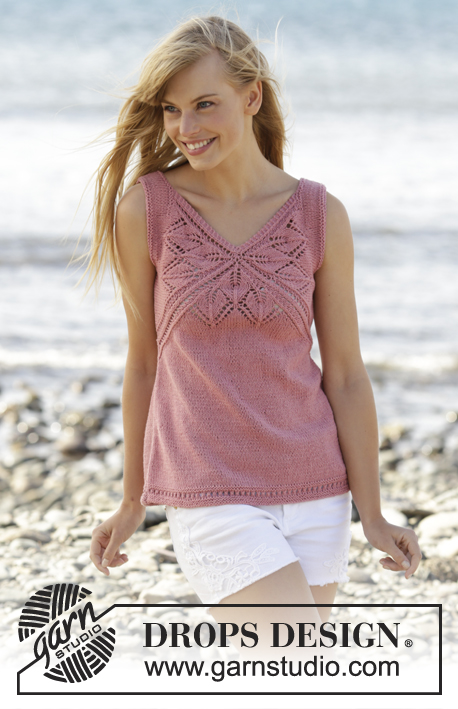
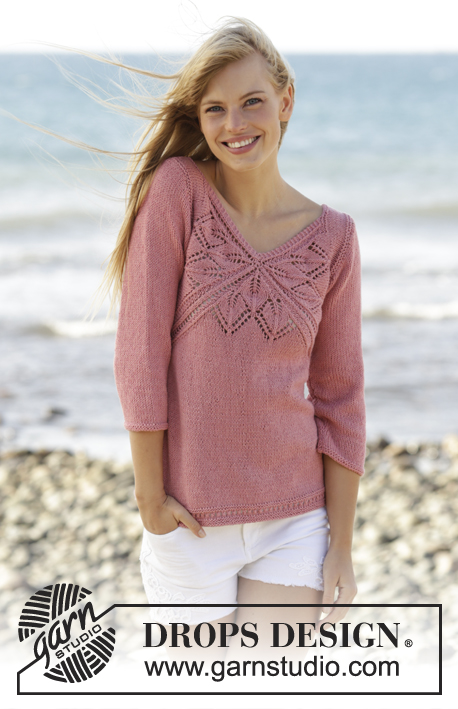
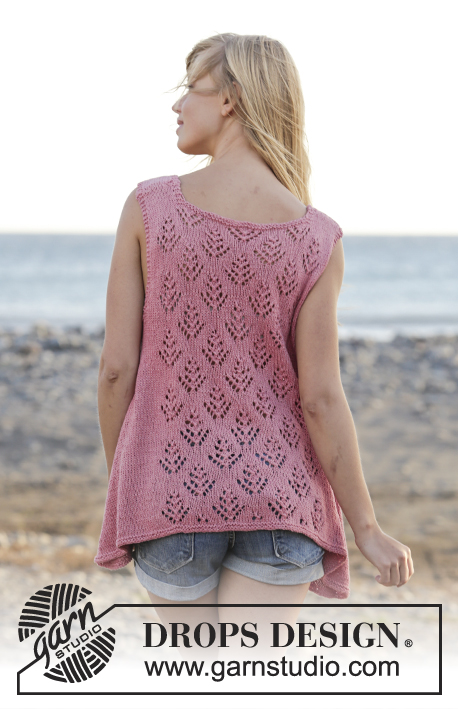
Knitted DROPS top with lace pattern and A-shape, worked top down in ”Belle”. Size: S - XXXL.
DROPS 167-6 |
|||||||||||||||||||
|
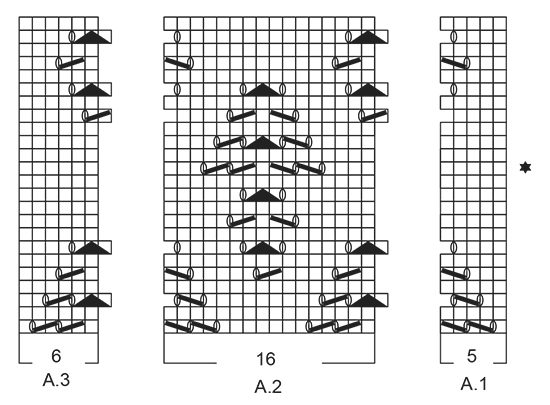
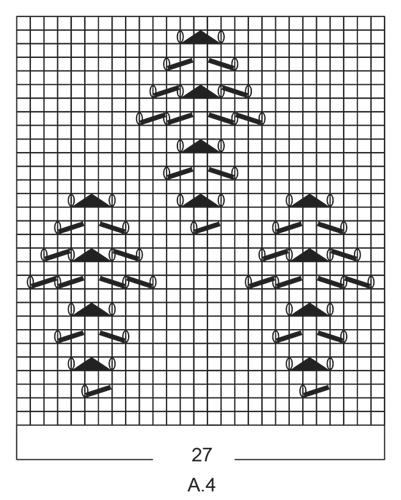
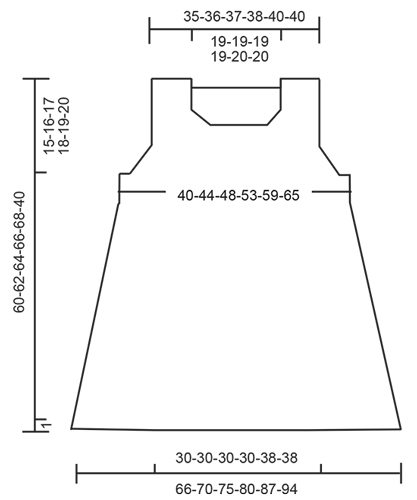
GARTER ST (worked in the round): 1 ridge = 2 rounds. * K 1 round and P 1 round *, repeat from *-*. GARTER ST (back and forth): K all rows. 1 ridge = 2 rows K. PATTERN: See diagrams A.1 to A.4. The diagrams show all rounds/rows in pattern seen from RS. INCREASE TIP 1: All inc are done from RS. Inc 1 st by making a YO. On next row P YO twisted (i.e. work in back loop of YO instead of front) to avoid holes. NOTE: Work the new sts in stocking st. INCREASE TIP 2: Work until 1 st remains before marker in the side, 1 YO, 2 sts in stocking st, 1 YO. Repeat in the other side. On next round K the YOs. They should make holes. ---------------------------------------------------------- TOP: The piece is worked top down. Work first front and back piece separately, back and forth down to armholes, then work in the round. BACK PIECE: Work right shoulder as follows: Cast on 16-17-17-18-20-20 sts on circular needle size 4.5 mm with Belle. Work as follows (1st row = from RS): 3 sts in GARTER ST - see explanation above (= towards the neck), work 10-11-11-12-14-14 sts in stocking st, 3 sts in garter st (= towards armhole). Continue like this until 4 rows in stocking st have been work inside the 3 sts in garter st in each side. On next row inc 1 st inside the 3 sts in garter st towards the neck - READ INCREASE TIP 1 = 17-18-18-19-21-21 sts. Work 1 row from WS and put piece aside. Work left shoulder as follows: Cast on and work as right shoulder but reversed. I.e. inc 1 st before the 3 sts in garter st towards the neck on 5th row in stocking st. Work 1 row from WS. Turn and work as before over all sts. At the end of row cast on 35-35-37-37-39-39 new sts for neck and then work the 17-18-18-19-21-21 sts from right shoulder on to needle = 69-71-73-75-81-81 sts. Work the new sts cast on for neck in garter st. When 2 ridges have been worked over these sts, continue with 2 rows in stocking st inside the 3 sts in garter st in each side. REMEMBER THE KNITTING TENSION Now work pattern as follows on next row from RS (NOTE: Beg on 13th row in A.1- A.3, see star in diagram): Work 3 sts in garter st, 2-3-4-5-0-0 sts in stocking st, A.1 (= 5 sts), A.2 (= 16 sts) 3-3-3-3-4-4 times in width, A.3 (= 6 sts), 2-3-4-5-0-0 sts in stocking st, 3 sts in garter st. Repeat A.1-A.3 vertically until finished measurements. When piece measures 13-12-12-10-10-7 cm from cast-on edge, inc 1 st inside the 3 sts in garter st in each side for armhole. Repeat inc on every row from RS 2-4-6-9-11-16 more times = 75-81-87-95-105-115 sts. Work 1 row from WS after last inc and put piece aside. FRONT PIECE: Work right shoulder as follows: Cast on 16-17-17-18-20-20 sts on circular needle size 4.5 mm with Belle. Work as follows (1st row = from RS): 3 sts in garter st (= towards armhole), work 10-11-11-12-14-14 sts in stocking st, 3 sts in garter st (= towards the neck). READ ALL OF THE FOLLOWING SECTION BEFORE CONTINUING! Continue like this, AT THE SAME TIME when piece measures 7-8-7-8-8-9 cm, inc for neck and when piece measures 13-12-12-10-10-7 cm inc for armholes the same way as on back piece. NOTE: In size XXXL beg inc for armholes before inc for neck. INCREASE NECK: Inc 1 st inside the 3 sts in garter st towards the neck. Repeat inc on every row from RS 4-4-5-5-6-6 more times = 5-5-6-6-7-7 sts inc for neck. When all inc are done, work 1 row from WS. Put piece aside. Work left shoulder as follows: Cast on and work as right shoulder but reversed. I.e. inc 1 st before the 3 sts in garter st towards the neck. When all inc for neck are done, work 1 row from WS. Turn and work as before over all sts. At the end of row cast on 27 new sts in all sizes for neck, then work all sts from right shoulder on to needle. Continue back and forth like this (continue inc for armholes) until 2 ridges have been worked over the new sts for neck. On next row from RS work pattern A.4 (= 27 sts) over the middle 27 sts on needle. NOTE: Work A.4 1 time vertically but the repetition will not be finished vertically before front and back pieces are put tog and you are working in the round on body. When all inc for armholes are done, there are 75-81-87-95-105-115 sts on needle. After last inc work 1 row from WS. Turn and work over all sts on front piece, cast on 4-6-8-10-12-14 new sts for armhole, insert a marker in the middle of these new sts (= 2-3-4-5-6-7 sts on each side of marker), work 75-81-87-95-105-115 sts from back piece on to same circular needle and cast on 4-6-8-10-12-14 new sts for armhole, insert a marker in the middle of these new sts (= 2-3-4-5-6-7 sts on each side of marker) = 158-174-190-210-234-258 sts on round. Beg of round is after the last 4-6-8-10-12-14 new sts cast on. BODY: Then work in the round on circular needle. NOW MEASURE THE PIECE FROM HERE. Now continue with pattern as follows: Work 3 sts in garter st, continue in stocking st with pattern as before over the next 69-75-81-89-99-109 sts - NOTE: Continue pattern A.4 until entire repetition has been worked 1 time vertically, then work in stocking st over all sts on front piece, 10-12-14-16-18-20 sts in garter st, stocking st over the next 5-8-11-15-12-17 sts, continue pattern A.1-A.3 as before over the next 59-59-59-59-75-75 sts, 5-8-11-15-12-17 sts in stocking st, 7-9-11-13-15-17 sts in garter st. When 2 ridges have been worked over the new sts for armholes, continue these sts in stocking st until finished measurements. When piece measures 4 cm, inc 2 st in each side of piece - READ INCREASE TIP 2! Repeat inc every 4th round until finished measurements. When piece measures 44-45-46-47-48-49 cm – adjust to finish after 10th or 20th round in A.1-A.3 - work 1 round in stocking st. There are now approx. 262-278-298-318-346-374 sts on round depending on where the pattern is finished. Then work 2 ridges. Cast off. ASSEMBLY: Sew the shoulder seams tog. Make sure that to avoid a tight seam. |
|||||||||||||||||||
Diagram explanations |
|||||||||||||||||||
|
|||||||||||||||||||
 |
|||||||||||||||||||
 |
|||||||||||||||||||
 |
|||||||||||||||||||
Have you finished this pattern?Tag your pictures with #dropspattern #woodstocktop or submit them to the #dropsfan gallery. Do you need help with this pattern?You'll find 22 tutorial videos, a Comments/Questions area and more by visiting the pattern on garnstudio.com. © 1982-2026 DROPS Design A/S. We reserve all rights. This document, including all its sub-sections, has copyrights. Read more about what you can do with our patterns at the bottom of each pattern on our site. |
|||||||||||||||||||


With over 40 years in knitting and crochet design, DROPS Design offers one of the most extensive collections of free patterns on the internet - translated to 17 languages. As of today we count 324 catalogues and 12290 patterns translated into English (UK/cm). 12290
We work hard to bring you the best knitting and crochet have to offer, inspiration and advice as well as great quality yarns at incredible prices! Would you like to use our patterns for other than personal use? You can read what you are allowed to do in the Copyright text at the bottom of all our patterns. Happy crafting!
Post a comment to pattern DROPS 167-6
We would love to hear what you have to say about this pattern!
If you want to leave a question, please make sure you select the correct category in the form below, to speed up the answering process. Required fields are marked *.