
Popular categories
Looking for a yarn?


Comments / Questions (24)
![]() Annelie wrote:
Annelie wrote:
Hej var kan jag bestalla Drops Andes garn online till denna troja, farg nummer 9020, 3740, 3755. 5320 och 7120? Kan ej hitta
01.03.2026 - 11:38
![]() Luminita wrote:
Luminita wrote:
Andes
05.02.2026 - 13:25
![]() Lumi wrote:
Lumi wrote:
Buona sera, Le scrivo per chiederle un informazione in merito a questo maglione Nordico Jacquard che l'ho finito, e visto che non ci sono in galleria esposti da nessuno che lo ha fatto, vorrei chiederle la cortesia di indicarmi se è possibile come dovrei procedere? In attesa di un suo feedback La saluto cordialmente.
31.01.2026 - 18:35DROPS Design answered:
Buonasera Lumi, può seguire le istruzioni riportate qui. Buon lavoro!
01.02.2026 - 20:24
![]() Eli Vadset wrote:
Eli Vadset wrote:
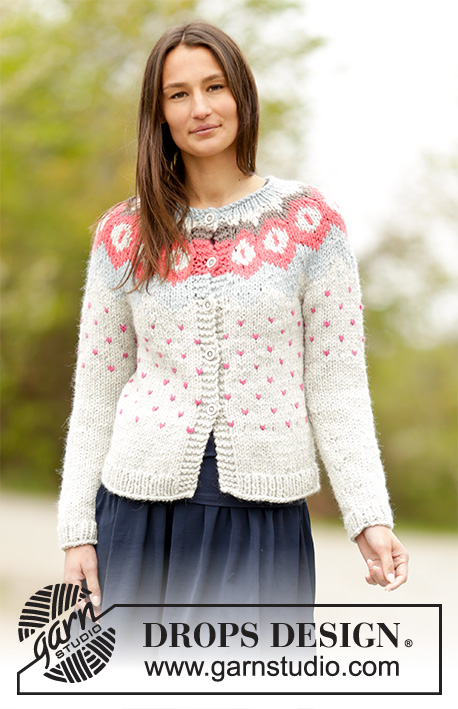
Hvordan få kjøpe strikkejakke av denne genseren
12.09.2022 - 12:35DROPS Design answered:
Hei Eli. For å finne oppskrift på jakken lik denne genseren, ta en titt her: Winter Poppies Cardigan mvh DROPS Design
12.09.2022 - 14:25
![]() Camilla wrote:
Camilla wrote:
Findes der en instruktionsvideo på hvordan man tager ud? Er nået til 10cm på ærmet hvor der står man skal tage 2 m ud. Ved dog ikke hvordan.
07.03.2022 - 22:26DROPS Design answered:
Hej Camilla. UDTAGNINGSTIPS: Start 1 m før mærket, slå om, strik 2 ret (mærket sidder midt mellem disse to m), slå om (= 2 m taget ud). På næste omg strikkes omslagen drejet ret så der ikke bliver hul. Mvh DROPS Design
09.03.2022 - 13:52
![]() Alba wrote:
Alba wrote:
Hola, estoy ya en la fase final de " elevación parte posterior del Escote" hay algún video explicativo de como hacerlo. No entiendo bien cómo hay que realizarlo. Gracias
19.09.2021 - 13:48DROPS Design answered:
Hola Alba, no hay un vídeo para trabajar esta parte en específico, pero sí hay un vídeo para la técnica usada, las filas acortadas: https://www.garnstudio.com/video.php?id=66&lang=es De todas formas, esta parte no es obligatoria; puedes pasar directamente al cuello.
19.09.2021 - 22:24
![]() Kniterella wrote:
Kniterella wrote:
I am knitting tbe Winter Poppies jumper, I havre knitted body n sleeves, how do I attach them without underarm holes? I don't like ur Tutorials as there is no audio insteuctions. I looked on YoyTube videod but all are top down yoke jumoers. I don't like top down anything, socks are Ik. Three needle cast off on underarm stitches does not work. I'm really syuck. I would like to finish my jumper after waiting 5 yrs to make.
15.03.2021 - 03:39DROPS Design answered:
Dear Kniterella, you simply slip the stitches on the same needle. The few stutches cast off will help the sleeve / shoulder sit better, and give yor arm more mobility, these stitches are sewn together after finishing the knitting. Happy knitting!
15.03.2021 - 08:13
![]() Patricia McDermott wrote:
Patricia McDermott wrote:
I have printed the pattern for Winter Poppies but the diagram did not print. How can I print off the diagrams. Regards Tricia
05.11.2020 - 18:36DROPS Design answered:
Dear Mrs McDermott, make sure your printer didn't save previous settings, all pages should be printed. Happy knitting!
06.11.2020 - 08:10
![]() Kniterella wrote:
Kniterella wrote:
I have nearly finished the body of jumper, just cast off for sleeves. I’m casting on 2 sleeves at the same time on circular needles, I can’t find a mustard yellow Andes yarn ball, is this yarn discontinued?
03.01.2020 - 15:53DROPS Design answered:
Dear Kniterella, Andes is not discontinued, but it has never mustard yellow colour. All available colours you can find here. Happy knitting!
03.01.2020 - 18:10
![]() Orysia Zwiryk wrote:
Orysia Zwiryk wrote:
I am knitting up Winter Poppies jumper, but have used other colours. I need some advice on contract colours. I have lt olive skun colour, chestnut red hair. The colours are MC Lt Beige mix 0206 Christmas red Lt Brown Turqupise and Grey Green Are these colours Ok?
04.09.2018 - 22:22DROPS Design answered:
Deat Orysia. With a MC as light beige your combo sounds great! Do share photos on our Facebook Group when you will have your Winter Poppies jumper done. Happy Knitting!
06.09.2018 - 11:34
|
||||||||||||||||||||||
Winter Poppies#winterpoppiessweater |
||||||||||||||||||||||
 |
 |
|||||||||||||||||||||
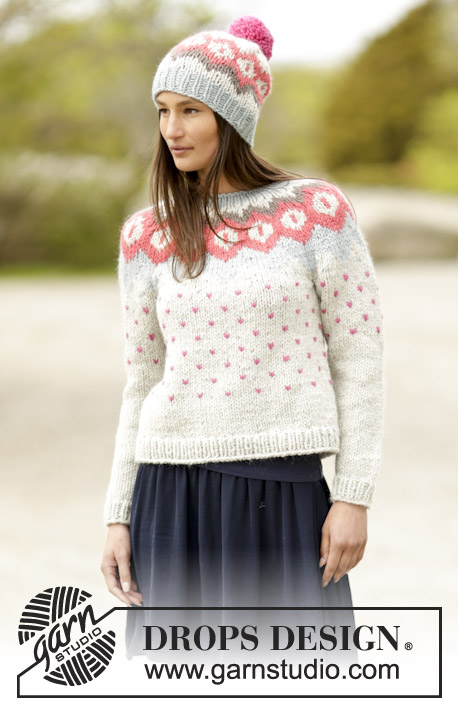
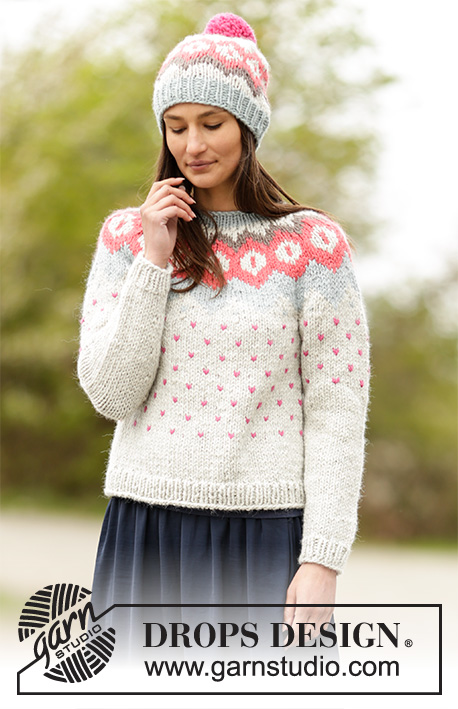
Set consists of: Knitted DROPS jumper with round yoke and Nordic pattern and hat with Nordic pattern and pompom in "Andes". Size: S - XXXL.
DROPS 164-28 |
||||||||||||||||||||||
|
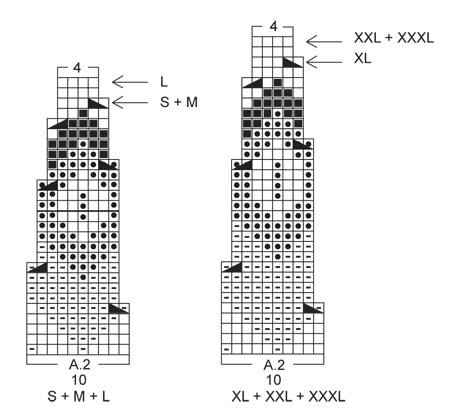
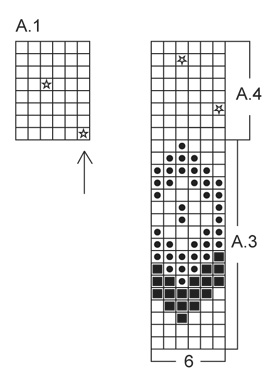
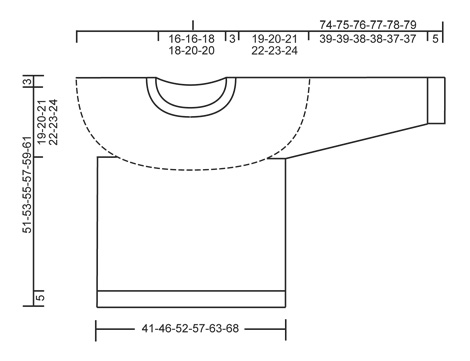
JUMPER: PATTERN: See diagrams A.1 and A.2. Choose diagram for correct size. Work entire pattern in stocking st. INCREASE TIP: Work until 1 sts remain before marker: Make 1 YO, K 2 sts (marker is in the middle of these two sts), make 1 YO (= 2 sts inc). On next round K YOs twisted to avoid holes. KNITTING TIP: To avoid the knitting tension to tighten when working pattern on yoke, it is important not to tighten the strands on back side of piece. Switch to a higher needle no when working pattern if the pattern is somewhat tight. ---------------------------------------------------------- BODY: Worked in the round on circular needle. Cast on 110-124-138-154-168-182 sts on circular needle size 7 mm with light grey. K 1 round. Then work rib = K 1/P 1 for 5 cm. Switch to circular needle size 8 mm and K 1 round while dec 20-22-24-28-30-32 sts evenly = 90-102-114-126-138-150 sts. Then work in stocking st. REMEMBER THE KNITTING TENSION When piece measures 12-13-11-12-11-12 cm, work pattern according to diagram A.1. When piece measures approx. 32-33-34-35-36-37 cm - adjust so that 1 round with light grey after a round with dots has been worked - work next round as follows: Cast off 2-3-3-4-4-4 sts for armhole, work 41-45-51-55-61-67 sts (= front piece), cast off 4-6-6-8-8-8 sts for armhole, work 41-45-51-55-61-67 sts (= back piece) and cast off the remaining 2-3-3-4-4-4 sts for armhole. Put piece aside and knit the sleeves. SLEEVE: Worked in the round on double pointed needles. Cast on 24-26-28-28-30-30 sts on double pointed needles size 7 mm with light grey. K 1 round. Then work rib = K 1/P 1 for 5 cm. Switch to double pointed needles size 8 mm and K 1 round while dec 1 st on round = 23-25-27-27-29-29 sts. Then work in stocking st. When piece measures 10 cm, inc 2 sts mid under sleeve - READ INCREASE TIP. Repeat inc every 4-3½-3½-3-3-3 cm a total of 9-10-10-11-11-11 times = 41-45-47-49-51-51 sts. AT THE SAME TIME when piece measures approx. 32-32-31-31-30-30 cm, work pattern in the round according to diagram A.1 - NOTE: St with arrow in diagram should fit middle st on round - count outwards where round beg. When piece measures 44-44-43-43-42-42 cm (NOTE: Shorter measurements in the larger sizes because of wider shoulder) - adjust so that 1 round with light grey after 1 round with dots has been worked - work next round as follows: Cast off the first 2-3-3-4-4-4 sts, work 37-39-41-41-43-43 sts and cast off the remaining 2-3-3-4-4-4 sts. Put piece aside and knit another sleeve. YOKE: Slip sleeves on to same circular needle as body where armholes were cast off (without working them first) = 156-168-184-192-208-220 sts on needle. K 1 round with light grey while dec 6-8-4-2-8-0 sts evenly = 150-160-180-190-200-220 sts on needle. K 0-2-2-2-0-2 rounds with light grey Then work pattern according to diagram A.2 (choose diagram for correct size) and READ KNITTING TIP (= 15-16-18-19-20-22 repetitions on round). Continue pattern like this and dec as shown in diagram. When A.2 has been worked (finish after a round marked with arrow for correct size), there are 60-64-72-76-80-88 sts on needle and piece measures approx. 51-53-55-57-59-61 cm up to shoulder. ELEVATION IN NECK: For better fit work an elevation at the back of neck. Insert 1 marker mid back and work back and forth on circular needle with light grey as follows: K 10-10-12-12-13-14 sts past marker, turn, tighten yarn and P 20-20-24-24-26-28 sts back. Turn, tighten yarn and K 30-30-36-36-39-42 sts, turn, tighten yarn and P 40-40-48-48-52-56 sts back. Turn piece, tighten yarn and K until mid back. K 1 round over all sts with light grey while dec 14-18-22-26-26-34 sts evenly = 46-46-50-50-54-54 sts on needle. NECK EDGE: Switch to a short circular needle size 7 mm and light grey green and work 5 rounds in stocking st before LOOSELY casting off with K. Jumper measures approx. 54-56-58-60-62-64 cm up to shoulder. ASSEMBLY: Sew the openings under the sleeves. ---------------------------------------------------------- HAT: PATTERN: See diagrams A.3 and A.4. Work entire pattern in stocking st. DECREASE TIP: Slip 1 st as if to K, K 1 with light grey, psso. ---------------------------------------------------------- HAT: Work size S/M on circular needle/double pointed needles size 6 and 7 mm. Work size L/XL on circular needle/double pointed needles size 7 and 8 mm. Worked in the round on circular needle, switch to double pointed needles when needed. Cast on 54 sts on circular needle size 6-7 mm with light grey green. Work rib = K 1/P 1 for 4-5 cm. Switch to double pointed needles size 7-8 mm and work pattern in the round according to diagram A.3 (= 9 repetitions on round). REMEMBER THE KNITTING TENSION After A.3 (piece measures approx. 15-16 cm), work pattern according to diagram A.4. When piece measures 20-21 cm, insert 6 markers in the piece, 9 sts apart. Continue A.4 and dec 1 st after every marker - READ DECREASE TIP. Repeat dec every other round 3 times in total, then every round 2 times in total = 24 sts remain on needle (work sts that do not fit pattern when dec, in light grey). On next round K all sts twisted tog 2 by 2 with light grey = 12 sts remain on needle. Cut the yarn and pull it through the remaining sts, tighten tog and fasten. POMPOM: Make a pompom with cerise, 10 cm in diameter and fasten it at the top of hat. |
||||||||||||||||||||||
Diagram explanations |
||||||||||||||||||||||
|
||||||||||||||||||||||
 |
||||||||||||||||||||||
 |
||||||||||||||||||||||
 |
||||||||||||||||||||||
Have you finished this pattern?Tag your pictures with #dropspattern #winterpoppiessweater or submit them to the #dropsfan gallery. Do you need help with this pattern?You'll find 30 tutorial videos, a Comments/Questions area and more by visiting the pattern on garnstudio.com. © 1982-2026 DROPS Design A/S. We reserve all rights. This document, including all its sub-sections, has copyrights. Read more about what you can do with our patterns at the bottom of each pattern on our site. |
||||||||||||||||||||||


With over 40 years in knitting and crochet design, DROPS Design offers one of the most extensive collections of free patterns on the internet - translated to 17 languages. As of today we count 324 catalogues and 12290 patterns translated into English (UK/cm). 12290
We work hard to bring you the best knitting and crochet have to offer, inspiration and advice as well as great quality yarns at incredible prices! Would you like to use our patterns for other than personal use? You can read what you are allowed to do in the Copyright text at the bottom of all our patterns. Happy crafting!
Post a comment to pattern DROPS 164-28
We would love to hear what you have to say about this pattern!
If you want to leave a question, please make sure you select the correct category in the form below, to speed up the answering process. Required fields are marked *.