
Popular categories
Looking for a yarn?


Comments / Questions (120)
![]() Simone Schwarz wrote:
Simone Schwarz wrote:
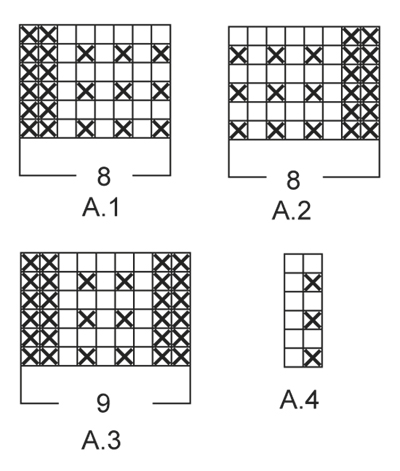
Hallo,ich möchte den Damenpullover Sigrid stricken.Sind in dem Muster die Randmaschen mit eingezeichnet? Muster A 1 beginnt z.B. mit einer linken Masche.Ist das die Randmasche? L.G.Simone
08.11.2024 - 20:01DROPS Design answered:
Liebe Frau Schwarz, ja genau, schlagen Sie keine zusätzliche Maschen an. Die ersten 8 M werden wie im A.1 und die letzten 8 Maschen wie in A.2 gestrickt. Viel Spaß beim Stricken!
11.11.2024 - 07:47
![]() Shelley wrote:
Shelley wrote:
At displacement, I get that the pattern moves but mine did not match up. Once I do the inc 1 after the edge garter, what am I doing with that increased st on next rows? I did garter, inc and then A3 but does not look right ?
26.01.2024 - 05:53DROPS Design answered:
Dear Shelley, could this video help you? We are showing there how to work A.3 and displacement. Happy knitting!
26.01.2024 - 08:22
![]() Shelley wrote:
Shelley wrote:
I am up to A3 but if I knit the pattern it does not match up for A1 and A2? I am adding the single garter and my rs row worked but the ws row does not?
21.01.2024 - 21:43DROPS Design answered:
Dear Shelley, A.3 is just one stitch more than A.1 and A.2, you cast on 2 stitches at the end of the next 2 rows and work 1 edge stitch in garter stitch, then A.3 (work the 2nd new stitch as the first in A.3) over A.1/ and at the end of the row work A.2 as before finish with the first of the new sts as the last st in A.3 + 1 edge st in garter stitch (remaining sts will be worked as before. Happy knitting!
22.01.2024 - 10:34
![]() Heather Nicholls wrote:
Heather Nicholls wrote:
When displacing the pattern either side of the back, how do I work the extra stitches into the 9 stitch diagram, A3? I work the garter stitch edge stitch and have more than 9 stitches to work. Should I repeat the first few stitches of the A3 diagram? Thank you in advance. I’m confused! Heather Nicholls
08.01.2024 - 00:35DROPS Design answered:
Dear Heather, you don't have any extra stitches, just "displace" or "move" pattern A.3. A.3 will always have 9 stitches; you decrease 1 stitch and increase 1 stitch to move the pattern but they aren't worked in the pattern. Happy knitting!
08.01.2024 - 00:45
![]() Denise Rudnicki wrote:
Denise Rudnicki wrote:
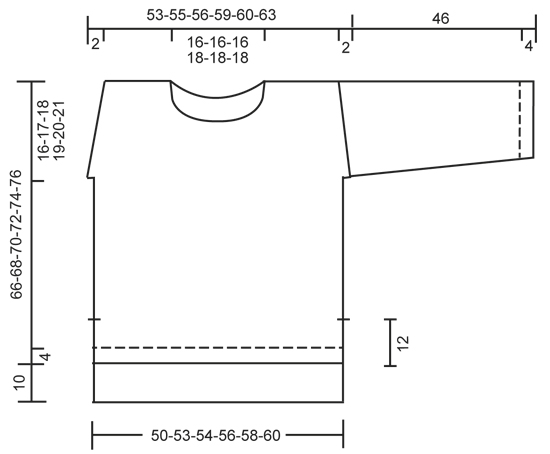
The schematic shows the shoulders sloping toward the neck, but there is no shoulder shaping in the pattern. Have I missed something?
10.08.2022 - 14:13DROPS Design answered:
Dear Mrs Rudnicki, it looks like you are right, there are no decrease for the shoulders, the lines on the sides should be straight. Thanks for noticing. Happy knitting!
11.08.2022 - 10:08
![]() Cath Rault wrote:
Cath Rault wrote:
I’m with Madiloo! Could you possibly add other photos?? I think part of the problem with this is the back is completely different to the front? The “displacement” is a term i haven’t come across in a knitting pattern before, and I have spent ages trying to work out what you mean. I find the way you write the patterns infuriating, but I’m sure I’ll get the hang of it eventually. I. Love your designs, but the instructions drive me nuts!!!!
20.03.2022 - 19:53DROPS Design answered:
Dear Mrs Rault, we don't have this jumper anymore so we can unfortunately not add any further picture; but this video shows how to work diagrams A.2 and A.3 as well as how to work the displacement and should help you to understand how to do. Happy knitting!
21.03.2022 - 09:42
![]() Jeannine Karas wrote:
Jeannine Karas wrote:
What is the recommended ease for this pattern?
15.09.2021 - 06:41DROPS Design answered:
Dear Mrs Karas, measure a similar garment you have and like the shape and compare these measurements to those in the chart, that's the best way to find out the matching size. Read more here. Happy knitting!
15.09.2021 - 07:18
![]() Tania wrote:
Tania wrote:
Can you please clarify how many balls of yarn are required in total for this pattern XXL and XXXL sizes
02.07.2021 - 02:01DROPS Design answered:
Dear Tania, you will always find the total amount of yarn required in grams in the header, ie in XXL: 500 g and in XXXL: 550 g /50 g a ball DROPS Air = 10 balls in XXL/11 balls in XXXL. Happy knitting!
02.07.2021 - 07:48
![]() Ula wrote:
Ula wrote:
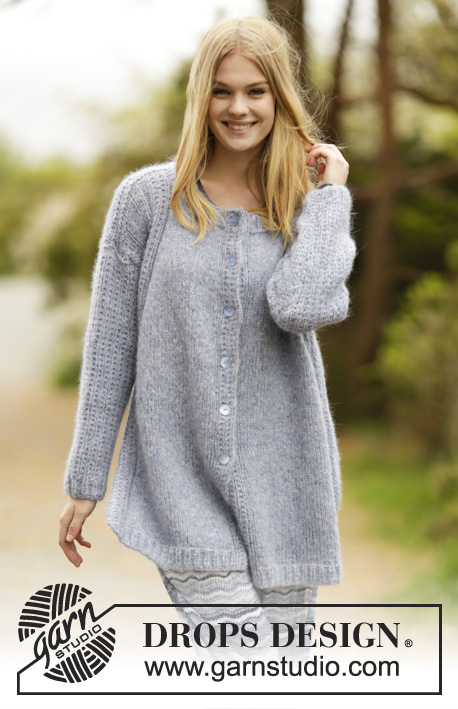
Hello, I would like to ask about how the photo of the jumper matches the pattern. By looking at the photo, I cannot really see the displacement of A3. Is that correct that the jumper in the photo does not include the displacement? Thank you for clarifying!
24.09.2020 - 19:23DROPS Design answered:
Dear Ula, both picture and pattern includes displacement - you start to displace A.3 after the vent, and repeat the displacement on every 4th row o*a total of 17 to 24 times depending on the size. Happy knitting!
25.09.2020 - 08:54
![]() Elise wrote:
Elise wrote:
Comment faire les augmentations avec le diagramme A-4 ? Merci
11.01.2020 - 14:50DROPS Design answered:
Bonjour Elise, les augmentations de A.4 doivent se tricoter de sorte que les côtes continuent, vous devez ainsi toujours avoir 1 maille point mousse (=1ère m de A.4), 1 maille jersey (=2ème maille de A.4). Vous allez donc tricoter les augmentations soit comme la 1ère soit comme la 2ème maille. Bon tricot!
13.01.2020 - 09:13
|
|||||||
Sigrid#sigridsweater |
|||||||
|
|
|||||||
Knitted DROPS jumper with false raglan, vent and textured pattern on shoulders and sleeves in ”Air”. Size: S - XXXL.
DROPS 166-18 |
|||||||
|
GARTER ST (back and forth): K all rows. 1 ridge = 2 rows K. PATTERN: See diagrams A.1 to A.4. The diagrams show all rows in pattern seen from RS. INCREASE TIP: Inc 1 st by making 1 YO. On next row work YOs twisted, i.e. work in the back loop of st instead of front to avoid holes. NOTE: Work the inc sts gradually in diagram A.4. DECREASE TIP: Dec 1 sts as follows: All dec are done from RS! Dec as follows after A.3: K 2 tog. Dec as follows before A.3: Work until 2 sts before A.3, slip 1 st as if to K, K 1, psso. ---------------------------------------------------------- JUMPER: Worked back and forth on circular needle and sewn tog when finished. Front piece is shorter than back piece. BACK PIECE: Cast on 95-98-101-107-113-116 sts on circular needle size 5 mm with Air. Work rib as follows: A.1 (= 8 sts), K 1, * P 2, K 1 *, repeat from *-* until 8 sts remain on row, A.2 (= 8 sts). Continue like this back and forth until piece measures 4 cm. On next row from RS switch to circular needle size 5.5 mm and work as follows: A.1, stocking st over the next 79-82-85-91-97-100 sts, AT THE SAME TIME dec 15-14-15-17-21-20 sts evenly, A.2 = 80-84-86-90-92-96 sts on needle in total. Continue in stocking st, work A.1 and A.2 in each side as before until piece measures 22 cm in all sizes. REMEMBER THE KNITTING TENSION At the end of the next 2 rows cast on 2 new sts (marks vent) = 84-88-90-94-96-100 sts. Now work A.3 (= 9 sts) over A.1 and A.2. i.e. inside 1 edge st in GARTER ST - see explanation above - in each side. When piece measures 26-24-24-23-23-23 cm, beg displacement of A.3 towards mid back. Work 1 edge st in garter st, inc 1 st - READ INCREASE TIP, A.3, dec 1 st - READ DECREASE TIP, stocking st until 2 sts remain before next A.3, dec 1 st, A.3, inc 1 st, 1 edge st in garter st. Repeat displacement of A.3 every 4th row 17-19-20-21-22-24 more times. NOTE: Inc is always inside 1 edge st in garter st in each side. AT THE SAME TIME when piece measures 60-61-62-63-64-65 cm, cast on 1 new st at the end of the next 2 rows for armholes = 86-90-92-96-98-102 sts. Continue pattern as before inside 1 edge st in garter st and 1 st in stocking st in each side. When piece measures 74-76-78-80-82-84 cm, cast off the middle 24-24-24-26-26-26 sts for neck and finish each shoulder separately. On next row from the neck, cast off 1 st = 30-32-33-34-35-37 sts remain on each shoulder. When piece measures 76-78-80-82-84-86 cm, work 1 ridge over all sts. Cast off. Work the other shoulder the same way. FRONT PIECE: Cast on and work as back piece. When piece measures 12 cm, work as follows: At the end of the next 2 rows cast on 2 new sts (marks vent) = 84-88-90-94-96-100 sts. Now work A.3 (= 9 sts) over A.1 and A.2. and work 1 edge st in garter st - see explanation above - in each side. When piece measures 16-14-14-13-13-13 cm, beg displacement of A.3 towards mid front as on back piece. AT THE SAME TIME when piece measures 50-51-52-53-54-55 cm, cast on 1 new st at the end of the next 2 rows for armholes = 86-90-92-96-98-102 sts. Continue pattern inside 1 edge st in garter st and 1 st in stocking st in each side. When piece measures 54-56-58-59-61-63 cm, slip the middle 14-14-14-16-16-16 sts on a stitch holder and finish each shoulder separately. Then cast off sts on every row from neck as follows: 3 sts 1 time, 2 sts 1 time and 1 st 1 time = 30-32-33-34-35-37 sts remain for shoulder. Work edge st towards neck in garter st. When piece measures 66-68-70-72-74-76 cm, work 1 ridge over all sts. Cast off. Work the other shoulder the same way. SLEEVE: Worked back and forth on circular needle. Cast on 39-41-43-43-43-45 sts on circular needle size 5 mm with Air. Work rib as follows: 1 edge st in garter st, K 1, * P 1, K 1 *, repeat from *-* until 1 st remains, 1 edge st in garter st. When rib measures 4 cm, switch to circular needle size 5.5 mm and continue pattern as follows: 1 edge st in garter st, work last st in A.4, repeat A.4 until 1 st remains, 1 edge st in garter st. When piece measures 10 cm, inc 1 st inside 1 edge st in garter st in each side. Work the inc sts in the pattern A.4. Repeat inc every 5½-4½-4½-3½-3-3 cm 6-7-7-9-11-11 more times = 53-57-59-63-67-69 sts. When sleeve measures 46 cm in all sizes, work a sleeve cap with short rows as follows from RS: Work until 8-9-9-10-11-12 sts remain, turn and work until 8-9-9-10-11-12 sts remain, turn and work until 17-19-19-21-22-23 sts remain, turn and work until 17-19-19-21-22-23 sts remain. Turn and work all sts on needle, turn and work over all sts. Cast off with K from RS. Knit another sleeve. ASSEMBLY: Sew the shoulder seams tog. Sew sleeves to body inside 1 edge st in garter st. Sew underarm seams and side seams in one inside 1 edge st in garter st but leave 12 cm for vent at the bottom of body (i.e. 22 cm on back piece and 12 cm on front piece). NECK EDGE: Beg from mid back and pick up approx. 120-130 sts (incl sts on stitch holder) on circular needle size 5 mm. K 1 round while adjusting the no of sts to 75-75-75-84-84-84. Then work rib (= K 1/P 2) for 3 cm. Cast off with K over K and P over P. |
|||||||
Diagram explanations |
|||||||
|
|||||||
 |
|||||||
 |
|||||||
Have you finished this pattern?Tag your pictures with #dropspattern #sigridsweater or submit them to the #dropsfan gallery. Do you need help with this pattern?You'll find 31 tutorial videos, a Comments/Questions area and more by visiting the pattern on garnstudio.com. © 1982-2026 DROPS Design A/S. We reserve all rights. This document, including all its sub-sections, has copyrights. Read more about what you can do with our patterns at the bottom of each pattern on our site. |
|||||||


With over 40 years in knitting and crochet design, DROPS Design offers one of the most extensive collections of free patterns on the internet - translated to 17 languages. As of today we count 324 catalogues and 12290 patterns translated into English (UK/cm). 12290
We work hard to bring you the best knitting and crochet have to offer, inspiration and advice as well as great quality yarns at incredible prices! Would you like to use our patterns for other than personal use? You can read what you are allowed to do in the Copyright text at the bottom of all our patterns. Happy crafting!
Post a comment to pattern DROPS 166-18
We would love to hear what you have to say about this pattern!
If you want to leave a question, please make sure you select the correct category in the form below, to speed up the answering process. Required fields are marked *.