
Popular categories
Looking for a yarn?


Comments / Questions (21)
![]() Nanette Stulp wrote:
Nanette Stulp wrote:
In het patroon 158-38 staat voor het lijf: haak 1 stokje in elk van de 1-4-3-0-3-4 losse??? Is dit 1 stokje - 4 losse- 3 stokjes etcetera? Hoe moet ik dit lezen ?
23.10.2024 - 11:51DROPS Design answered:
Dag Nanette,
De reeks getallen corresponderen met de maten, dus als je de eerste maat haakt, dan haak je 1 stokje in elk van de 1 losse, als je de tweede maat haakt, dan haak je 1 stokje in elk van de 4 lossen, enzovoort.
30.10.2024 - 19:39
![]() Anneke wrote:
Anneke wrote:
Hallo, Dank u wel voor jullie geduldige uitleg! Ik zie nu (eindelijk) hoe ik het werk in elkaar moet naaien. Geweldig, die ondersteuning na verkoop. Merci!
14.01.2024 - 18:20
![]() Anneke wrote:
Anneke wrote:
Hallo, Excuses, maar ik begrijp echt niet wat hiermee bedoeld wordt: "De bovenkant van de laatste toer van het rechter voorpand wordt tegen de bovenkant van de laatste toer van het rechter voorpand genaaid. Deze naad komt midden achter en dan wordt de kraag tegen de halslijn op het achterpand genaaid." Ik heb allerlei geprobeerd, maar ik zie het echt niet. Kan u het eventueel in andere bewoordingen uitleggen. Vriendelijke groet.
12.01.2024 - 02:07DROPS Design answered:
Dag Anneke,
Aan de voorpanden heb je op een gegeven moment niet meer over de schoudersteken gehaakt, maar alleen over de steken aan de kant van midden voor. De laatste toer hiervan komt tegen de laatste toer van het andere voorpand. Dus de kopse kant wordt tegen de kopse kant van het andere voorpand genaaid. Daarna wordt de halslijn tegen het achterpand genaaid, waarbij de naad van de kopse kanten tegen midden achter komt.
14.01.2024 - 13:19
![]() Anneke wrote:
Anneke wrote:
Hallo, Betreffende mijn vraag over model nr ne-152 en uw antwoord, Comment 18: ik heb geen twee flapjes op het rugpand. Volgens het patroon dat ik volgde zitten die flapjes aan de voorkant, meer bepaald 1 aan het linker- en 1 aan het rechtervoorpand. Als ik een foto kon toevoegen zou het misschien duidelijker zijn. Of kan u mij zo helpen om dit op te lossen? Fijn nieuwjaar! Anneke
31.12.2023 - 15:59DROPS Design answered:
Dag Anneke,
Bij het voorpand heb je op een gegeven moment niet meer over de buitenste 20 tot 24 st (afhankelijk van je maat) gehaakt, maar alleen over de steken midden voor, voor de kraag. Dat laatste stukje bedoel ik het 'flapje' mee. De bovenkant van de laatste toer van het rechter voorpand wordt tegen de bovenkant van de laatste toer van het rechter voorpand genaaid. Deze naad komt midden achter en dan wordt de kraag tegen de halslijn op het achterpand genaaid.
01.01.2024 - 13:10
![]() Anneke Nelissen wrote:
Anneke Nelissen wrote:
Hallo, ik heb model nr ne-152 gehaakt. Bij de afwerking begrijp ik niet wat bedoeld wordt met:"naai de kraag samen middenachter, met de zijkanten tegen elkaar en naai dan de kraag langs de hals op het achterpand. Is hier ergens een instructievideo van te vinden? Vriendelijke groet, Anneke
28.12.2023 - 03:24DROPS Design answered:
Dag Anneke,
Als het goed is heb je 2 'flapjes' aan de achterkant voor de kraag. Deze naai je met de korte kanten tegen elkaar, zodat je een naad hebt, precies midden achter in de hals. Daarna naai je de kraag langs de halslijn, dus tegen het pand.
30.12.2023 - 18:00
![]() Lorena wrote:
Lorena wrote:
Me podrian explicar a que se refiere donde dice: después hacer 1 p.a. en cada una de las 1-4-3-0-3-4 cad sig, ¿1-4-3-0-3-4?
26.08.2020 - 00:12DROPS Design answered:
Hola Lorena. Los patrones de DROPS están preparados para varias tallas. Cuando hay en las explicaciones varios números se trabaja como sigue: el primer número es para la talla más pequeña, el siguiente número para la siguiente talla, etc. Cuando solo hay número, eso significa que es igual para todas las tallas.
30.08.2020 - 20:08
![]() Anna Hayward wrote:
Anna Hayward wrote:
I love Drops Designs, but I cannot seem to make sense of your sizing. I recently made this cardigan for my mother, who is a UK size 20. I made it XL but its a little too small. It seems from the measurements that the largest size for this cardigan correlates to a UK size 16 (which isn\'t that large). Should I use a larger hook?
17.09.2018 - 18:41DROPS Design answered:
Dear Anna, the sizing always depends on the style of the piece, the used yarn, etc. Please always refer to the given measurements for each size and see the drawing at the bottom of the page as well. Always make a trial swatch and adjust your needle accordingly. If the piece you made is too small, you should use a biffer hook / needle. Happy Crafting.
18.09.2018 - 04:42
![]() Helen Kaiser wrote:
Helen Kaiser wrote:
Do you happen to have a picture of the collar? I am having problems trying to figure out how to attach. I LOVE these patterns I have another in progress and a few more I am going to make :)
01.01.2018 - 18:33DROPS Design answered:
Dear Mrs Kaiser, there is no picture from the collar, just work as explained, ie short rows to give the collar the correct shape (it will be longer towards mid front and shorter towards shoulder). Happy crocheting!
02.01.2018 - 11:31
![]() Nathalie Marchand wrote:
Nathalie Marchand wrote:
Bonjour, je suis rendue à assembler mon cardigan, mais en lisant les indiquations je vois qu'on m'indique d' assembler le col, mais je n'ai pas les indiquations pour le faire??? pouvez-vous m'aider? Merci à l'avance et merci pour vos patrons superbes
28.11.2016 - 23:02DROPS Design answered:
Bonjour Mme Marchand, cousez le dernier rang des 2 parties du col (devant droit et devant gauche) entre elles puis cousez le col le long de l'encolure dos (la couture des 2 moitiés de col doit arriver approx. au milieu de l'encolure dos). Bon assemblage!
29.11.2016 - 09:15
![]() Andrea Stein wrote:
Andrea Stein wrote:
Finde diese Broomstick Lace Muster wunderschön. Gibt es noch mehr Modelle ausser 158-38, bzw. 158-39, damit?
03.09.2016 - 12:31
|
|
Lavender Touch Cardigan#lavendertouchcardigan |
|
|
|
|
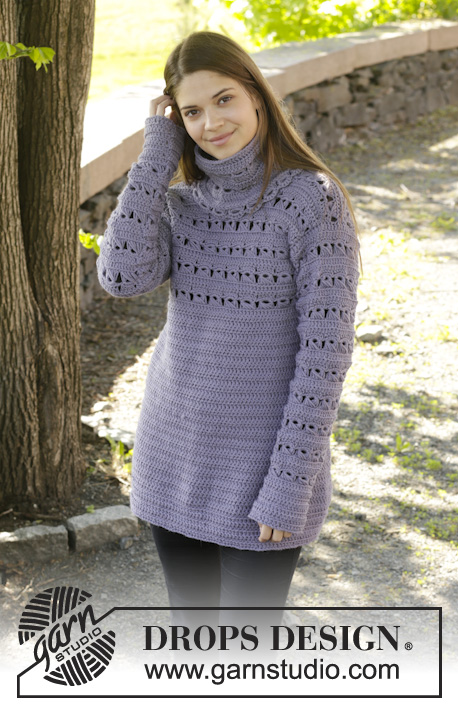
Crochet DROPS jacket with broomstick lace in ”Nepal”. Size: S - XXXL.
DROPS 158-38 |
|
|
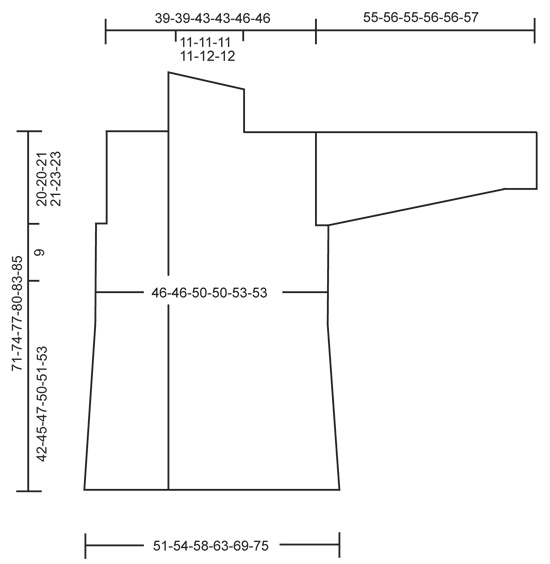
CROCHET INFO: Replace first tr on every row with 3 ch. DECREASE TIP: Dec 1 tr by working 2 tr tog as follows: Work 1 tr in first st but wait with last pull through, work 1 tr in next st but on last pull through, pull yarn through all 3 loops on hook. INCREASE TIP: Inc by working 2 tr in 1 tr. PATTERN 1: Work 1 tr in back loop of every tr on every row from RS and front loop of every tr on every row from WS. BROOMSTICK LACE: ROW 1 (= WS): Slip the first ch on needle size 20 mm, * pick up 1 st on hook size 5 mm through front loop of next st and slip st loosely on to needle size 20 mm *, repeat from *-* the entire row. Use 2 needles size 20 mm if needed. All sts on row are now loosely on needle size 20 mm. ROW 2 (= RS): * Insert hook through the first 5 sts on needle, work 1 sl st (this binds the 5 sts tog), slip sts off the needle and work 1 ch, 5 dc through the 5 sts, work 1 ch *, repeat from *-* until 5 sts remain on needle, insert hook through the 5 sts on the needle, work 1 sl st (this binds the 5 sts tog), work 1 ch, slip sts off the needle and work 5 dc through the 5 sts. ROW 3 (= WS): 3 ch – see CROCHET INFO above, 1 tr in front loop of every dc on previous row (i.e. do not work in ch and sl sts on previous row). ROW 4 (= RS): 1 tr in back loop of every tr on previous row. Repeat rows 1-4. ---------------------------------------------------------- BODY: Worked back and forth from mid front. Work 203-212-235-250-277-296 ch (incl 3 ch to turn with) on hook size 5 mm with Nepal. Work next row as follows: 1 tr in 4th ch from hook, then work 1 tr in each of the next 1-4-3-0-3-4 ch, * skip 1 ch, 1 tr in each of the next 5 ch *, repeat from *-* the entire row = 167-175-194-206-229-245 tr (first 3 ch = 1 tr). READ CROCHET INFO! Insert 1 marker after 48-50-56-59-66-70 tr in from each side (= 71-75-82-88-97-105 tr between markers on back piece). Then work PATTERN 1 - see explanation above. When 6 rows have been worked, work pattern 1 over the outermost 10 sts in each side of piece and tr through both loops of st over the remaining sts. REMEMBER THE CROCHET TENSION! Work the outermost 10 sts in each side of piece in pattern 1 until finished measurements. When piece measures approx. 13 cm, dec 1 tr on each side of both markers (= 4 sts dec) - READ DECREASE TIP! Repeat dec every 13-7-6-4-3½-2½cm 2-4-5-8-10-14 more times. After all dec 155-155-170-170-185-185 tr remain on row, i.e. there are now 45-45-50-50-55-55 tr on each front piece and 65-65-70-70-75-75 tr on back piece. Work tr until piece measures approx. 42-45-47-50-51-53 cm, adjust so that next row is from WS. Then work BROOMSTICK LACE – see explanation above, over all sts. When piece measures 51-54-56-59-60-62 cm, adjust so that next row is 4th row (= RS) in broomstick lace, finish each front piece and back piece separately. RIGHT FRONT PIECE: Work broomstick lace as before until 5 tr remain before marker = 40-40-45-45-50-50 tr (5 tr = armhole). Continue with broomstick lace as before over these sts. Work until piece measures 71-74-77-80-83-85 cm, adjust to finish with 3rd or 4th row in broomstick lace. The outermost 20-20-22-22-24-24 sts towards armhole = shoulder, these are no longer worked. Then work pattern 1 over the 20-20-23-23-26-26 sts towards mid front (= collar). Work 4 or 5 rows, adjust so that next row is from RS. Then work short rows from mid front as follows: 1 tr in each of the first 12-12-15-15-18-18 tr, * 1 htr in next tr, 1 dc in next tr and 1 sl st in next tr, turn piece with 1 ch. Skip sl st and work 1 sl st in dc, 1 dc in htr, 1 htr in first tr and tr the rest of row *. Turn and work 1 tr in each of the first 8-8-11-11-14-14 tr, then repeat on same row from *-* 1 more time. Fasten off. LEFT FRONT PIECE: Work as right front piece but reversed. Beg short rows from WS. BACK PIECE: Work broomstick lace as before over the middle 55-55-60-60-65-65 tr (5 tr in each side = armholes). When piece measures 69-72-75-78-81-83 cm, adjust so that next row is 3rd or 4th row in broomstick lace, work 1 row with tr over the outermost 20-20-22-22-24-24 tr in each side (the middle 15-15-16-16-17-17 tr = neck). Fasten off. SLEEVE: Worked back and forth and sewn tog afterwards. Work 44-44-44-50-50-50 ch (incl 3 ch to turn with) on hook size 5 mm with Nepal. Turn and work 1 tr in 4th ch from hook. Continue with 1 tr in each of the next 4 ch, * skip 1 ch, 1 tr in each of the next 5 ch *, repeat from *-* the entire row = 35-35-35-40-40-40 tr. Then work pattern 1. When 6 rows have been worked like this (piece measures approx. 8 cm) and last row is from RS, work broomstick lace until finished measurements. When piece measures 10 cm, adjust so that next row is 3rd row in broomstick lace, inc 2 tr evenly on 3rd row in broomstick lace – read INCREASE TIP above. Then inc 3 tr evenly on next row = 40-40-40-45-45-45 tr. * Work 1 repetition of broomstick lace vertically. Work 1st-2nd row of broomstick lace, then inc 2 tr evenly on 3rd row in broomstick lace. Then inc 3 tr evenly on next row = 5 tr inc *, repeat from *-* 2-2-3-2-3-3 more times vertically = 55-55-60-60-65-65 tr. Work broomstick lace until piece measures 55-56-55-56-56-57 cm vertically, adjust to finish with 3rd or 4th row. Fasten off. Work another sleeve the same way. POCKET: Work 32 ch (incl 3 ch to turn with) on hook size 5 mm with Nepal. Work next row as follows: 1 tr in 4th ch from hook, then work 1 tr in each of the next 4 ch, * skip 1 ch, 1 tr in each of the next 5 ch *, repeat from *-* the entire row = 25 tr (first 3 ch = 1 tr). Then work pattern 1 until piece measures 12 cm, adjust so that last row is from RS. Work 1st and 2nd row in broomstick lace (= 5 repetitions). Fasten off. Work another pocket the same way. ASSEMBLY: Sew the shoulder seams. Sew collar tog mid back, edge to edge and then sew collar to neck line on back piece. Sew tog sleeves edge to edge. NOTE: Only sew in tr rows on sleeve. Sew sleeves in body. NOTE: Only sew sleeves to tr rows on body. Sew the pockets on to front piece. Sew on buttons evenly down on left band – top button should be 1 cm down from broomstick lace. Button through tr on right band. |
|
 |
|
Have you finished this pattern?Tag your pictures with #dropspattern #lavendertouchcardigan or submit them to the #dropsfan gallery. Do you need help with this pattern?You'll find 9 tutorial videos, a Comments/Questions area and more by visiting the pattern on garnstudio.com. © 1982-2026 DROPS Design A/S. We reserve all rights. This document, including all its sub-sections, has copyrights. Read more about what you can do with our patterns at the bottom of each pattern on our site. |


With over 40 years in knitting and crochet design, DROPS Design offers one of the most extensive collections of free patterns on the internet - translated to 17 languages. As of today we count 324 catalogues and 12290 patterns translated into English (UK/cm). 12290
We work hard to bring you the best knitting and crochet have to offer, inspiration and advice as well as great quality yarns at incredible prices! Would you like to use our patterns for other than personal use? You can read what you are allowed to do in the Copyright text at the bottom of all our patterns. Happy crafting!
Post a comment to pattern DROPS 158-38
We would love to hear what you have to say about this pattern!
If you want to leave a question, please make sure you select the correct category in the form below, to speed up the answering process. Required fields are marked *.