
Popular categories
Looking for a yarn?


Comments / Questions (37)
![]() Josianne wrote:
Josianne wrote:
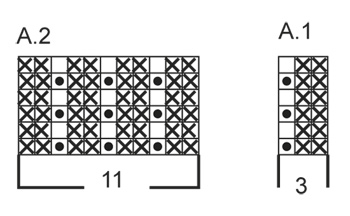
3. Markierer in dies Masche einbringen: wieviele maschen sind zw. 2. und 3. Markierer? beii Grösse L/XL? Vielen Dank im Voraus. Josianne
17.10.2018 - 12:47DROPS Design answered:
Liebe Josianne, es sind 5 M nach dem 2. Markierer (= in der Mitte A.2 = 5 Maschen bleiben in A.2) und vor dem 3. Markierer (= die letzte Masche A.1). Viel Spaß beim stricken!
17.10.2018 - 15:02
![]() Laura wrote:
Laura wrote:
Buonasera, avrei tre domande da fare: 1. cosa significa lavorare l'ultima maglia (di A2) in A1? 2. I diagrammi sono sempre sul diritto del lavoro, significa che devo considerare tutti i ferri come fossero sul diritto mentre lavoro in tondo? Mentre devo considerare anche la descrizione del rovescio quando lavoro avanti e indietro? 3. Cosa significa inserire il segnapunti nella maglia? Grazie
08.11.2017 - 21:22DROPS Design answered:
Buonasera Laura, ecco le risposte: 1. significa che deve lavorare l'ultima maglia del diagramma A.1. 2. I diagrammi mostrano il diritto del lavoro: quando lavora avanti e indietro segue le indicazioni per il rovescio del lavoro. 3. Il segnapunti in questo caso non va inserito tra due maglie ma nella maglia: può utilizzare quelli a lucchetto o a graffetta. Buon lavoro!
08.11.2017 - 21:47Hilde wrote:
Very lovely poncho! I made it (with a few changes to the pattern). Very happy with this warm garment. More photo's and comments on my (Dutch) blog.
15.01.2017 - 18:59
![]() Sonia wrote:
Sonia wrote:
The first incr round is a problem for me. I worked to 1st marker, YO, sm, then to 2nd marker. On my needles I have 2nd marker, [YO and slipped st] then 3rd marker. I do not understand instructions to 2nd & 3rd markers. What I did: YO, sm, knit tog YO & K st, as per rd 2 in diagram, sm, YO. I don't have sts between 2nd & 3rd markers to work "until 3rd marker" and I don't understand "work st with marker." Can you please clarify for me and also let me know when to slip markers (sm)?
29.10.2016 - 22:06DROPS Design answered:
Dear Sonia, when you inserted markers, the markers should be in the sts, not between the sts: 1st marker is in the last st in A.2, 2nd marker is in the mid st on shoulder, 3rd marker is in the last st in A.1 ... On 2nd marker, you have to inc on each side of the st with marker (= the mid st on shoulder), YO, work this st as in diagram, YO (= 2 sts inc at 2nd marker). Work then to 3rd marker, work st with marker, and make a YO. Happy knitting!
31.10.2016 - 10:30
![]() Tine wrote:
Tine wrote:
Hallo ihr Lieben, für den Kragen habe ich 96 M auf der Nadel, dann komme ich aber mit dem Muster nicht hin: 6xA1(18 M)+A2(11 M)+A1(3 M)+12xA1(36 M)+A2(11M)+A1(3 M)+6xA1(18 M) = 100 M ??? Wo ist mein Fehler? Danke!
18.10.2016 - 16:52DROPS Design answered:
Liebe Tine, die 96 M. sollen Sie so stricken: 6x A.1 (= 18 M), A.2 (= 11 M), die letzte M von A.1 stricken, 12xA.1 (=36 M), A.2, die letzte M von A.1 stricken und 6x A.1, d.h.: 18+11+1+36+11+1+18 = 96 M.
19.10.2016 - 09:04
![]() Phulpin wrote:
Phulpin wrote:
Bonjour la question est sur les augmentations: fait on en meme temps les augmentations avant 1 et 4 et après 3 et 6 avec les suivantes 2 et 5 ème marqueurs.? merci
02.09.2016 - 20:05DROPS Design answered:
Bonjour Mme Phulpin, on augmente avant le 1er et le 4ème marqueur + après le 3ème et le 6ème marqueur 12-18-21 x tous les 2 tours et 11 x tous les 4 tours et on augmente de chaque côté du 2ème et du 5ème marqueur 16 x tous les 2 tours. On va donc augmenter en même temps à chaque marqueur au début (= 12 x en taille S/M et 16 x pour les autres tailles), puis les augmentations ne se feront plus à la même fréquence: tous les 2 rangs ou tous les 4 rangs. Bon tricot!
05.09.2016 - 08:37Mishka Meunier wrote:
Bonjour! Je ne comprends pas comment tricoter les augmentations. J'en suis à tricoter les premières augmentations. Merci
02.12.2014 - 15:46DROPS Design answered:
Bonjour Mme Meunier, les augmentations se tricotent en point fantaisie - à la 1ère augm, on tricote l'augm comme la dernière m de A.1 (= 1 m torse à l'end), les 2 augm suivantes seront tricotées torse à l'env (torse = dans le brin arrière pour éviter un trou). Bon tricot!
02.12.2014 - 16:55
![]() BIDET wrote:
BIDET wrote:
Le diagramme A1 lu de droite à gauche puisque travail en rond, comporte t il deux mailles tricotées en point endroit et un jeté et une maille glissée ou bien une maille tricotée au point endroit et un jeté et une maille glissée ? la video drops qui explique les fausses côtes anglaises circulaires parle d'une maille tricotée un jeté et une maille glissée au premier tour -
29.10.2014 - 21:10DROPS Design answered:
Bonjour Mme Bidet, quand on tricote A.1 en rond, on a au tour 1: 2 m env, 1 jeté, glisser 1 m à l'env, et au tour 2, 2 m end, tricotez ens à l'end le jeté et la m glissée. Les "x" dans le diagramme sont des m tricotées à l'env tous les tours (en rond) et en jersey env quand on tricote en rangs. Bon tricot!
30.10.2014 - 10:02
![]() BIDET wrote:
BIDET wrote:
Comment comprendre le diagramme et l'explication du point fantaisie - travail circulaire donc pas de travail à l'envers - merci
27.10.2014 - 20:40DROPS Design answered:
Bonjour Mme Bidet, quand on tricote en rond, on lit le diagramme tous les rangs de droite à gauche, on tricote toujours les mailles telles qu'elles doivent se présenter sur l'endroit - alors qu'en allers-retours, on lit le diagramme de droite à gauche sur l'endroit et de gauche à droite sur l'envers. Bon tricot!
28.10.2014 - 08:52
![]() Natiel wrote:
Natiel wrote:
ça donne vraiment envie de le tricoter et surtout de le porter !
10.07.2014 - 15:53
|
||||||||||
Shelter#shelterponcho |
||||||||||
|
|
||||||||||
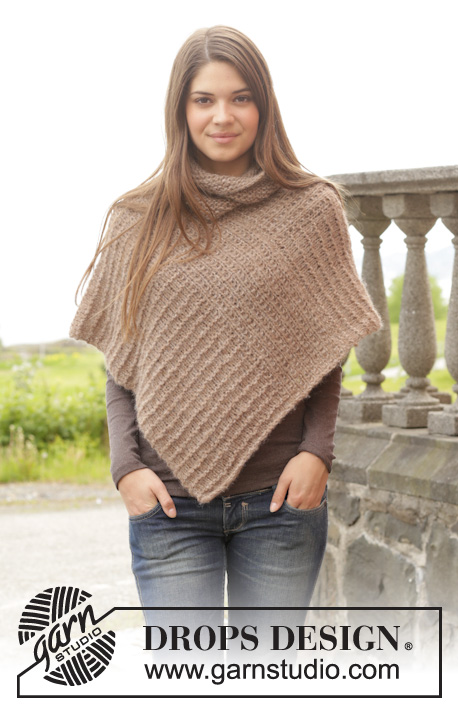
Knitted DROPS poncho in false English rib, worked top down in ”Big Merino”. Size S-XXXL.
DROPS 156-31 |
||||||||||
|
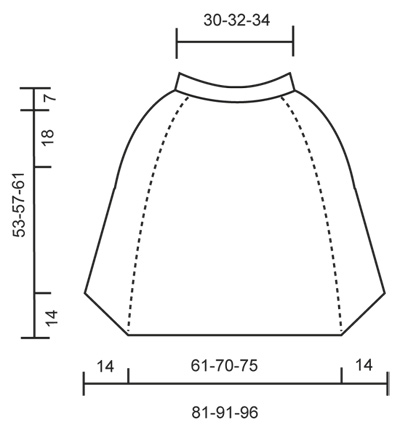
GARTER ST (back and forth on needle): K all rows. 1 ridge = 2 rows K. PATTERN: See diagrams A.1 and A.2. Diagrams show all rows seen from RS. INCREASE TIP: Inc 1 st by making 1 YO, on next round work YO twisted (i.e. work in back loop of st instead front) to avoid holes. NOTE! Work the inc sts in pattern A.1/A.2. On first inc work the new sts as last st in pattern A.1 (i.e. on next round after round with inc, K YOs twisted. After the next 2 rounds with inc, P YOs twisted). DECREASE TIP: Dec inside 1 edge st in garter st. Dec before 1 edge st as follows: K 2 tog. Dec after 1 edge st as follows: Slip 1 st as if to K, K 1, psso. ---------------------------------------------------------- PONCHO: Work top down on circular needle. First work a neck edge back and forth, then work poncho in the round on circular needle, then continue back and forth on front and back piece. Cast on 96-102-108 sts on circular needle size 5.5 mm with Big Merino. Work in GARTER ST back and forth - see explanation above - for 7 cm. Then work in the round. NOW MEASURE THE PIECE FROM HERE. Work 1 round in stocking st. On next round work as follows from the back: A.1 (= 3 sts) 6-7-7 times in width, insert 1st marker in last st, A.2 (= 11 sts), insert 2nd marker in the middle st (= middle of shoulder), work last st in A.1, insert 3rd marker in this st, A.1 12-13-14 times in width, insert 4th marker in last st, A.2, insert 5th marker in the middle st (= middle of shoulder), work last st in A.1, insert 6th marker in this st, A.1 6-6-7 times in width. Continue like this, AT THE SAME TIME on next round beg inc: Work until 1st marker, 1 YO, work until 2nd marker, 1 YO on each side of this st, work until 3rd marker, work st with marker, 1 YO, work until 4th marker, 1 YO, work until 5th marker, 1 YO on each side of this st, work until 6th marker and work this st, 1 YO, work the rest of round = 104-110-116 sts. Work the inc sts in pattern A.1/A.2 - READ INCREASE TIP. REMEMBER THE KNITTING TENSION! Inc as follows before 1st and 4th marker and after 3rd and 6th marker (= 4 inc): Repeat inc every other round 12-18-21 more times, and every 4th round 11 times in all sizes. Inc on each side of 2nd and 5th marker as follows (= 4 inc): Repeat inc every other round 16 more times. When inc are done, there are 260-290-306 sts on round. When piece measures 39-43-47 cm, work as follows from beg of round: Work the first 62-71-74 sts (= back piece), cast off the next 5 sts, work the next 125-140-148 sts (= front piece), cast off the next 5 sts, work the remaining 63-69-74 sts (= back piece). Then finish front and back piece back and forth separately. FRONT PIECE: There are now 125-140-148 sts for front piece. Continue back and forth with pattern over front piece as before, AT THE SAME TIME work 1 edge st in garter st in each side. On next row from RS beg dec in each side of piece - READ DECREASE TIP. Repeat dec on every row from RS 13 more times = 97-112-120 sts. Piece measures 53-57-61 cm - adjust so that next row is 2nd, 4th or 6th row in diagram. Cast off sts with K over K and P over P. NOTE! Cast off YOs with P. Cut and fasten the yarn. BACK PIECE: Work as front piece. ASSEMBLY: Sew tog edge in garter st in the back of neck. Sew neatly tog st by st to get a nice seam. Cut the yarn and fasten. |
||||||||||
Diagram explanations |
||||||||||
|
||||||||||
 |
||||||||||
 |
||||||||||
Have you finished this pattern?Tag your pictures with #dropspattern #shelterponcho or submit them to the #dropsfan gallery. Do you need help with this pattern?You'll find 19 tutorial videos, a Comments/Questions area and more by visiting the pattern on garnstudio.com. © 1982-2026 DROPS Design A/S. We reserve all rights. This document, including all its sub-sections, has copyrights. Read more about what you can do with our patterns at the bottom of each pattern on our site. |
||||||||||


With over 40 years in knitting and crochet design, DROPS Design offers one of the most extensive collections of free patterns on the internet - translated to 17 languages. As of today we count 324 catalogues and 12245 patterns translated into English (UK/cm). 12245
We work hard to bring you the best knitting and crochet have to offer, inspiration and advice as well as great quality yarns at incredible prices! Would you like to use our patterns for other than personal use? You can read what you are allowed to do in the Copyright text at the bottom of all our patterns. Happy crafting!
Post a comment to pattern DROPS 156-31
We would love to hear what you have to say about this pattern!
If you want to leave a question, please make sure you select the correct category in the form below, to speed up the answering process. Required fields are marked *.