
Popular categories
Looking for a yarn?


Comments / Questions (91)
![]() Knitting Well Done wrote:
Knitting Well Done wrote:
Hello , I don't understand how to centered the diagram even if I follow the lesson... do you have a video that show exactly what to do to center it and make the sleeve? Thank you 👱🏻♀️
13.03.2022 - 11:29
![]() Vale wrote:
Vale wrote:
I'm so sorry to have to ask again but I don't understand: how can I decrease every 2,5 cm if there's a pattern? With 2 tog decrease, it will be deformed the pattern motif... I'm so confused .. I'm referring to this "When A.2 has been worked, continue with A.3. NOTE: Adjust pattern so that the middle st in diagram (see arrow) is one of the 2 middle sts on sleeve, AT THE SAME TIME beg dec under sleeve - remember DECREASE TIP" The decrease tip mean to knit just 2 stitches together?
20.02.2022 - 00:33DROPS Design answered:
Dear Vale, if your tension is right in height, you should decrease approx. on every 7th round in size M = ca on every 2,5 cm; decrease as explained under DECREASE TIP , ie work until 3 sts remain before marker and decrease as shown in this video - the pattern will not match anymore at the transitions between rounds, that's just okay. Happy knitting!
21.02.2022 - 09:58
![]() Vale wrote:
Vale wrote:
I'm sorry to ask but: I don't understand how to decrease every 2,5 cm, if I have a pattern? If I decrease, the pattern will be deformed... also, what decrease I should do? (2 tog?) how? This is the pattern I'm referring: "When A.2 has been worked, continue with A.3. NOTE: Adjust pattern so that the middle st in diagram (see arrow) is one of the 2 middle sts on sleeve, AT THE SAME TIME beg dec under sleeve - remember DECREASE TIP" Thank you...seems difficult without a chart.
20.02.2022 - 00:29
![]() Vale wrote:
Vale wrote:
Sorry, I have problems again in the instructions " When A.2 has been worked, continue with A.3. NOTE: Adjust pattern so that the middle st in diagram (see arrow) is one of the 2 middle sts on sleeve, AT THE SAME TIME beg dec under sleeve - remember DECREASE TIP. Repeat dec every 3-2½-2½-2½-2½-2½ cm / 1 1/8"-7/8"-7/8"-7/8"-7/8"-7/8" 9-12-12" etc . I don't also understand how to adjust "pattern so that the middle st in diagram is one of the 2 middle". what mean? Please..help...
19.02.2022 - 15:30DROPS Design answered:
Dear Vale, this lesson will explain you how to center a diagram. Happy knitting!
21.02.2022 - 09:17
![]() Pattern wrote:
Pattern wrote:
Sorry again but I don't understand the previously answer, in your comment says "you should increase a total of 60 sts in size L and get so 228", but I don't know what increase of 60 stitches is it exactly? Thank you again....
01.02.2022 - 17:29DROPS Design answered:
Oops sorry, I mistyped, I meant you have 204 sts on the needle in size L - you now increase 24 sts evenly (this lesson explains how to increase evenly on a round), there are now 228 sts and you will repeat K2, P2 all the round - US-pattern will be edited asap. Happy knitting!
02.02.2022 - 07:34
![]() Patterns Difficult wrote:
Patterns Difficult wrote:
Hello, this pattern have a mistake in the Body instructions. Yesterday I had to try and try. I have 230 stitches and it says to "Continue to work rib as follows: * K 2, P 2 *, repeat from *-* until 2 sts remain, K 2. When rib has been worked for 4 cm / 1½'', bind off with K over K and P over P." But with 230 stitches, it will end with 2Kand start with 2K so I will have 4 K between the others 2k p2 2k p2 etc. What happened? Why 230 stitches?It's not an Even number to do ribbing...Thanks..
01.02.2022 - 12:22DROPS Design answered:
Hi, it looks like there is a mistake in the US-English pattern, you should increase a total of 60 sts in size L and get so 228 sts and work K2 P2 over these 228 sts (= 57 times (K2,P2). thanks for noticing. Happy knitting!
01.02.2022 - 16:13
![]() Karine wrote:
Karine wrote:
Koon L suurust. Siis kui on vaja kududa varrukale mustrit A4 (5silmust) on silmuseid 48 3 simust jääb üle kuidas neid kududa?
03.01.2022 - 19:49DROPS Design answered:
Tere Karine! Koo nii palju silmuseid mustrisse, kui mahub, ülejäänud nii, kuidas ilusam jääb. Head kudumist!
07.01.2022 - 21:55
![]() Val wrote:
Val wrote:
Sorry , I have to ask again, is it sure that decrease is "work until 3 sts remain before the marker this: K2 tog, K1, slip marker, K1, slip 1 as if to K, K1, psso, and work until 3 sts remain before next marker on the other side of the jumper and repeat the decrease.”" I see that in the psso passage, Should not be simply : slip marker, K1, slip 1 as if to K , and psso? Why K1 is repeated 2 times? the video tutorial says this only (not 2 times k2) : K1, slip 1 psso
14.12.2021 - 18:16DROPS Design answered:
Dear Val, when working body you will decrease a total of 4 stitches on the round (= 2 sts decreased at each marker) / when working sleeve you will decrease that way only 2 sts (only 1 marker, mid under sleeve). Happy knitting!
15.12.2021 - 08:25
![]() Val wrote:
Val wrote:
Sorry >
14.12.2021 - 18:13
![]() Val wrote:
Val wrote:
Hello,I was able to adjust everything.I'm now again the beginning of the round, before start the dec tip. So, I hope this time I 've understood well: So I have to: knit the first 12 stitches, but before reach the first stitch marker of the round, 3 stitches before, I have to “work until 3 sts remain before the marker, K2 tog, K1, slip marker, K1, slip 1 as if to K, K1, psso, and work until 3 sts remain before next marker on the other side of the jumper and repeat. Right? Thank you again!
14.12.2021 - 17:43DROPS Design answered:
Dear Val, looks right, I'm just wondering about the first 12 stitches, rounds were worked on yoke from mid back, so that you continue from mid back towards the side, and then work until 3 sts remain before 1st marker on the side and decrease etc.. But if you could find the sides of the jumper, it looks then fine, as the decreases are worked on each side (below sleeves). Happy knitting!
15.12.2021 - 07:55
|
||||||||||
Silver Stag#silverstagsweater |
||||||||||
 |
 |
|||||||||
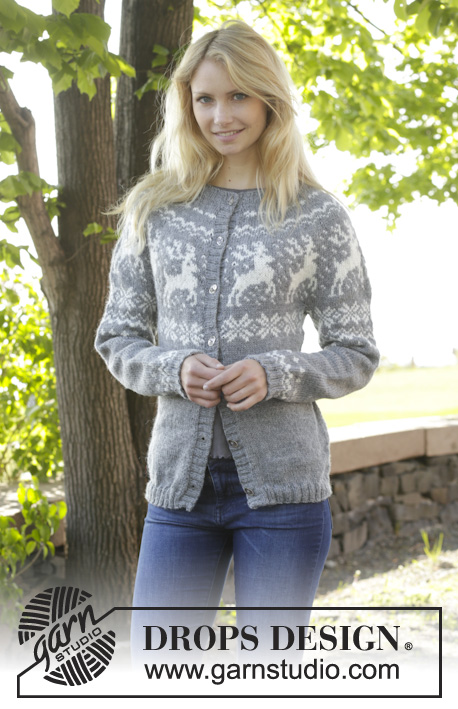
Knitted DROPS Christmas jumper with round yoke, reindeer pattern, worked top down in ”Karisma”. Size: S - XXXL.
DROPS 157-23 |
||||||||||
|
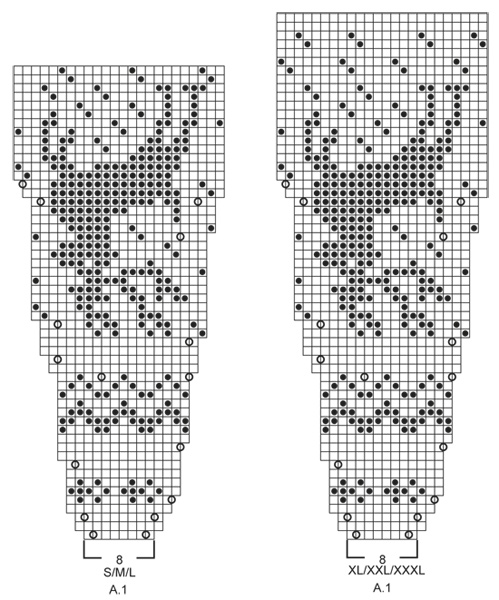
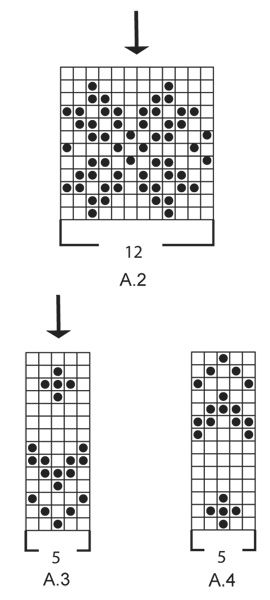
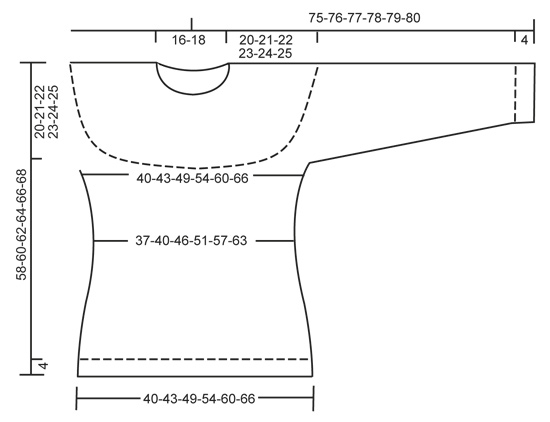
PATTERN: See diagrams A.1 to A.4. The diagrams show all rows in pattern seen from RS. Work entire pattern in stocking st. DECREASE TIP (applies to sides and sleeves): Dec before marker and 1 st K as follows: K 2 tog. Dec after marker and 1 st K as follows: Slip 1 st as if to K, K 1, psso. INCREASE TIP (applies to sides): Inc 4 sts in total on row. Work until 1 st remains before marker, 1 YO, 2 sts in stocking st, 1 YO = 2 sts inc. On next round K YO twisted (i.e. work in back loop of st instead of front) to avoid holes. ---------------------------------------------------------- JUMPER: Worked in the round on circular needle, top down. Work sleeves in the round on double pointed needles. YOKE: Cast on 88-92-96-100-104-108 sts on circular needle size 3 mm with medium grey. Work rib P 2/K 2 until piece measures 3 cm. Now switch to circular needle size 4 mm and work 1 round in stocking st, AT THE SAME TIME inc 0-4-8-20-24-28 sts evenly = 88-96-104-120-128-136 sts. Now work as follows: A.1 (= 8 sts) 11-12-13-15-16-17 times in width. REMEMBER THE KNITTING TENSION! When A.1 has been worked 1 time vertically, there are 264-288-312-360-384-408 sts on round. Continue with 3-5-9-5-7-11 rounds with medium grey. NOTE: In size S, L, XL, XXXL stop 24 sts (= 1 repetition) before last round is worked. This is now beg of the next rounds. Pattern is now correctly placed after sts are divided for sleeves and body. Work next round as follows: Work the first 37-40-46-52-58-64 sts (= half back piece), slip the next 58-64-64-76-76-76 sts on a stitch holder (= sleeve), cast on 10 new sts under sleeve, insert a marker in the middle of these 10 sts, work the next 74-80-92-104-116-128 sts (= front piece), slip the next 58-64-64-76-76-76 sts on a stitch holder (= sleeve), cast on 10 new sts under sleeve, insert a marker in the middle of these 10 sts, work the remaining 37-40-46-52-58-64 sts (= half back piece). BODY: There are now 168-180-204-228-252-276 sts for body. Now work A.2 (= 12 sts) over all sts on round. Continue like this until A.2 has been worked 1 time vertically. Now work piece in stocking st with medium grey. On next round dec 1 st on each side of each marker in the sides - SEE DECREASE TIP. Repeat dec every 2 cm 2 more times = 156-168-192-216-240-264 sts. When piece measures 12-13-14-15-16-17 cm from marker under sleeves, inc 1 st on each side of marker in each side of piece – see INCREASE TIP. Repeat inc every 2 cm 2 more times = 168-180-204-228-252-276 sts. When piece measures 56-58-60-62-64-66 cm, switch to circular needle size 3 mm and inc 20-24-24-28-28-32 sts evenly = 188-204-228-256-280-308 sts. Continue to work rib as follows: * K 2, P 2 *, repeat from *-*. When rib has been worked for 4 cm, cast off with K over K and P over P. SLEEVES: First work pattern, then continue sleeve in medium grey. Slip sts from stitch holder back on double pointed needles size 4 mm. There are now 58-64-64-76-76-76 sts for sleeve. Work 1 row in stocking st. Then cast on 10 sts under sleeve = 68-74-74-86-86-86 sts. Insert a marker in the middle of these new sts. Then work the sleeve in the round. Now work A.2. NOTE: Adjust so that the 2 middle sts in diagram (see arrow) are the 2 middle sts on sleeve. When A.2 has been worked, continue with A.3. NOTE: Adjust pattern so that the middle st in diagram (see arrow) is one of the 2 middle sts on sleeve, AT THE SAME TIME beg dec under sleeve - remember DECREASE TIP. Repeat dec every 3-2½-2½-2½-2½-2½ cm 9-12-12-12-12-12 more times = 48-48-48-60-60-60 sts. When sleeve measures 38 cm, work A.4. NOTE: Adjust so that the middle st in diagram (see arrow) is one of the 2 middle sts on sleeve. When A.4 has been worked vertically, switch to double pointed needles size 3 mm and inc 4-8-8-0-4-4 sts evenly = 52-56-56-60-64-64 sts. Then work rib (= K 2/P 2) for 3 cm. Cast off with K over K and P over P. |
||||||||||
Diagram explanations |
||||||||||
|
||||||||||
 |
||||||||||
 |
||||||||||
 |
||||||||||
Have you finished this pattern?Tag your pictures with #dropspattern #silverstagsweater or submit them to the #dropsfan gallery. Do you need help with this pattern?You'll find 25 tutorial videos, a Comments/Questions area and more by visiting the pattern on garnstudio.com. © 1982-2026 DROPS Design A/S. We reserve all rights. This document, including all its sub-sections, has copyrights. Read more about what you can do with our patterns at the bottom of each pattern on our site. |
||||||||||


With over 40 years in knitting and crochet design, DROPS Design offers one of the most extensive collections of free patterns on the internet - translated to 17 languages. As of today we count 324 catalogues and 12291 patterns translated into English (UK/cm). 12291
We work hard to bring you the best knitting and crochet have to offer, inspiration and advice as well as great quality yarns at incredible prices! Would you like to use our patterns for other than personal use? You can read what you are allowed to do in the Copyright text at the bottom of all our patterns. Happy crafting!
Post a comment to pattern DROPS 157-23
We would love to hear what you have to say about this pattern!
If you want to leave a question, please make sure you select the correct category in the form below, to speed up the answering process. Required fields are marked *.