
Popular categories
Looking for a yarn?


Comments / Questions (99)
![]() Carole wrote:
Carole wrote:
Je ne comprend pas comment faire les diminutions encolure sur l’envers ….12 mailles en attente….?? Est ce côté bordure? Dois je diminuer la bordure? Je suis complètement perdu! Merci
04.08.2025 - 21:35DROPS Design answered:
Bonjour Carole, les mailles de l'encolure à mettre en attente sont les 12 premières sur l'envers pour le devant gauche/les 12 dernières pour le devant droit; autrement dit, sur l'envers pour le devant gauche, tricotez ces 12 mailles et mettez les en attente, terminez le rang, tournez et tricotez le rang suivant sur l'endroit. Puis rabattez au début de chaque rang sur l'envers 2 x 2 m et 4 x 1 m. Pour le devant droit, vous ferez la même chose mais en commençant sur l'endroit. Bon tricot!
05.08.2025 - 08:43
![]() Carole wrote:
Carole wrote:
Bonjour…j’aimerais confirmer avant de poursuivre… total, tricoter A.1 (= 4 m), 2 m env et 8-13 m env, placer 1 marqueur (= côté), 8-13 m env, 2 m env, ** Les explications précédentes pour le marqueur: m env et 8-13 m end, placer 1 marqueur (= côté), 8-13 m end, 2 m env Les 8-13 sont différentes ? (Env. et end.) Merci
12.07.2025 - 02:05DROPS Design answered:
Bonjour Carole, merci de nous le faire savoir, c'est a corriger. La version correcte est: ...tricoter A.1 (= 4 m), 2 m env et 8-13 m end, placer 1 marqueur (= côté), 8-13 m end, 2 m env, **... Bon tricot!
14.07.2025 - 07:59
![]() Alina Gabriela wrote:
Alina Gabriela wrote:
What k8-13 means, please? How many stitches to knit?
07.07.2025 - 03:22DROPS Design answered:
Dear Alina, K = knit. So you knit 8 stitches for size S or 13 stitches for size M. If you are working another size you need to read its corresponding section. Happy knitting!
14.07.2025 - 00:17
![]() Barbara Amos wrote:
Barbara Amos wrote:
The pattern Rosalinde has an instruction in size L-XL which says k6-11. I do not understand what I am supposed to do. Could you please explain. Thank you.
12.05.2024 - 18:41DROPS Design answered:
Dear Barbara, K = knit. So you knit 6 sts or 11 sts depending on the size you are working. In this case knit 6 for size L and knit 11 for size XL. Happy knitting!
12.05.2024 - 20:44
![]() MARIA DANIELSSON wrote:
MARIA DANIELSSON wrote:
När man gör ökningen för ärmen hur kan man "sticka in" de extra maskorna i A1 och A6? A6 har 11 maskor och A1 har 4 - så hur ska man få in fler i dem? Det blir ju helknasigt...
18.06.2023 - 17:31DROPS Design answered:
Hei Maria. I f.eks str. S skal det økes med 30 masker på hver 2,5 cm. Det økes på hver side av A.1 kun på begynnelsen av omgangen (A.1 er midt under ermet). De 4 første maskene som økes i hver side strikkes fortløpende inn i A.1. Da vil A.1 bestå av 12 masker etter 7,5 cm, husk fletten i A.1 ligger over i hverandre (de økte maskene er på hver side av A.1 og strikkes rett). De neste økte maske (det økes 2 masker pr omgang på hver 2,5 cm 11 ganger i hver side) strikkes fortløpende inn i A.6 (vrang). mvh DROPS Design
19.06.2023 - 11:47
![]() Monika wrote:
Monika wrote:
Witam :) jak wykończyć dekolt? nie jest to opisane, a na zdjęciu niezbyt dokładnie widać. chodzi mi o to ile rzędów i jakim ściegiem, ewentualnie czy jest jakaś specjalna technika dekoltowa. wybaczcie, zrobiłam w życiu mało swetrów, więc wykańczanie dekoltu jeszcze nie jest dla mnie oczywiste ;)
06.10.2022 - 21:33DROPS Design answered:
Witaj Moniko, to mi umknęło tłumaczenie ostatniego akapitu. Jest to już uzupełnione na stronie. W razie pytań śmiało pisz. Miłej pracy!
07.10.2022 - 09:26
![]() Della Pietra Teresa wrote:
Della Pietra Teresa wrote:
Solitamente porto la taglia m ho fatto altre vostre maglie la misura è sempre stata esatta . In questo caso però ho come girovita una XXL e come giro seno una L . Come mi devo comportare visto che a me sembra stranissima questa cosa perché io ho un girovita segnato . Grazie
01.02.2022 - 18:42DROPS Design answered:
Buonasera Teresa, questo modello è stato progettato per essere molto aderente, per cui non ha l'agio che di solito hanno quasi tutti gli altri modelli DROPS. Buon lavoro!
01.02.2022 - 22:07
![]() Monika wrote:
Monika wrote:
Witam.Szerokość dekoltu w centymetrach jest podana dosyć niewielka,tutaj 13 cm,w Brume 16,ale na modelce w obu wypadkach dekolt jest pięknie szeroki.Brume już zrobiłam i wiem,że dekolt wyszedł zgodny z pomiarem we wzorze-16 cm,nie ze zdjęciem na modelce.Czy tutaj będzie tak samo że wyjdzie mi taki mały dekolt,13cm?Jeśli tak, to czemu na zdjęciu jest pokazane co innego i jak osiągnąć taki efekt?
21.04.2020 - 16:52DROPS Design answered:
Witaj Moniko, o jaki dekolt chodzi, z przodu czy z tyłu? Czy mierzysz długość wzdłuż brzegu robótki? Te 13-16 cm na dekolcie tyłu (podane na schematycznym rysunku na dole wzoru), jest to wymiar na długość (w prostej linii, od rogu do rogu dekoltu), wzdłuż brzegu dekoltu (po skosie) ten wymiar będzie szerszy. Pozdrawiamy
22.04.2020 - 16:03
![]() Beatriz Garcia wrote:
Beatriz Garcia wrote:
Me gustan mucho los modelos de Drops aparte muy bien explicados ya casi terminando este diseño de Rosalinda solo me falta el cuello después de 5 años jajajaja que lo tejía y lo dejaba pero al fin lo estoy terminando Gracias por compartir los patrones Yam hermosos
22.01.2020 - 03:22
![]() Daniela wrote:
Daniela wrote:
Buonasera. Sto eseguendo il modello Rosalinde n° r-623. Il modello è stato corretto. Nella correzione viene citato un nuovo diagramma A.2, ma fra i diagrammi compare un solo A.2. Ora non so come proseguire perché il diagramma indicato contiene 19 maglie, mentre con il motivo A.3 sono a 11 maglie. Cosa intendete con la correzione? Grazie
04.01.2019 - 19:02DROPS Design answered:
Buonasera Daniela. Quando vengono corretti i diagrammi, trova solo il diagramma aggiornato. Non è stato modificato il numero delle maglie del diagramma. Il diagramma A2 si lavora su 19 m, il diagramma A3 inizia con 19 m e finisce con 11 m e va lavorato sopra al diagramma A2. Buon lavoro!
04.01.2019 - 19:25
|
|||||||||||||||||||||||||
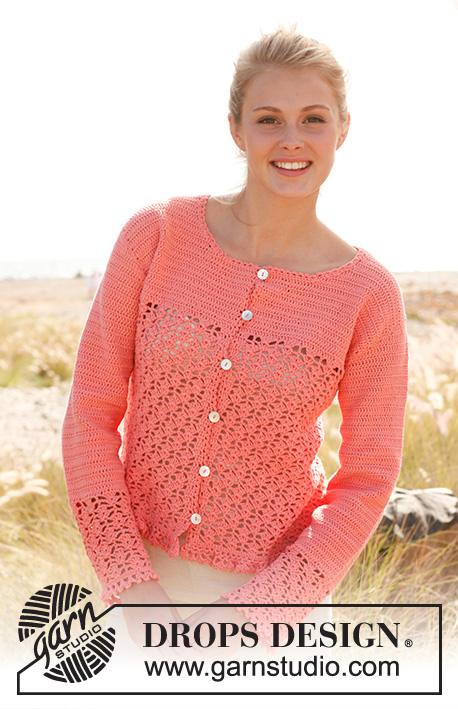
Rosalinde#rosalindecardigan |
|||||||||||||||||||||||||
 |
 |
||||||||||||||||||||||||
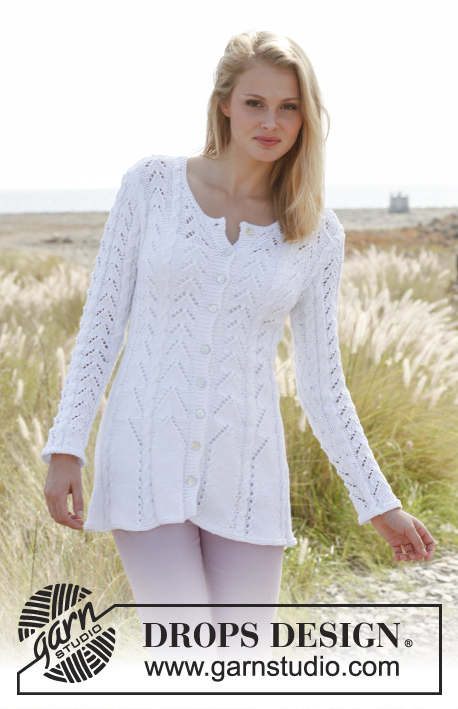
Knitted DROPS fitted jacket with lace pattern and cables in ”Muskat”. Size: S - XXXL.
DROPS 148-2 |
|||||||||||||||||||||||||
|
GARTER ST (back and forth on circular needle): K all rows. 1 ridge = 2 rows K. GARTER ST (in the round on double pointed needles): 1 ridge = * K 1 round and P 1 round *, repeat from *-*. PATTERN: See diagrams A.1 to A.6. Diagrams show all rows/rounds in pattern seen from RS. DECREASE TIP: Dec in each side on section in stocking st in both sides on body as follows: Slip 1st st as if to K, K 1, psso, work in stocking st until 2 sts remain, K 2 tog (= 2 sts dec). INCREASE TIP: Inc 1 st by making 1 YO. On next row work YOs twisted to avoid holes (i.e. work in back loop of st instead of front). BUTTONHOLE: Dec for buttonholes on right band. 1 buttonhole = K tog third and fourth st from mid front and make 1 YO. Dec for buttonholes when piece measures: SIZE S: 8, 14, 20, 26, 32, 38, 44, 50 and 56 cm SIZE M: 8, 15, 22, 28, 34, 40, 46, 52 and 58 cm SIZE L: 8, 14, 21, 27, 34, 40, 47, 53 and 60 cm SIZE XL: 6, 13, 20, 27, 34, 41, 48, 55 and 62 cm SIZE XXL: 8, 15, 22, 29, 36, 43, 50, 57 and 64 cm SIZE XXXL: 10, 17, 24, 31, 38, 45, 52, 59 and 66 cm ---------------------------------------------------------- BODY: Worked back and forth on circular needle from mid front. Cast on 244-264-312-332-404-420 sts (incl 6 band sts in each side towards mid front) on circular needle size 4 mm with Muskat. K 3 rows (1st row = WS). Work next row as follows from RS: SIZE S + M: 6 band sts in GARTER ST – see explanation above, P 2, * A.2 (= 19 sts), A.1 (= 4 sts) *, repeat from *-* 2 times in total, P 2 and K 8-13, insert 1 marker (= side), K 8-13, P 2, ** A.1 (= 4 sts), A.2 (= 19 sts) **, repeat from **-** 4 times in total, work A.1 (= 4 sts), P 2 and K 8-13, insert 1 marker (= side), K 8-13, P 2, ** A.1 (= 4 sts), A.2 (= 19 sts) **, repeat from **-** 2 times in total and finish with P 2 and 6 band sts in GARTER ST. SIZE L + XL: 6 band sts in GARTER ST - see explanation above, P 2, A.2 (= 19 sts), * A.2 (= 19 sts), A.1 (= 4 sts) *, repeat from *-* 2 times in total, P 2 and K 6-11, insert 1 marker (= side), K 6-11, P 2, ** A.1 (= 4 sts), A.2 (= 19 sts) **, repeat from **-** 2 times in total, work A.2 (= 19 sts), A.1 (= 4 sts), A.2 (= 19 sts), * A.2 (= 19 sts), A.1 (= 4 sts) *, repeat from *-* 2 times in total, P 2 and K 6-11, insert 1 marker (= side), K 6-11, P 2, ** A.1 (= 4 sts), A.2 (= 19 sts) **, repeat from **-** 2 times in total, work A.2 (= 19 sts) and finish with P 2 and 6 band sts in GARTER ST. Size XXL + XXXL: 6 band sts in GARTER ST - see explanation above, P 2, A.2 (= 19 sts), * A.2 (= 19 sts), A.1 (= 4 sts) *, repeat from *-* 3 times in total, P 2 and K 6-10, insert 1 marker (= side), K 6-10, P 2, ** A.1 (= 4 sts), A.2 (= 19 sts) **, repeat from **-** 3 times in total, work A.2 (= 19 sts), A.1 (= 4 sts), A.2 (= 19 sts), * A.2 (= 19 sts), A.1 (= 4 sts) *, repeat from *-* 3 times in total, P 2 and K 6-10, insert 1 marker (= side), K 6-10, P 2, ** A.1 (= 4 sts), A.2 (= 19 sts) **, repeat from **-** 3 times in total, work A.2 (= 19 sts) and finish with P 2 and 6 band sts in GARTER ST. ALL SIZES - READ ALL OF THE FOLLOWING SECTION BEFORE CONTINUING! Continue pattern like this (from WS work K over K and P over P). REMEMBER THE KNITTING TENSION! When piece measures 8 cm, (adjust so that next row is worked from RS), dec 1 st in each side on body (i.e. at the edge in each side on both sections in stocking st with markers) – READ DECREASE TIP (= 4 sts dec). Repeat dec every 8 cm 3 more times (= 4 dec in total – after last dec 8-18-4-14-4-12 sts in stocking st remain in each side, i.e. 4-9-2-7-2-6 sts on each side of both markers). AT THE SAME TIME when piece measures 8-8-8-6-8-10 cm, beg dec for BUTTONHOLES - see explanation above. After diagram A.2 continue with diagram A.3 (instead of A.2 - work the other sts as before). After all dec in the sides and in A.3, 164-184-200-220-260-276 sts remain on needle and piece measures approx. 32 cm. Then continue as before but work pattern according to diagram A.4 instead of A.3. When piece measures approx. 40 cm in all sizes (adjust so that next row is worked from RS), inc as follows: ALL SIZES: Inc 1 st on the right side of every cable (i.e. in every other P-section with 2 P sts seen from RS) – READ INCREASE TIP (= 9-9-9-9-13-13 sts inc). When piece measures 42-42-42-42-43-43 cm, inc 1 st on the left side of every cable (i.e. in the remaining P-sections with 2 P sts = 9-9-9-9-13-13 sts inc). Repeat inc on the right side of every cable (i.e. in every other P-section with 3 P sts) when piece measures 44-44-44-44-46-46 cm and on the left side of every cable (i.e. in the remaining P-sections with 3 P sts) when piece measures 46-46-46-46-49-49 cm. SIZE L + XL (only applies to these 2 sizes): AT THE SAME TIME when piece measures 42 cm, inc 1 st on each side of marker in each side - READ INCREASE TIP (= 4 sts inc). Repeat inc when piece measures 46 cm. ALL SIZES: When all inc are done there are 200-220-244-264-312-328 sts in total on needle. Continue pattern. When piece measures 47-48-49-50-51-52 cm, work next row from RS as follows: Work 48-52-59-63-74-77 sts as before (= right front piece), cast off 8-10-8-10-12-14 sts for armhole, work 88-96-110-118-140-146 sts as before (= back piece), cast off 8-10-8-10-12-14 sts for armhole and work the last 48-52-59-63-74-77 sts as before (= left front piece). Finish each part separately. LEFT FRONT PIECE: = 48-52-59-63-74-77 sts. Continue pattern as before (1st row = WS). Then cast off for armhole at beg of every row from RS: 2 sts 1-2-1-2-6-7 times and 1 st 1-3-1-3-6-7 times = 45-45-56-56-56-56 sts. When piece measures 56-58-60-62-64-66 cm, slip the outermost 12-12-15-15-15-15 sts towards mid front on 1 stitch holder for neck (work them before slipping them on the stitch holder). Continue to cast off for neck at beg of every row from WS: 2 sts 2 times and 1 st 4 times - NOTE: Work sts that do not fit the pattern in stocking st when casting off for neck. After all cast offs for armhole and neck, 25-25-33-33-33-33 sts remain on shoulder. Continue pattern as before with 1 edge st in garter st in each side until piece measures approx. 66-68-70-72-74-76 cm - adjust after 1 whole repetition with A.4 vertically, cast off. RIGHT FRONT PIECE: Work as left front piece but reversed, i.e. when casting off for armholes, cast off at beg of every row from WS (instead of RS) and cast off for neck at beg of every row from RS (instead of WS) – NOTE: When slipping sts on 1 stitch holder for neck, adjust so that 1 row from WS has been worked after last buttonhole before slipping sts on stitch holder. BACK PIECE: = 88-96-110-118-140-146 sts. Continue to cast off for armholes at beg of every row in each side as on front piece = 82-82-104-104-104-104 sts. Continue pattern as before with 1 edge st in garter st in each side. When piece measures 64-66-68-70-72-74 cm, cast off the middle 30-30-36-36-36-36 sts for neck. Continue to cast off 1 st on next row from neck = 25-25-33-33-33-33 sts remain on the shoulder. Continue pattern with 1 edge st in garter st in each side until back piece is the same length as front piece, cast off. Repeat on the other shoulder. SLEEVE: Worked in the round on double pointed needles, switch to circular needle when needed. Cast on 51-51-68-68-85-85 sts on double pointed needles size 4 mm with Muskat. Work 2 ridges in GARTER ST in the round on double pointed needles - see explanation above! Work next round as follows: * Work A.1 (= 4 sts), work A.5 (= 13 sts) *, repeat from *-* 3-3-4-4-5-5 times in total. Continue pattern like this upwards. When A.5 has been worked, 45-45-60-60-75-75 sts remain on needle and piece measures approx. 9 cm. Now continue pattern but work A.6 instead of A.5 until finished measurements (work the other sts as before). AT THE SAME TIME when piece measures 11-11-10-12-12-12 cm, inc 1 st on each side of A.1 at beg of round (inc by making 1 YO which is worked P twisted on next round). Repeat inc every 2½-2-3-2-2½-2 cm 14-17-12-16-12-14 more times (= 15-18-13-17-13-15 inc in total) = 75-81-86-94-101-105 sts – NOTE: Work the first 4 sts inc in each side in A.1, work the next 11-11-9-11-9-11 sts in A.6 and P the remaining 0-3-0-2-0-0 sts. READ ALL OF THE FOLLOWING SECTION BEFORE CONTINUING! When piece measures 49-49-48-48-45-44 cm (shorter measurements in the larger sizes because of wider shoulders), cast off 8-10-8-10-12-14 sts mid under sleeve (i.e. cast off A.1 and 2-3-2-3-4-5 sts on each side of A.1), finish the sleeve working back and forth on needle. Then cast off for sleeve cap at beg of every row in each side as follows: Cast off 2 sts 3-4-3-4-4-4 times and 1 st 3-3-2-2-7-10 times, then cast off 2 sts in each side until piece measures approx. 56-57-54-55-56-57 cm – adjust after 1 whole repetition with A.6 vertically. Then cast off the remaining sts, piece measures approx. 57-58-55-56-57-58 cm. Knit another sleeve. ASSEMBLY: Sew the shoulder seams. Sew the sleeves inside 1 edge st. Sew on buttons. Steam the garment to make it hang nicely. NECK EDGE: Pick up approx. 90 to 110 sts around the neck (incl sts on stitch holders at the front) on circular needle size 4 mm. K 3 rows and cast off with K from RS. |
|||||||||||||||||||||||||
Diagram explanations |
|||||||||||||||||||||||||
|
|||||||||||||||||||||||||
 |
|||||||||||||||||||||||||
 |
|||||||||||||||||||||||||
Have you finished this pattern?Tag your pictures with #dropspattern #rosalindecardigan or submit them to the #dropsfan gallery. Do you need help with this pattern?You'll find 28 tutorial videos, a Comments/Questions area and more by visiting the pattern on garnstudio.com. © 1982-2026 DROPS Design A/S. We reserve all rights. This document, including all its sub-sections, has copyrights. Read more about what you can do with our patterns at the bottom of each pattern on our site. |
|||||||||||||||||||||||||


With over 40 years in knitting and crochet design, DROPS Design offers one of the most extensive collections of free patterns on the internet - translated to 17 languages. As of today we count 324 catalogues and 12290 patterns translated into English (UK/cm). 12290
We work hard to bring you the best knitting and crochet have to offer, inspiration and advice as well as great quality yarns at incredible prices! Would you like to use our patterns for other than personal use? You can read what you are allowed to do in the Copyright text at the bottom of all our patterns. Happy crafting!
Post a comment to pattern DROPS 148-2
We would love to hear what you have to say about this pattern!
If you want to leave a question, please make sure you select the correct category in the form below, to speed up the answering process. Required fields are marked *.