
Popular categories
Looking for a yarn?


Comments / Questions (30)
![]() Pia Bengtsson wrote:
Pia Bengtsson wrote:
Jeg skal strikke ærme og har taget ud og så passer mønsteret ikke mere altså der kommer fire grå masker ved siden af hinanden. Hvad gør jeg?
14.08.2016 - 21:16DROPS Design answered:
Hej Pia. Ja, det kommer til at ske automatisk, men er ikke en fejl. Du strikker videre og tager ud som staar og strikker som mönstret er.
07.09.2016 - 14:36
![]() Soulhié Marie France wrote:
Soulhié Marie France wrote:
Merci pour vos réponses ultra-rapides, je vais essayer !
15.04.2015 - 13:38
![]() Soulhié Marie France wrote:
Soulhié Marie France wrote:
Excusez-moi encore mais comment sont réparties les 8 augmentations dont il est question pour l'encolure ? merci pour votre réponse
14.04.2015 - 19:09DROPS Design answered:
Bonjour Mme Soulhié, pour augmenter dans le col sur les bordures des devants, augmentez 1 m dans chacune des sections 2 m end des 34 m côté col, vous aurez ainsi des côtes 8 fois (3 m end/2 m env) vu sur l'endroit, en haut de la bordure (côté col) et toujours 2 m end/2 m env au-dessus des autres mailles. Bon tricot!
15.04.2015 - 08:45
![]() SOULHIE Michel wrote:
SOULHIE Michel wrote:
Bonjour, je souhaiterais avoir des explications en ce qui concerne la bordure. Je ne comprends pas la partie des augmentations. Par exemple qu'entendez-vous par " chaque section endroit " ? Je vous remercie d'avance pour votre réponse. Marie-France
01.04.2015 - 14:44DROPS Design answered:
Bonjour Marie-France, la bordure se tricote d'abord en côtes 2 m end/2 m env - vous augmentez ensuite 1 m end dans chaque section 2 m end (vu sur l'endroit) et continuez ainsi en côtes 3 m end/2 m env, puis 4 m end/2 m env (vu sur l'end) dans les sections concernées. Bon tricot!
01.04.2015 - 16:45
![]() Camilla Jonasson wrote:
Camilla Jonasson wrote:
Hej. När man börjar denna kofta ska man ju ha en rätstickad maska i varje sida. Ska man även ha det sen när man fortsätter med bakstycket för sig? Eller kör man med bara slätstickning då?
12.01.2015 - 10:33DROPS Design answered:
Hej Camilla, nej på bakstycket behöver du inte ha en rätstickad maska, här fortsätter du mönstret. Lycka till!
02.02.2015 - 15:58
![]() Karin Overeem wrote:
Karin Overeem wrote:
Jag undrar om hela koftat ska rätstickas? Tycker det på bilden ser ut som slätstickning från resåren och uppåt. Tack på förhand!
28.10.2014 - 17:06DROPS Design answered:
Hej Karin, Nej det skall slätstickas. Lycka till!
29.10.2014 - 15:20
![]() Tina wrote:
Tina wrote:
Vielen Dank :)
15.03.2014 - 08:55
![]() Tina wrote:
Tina wrote:
Ist es möglich, an diese Jacke eine Kapuze zu stricken?
12.03.2014 - 18:33DROPS Design answered:
Liebe Tina, wegen des Schalkragens eigenet sich dieses Modell weniger für eine Kapuze. Unser Tipp: suchen Sie sich ein anderes Muster mit Kapuze und stricken Sie das sogenannen Pippi-Muster (von Pippi Langstrumpf), wenn Ihnen dies gefällt. Die evtl Anpassung an das Muster ist einfacher als den Schnitt zu ändern. Dort hilft Ihnen sicher der Laden weiter, bei dem Sie die Wolle kaufen.
14.03.2014 - 12:53
![]() Anneli wrote:
Anneli wrote:
Gör inte samma misstag som jag. När du ska bestämma vilken storlek du ska sticka, så står bystvidden uppe vid axlarna! Gå inte efter måttet längst ner. Jag har nyss börjat om, för min blev för liten... Verkar annars vara en trevlig kofta! Jag stickar den i Nepal, och det verkar bli mysigt.
21.12.2012 - 14:25
![]() Ulrika wrote:
Ulrika wrote:
Alldeles underbar!!
28.06.2011 - 10:12
|
||||||||||
Catherine#catherinejacket |
||||||||||
|
|
||||||||||
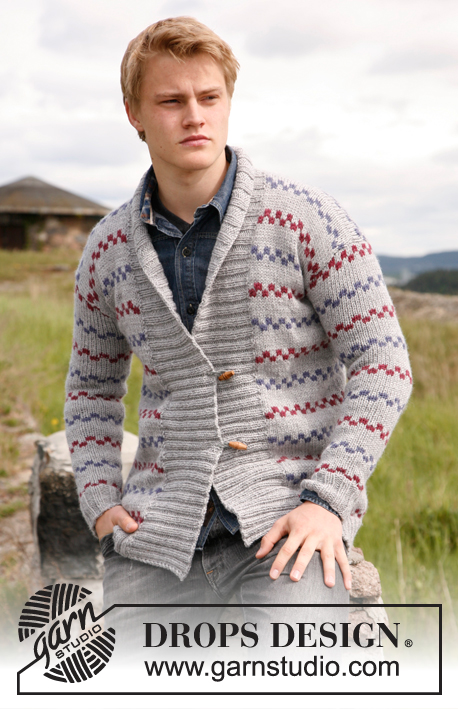
Knitted Pippi jacket with shawl collar and sripes, in DROPS Alaska. Size: S - XXXL.
DROPS 135-22 |
||||||||||
|
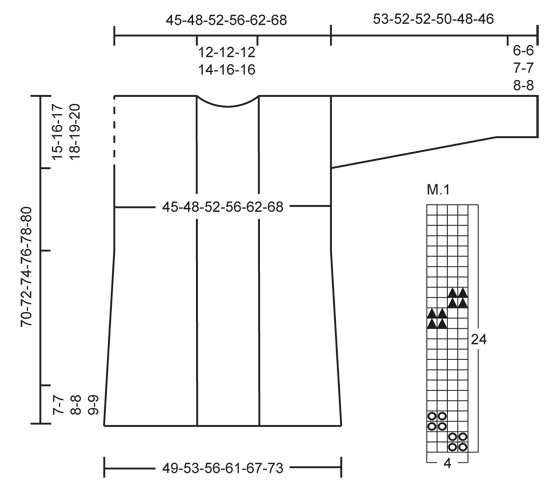
GARTER ST: K all rows. PATTERN: See diagram M.1 - diagram is worked in stocking st. DECREASE TIP: Dec by K 2 sts tog. INCREASE TIP: Inc 1 st by making 1 YO. On next round K YO twisted (i.e. work in back loop of st instead of front) to avoid holes. -------------------------------------------------------- BODY: Worked back and forth on circular needle. Cast on 160-172-184-200-216-236 sts (incl 1 edge st in each side) on circular needle size 4.5 mm with light grey. On 1st row (= RS) work rib as follows: 1 edge st in garter st, * K 2, P 2 *, repeat from *-* and finish with K 2, 1 edge st in garter st. When piece measures 7-7-8-8-9-9 cm, dec 12-12-12-16-16-16 sts evenly in rib on next row from WS =148-160-172-184-200-220 sts. Now switch to circular needle size 5 mm. On next row from RS work as follows: 1 edge st in garter st, work diagram M.1 until 3 sts remain, finish with the first 2 sts in diagram M.1 and 1 edge st in garter st. REMEMBER THE KNITTING TENSION! Work diagram M.1 1 time vertically, then work the first 6 rows in diagram M.1. Insert 2 markers in the piece; 32-35-38-40-43-48 sts (= front piece) in from each side (back piece = 84-90-96-104-114-124 sts). Move the markers upwards when working. On next row (= 7th row in diagram M.1), dec 1 st on each side of every marker - Read decrease tip above (= 4 sts dec). Repeat dec every 12 rows (i.e. dec on 7th and 19th row in diagram M.1 alternately = stocking st with light grey) a total of 4 times = 132-144-156-168-184-204 sts. When piece measures 55-56-57-58-59-60 cm, divide the piece at the markers and finish each part separately. BACK PIECE: = 76-82-88-96-106-116 sts. Continue with diagram M.1 until piece measures 68-70-72-74-76-78 cm. On next row, cast off the middle 16-16-16-20-24-24 sts for neck and finish each shoulder separately. Cast off 2 sts on next row from neck = 28-31-34-36-39-44 sts remain on shoulder. Loosely cast off all sts when piece measures 70-72-74-76-78-80 cm. RIGHT FRONT PIECE: = 28-31-34-36-39-44 sts. Continue with diagram M.1 until piece measures 70-72-74-76-78-80 cm, loosely cast off all sts. LEFT FRONT PIECE: Work as right front piece but reversed. SLEEVE: Worked in the round on double pointed needles. Cast on 32-36-40-40-44-48 sts with light grey on double pointed needles size 4.5 mm and work rib as follows: * K 2, P 2 *, repeat from *-*. Work rib for 6-6-6-7-7-7 cm, switch to double pointed needles size 5 mm and continue with diagram M.1. Insert a marker at the beg of the round. Read all of the following section before continuing! Size S, M, L: Inc 1 st on each side of marker - Read increase tip above - on 5th round in diagram M.1 (= stocking st with light grey) = 2 new sts. Repeat inc every 12 rows (i.e. inc on 5th and 17th round in diagram M.1 alternately = stocking st with light grey) a total of 8 times (= inc 2 sts a total of 8 times) = 48-52-56 sts. Size XL, XXL, XXXL: Inc 1 st on each side of marker - Read increase tip above - on 5th round in diagram M.1 = 2 new sts. Repeat inc every 12 rows (i.e. inc on 5th and 17th round in diagram M.1 alternately = stocking st with light grey) a total of 4 times (= inc 2 sts a total of 4 times) = 48-52-56 sts. Then inc 1 st on each side of marker on 5th, 11th, 17th and 23rd round in diagram M.1 (= inc 2 sts a total of 4 times) = 56-60-64 sts. All sizes: Continue until piece measures 50-49-49-47-45-43 cm (shorter measurements in the larger sizes because of broader shoulder width). Then work back and forth on row and cast off 5-5-6-6-6-7 sts for sleeve cap at the beg of the next 4 rows. At beg of the next 2 rows, cast off 6-7-7-7-8-7 sts = 16-18-18-18-20-22 sts remain. Piece now measures approx. 53-52-52-50-48-46 cm. Loosely cast off all sts. Work another sleeve. ASSEMBLY: Sew shoulder seams from RS with stitches. Sew in sleeves in front loop of outermost sts. LEFT FRONT BAND: Worked back and forth on needle. Beg mid back of neck, knit up from RS approx. 140-180 sts inside 1 edge st around the neck and along left front piece on circular needle size 4.5 mm with light grey. On next row (= WS) adjust no of sts to 146-150-158-166-174-178 sts (divisible by 4 + 2) while at the same time P the sts. Work rib on next row from RS as follows: 1 edge st in garter st, K 1, * P 2, K 2 *, repeat from *-*. Continue with rib until band measures 7-7-7-8-8-8 cm. Insert a marker from RS after the first 34-34-38-38-42-42 sts on needle. Now inc 1 st in every K-section (seen from RS) over the 34-34-38-38-42-42 sts = 8-8-9-9-10-10 new sts in the neck. Repeat inc when band measures 10-10-10-11-11-11 cm = 162-166-176-184-194-198 sts. When band measures 11-11-11-12-12-12 cm, cast off all sts with K over K and P over P. RIGHT FRONT BAND: Work up along right front piece from bottom edge until mid back of neck. P 1 row from WS and adjust no of sts as on left front band. 1st row in rib is worked as follows from RS: * K 2, P 2 *, repeat from *-* and finish with K 1 and 1 edge st in garter st mid back of neck. Work and inc in the neck as on left front band. ASSEMBLY: Sew bands tog mid back of neck inside 1 edge st. BELT: Cast on 15 sts on needle size 4.5 mm and work rib as follows: K 1, * P 1, K 1 *, repeat from *-*. Work rib for 150-160-170-180-190-200 cm, cast off all sts with K over K and P over P. |
||||||||||
Diagram explanations |
||||||||||
|
||||||||||
 |
||||||||||
Have you finished this pattern?Tag your pictures with #dropspattern #catherinejacket or submit them to the #dropsfan gallery. Do you need help with this pattern?You'll find 16 tutorial videos, a Comments/Questions area and more by visiting the pattern on garnstudio.com. © 1982-2026 DROPS Design A/S. We reserve all rights. This document, including all its sub-sections, has copyrights. Read more about what you can do with our patterns at the bottom of each pattern on our site. |
||||||||||


With over 40 years in knitting and crochet design, DROPS Design offers one of the most extensive collections of free patterns on the internet - translated to 17 languages. As of today we count 324 catalogues and 12290 patterns translated into English (UK/cm). 12290
We work hard to bring you the best knitting and crochet have to offer, inspiration and advice as well as great quality yarns at incredible prices! Would you like to use our patterns for other than personal use? You can read what you are allowed to do in the Copyright text at the bottom of all our patterns. Happy crafting!
Post a comment to pattern DROPS 135-22
We would love to hear what you have to say about this pattern!
If you want to leave a question, please make sure you select the correct category in the form below, to speed up the answering process. Required fields are marked *.