
Popular categories
Looking for a yarn?


Comments / Questions (50)
![]() Caroline Quidoz wrote:
Caroline Quidoz wrote:
Bonjour J’aimerais que l’ouvrage mesure 65 cm de largeur dans le bas (taille xxl) et 55 cm dans le haut (environ la taille xl) au lieu de 60 cm (xxl). Donc obtenir 20 cm de longueur de raccourci total au lieu de 10 cm. Tout en gardant sensiblement la même longueur totale pour la veste au complet. J’ai très peu d’expérience avec le fonctionnement des rangs raccourcis, mais je comprends vite. Pouvez-vous me recommander des ajustements d’instructions.
17.02.2022 - 03:50DROPS Design answered:
Bonjour Mme Quidoz, nous ne sommes malheureusement pas en mesure de pouvoir adapter chacun de nos modèles à chaque demande, merci de bien vouloir contacter votre magasin - même par mail ou téléphone - pour toute assistance individuelle et personnalisée. Merci pour votre compréhension. Bon tricot!
17.02.2022 - 10:29
![]() Nathalie wrote:
Nathalie wrote:
Désolé j'ai relu le patron , ce serait plutôt 2 rangs et pas 7 de différence ( car on tricote sur toutes les mailles place le marqueur et retour) lorsque l'on place le marqueur qui ferait une différence de longueur sur les deux parties du devant (bas) ce qui n'est pas calculer au premier 27 cm ? Donc ,si je fais 2 rangs de plus lorsque j'atteint le 27 cm sur la dernière partie du devant les deux parties serait t'elles plus égales?
09.05.2018 - 20:18DROPS Design answered:
Bonjour Nathalie, les 2 devants doivent avoir la même longueur - cf réponse ci-dessous. Bon tricot!
10.05.2018 - 09:11
![]() Nathalie wrote:
Nathalie wrote:
Bonjour je suis à tricoter la partie bas du dos et des devants,(XL) il me semble que les deux parties du devant ne correspondent pas car on calculent 27 cm et à partir de là on fait les rangs raccourcis , tandis que la dernière partie , 27 cm ,inclus les rangs raccourcis? donc j'aurai un panneau du devant plus long de 7 rangs
09.05.2018 - 19:26DROPS Design answered:
Bonjour Nathalie, le 1er marqueur se situe après les 27 cm + 6 rangs = le marqueur se place dans le 7ème rang. pour le 2ème devant, on tricote 6 rangs après celui avec le 2ème marqueur et on tricote 27 cm = les 2 devants seront bien égaux. Bon tricot!
10.05.2018 - 09:09
![]() Annette Poggel wrote:
Annette Poggel wrote:
Ist wirklich die Maschenzahl von 67 beim unteren Teil für alle Grössen gleich? ich habe gerade begonnen, und es sieht so schmal aus. Danke für Ihre Hilfe
03.01.2018 - 17:46DROPS Design answered:
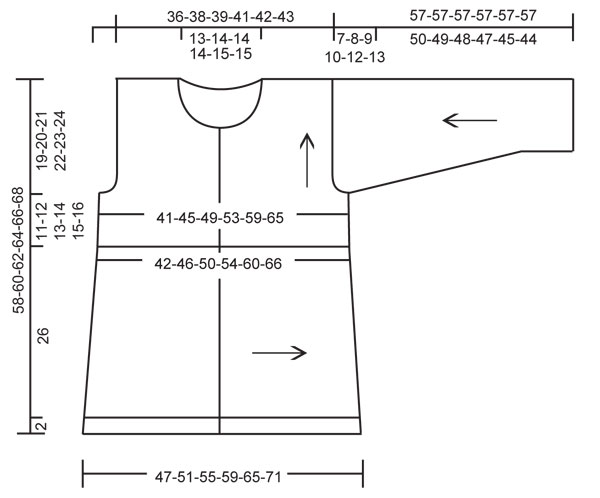
Liebe Frau Poggel, das untere Teil wird quer gestrickt und misst 26 cm in allen Größen (siehe Maßnahmenskizze). Viel Spaß beim stricken!
04.01.2018 - 13:19
![]() Trees wrote:
Trees wrote:
Als ik met de hals begin,vanaf waar moet ik meten.vanaf het armsgat of vanaf de ophaalsteken. Er staat 26 cm hoogte.
20.06.2015 - 11:26DROPS Design answered:
Hoi Trees. Er staat in het patroon: Ga verder tot een totale hoogte van 20-22-22-24-24-26 cm. Dus je meet vanaf de onderkant van het werk.
23.06.2015 - 12:27
![]() DROPS Design wrote:
DROPS Design wrote:
Liebe Sylvia, das Modell îst aus der angegebenen Wolle gefertigt und sieht so aus, wenn Sie der Anleitung folgen.
31.01.2014 - 16:17
![]() Sylvia wrote:
Sylvia wrote:
Schade, die Abbildung zeigt nicht das Original, die Streifen werden sehr viel schmaler, da ja über mehr als 250 Maschen gestrickt wird im Oberteil. Schade Schade....das man sich auf die Bilder nicht verlassen kann. So wird das Gesamtbild nicht so schön werden.
31.01.2014 - 09:33
![]() Hanne Gunnertoft wrote:
Hanne Gunnertoft wrote:
Hej. Tusind tak for svar ang. Huller. Jeg mangler nu kun ærmer og forstår hvad Anita W. Længere nede mener: at det er underligt at trøjen på billedet ikke er strikket efter opskriften, da farverne på øverste stykke ellers ville være ens på begge sider, op til ærmegab? Er der på computer ændret på farverne?
13.10.2013 - 22:14
![]() Greet Van Doren wrote:
Greet Van Doren wrote:
Ik vind het raar dat het onderlijf met een rondbrei naald moet gebeuren. Het zijn toch niet zoveel steken? Het bovenlijf daarentegen zijn wél heel veel steken. En hier ga je niet met een rondbreinaald werken? Of toch wel? Het lijkt mij allemaal nogal ingewikkeld beschreven. Of ben ik verkeerd?
12.10.2013 - 23:58DROPS Design answered:
Hoi Greet. Er wordt alleen met een rondbreinaald gebreid - heen en weer. In Scandinavië wordt er eigenlijk bijna altijd op rondbreinld gebreid - ook heen en weer (en het zijn van oorsprong Noorse patronen). Maar je kan vaak gewoon rechte naalden gebruiken als er ruimte genoeg is op de nld en als je dat prettiger vindt.
14.10.2013 - 11:24
![]() Sólrun wrote:
Sólrun wrote:
Jeg har strikket en færdig og mangler montering. Har lavet et forsøg med venstre forkant. Men den krøller meget. Hvad kan jeg gøre?
08.04.2013 - 18:32DROPS Design answered:
Pröv at vaske delene först og pres dem med et strygejern (laeg et haandklaede imellem) eller spaend delene op med knappenaale naar det er vaadt og lad det törre
09.04.2013 - 14:24
|
|
Evening Plum#eveningplumcardigan |
|
|
|
|
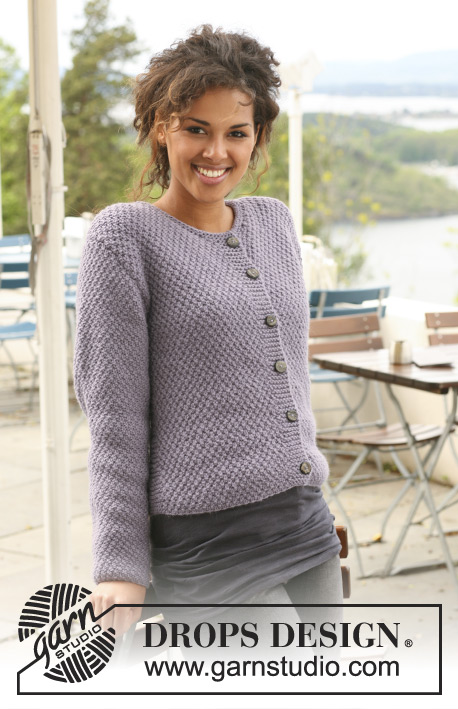
DROPS jacket in ”Delight” - knitted in different directions. Size S - XXXL.
DROPS 126-7 |
|
|
GARTER ST (back and forth on needle): K all rows. KNITTING TIP: To avoid a hole when turning mid piece slip first st as if to K, tighten thread and continue. -------------------------------------------------------- JACKET: Worked in parts, knitted in different directions. The arrows on chart show the knitting direction. BOTTOM PART OF BODY PIECE: Worked back and forth on circular needle in order to fit in all sts. Cast on 67 sts (includes 2 edge sts each side) on circular needle size 3 mm with Delight. Work stocking st back and forth on needle with 2 GARTER STS - see above – each side. REMEMBER THE KNITTING TENSION! When piece measures 21-23-25-27-30-33 cm - adjust so that next row is from RS – work shortened rows as follows (first row = RS) - See KNITTING TIP: Work 20 sts, turn piece and work return row. Work 40 sts, turn piece and work return row. Work 60 sts, turn piece and work return row. Work all sts, insert a marker in the last st (marks middle of side), turn piece and work return row. Work 60 sts, turn piece and work return row. Work 40 sts, turn piece and work return row. Work 20 sts, turn piece and work return row. Continue in stocking st back and forth on all sts (continue with 2 garter sts each side). When piece measures 42-46-50-54-60-66 cm from marker at the side - adjust so that next row is from RS - work shortened rows in the same way as before. After shortened rows continue in stocking st back and forth on all sts (continue with 2 garter sts each side). When piece measures 21-23-25-27-30-33 cm from the second marker cast off LOOSELY. Piece now measures approx 84-92-100-108-120-132 cm along the shortest side and approx 93-101-109-117-129-141 cm along the longest side (= bottom of jacket). TOP PART OF BODY PIECE: Beg at the right side of piece along the shortest side and pick up sts from RS in the second of the 2 garter sts (use a crochet hook) as follows: * Pick up 1 st in each of the first 3 garter sts, skip 1 garter st *, repeat from *-*. Continue in stocking st back and forth on needle from mid front with 1 garter st each side. AT THE SAME TIME on first row adjust no of sts to 198-216-238-258-286-316. When piece measures 11-12-13-14-15-16 cm from where sts were picked up work next row as follows: Work 47-51-57-61-67-75 sts (= front piece), cast off 6-6-6-8-10-10 sts for armhole, work 92-102-112-120-132-146 sts (= back piece), cast off 6-6-6-8-10-10 sts for armhole and work the remaining 47-51-57-61-67-75 sts (= front piece). Now complete front and back pieces separately. BACK PIECE: = 92-102-112-120-132-146 sts. Cast off for armhole at the beg of every row each side as follows: 2 sts 1-1-2-3-5-7 times and 1 st 1-3-5-5-6-7 times = 86-92-94-98-100-104 sts. Continue in stocking st until piece measures 28-30-32-34-36-38 cm from where sts were picked up. Now cast off the middle 28-30-30-30-32-32 sts for neck and complete each shoulder separately. Cast off 2 sts on neckline on next row = 27-29-30-32-32-34 sts left on shoulder. When piece measures 30-32-34-36-38-40 cm from where sts were picked up (the whole back piece measures approx 56-58-60-62-64-66 cm) cast off LOOSELY. RIGHT FRONT PIECE: = 47-51-57-61-67-75 sts. Cast off for armhole at the beg of every row at the side as described for back piece = 44-46-48-50-51-54 sts. Continue until piece measures 20-22-22-24-24-26 cm. Now cast off to shape the neckline at the beg of every row from mid front: 4 sts 1 time, 2 sts 4 times and 1 st 5-5-6-6-7-8 times = 27-29-30-32-32-34 sts left on shoulder. Continue until piece measures 30-32-34-36-38-40 cm from where sts were picked up, adjust to back piece, and cast off LOOSELY. LEFT FRONT PIECE: Like right front piece, but mirrored. SLEEVE: Worked back and forth on circular needle. Cast on 58-60-60-62-64-64 sts (includes 1 edge st each side) on circular needle size 3 mm with Delight. Work 8 rows garter st and continue in stocking st. When piece measures 10-10-10-8-7-6 cm inc 1 st each side and repeat the inc a total of 12-14-17-18-20-24 times as follows: SIZE S: on every 11th row, SIZE M: on every 9th row, SIZE L + XL: on every 7th row, SIZE XXL: on every 6th row and SIZE XXXL: on every 5th row = 82-88-94-98-104-112 sts. When piece measures 50-49-48-47-45-44 cm cast off for sleeve cap at the beg of every row each side as follows: 4 sts 1 time, 3 sts 2 times, 2 sts 2-3-3-4-4-4 times and 1 st 1-2-2-3-6-8 times, then 2 sts at the beg of every row until piece measures approx 56 cm for all sizes. Now cast off 3 sts at beg of the next 2 rows and cast off remaining sts. ASSEMBLY: Sew shoulder seams. Sew sleeve seams inside 1 edge st. Set in sleeves. NECKLINE: Pick up from RS approx 100 to 140 sts round the neck on circular needle size 3 mm with Delight. Work 6 rows garter st back and forth on needle and cast off. BORDER AT BOTTOM OF BODY PIECE: Pick up 1 and 2 sts in each garter st alternately at the bottom of body piece on circular needle size 3 mm with Delight. Work garter st back and forth on needle, AT THE SAME TIME adjust no of sts to 228-246-266-286-314-342 sts on first row. Cast off LOOSELY when border measures 2 cm. LEFT FRONT BAND: Pick up approx 116-120-120-124-126-130 sts along left front piece on circular needle size 3 mm with Delight – NOTE: If picking up less/more sts adjust no of sts on first row. Work garter st back and forth on needle and cast off LOOSELY when front band measures approx 2 cm. RIGHT FRONT BAND: Like left front band. AT THE SAME TIME after 1 cm make 3 buttonholes evenly distributed. 1 BUTTONHOLE = cast off 2 sts and cast on 2 new on next row. Place the bottom buttonhole in transition just below the chest (where sts were picked up), and the others with approx 4-6 cm between each. Sew buttons on left front band. |
|
 |
|
Have you finished this pattern?Tag your pictures with #dropspattern #eveningplumcardigan or submit them to the #dropsfan gallery. Do you need help with this pattern?You'll find 20 tutorial videos, a Comments/Questions area and more by visiting the pattern on garnstudio.com. © 1982-2026 DROPS Design A/S. We reserve all rights. This document, including all its sub-sections, has copyrights. Read more about what you can do with our patterns at the bottom of each pattern on our site. |


With over 40 years in knitting and crochet design, DROPS Design offers one of the most extensive collections of free patterns on the internet - translated to 17 languages. As of today we count 324 catalogues and 12290 patterns translated into English (UK/cm). 12290
We work hard to bring you the best knitting and crochet have to offer, inspiration and advice as well as great quality yarns at incredible prices! Would you like to use our patterns for other than personal use? You can read what you are allowed to do in the Copyright text at the bottom of all our patterns. Happy crafting!
Post a comment to pattern DROPS 126-7
We would love to hear what you have to say about this pattern!
If you want to leave a question, please make sure you select the correct category in the form below, to speed up the answering process. Required fields are marked *.