
Popular categories
Looking for a yarn?


Comments / Questions (38)
![]() Brina We wrote:
Brina We wrote:
Ich versuche mich gerade an dem Vorderteil, aber ich komme auf keinen grünen Nenner. Ich habe für Größe „L“ 47 M. angeschlagen und dann eine R. li gestrickt. Und bin nun wieder bei der Vorderseite. Ich soll nun das M1A stricken über 26 M. und danach 4 li. 3re 3x + 4 li. 2 re + Kr. = 27 Doch 27 + 26 = 53, dass passt ja nicht bei 47 M. Was muss ich in M1A Stricken? Ich hab es mit dem Diagramm versucht, aber das verstehe ich nicht.
17.02.2022 - 12:29DROPS Design answered:
Liebe Brina, in L stricken Sie so: die 26 Maschen in M.1A, dann *4 li, 3 re*, x 2 (7x2 = 14 M Rippenmuster) + 4 li + 2 re, + 1 Randmasche = 26+14+4+2+1=47 Maschen. Dann stricken Sie M.1B über die Maschen M.1A (= 26 Maschen) , dh immer 47 Maschen; oder misverstehe ich vielleicht Ihre Frage?
17.02.2022 - 13:39
![]() Shel wrote:
Shel wrote:
Hello again! For the front band a couple of questions please: 1) what does it mean to pick up "161 sts (DIVISIBLE BY 6+5)" ? I'm making size Large. 2) is it 161 stitches altogether (right AND left sides) or 161 each side? I tried picking up 161 on the left side but could only find about half that number to pick up - and they are quite close together. Thank you.
19.10.2021 - 23:06DROPS Design answered:
Dear Shel, the number of stitches given for the bands should be picked up from the middle of the neck on the back, through the bottom edge. Once for the left side once for the right side. Of course if it feels too much, you can use less stitches, but the number should be a number that could be divisible by 6 plus 5. Happy Stitching!
20.10.2021 - 02:32
![]() Debbie wrote:
Debbie wrote:
Front band. To make band wider? Inc 1 sts in each p section on every 38 sts ? So when I have 3 pearl stiches I would increase 1 sts or 3 sts, on every 38 sts? I would like to know is it 1 or 3 inc in the pearl section,don’t understand the directions. So then I will not have 167 sts I will have around 15 sts more,correct.
02.07.2021 - 21:44DROPS Design answered:
Dear Debbie, for the bands, you start out with picking up 149-155-161-167-173-179 stitches, then when you get to 4 cm, mark out 32-32-32-38-38-38 stitches from mid back, and then do the increases in the purl stitches of these marked out stitches. Happy Stitching!
03.07.2021 - 06:42
![]() Debbie wrote:
Debbie wrote:
Right front piece. On size xl what are the 26 sts p4/k3 times 3=21 sts then p4,k2 and 1 edge st =7 so 21 sts +7=28 how to knit the 26 sts ?
03.05.2021 - 19:40DROPS Design answered:
Dear Debbie, if you mean the set up row, the 26 stitch is not all that is in the row, but it is M.1A pattern (wich is on 26 stitch), and then *p4 /k3- 3 times, , p4, k2, and the edges stitch in one row (26 + 21 stitch = 47 stitch for size XL, wich you cast on to beginn with.) Happy knitting!
03.05.2021 - 23:39
![]() Shel wrote:
Shel wrote:
Hi, just started the back piece. It says "continue in rib as follows (first row= RS" followed by rib pattern. My question- for WS is the pattern followed exactly the same or are the stitches reversed i.e. knit for purl and purl for knit? Thanks!
09.04.2021 - 16:08DROPS Design answered:
Dear Shel, you start the back with ribbing, so from the WS you knit what looks like a knit stitch (that was knit as a purl from the other side), and purl the stitches that look like purls (that were knitted in the previous row, from the RS. Happy Knitting!
09.04.2021 - 19:04
![]() Chris wrote:
Chris wrote:
Me again.. On the front sides, when you get to 37 stitches (for XXL), the instructions say 'continue with K over K' etc.. Does that mean you don't continue with the pattern? Thanks.
13.01.2019 - 22:10DROPS Design answered:
Dear Chris, work the sts as before, with cables towards the neck. Happy knitting!
14.01.2019 - 12:33
![]() Chris wrote:
Chris wrote:
I did not intend that my full name should appear in my question - everyone else only has their first name shown - would you please revise my name to Chris or delete my question as soon as possible.
04.01.2019 - 21:02DROPS Design answered:
Dear Chris, your question (and the answer) has been updated. Happy knitting!
07.01.2019 - 09:21
![]() Chris wrote:
Chris wrote:
Stuck at the back armholes. Working the XXL size, 4 stitches have been cast off at the beginning of rows 1,2,3 and 4 of the armhole. Now I need to decrease 2 stitches 4 times, followed by 1 stitch 4 times. From the number of stitches remaining it appears that I need to actually double these workings. I want a neat effect so please explain (stitch by stitch) exactly how to work the decreases in both right side and wrong side rows.
04.01.2019 - 19:13DROPS Design answered:
Dear Chris, you cast off 4 sts at the beg of next 4 rows (= from both RS and WS = 4 sts 2 times on each side), then cast off 2 sts at the beg of next 8 rows (= 2 sts 4 times on each side), then cast off 1 st at the beg of next 8 rows (= 1 st 4 times on each side). Cast off the sts K over K and P over P and continue working them as before, K over K and P over P. Happy knitting!
07.01.2019 - 08:35
![]() Charlene wrote:
Charlene wrote:
I would like to knit Giselle (120-18) in Air, which is in the same yarn group as Paris. I am worried, however, that it wouldn\'t turn out well when worked in the much lighter yarn. What do you think? Thank you.
10.10.2018 - 23:41DROPS Design answered:
Dear Charlene, since Paris and Air both belong to same yarn group you could use here Air instead of Paris, but texture will be different since both yarns are different. You may like to choose another yarn less "fluffy" just as Nepal or Alaska. Your DROPS store can help you choosing the yarn suiting you - even per mail or telephone. Happy knitting!
11.10.2018 - 10:24
![]() Ornella wrote:
Ornella wrote:
Splendido modello, chiare le istruzioni, grazie a voi ho fatto un bellissimo cardigan. Ho usato bomull lin uni colour unico difetto molti gomitoli del filato erano aggiunti anche più volte.......
09.05.2015 - 19:08
|
||||||||||||||||
Giselle#gisellecardigan |
||||||||||||||||
 |
 |
|||||||||||||||
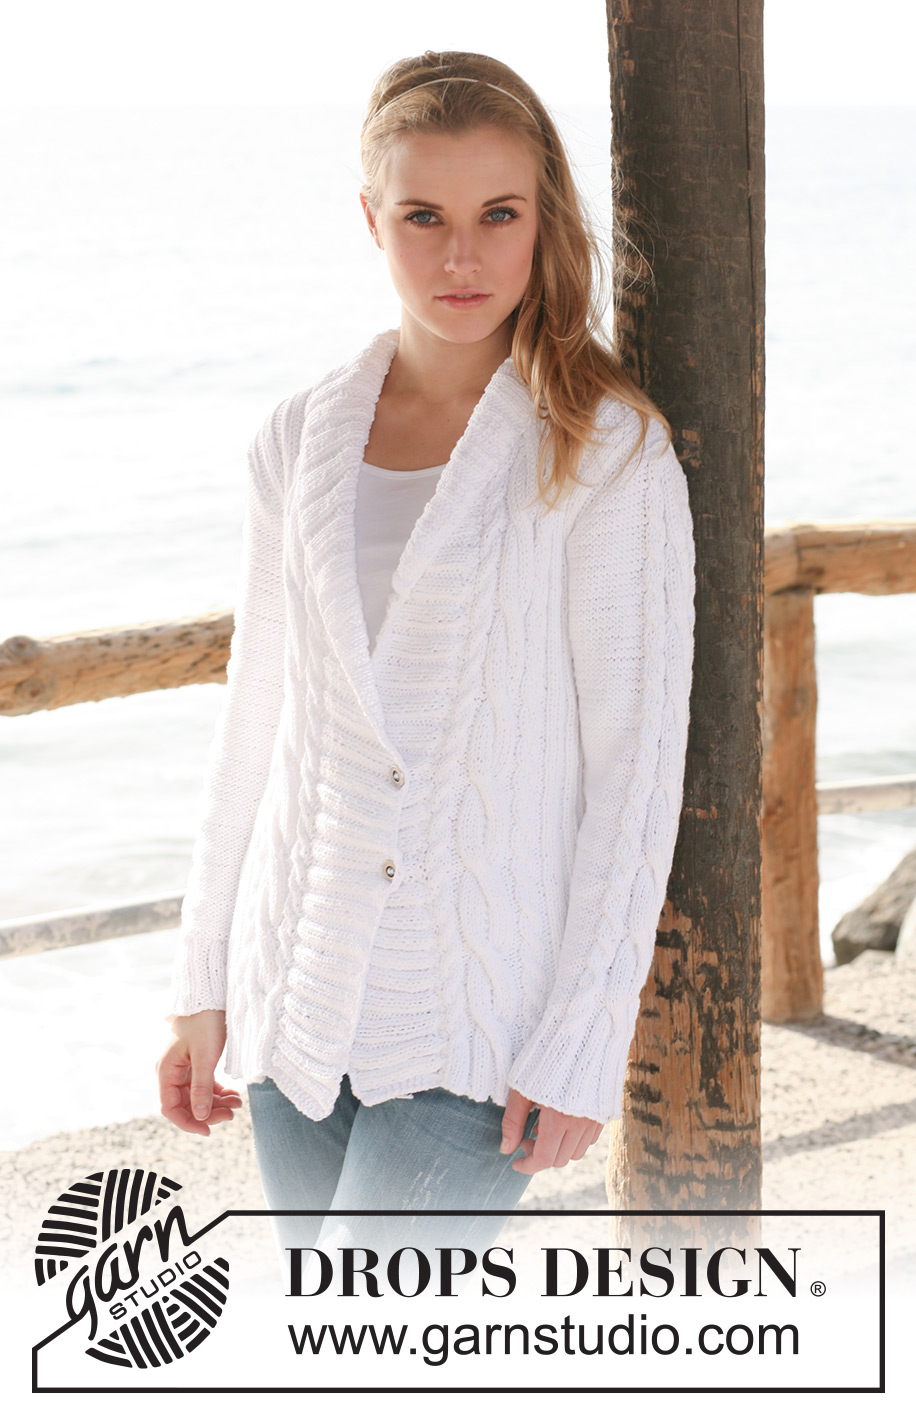
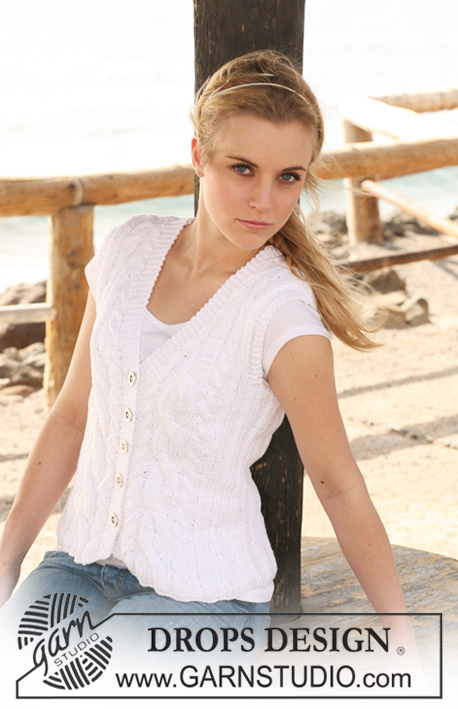
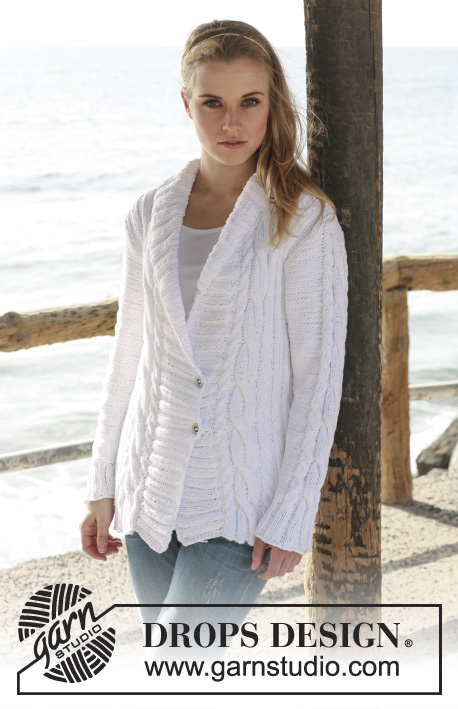
Knitted DROPS jacket with rib and cables in ”Paris”. Size XS to XXXL.
DROPS 120-18 |
||||||||||||||||
|
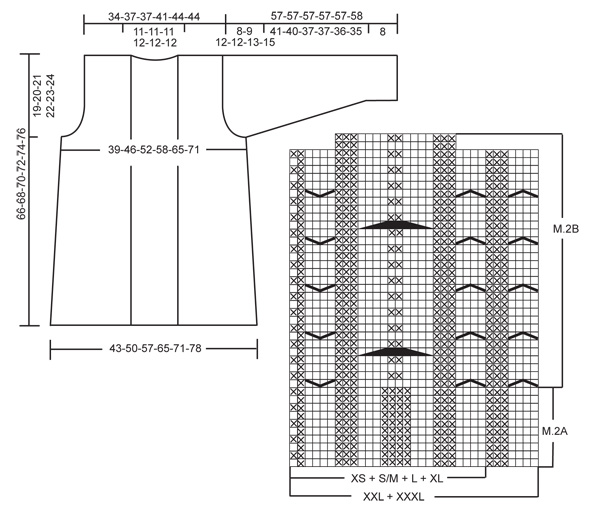
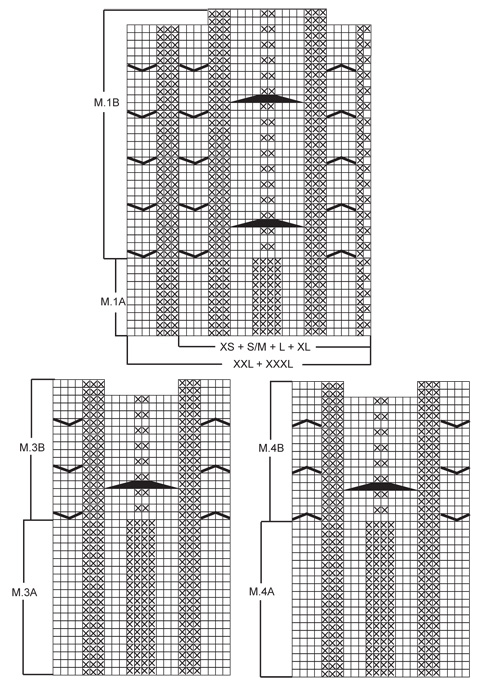
GARTER ST (back and forth on needle): K all rows. PATTERN: See diagram M.1 to M.4. Diagrams show the pattern from RS. INCREASING TIP (applies to sleeve): Make all inc from RS! Inc inside 1 edge st in garter st each side by making 1 YO, on next row K YO into back of loop to avoid a hole. BUTTONHOLES: Make 2 buttonholes on right front band approx 37-39-41-43-45-47 and 45-47-49-51-53-55 cm from shoulder. 1 BUTTONHOLE = cast off 1 st and cast on 1 new st on next row (for neatest result make buttonhole in P-section, as seen from RS). --------------------------------------------------------- --------------------------------------------------------- JACKET: All parts worked back and forth on circular needle. BACK PIECE: Cast on 81-95-109-123-135-149 sts on circular needle size 4 mm with Paris. P 1 row from WS and continue in rib as follows (first row = RS): 1 edge st in GARTER ST - see above, K2, * P4/K3 *, repeat from *-* a total of 1-2-3-4-4-5 times, * P3/K3 *, repeat from *-* a total of 3-3-3-3-4-4 times, * P4/K3 *, repeat from *-* a total of 3 times, P4, * K3/P3 *, repeat from *-* a total of 3-3-3-3-4-4 times, * K3/P4 *, repeat from *-* a total of 1-2-3-4-4-5 times, K2 and 1 edge st in GARTER ST. When piece measures 6 cm work next row as follows from RS: 1 edge st in garter st, rib as before on the next 6-13-20-27-27-34 sts, stocking st on the next 21-21-21-21-27-27 sts, rib as before on the next 25 sts, stocking st on the next 21-21-21-21-27-27 sts, rib as before on the next 6-13-20-27-27-34 sts and 1 edge st. Continue like this with K over K, P over P and edge sts in garter st. REMEMBER THE KNITTING TENSION! When piece measures 34 cm dec on next row from RS as follows: dec all P4 (= 6-8-10-12-12-14 P-sections) to P3 by P tog the first 2 P sts in each P-section = 75-87-99-111-123-135 sts. When piece measures 47-48-49-50-51-52 cm cast off for armhole each side at beg of every row: 4 sts 1 time for all sizes, 4 sts 0-0-0-0-1-1 time, 2 sts 0-1-3-4-4-6 times and 1 st 1-2-4-5-4-6 times = 65-71-71-77-83-83 sts. Continue with K over K, P over P and 1 garter st each side towards armhole. When piece measures 64-66-68-70-72-74 cm cast off the middle 19-19-19-21-21-21 sts for neck and complete each shoulder separately. Cast off 1 st on neckline on next row = 22-25-25-27-30-30 sts left on shoulder. Cast of loosely with K over K and P over P when piece measures 66-68-70-72-74-76 cm. RIGHT FRONT PIECE: Cast on 33-40-47-54-61-68 sts on circular needle size 4 mm with Paris. P 1 row from WS and continue in rib as follows from mid front (first row = RS): Size XS: M.1A (= 26 sts), P4/K2 and 1 edge st in GARTER ST. Size S/M + L + XL + XXL + XXXL: M.1A (= 26-26-26-33-33) sts, * P4/K3 *, repeat from *-* a total of 1-2-3-3-4 times, P4, K2 and 1 edge st in GARTER ST. ALL SIZES: When piece measures 6 cm work M.1B instead of M.1A until finished measurements (work remaining sts as before). AT THE SAME TIME when piece measures 34 cm dec on next row from RS as follows: dec all P4 (= 1-2-3-4-4-5 P-sections) to P3 by P tog the first 2 sts in each P-section = 32-38-44-50-57-63 sts. When piece measures 47-48-49-50-51-52 cm cast off 4 sts for armhole at beg of row from WS and now cast off to shape the armhole at beg of every row from WS: 4 sts 0-0-0-0-1-1 time, 2 sts 0-1-3-4-4-6 times and 1 st 1-2-4-5-4-6 times = 27-30-30-33-37-37 sts left on needle. Continue with K over K, P over P and 1 garter st towards armhole. When piece measures 65-67-69-71-73-75 cm dec 5-5-5-6-7-7 sts evenly on M.1 = 22-25-25-27-30-30 sts left on shoulder. On next row cast off all sts of with K over K and P over P. LEFT FRONT PIECE: Like right front piece, but mirrored, i.e. work M.2 instead of M.1. When casting off for armhole at the side cast off at beg of row from RS (instead of WS). RIGHT SLEEVE: Worked back and forth on needle. Cast on 52-52-52-52-56-56 sts on circular needle size 4 mm with Paris. P 1 row from WS and continue in rib back and forth on needle as follows (first row = RS): Size XS + S/M + L + XL: 1 edge st in garter st, P1, * K3/P3 *, repeat from *-* a total of 2 times, M.3A (= 24 sts), * P3/K3 *, repeat from *-* a total of 2 times, P1 and 1 edge st in garter st. Size XXL + XXXL: 1 edge st in garter st, P1, * K3/P4 *, repeat from *-* a total of 2 times, M.3A (= 24 sts), * P4/K3 *, repeat from *-* a total of 2 times, P1 and 1 edge st in garter st. ALL SIZES: Continue like this until piece measures approx 8 cm. Now work next row as follows from RS: 1 edge st in garter st, 13-13-13-13-15-15 sts in reverse stocking st (i.e. P on RS and K on WS), M.3B, 13-13-13-13-15-15 sts in reverse stocking st and 1 edge st in garter st. Continue like this (M.3B repeated vertically). AT THE SAME TIME when piece measures 9-9-9-9-11-13 cm inc 1 st each side - see INCREASING TIP, and repeat the inc on every 6-4-3-2.5-2-1.5 cm a total of 7-10-12-14-15-18 times = 66-72-76-80-86-92 sts. When piece measures 49-48-45-45-44-43 cm - NOTE! Less for the larger sizes because of longer sleeve cap and wider shoulder- cast off for sleeve cap each side at beg of every row: 4 sts 1 time, 2 sts 3-3-2-2-2-2 times and 1 st 2-3-9-9-10-12 times, then cast off 2 sts each side until piece measures 56-56-56-56-56-57 cm. On next row cast off 3 sts at beg of row, and now dec 6 sts evenly on M.3. Cast off 3 sts at beg of next row and work remaining sts on row, P sts from M.3. Cast off all sts. LEFT SLEEVE: Like right sleeve, but work M.4 instead of M.3. ASSEMBLY: Sew shoulder seams. FRONT BAND: Pick up from RS approx 149-155-161-167-173-179 sts (divisible by 6 + 5) along left front piece from mid back to bottom edge on circular needle size 4 mm with Paris. K 1 row from WS and continue in rib as follows from RS: 2 garter sts, * P3/K3 *, repeat from *-* until 3 sts remain and finish with 3 garter sts. Continue like this until front band measures 4 cm. Now insert a marker after 32-32-32-38-38-38 sts from mid back. Continue in rib as before, AT THE SAME TIME inc 1 st in each P-section (as seen from RS) on the 32-32-32-38-38-38 sts = 5-5-5-6-6-6 inc sts (to make collar wide enough round neckline). Repeat the inc when front band measures 7 and 10 cm. When front band measures 11-11-11-12-12-12 cm cast off all sts with K over K and P over P. Repeat along right front piece from bottom edge to mid back (first row rib worked as follows from RS: 3 garter sts, * K3/P3 *, repeat from *-* until 2 sts remain and finish with 2 garter sts mid back). When front band measures 9-9-9-10-10-10 cm make 2 BUTTONHOLES – see above. ASSEMBLY: Sew front bands tog mid back in outer loops of sts. When folding collar towards RS there will be 4 garter sts mid back with K6 each side. Set in sleeves inside 1 edge st. Sew sleeve and side seams in outer loop of sts. Sew buttons on left front band. |
||||||||||||||||
Diagram explanations |
||||||||||||||||
|
||||||||||||||||
 |
||||||||||||||||
 |
||||||||||||||||
Have you finished this pattern?Tag your pictures with #dropspattern #gisellecardigan or submit them to the #dropsfan gallery. Do you need help with this pattern?You'll find 21 tutorial videos, a Comments/Questions area and more by visiting the pattern on garnstudio.com. © 1982-2026 DROPS Design A/S. We reserve all rights. This document, including all its sub-sections, has copyrights. Read more about what you can do with our patterns at the bottom of each pattern on our site. |
||||||||||||||||


With over 40 years in knitting and crochet design, DROPS Design offers one of the most extensive collections of free patterns on the internet - translated to 17 languages. As of today we count 324 catalogues and 12290 patterns translated into English (UK/cm). 12290
We work hard to bring you the best knitting and crochet have to offer, inspiration and advice as well as great quality yarns at incredible prices! Would you like to use our patterns for other than personal use? You can read what you are allowed to do in the Copyright text at the bottom of all our patterns. Happy crafting!
Post a comment to pattern DROPS 120-18
We would love to hear what you have to say about this pattern!
If you want to leave a question, please make sure you select the correct category in the form below, to speed up the answering process. Required fields are marked *.