
Popular categories
Looking for a yarn?


Comments / Questions (38)
![]() Dolfin wrote:
Dolfin wrote:
Mais oui bien sûr ! Effectivement, vous avez raison, c'est pour cela que j'avais mon décalage. Merci beaucoup. Bon week-end à vous.
21.06.2025 - 08:04
![]() Dolfin wrote:
Dolfin wrote:
Excusez-moi d'insister, mais sur votre modèle, ce n'est pas la deuxième, mais la troisième taille puisqu'il a un XS et un S/M avant le L. Bonne fin de journée
19.06.2025 - 18:08DROPS Design answered:
Bonjour Mme Dolfin, tout à fait, vous avez raison, toutefois, dans le paragraphe cité (sauf erreur de ma part), la taille L est la 2ème taille, soit: Taille S/M + L + XL + XXL + XXXL : M1A (= 26-26-26-33-33 m), *4 m env, 3 m end*, répéter de *à* 1-2-3-3-4 fois au total, 4 m env, 2 m end, 1 m lis au POINT MOUSSE.. Bon tricot!
20.06.2025 - 07:42
![]() DOLFIN wrote:
DOLFIN wrote:
Bonjour, Je fais le modèle en L, j'ai 47m . M1A = 26m, puis 4 + 3 = 7 * 3 = 21, puis 4 + 2 + 1 = 7m, soit 26 + 21 + 7 = 54m N'y a-t-il pas une erreur c'est-à-dire dans la deuxième section ce n'est pas plutôt 7 * 2 = 21 m (au lieu de 3 fois, ce qui fait bien 47 du coup) ?
19.06.2025 - 16:01DROPS Design answered:
Bonjour Mme Dolfin, tout à fait, dans cette section, la taille L est la 2ème taille, vous allez donc tricoter 1 x les 26 m de M.1A puis 2 fois les côtes (4 m env, 3 m end), puis encore 4 m env, 2 m end et 1 m lis soit: 26+(7x2)+4+2+1=47 mailles. Bon tricot!
19.06.2025 - 17:15
![]() Margi wrote:
Margi wrote:
Es heißt für die Blende... Maschen aufnehmen. Wie nehme ich die auf? Stricke ich von unten rechte Maschen auf und beginne das Muster im Nacken?
19.09.2024 - 22:17DROPS Design answered:
Liebe Margi, für die linke Blende nehmen Sie Maschen auf der Vorderseite so auf: beginnen Sie an der hintere Mitte dann nehmen Sie die Maschen bis Schulter dann am linken Vorderteil bis die untere Kante; beim rechten Vorderteil beginnen Sie an der untere Kante bis Schulter und bis zu der hinteren Mitte. Viel Spaß beim Stricken!
20.09.2024 - 08:44
![]() Stéphanie wrote:
Stéphanie wrote:
Bonjour, J' ai commencé le demi devant droit. Je tricote la taille S/M. J' ai un souci quand je dois remplacer M1A par M1B. En effet le diagramme indique quoi faire sur l'endroit du travail mais pas sur l'envers. Dois je tricoter les 26 toutes à l'envers quand je suis sur l'envers du travail ou d'une autre manière ? Merci d'avance pour votre réponse.
20.05.2024 - 17:48DROPS Design answered:
Bonjour Stéphanie, les diagrammes montrent tous les rangs: ceux sur l'endroit (à lire de droite à gauche) et ceux sur l'envers (à lire de gauche à droite); autrement dit, les cases blanches sont des mailles en jersey endroit et les croix des mailles en jersey envers - notez que la 1ère maille de M.1A/M.1B se tricote au point mousse (à l'endroit sur l'endroit, à l'endroit sur l'envers). Bon tricot!
21.05.2024 - 13:55
![]() Margi wrote:
Margi wrote:
Hallo, soll das Zopfmuster nach den Armausschnitten beim Vorderteil bis zur Schulter hoch gestrickt werden oder nur rechte und linke Maschen?
15.05.2024 - 01:23DROPS Design answered:
Liebe Margo, das Muster stricken Sie genauso wie zuvor bis zur Schulter; kurz vor Abketten wird man dann in M.1 abnehmen, um die korrekte Breite zu behalten. Viel Spaß beim Stricken!
15.05.2024 - 07:40
![]() Margi wrote:
Margi wrote:
Hallo, gibt es ein Video oder eine bessere Beschreibung von der Blende? Linkes Vorderteil oben oder unten, links von wo aus gesehen? In zwei Teilen gestrickt, wo fängt der erste Teil an und wo der zweite? Es soll ja zusammen genäht werden im Nacken. Bitte genauer erklären. Danke
05.05.2024 - 20:23DROPS Design answered:
Liebe Margo, damit es nicht so viele Maschen auf einmal gibt, wird man die Blende in 2 Teilen stricken: die linke Blende beginnt in der hintere Mitte bis am linken Vorderteil (von der Vorderseite gesehen, dh die Rückreihen stricken Sie von unten bis oben/hinteren Mitte) und die rechte Blende stricken Sie von der untere Kante am rechten Vorderteil bis der hintere Mitte, dann werden die beide Blende zusammen genäht. Viel Spaß beim Stricken!
06.05.2024 - 08:52
![]() Véronique wrote:
Véronique wrote:
Bonjour! Je tricote présentement le dos et j’ai débuté la section au-delà des 6cm de côtes. Dans le patron, il est mentionné de tricoter 21m en jersey, intercalé entre les côtes du centre et des bords. Je me demande si j’ai bien compris le patron car il ne semble pas y avoir d’autre sections tricotées en jersey sur le modèle. Merci d’avance!
14.02.2024 - 14:52DROPS Design answered:
Bonjour Véronique, c'est juste ainsi, vous allez tricoter le dos avec les 21 mailles centrales en jersey et (en taille S à XL), avec des mailles en côtes de chaque côté. Bon tricot!
14.02.2024 - 16:31
![]() Brina We wrote:
Brina We wrote:
Ja, ich glaube es hat jetzt klick gemacht re., li. 4 re. 3 li., 3 re, usw. bis zum Ende der Klammer. Also im Grunde der rechte Teil vom Diagramm. Danke für den Denkanstoß
18.02.2022 - 09:48
![]() Brina We wrote:
Brina We wrote:
Geholfen haben Sie mir schon mit dem x 2. Ich bin von x 3 ausgegangen, weil ich nicht richtig geschaut habe und beim Rückenteil ich an dritte Stelle gucken musste. Aber ich verstehe nicht, was ich bei M1A stricken muss. Welche M. Sind M1A.
17.02.2022 - 20:40DROPS Design answered:
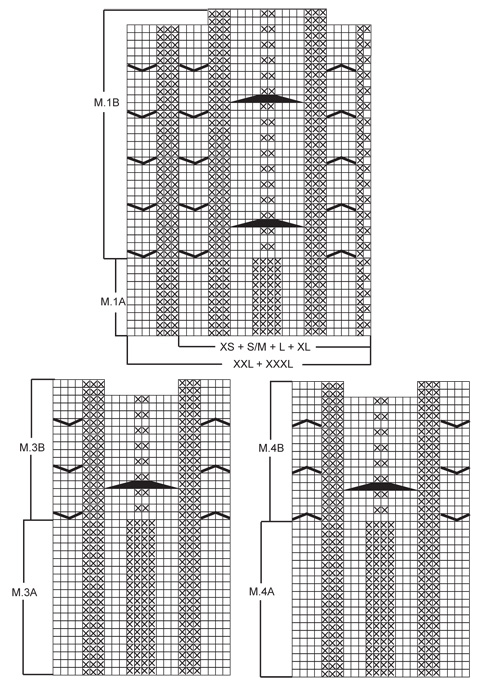
Liebe Brina, die Diagramme sind alle in 2 Teilen geteilt, die unteren Reihen sind A und die oberen sind B; bei M.1 in L stricken Sie nur die 26 ersten unten markierten Maschen (siehe "XS+S/M+L+XL" im Diagram), bei M.2 die 26 letzten. M.1A/M.2A sind die ersten Reihen die an der rechten Seite (M.1)/linken Seiten(M.2) gezeigt/markiert sind = Bündchen vor Zöpfen. (Gleich dann mit M.3 und M.4, die ersten Reihen sind A und die letzten B). Hilft es Ihnen noch?
18.02.2022 - 08:25
|
||||||||||||||||
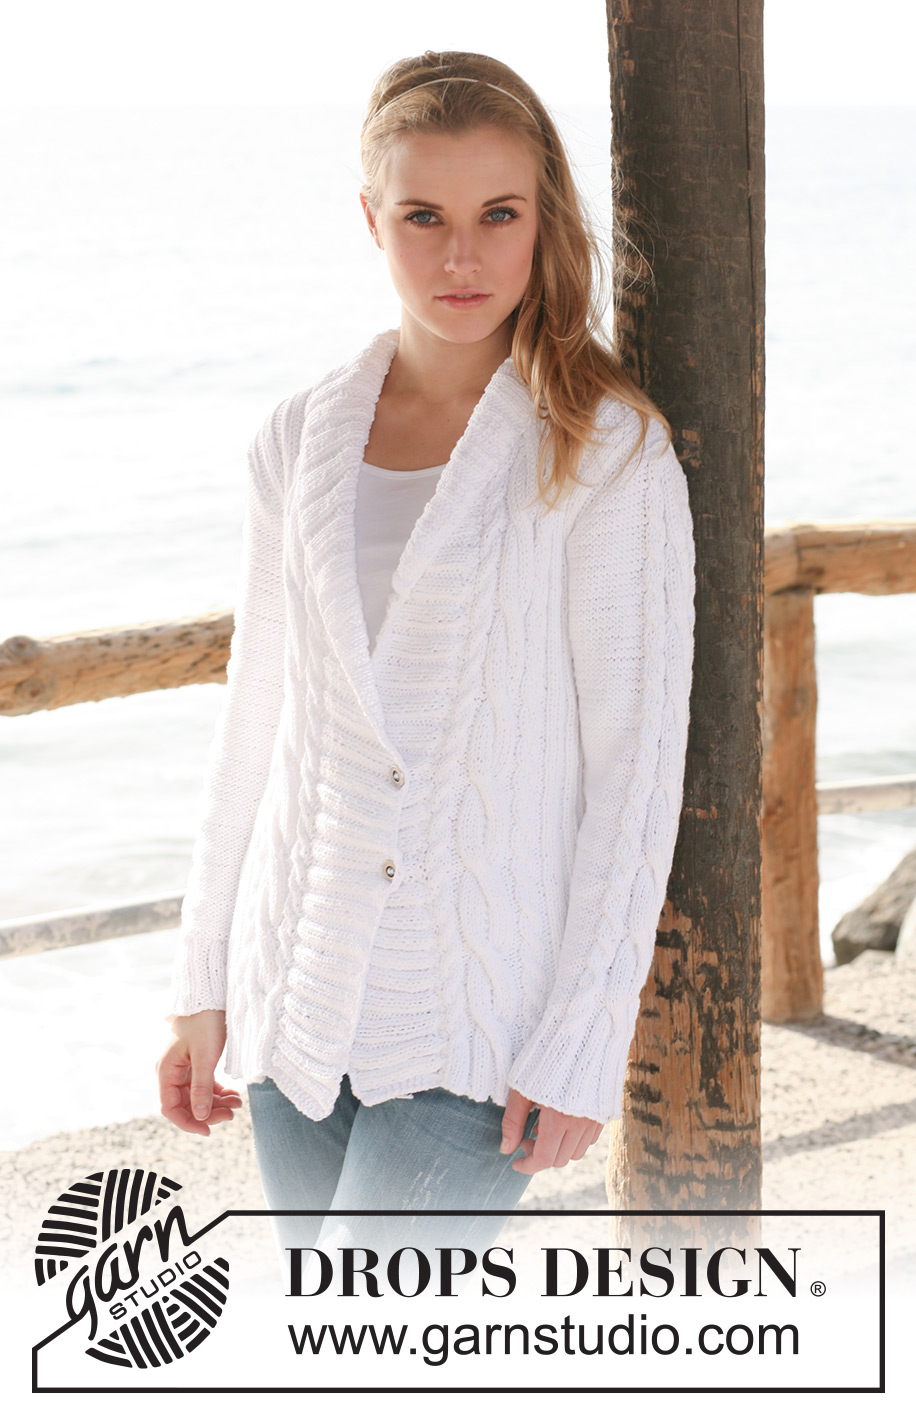
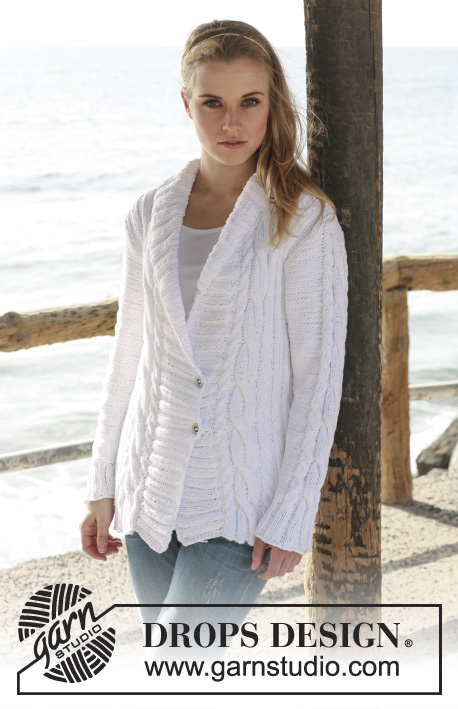
Giselle#gisellecardigan |
||||||||||||||||
 |
 |
|||||||||||||||
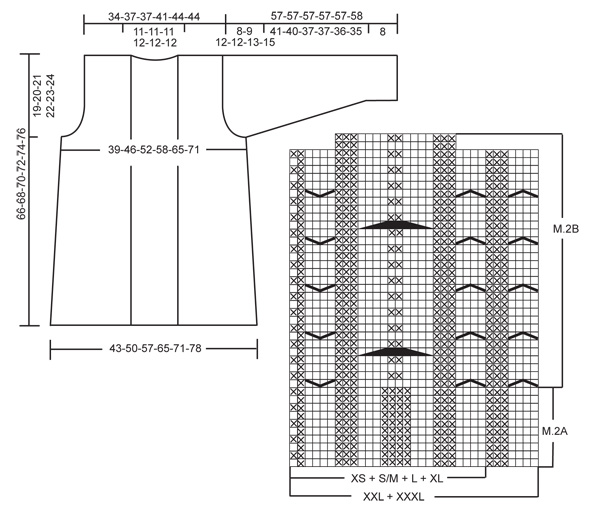
Knitted DROPS jacket with rib and cables in ”Paris”. Size XS to XXXL.
DROPS 120-18 |
||||||||||||||||
|
GARTER ST (back and forth on needle): K all rows. PATTERN: See diagram M.1 to M.4. Diagrams show the pattern from RS. INCREASING TIP (applies to sleeve): Make all inc from RS! Inc inside 1 edge st in garter st each side by making 1 YO, on next row K YO into back of loop to avoid a hole. BUTTONHOLES: Make 2 buttonholes on right front band approx 37-39-41-43-45-47 and 45-47-49-51-53-55 cm from shoulder. 1 BUTTONHOLE = cast off 1 st and cast on 1 new st on next row (for neatest result make buttonhole in P-section, as seen from RS). --------------------------------------------------------- --------------------------------------------------------- JACKET: All parts worked back and forth on circular needle. BACK PIECE: Cast on 81-95-109-123-135-149 sts on circular needle size 4 mm with Paris. P 1 row from WS and continue in rib as follows (first row = RS): 1 edge st in GARTER ST - see above, K2, * P4/K3 *, repeat from *-* a total of 1-2-3-4-4-5 times, * P3/K3 *, repeat from *-* a total of 3-3-3-3-4-4 times, * P4/K3 *, repeat from *-* a total of 3 times, P4, * K3/P3 *, repeat from *-* a total of 3-3-3-3-4-4 times, * K3/P4 *, repeat from *-* a total of 1-2-3-4-4-5 times, K2 and 1 edge st in GARTER ST. When piece measures 6 cm work next row as follows from RS: 1 edge st in garter st, rib as before on the next 6-13-20-27-27-34 sts, stocking st on the next 21-21-21-21-27-27 sts, rib as before on the next 25 sts, stocking st on the next 21-21-21-21-27-27 sts, rib as before on the next 6-13-20-27-27-34 sts and 1 edge st. Continue like this with K over K, P over P and edge sts in garter st. REMEMBER THE KNITTING TENSION! When piece measures 34 cm dec on next row from RS as follows: dec all P4 (= 6-8-10-12-12-14 P-sections) to P3 by P tog the first 2 P sts in each P-section = 75-87-99-111-123-135 sts. When piece measures 47-48-49-50-51-52 cm cast off for armhole each side at beg of every row: 4 sts 1 time for all sizes, 4 sts 0-0-0-0-1-1 time, 2 sts 0-1-3-4-4-6 times and 1 st 1-2-4-5-4-6 times = 65-71-71-77-83-83 sts. Continue with K over K, P over P and 1 garter st each side towards armhole. When piece measures 64-66-68-70-72-74 cm cast off the middle 19-19-19-21-21-21 sts for neck and complete each shoulder separately. Cast off 1 st on neckline on next row = 22-25-25-27-30-30 sts left on shoulder. Cast of loosely with K over K and P over P when piece measures 66-68-70-72-74-76 cm. RIGHT FRONT PIECE: Cast on 33-40-47-54-61-68 sts on circular needle size 4 mm with Paris. P 1 row from WS and continue in rib as follows from mid front (first row = RS): Size XS: M.1A (= 26 sts), P4/K2 and 1 edge st in GARTER ST. Size S/M + L + XL + XXL + XXXL: M.1A (= 26-26-26-33-33) sts, * P4/K3 *, repeat from *-* a total of 1-2-3-3-4 times, P4, K2 and 1 edge st in GARTER ST. ALL SIZES: When piece measures 6 cm work M.1B instead of M.1A until finished measurements (work remaining sts as before). AT THE SAME TIME when piece measures 34 cm dec on next row from RS as follows: dec all P4 (= 1-2-3-4-4-5 P-sections) to P3 by P tog the first 2 sts in each P-section = 32-38-44-50-57-63 sts. When piece measures 47-48-49-50-51-52 cm cast off 4 sts for armhole at beg of row from WS and now cast off to shape the armhole at beg of every row from WS: 4 sts 0-0-0-0-1-1 time, 2 sts 0-1-3-4-4-6 times and 1 st 1-2-4-5-4-6 times = 27-30-30-33-37-37 sts left on needle. Continue with K over K, P over P and 1 garter st towards armhole. When piece measures 65-67-69-71-73-75 cm dec 5-5-5-6-7-7 sts evenly on M.1 = 22-25-25-27-30-30 sts left on shoulder. On next row cast off all sts of with K over K and P over P. LEFT FRONT PIECE: Like right front piece, but mirrored, i.e. work M.2 instead of M.1. When casting off for armhole at the side cast off at beg of row from RS (instead of WS). RIGHT SLEEVE: Worked back and forth on needle. Cast on 52-52-52-52-56-56 sts on circular needle size 4 mm with Paris. P 1 row from WS and continue in rib back and forth on needle as follows (first row = RS): Size XS + S/M + L + XL: 1 edge st in garter st, P1, * K3/P3 *, repeat from *-* a total of 2 times, M.3A (= 24 sts), * P3/K3 *, repeat from *-* a total of 2 times, P1 and 1 edge st in garter st. Size XXL + XXXL: 1 edge st in garter st, P1, * K3/P4 *, repeat from *-* a total of 2 times, M.3A (= 24 sts), * P4/K3 *, repeat from *-* a total of 2 times, P1 and 1 edge st in garter st. ALL SIZES: Continue like this until piece measures approx 8 cm. Now work next row as follows from RS: 1 edge st in garter st, 13-13-13-13-15-15 sts in reverse stocking st (i.e. P on RS and K on WS), M.3B, 13-13-13-13-15-15 sts in reverse stocking st and 1 edge st in garter st. Continue like this (M.3B repeated vertically). AT THE SAME TIME when piece measures 9-9-9-9-11-13 cm inc 1 st each side - see INCREASING TIP, and repeat the inc on every 6-4-3-2.5-2-1.5 cm a total of 7-10-12-14-15-18 times = 66-72-76-80-86-92 sts. When piece measures 49-48-45-45-44-43 cm - NOTE! Less for the larger sizes because of longer sleeve cap and wider shoulder- cast off for sleeve cap each side at beg of every row: 4 sts 1 time, 2 sts 3-3-2-2-2-2 times and 1 st 2-3-9-9-10-12 times, then cast off 2 sts each side until piece measures 56-56-56-56-56-57 cm. On next row cast off 3 sts at beg of row, and now dec 6 sts evenly on M.3. Cast off 3 sts at beg of next row and work remaining sts on row, P sts from M.3. Cast off all sts. LEFT SLEEVE: Like right sleeve, but work M.4 instead of M.3. ASSEMBLY: Sew shoulder seams. FRONT BAND: Pick up from RS approx 149-155-161-167-173-179 sts (divisible by 6 + 5) along left front piece from mid back to bottom edge on circular needle size 4 mm with Paris. K 1 row from WS and continue in rib as follows from RS: 2 garter sts, * P3/K3 *, repeat from *-* until 3 sts remain and finish with 3 garter sts. Continue like this until front band measures 4 cm. Now insert a marker after 32-32-32-38-38-38 sts from mid back. Continue in rib as before, AT THE SAME TIME inc 1 st in each P-section (as seen from RS) on the 32-32-32-38-38-38 sts = 5-5-5-6-6-6 inc sts (to make collar wide enough round neckline). Repeat the inc when front band measures 7 and 10 cm. When front band measures 11-11-11-12-12-12 cm cast off all sts with K over K and P over P. Repeat along right front piece from bottom edge to mid back (first row rib worked as follows from RS: 3 garter sts, * K3/P3 *, repeat from *-* until 2 sts remain and finish with 2 garter sts mid back). When front band measures 9-9-9-10-10-10 cm make 2 BUTTONHOLES – see above. ASSEMBLY: Sew front bands tog mid back in outer loops of sts. When folding collar towards RS there will be 4 garter sts mid back with K6 each side. Set in sleeves inside 1 edge st. Sew sleeve and side seams in outer loop of sts. Sew buttons on left front band. |
||||||||||||||||
Diagram explanations |
||||||||||||||||
|
||||||||||||||||
 |
||||||||||||||||
 |
||||||||||||||||
Have you finished this pattern?Tag your pictures with #dropspattern #gisellecardigan or submit them to the #dropsfan gallery. Do you need help with this pattern?You'll find 21 tutorial videos, a Comments/Questions area and more by visiting the pattern on garnstudio.com. © 1982-2026 DROPS Design A/S. We reserve all rights. This document, including all its sub-sections, has copyrights. Read more about what you can do with our patterns at the bottom of each pattern on our site. |
||||||||||||||||


With over 40 years in knitting and crochet design, DROPS Design offers one of the most extensive collections of free patterns on the internet - translated to 17 languages. As of today we count 324 catalogues and 12290 patterns translated into English (UK/cm). 12290
We work hard to bring you the best knitting and crochet have to offer, inspiration and advice as well as great quality yarns at incredible prices! Would you like to use our patterns for other than personal use? You can read what you are allowed to do in the Copyright text at the bottom of all our patterns. Happy crafting!
Post a comment to pattern DROPS 120-18
We would love to hear what you have to say about this pattern!
If you want to leave a question, please make sure you select the correct category in the form below, to speed up the answering process. Required fields are marked *.