
Popular categories
Looking for a yarn?


Comments / Questions (65)
![]() René wrote:
René wrote:
Sur le côté du devant gauche ..j'ai aug 4 mailles tricoter le rang entier ensuite j'ai refait un aller jusqu'au aug j'en n'ai rajouté encore 4 ensuite j'ai fait le retour un aller j'ai rajouter 5 mailles retour un aller jusqu'au côté j'ai rajouter les 9 dernières mailles voilà et cela me fait une manche de 9 cm de long :-( j'ai du mal faire le travail je suis perdu car j'aime beaucoup de que j'ai fait mais je but sur a manche :-( à l'aide
11.01.2017 - 20:11DROPS Design answered:
Bonjour René, si vous tricotez la 2ème taille, il vous faudra alors augmenter sur le côté: 1 x 4 mailles, puis 1 x 5 mailles et 1 x 9 mailles pour un total de 38 mailles. Bon tricot!
12.01.2017 - 09:02
![]() Rene wrote:
Rene wrote:
Bonjour je voudrais avoir de l'aide s'il vous plait je suis arrivé ici et je ne comprend pas les augmentations :-/ 2 × 4 mailles ? cela veut dire cas la fin du rangs je doit rajouté 4 mailles refaire un rang et augmenter encore une fois 4 mailles ? merci pour votre aide 16-17-20 (23-25) cm de hauteur totale, augmenter pour la manche tous les rangs en fin de rang sur le côté : 1-1-2 (2-3) fois 4 m, 1-1-1 (1-1) fois 5 m et 1 fois 8-9-8 (12-12) m = 35-38-42
11.01.2017 - 16:19DROPS Design answered:
Bonjour René, pour augmenter 2 x 4 m sur le côté, montez 4 m à la fin d'un rang sur l'envers (= devant gauche) tournez et tricotez le rang retour sur l'endroit. À la fin du rang suivant sur l'envers, montez 4 m, tournez et tricotez le rang retour, et ainsi de suite pour les autres mailles à augmenter sur le côté. Bon tricot!
11.01.2017 - 18:28
![]() Inger Hanesjö wrote:
Inger Hanesjö wrote:
Hur många maskor ska lägga upp för bakstycket på BabyDROPS 16-16? Mvh Inger
03.10.2016 - 08:25DROPS Design answered:
Hej Inger. Sticka in m från vänster framst på st, lägg upp 8-10-10 (12-12) nya m i nacken och sticka in m från höger framst på st = totalt 64-70-78 (90-102) m.
03.10.2016 - 10:22
![]() Chr. wrote:
Chr. wrote:
Hallo, Ich habe eine Frage zu dem Knopfloch. Laut Anleitung muss ich um ein Knopfloch zu bekommen 3 Maschen abketten und in der darauf folgenden Reihe eine Masche zunehmen. Aber dann fehlt mir doch eine Masche? D.h. müsste ich um die Maschen nicht zu reduzieren nicht 2 Maschen zunehmen? Über eine Antwort wäre ich sehr dankbar. Vielen Dank schon mal im Voraus
25.09.2016 - 14:10DROPS Design answered:
Liebe Chr., für 1 Knopfloch muss man nicht 3 Maschen sondern die dritte M. abk, dh nur 1 M, und an der nächsten R darüber eine neue M. anschlagen.
26.09.2016 - 10:37
![]() Viktoria wrote:
Viktoria wrote:
Absolut schönes Jäckchen, welches sehr schnell gestrickt ist. Werde ich noch in anderen Farben stricken. Danke für die tolle Anleitung!
02.08.2016 - 23:17Agueda wrote:
Hola, no entiendo las referencias que quiere decir Mon 18-20-21 (23-25)?
26.04.2016 - 22:15DROPS Design answered:
Hola Agueda, montar 18-20-21 (23-25) pts. Cada cifra corresponde a una talla empezando desde la más pequeña: Talla: 1/3 – 6/9 – 12/18 meses (2 – 3/4) años, es decir, 18 pts para la talla 1/3 meses; 20 pts para la talla 6) meses; 21 pts para la talla12/18 meses...etc
27.04.2016 - 08:49
![]() Françoise wrote:
Françoise wrote:
Bonjour. Selon les explications : Dos, monter 8 - 10 - 10 (12 - 12) m pour l’encolure. Ne faudrait-il pas ajouter un nombre de mailles impair pour l’encolure ? On obtiendrait : 3 mailles point mousse pour la manche gauche, point de riz (avec une maille envers après et avant le point mousse) et 3 mailles point mousse pour la manche droite. Merci pour tous vos magnifiques modèles.
04.02.2015 - 17:54DROPS Design answered:
Bonjour Françoise, et merci. Le point de riz se tricote bien également sur un nombre pair de mailles. Bon tricot!
05.02.2015 - 08:52
![]() Sigrid wrote:
Sigrid wrote:
Beste garnastudio, ik heb het linkerdeel af en wil Nu aan het rechterdeel beginnen. Er staat 'alles in spiegelbeeld'. Ik ben voor het linkerdeel met recht begonnen. Moet ik dan na het opzetten met averechts beginnen? Of hetzelfde breien alleen dan de mouwen aan de voorkant opzetten ipv aan het einde van de naald...? Alvast bedankt!
03.11.2014 - 23:38DROPS Design answered:
Hoi Sigrid. Op het linker voorpand ben brei je van de zijkant tot middenvoor (dus je begint de nld met tricotst en eindigt met 3 ribbelst). Brei je het rechter voorpand, dan begin je middenvoor, dus 3 ribbelst en dan tricotst. Je zet dan st op aan het eind van de nld (zijkant rechter voorpand), waar op het linker voorpand de mouwen aan het begin van de nld kwamen.
05.11.2014 - 17:00
![]() Theodora wrote:
Theodora wrote:
Goedendag! Wat een leuk vestje inderdaad! Ik begrijp één ding niet: waarom voor dit patroon een rondbreinaald nodig? Zou u dit mij alstublieft uit willen leggen? Bij voorbaat hartelijk dank! Met vriendelijke groet, Theodora
01.11.2014 - 23:33DROPS Design answered:
Hoi Theodora. Deze techniek is zeer uitgebreid in Scandinavië en wordt ook steeds populairder in overige landen. Het breit makkelijker (als je continentaal breit) en je kan veel meer steken kwijt op een rondbreinaald dan op een rechte naald.
03.11.2014 - 17:01
![]() Francesca wrote:
Francesca wrote:
Buongiorno! Come posso fare questo maglioncino usando i ferri dritti?purtroppo non riesco ad usare i ferri circolari e per ogni modello che prevede di usarli, ho il solito problema di adeguarlo ai ferri dritti....esiste una "regola"?grazie mille!
28.10.2014 - 11:52DROPS Design answered:
Buongiorno Francesca. La giacca è lavorata tutta avanti e indietro sui ferri. Nel caso di questo modello, può utilizzare i ferri dritti al posto dei circolari senza dover modificare niente nelle spiegazioni. Buon lavoro!
28.10.2014 - 12:05
|
|
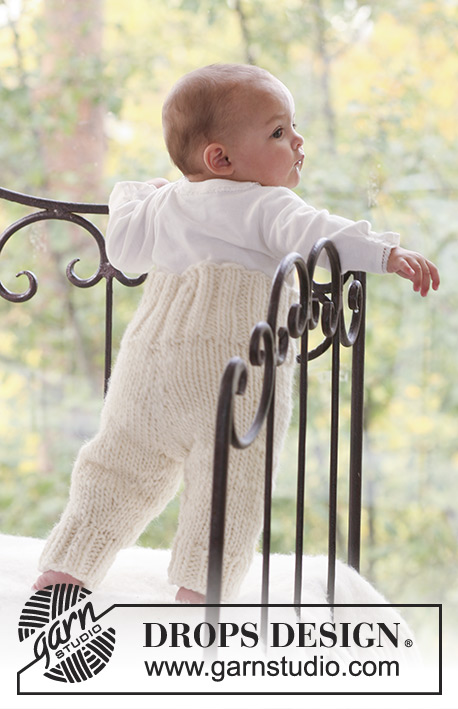
Miss Mossy Jacket#missmossyjacket |
|
|
|
|
Knitted jacket with seamless sleeves for baby and children in DROPS Snow
DROPS Baby 16-16 |
|
|
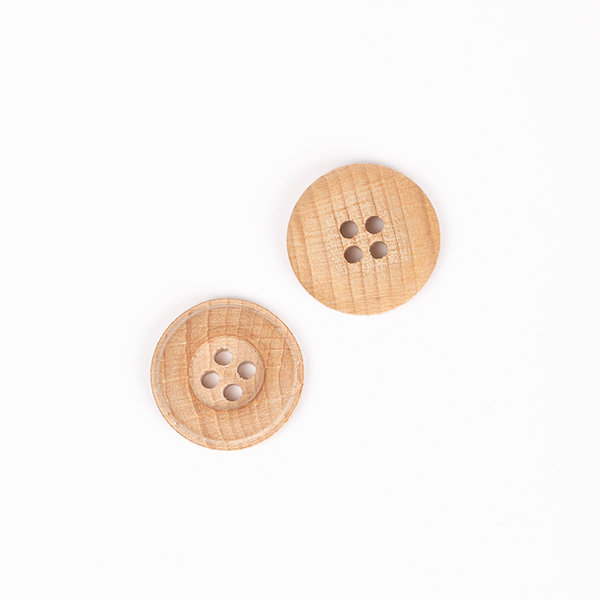
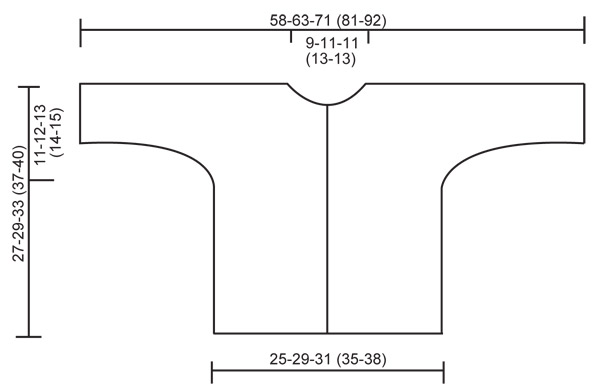
GARTER ST (back and forth on needle): K all rows. MOSS ST: Row 1: * K1, P1 *, repeat from *-*. Row 2: K over P and P over K. Repeat row 2. DECREASING TIP: Dec as follows from RS after 3 garter sts: slip 1 st as if to K, K1, psso Dec as follows from RS before 3 garter st: K2 tog. INCREASING TIP: Inc 1 st by making 1 YO. Work YO into back of loop on return row to avoid a hole. BUTTONHOLES: Cast off for buttonholes on right front band. 1 buttonhole = cast of 3rd st from mid front and cast on 1 new st on return row. Cast off for buttonholes when piece measures: SIZE: 1/3 months: 3, 10, 16 and 22 cm SIZE 6/9 months: 3, 10, 17 and 24 cm SIZE 12/18 months: 4, 10, 16, 22 and 28 cm SIZE 2 years: 4, 11, 18, 25 and 31 cm SIZE 3/4 years: 4, 12, 19, 27 and 34 cm ---------------------------------------------------------- ---------------------------------------------------------- JACKET: Worked in one piece. Beg at bottom of front piece, cast on sts for sleeves and finish at bottom of back piece. To fit in all sts work jacket back and forth on circular needle. LEFT FRONT PIECE: Cast on 18-20-21 (23-25) sts (includes 1 edge st at side and 3 front band sts towards mid front) on needle size 8 mm with Snow. Work 6 rows garter st – SEE ABOVE. Continue in stocking st with 3 garter sts on front band towards mid front. REMEMBER THE KNITTING TENSION! When piece measures 13-14-17 (20-22) cm work 2 rows garter st on all sts and now continue in moss st – SEE ABOVE – with front band in garter st as before. AT THE SAME TIME when piece measures 16-17-20 (23-25) cm cast on new sts at side for sleeve. Cast on at the end of every row towards the side: 4 sts 1-1-2 (2-3) times, 5 sts 1-1-1 (1-1) time and 8-9-8 (12-12) sts 1 time = 35-38-42 (48-54) sts. Incorporate inc sts in moss st as you go along. NOTE! After the last inc work 3 sts at side in garter st (= sleeve edge). When piece measures 22-24-28 (31-34) cm work 2 rows garter st on 9-10-10 (11-11) sts towards mid front (including the 3 front band sts) - work remaining sts as before. On next row from mid front cast off the first 6-7-7 (8-8) sts for neck and now cast off to shape the neckline on every other row – SEE DECREASING TIP: 1 st 2 times = 27-29-33 (38-44) sts left on shoulder/sleeve. Continue in moss st with 3 garter sts each side (= neckline and sleeve edge). When piece measures 27-29-33 (37-40) cm insert a marker (= mid shoulder). NOW MEASURE PIECE FROM HERE! When piece measures 1 cm inc 1 st inside the 3 garter sts on neckline on next row from RS – SEE INCREASING TIP = 28-30-34 (39-45) sts. Work return row and now slip sts on a stitch holder. RIGHT FRONT PIECE: Cast on and work like left front piece, but mirrored. REMEMBER BUTTONHOLES – SEE ABOVE. BACK PIECE: Work sts from left front piece in on needle, cast on 8-10-10 (12-12) new sts for neckline on back piece and work sts from right front piece in on needle = 64-70-78 (90-102) sts. Continue as follows: 3 garter sts, 22-24-28 (33-39) moss sts, 14-16-16 (18-18) garter sts (= neckline), 22-24-28 (33-39) moss sts, 3 garter sts. After 6 rows garter st on neckline continue in moss st on these sts. When piece measures 8-8-9 (9-9) cm loosely cast off sleeve sts. Cast off as follows each side at the beg of every row: 8-9-8 (12-12) sts 1 time, 5 sts 1-1-1 (1-1) time and 4 sts 1-1-2 (2-3) times = 30-34-36 (40-44) sts. When piece measures approx 14-15-16 (17-18) cm (make sure to have the same amount of rows in moss st as on front piece) work 2 rows garter st on all sts. Now continue in stocking st. When piece measures approx 24-26-30 (34-37) cm (adjust to front piece) work 6 rows garter st on all sts. Cast off loosely. ASSEMBLY: Fold piece double by shoulder and sew under arm and side seams inside 1 edge st. Sew on buttons. |
|
 |
|
Have you finished this pattern?Tag your pictures with #dropspattern #missmossyjacket or submit them to the #dropsfan gallery. Do you need help with this pattern?You'll find 12 tutorial videos, a Comments/Questions area and more by visiting the pattern on garnstudio.com. © 1982-2026 DROPS Design A/S. We reserve all rights. This document, including all its sub-sections, has copyrights. Read more about what you can do with our patterns at the bottom of each pattern on our site. |


With over 40 years in knitting and crochet design, DROPS Design offers one of the most extensive collections of free patterns on the internet - translated to 17 languages. As of today we count 324 catalogues and 12290 patterns translated into English (UK/cm). 12290
We work hard to bring you the best knitting and crochet have to offer, inspiration and advice as well as great quality yarns at incredible prices! Would you like to use our patterns for other than personal use? You can read what you are allowed to do in the Copyright text at the bottom of all our patterns. Happy crafting!
Post a comment to pattern DROPS Baby 16-16
We would love to hear what you have to say about this pattern!
If you want to leave a question, please make sure you select the correct category in the form below, to speed up the answering process. Required fields are marked *.