
Popular categories
Looking for a yarn?


Comments / Questions (16)
![]() Kerstin Andersson wrote:
Kerstin Andersson wrote:
Jag skulle väldig gärna ville be om ett förtydligande på hur det ska avmaskas på ärmar och fram- och bakstycke. Jag får inte ihop denna förklaringen: Det avm på varje sida av M.2 samtidigt i varje sida av framst, bakst och ärmarna så här: Ärmarna: 1 m 38-38-40 (40-40) ggr på varje och vartannat v fram- och bakst: Sticka först 5-3-3 (4,5-3) cm innan avm startar, sedan avm 1 m 23-26-28 (26-28) ggr på vartannat v.
13.02.2017 - 12:04DROPS Design answered:
Hej Kerstin. Det kommer jo lidt an paa hvilken str du laver. F.eks. den mindste (dame small). Du har 4 maerketraade i arbejdet (1 i hver overgang mellem aerme og bol) Du tager ind paa hver side af M.2 aermerne: 1 m 38 gange paa hver og hver 2. omg (skiftevis) og paa bolen: strik först 5 cm uden noget, saa 1 m 23 gange paa hver 2. omg.
13.02.2017 - 13:33
![]() Dorthe wrote:
Dorthe wrote:
Under montering. Man skal sætte maskerne tilbage på pinden. Ærmer 8+m2, forstykker 6+m2, ryg. Men min regning kan ikke kun komme til 6 masker ved forstykker. Man har jo lige sat 7+3+2+3 på en tråd Hvordan hænger det sammen?
11.03.2016 - 12:18DROPS Design answered:
Hej Dorthe, Stemmer det ikke med at du har 6 m tilbage på forstykket når du har sat maskerne på en tråd? Du sætter alle m tilbage på p og tager ind til 92-96 m jævnt fordelt inden du fortsætter i rib.
11.03.2016 - 14:03
![]() Anita Steinfort wrote:
Anita Steinfort wrote:
Dank je wel voor de vertaling, dit maakt het voor mij allemaal een stuk helderder.
24.02.2016 - 18:08
![]() Anita Steinfort wrote:
Anita Steinfort wrote:
Wanneer wordt de rest van de vertaling gedaan?? De helft van de tekst van dit patroon is in het engels
12.02.2016 - 23:56DROPS Design answered:
Hoi Anita. Wij zullen het patroon bekijken en zsm opnieuw plaatsen.
15.02.2016 - 14:30
![]() DROPS Design wrote:
DROPS Design wrote:
Hej, enligt mönster, under montering skall du avmaska till ca 92-96 m jämnt fördelat på 1a v.
03.12.2009 - 09:43
![]() Helene Dyrelöv wrote:
Helene Dyrelöv wrote:
Jag har stickat denna modell. Den blev jättefin. Det fattas tyvärr lite i beskrivningen. Vid monteringen måste man plocka upp nya maskor där man maskat av för halsringningen. Jag vet inte hur många maskor det ska vara.
28.11.2009 - 20:52
|
||||||||||
DROPS 49-15 |
||||||||||
|
|
||||||||||
DROPS Textured Sweater in Alaska
DROPS 49-15 |
||||||||||
|
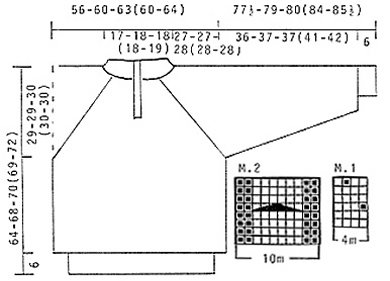
Gauge: 17 sts x 22 rows on larger needles in Pattern 1 = 10 x 10 cm . Rib: * K 2, P 2 *. Repeat from *-*. Pattern: See charts. (1 chart = 1 repeat). The pattern is seen from the right side. Garter Stitch, when knitting flat: Knit all sts all rows. Body: Numbers in ( ) = men's sizes. Cast on 188-204-212 (204-216) sts on smaller circular needles; join and place a marker at the join. Knit rib for 6 cm . Change to larger circular needles and knit Pattern 1 to finished dimensions. When the work measures 35-39-40 (39-42) cm , work the next row as follows: bind off 2 sts for armhole, 90-98-102 (98-104) sts for the front, bind off 4 sts for armhole, 90-98-102 (98-104) sts for the back, bind off 2 sts for armhole. Put the work aside. Sleeves: Cast on 36-40-40 (40-40) sts on smaller double pointed needles; join and place a marker at the join. Knit rib for 6 cm . Change to larger double pointed needles, and knit Pattern 1, increasing 8-4-8 (8-8) sts evenly distributed on the 1st row = 44-44-48 (48-48) sts. After the rib, inc 1 st each side of marker 27 times: Women's: alternately every other and every 3rd row Men's: every 3rd row = 98-98-102 (102-102) sts. When the work measures 42-43-43 (47-48) cm , bind off 2 sts each side of marker and put the work aside = 94-94-98 (98-98) sts. Body: Put the sleeves in on the same circular needles as the body where sts have been bound off for armholes. Place a marker in each transition between the sleeves and the body = 4 markers. Body and sleeves = 368-384-400 (392-404) sts. Begin 5 sts before the marker in the transition between the sleeve and back (that is, 5 sts inside the sleeve) and establish the pattern as follows: Knit Pattern 2 (10 sts), knit 80-88-92 (88-94) sts of Pattern 1 (back), knit Pattern 2 (10 sts), knit 84-84-88 (88-88) sts of Pattern 1 (right sleeve), knit Pattern 2 (10 sts), knit 80-88-92 (88-94) sts of Pattern 1 (front), knit Pattern 2 (10 sts), knit 84-84-88 (88-88) sts of Pattern 1 (left sleeve). (NOTE: The previously placed markers are not necessary at this point; if you use markers from this point, place one marker at each side of each Pattern 2 = 8 markers.) Raglan shaping: Read the entire next section before you knit! Decrease inside each Pattern 2 as follows: Sleeves: Dec 1 st each side 38-38-40 (40-40) times alternately every and every other row (that is, rows 1, 3, 4, 6, 7, 9, etc.) Front and back: Knit 5-3-3 (4.5-3) cm before beginning decreases, then dec 1 st each side 23-26-28 (26-28) times every other row. Make decreases as follows: Before Pattern 2: Right side: K 2 tog, Wrong side: Slip 2 sts off needle, put them back onto left needle twisted (one by one), then P 2 tog into the back of the sts. After Pattern 2: Right side: Slip 1, K 1, pass the slipped st over (psso). Wrong side: P 2 tog. At the same time, when the work measures 45-49-51 (50-53) cm , divide for the neck split at the center front and knit the rest back and forth on the needles. Continue in pattern and raglan shaping, but keep the edge st at each side of the neck split in garter stitch. When the work measures 58-62-64 (63-66) cm , put sts on stitch holders each neck edge every other row: 6-7-7 (7-8) sts 1 time, 3 sts 1 time, 2 sts 1 time, 1 st 3 times. When the neck and raglan shaping are complete the work measures approx. 64-68-70 (69-72) cm and 76-78-78 (78-78) sts remain, distributed on the needles as follows: sleeve (8 sts), Pattern 2 (10 sts), fronts (3 sts each), Pattern 2 (10 sts), sleeve (8 sts), Pattern 2 (10 sts), back (34-36-36 (36-36) sts) Assembly: Change to smaller needles and pick up sts across the bound-off sts at the front neck to approx. 92-96 sts including sts from stitch holders each side. Knit 4 rows garter st over all sts, then knit rib for 16 cm keeping the edge stitch each center front edge in garter stitch, bind off. Fold the rib double against the wrong side and sew - leaving room at the center front to sew in the zipper. Sew the zipper in between the sides of the collar and on down behind the split. |
||||||||||
Diagram explanations |
||||||||||
|
||||||||||
 |
||||||||||
Have you finished this pattern?Tag your pictures with #dropspattern or submit them to the #dropsfan gallery. Do you need help with this pattern?You'll find 26 tutorial videos, a Comments/Questions area and more by visiting the pattern on garnstudio.com. © 1982-2026 DROPS Design A/S. We reserve all rights. This document, including all its sub-sections, has copyrights. Read more about what you can do with our patterns at the bottom of each pattern on our site. |
||||||||||


With over 40 years in knitting and crochet design, DROPS Design offers one of the most extensive collections of free patterns on the internet - translated to 17 languages. As of today we count 325 catalogues and 12298 patterns translated into English (UK/cm). 12298
We work hard to bring you the best knitting and crochet have to offer, inspiration and advice as well as great quality yarns at incredible prices! Would you like to use our patterns for other than personal use? You can read what you are allowed to do in the Copyright text at the bottom of all our patterns. Happy crafting!
Post a comment to pattern DROPS 49-15
We would love to hear what you have to say about this pattern!
If you want to leave a question, please make sure you select the correct category in the form below, to speed up the answering process. Required fields are marked *.