
Popular categories
Looking for a yarn?


Comments / Questions (11)
![]() Cactusjoe wrote:
Cactusjoe wrote:
Bonjour, J'ai commencé ce modèle avec une autre couleur (n°10) que je trouve simple et chic à la fois. Cependant, je veux savoir si la maille lisière en point mousse est valable pour tout l'ouvrage ou quand on a fait les diminutions des emmanchures on continue en maille lisière normal? Merci pour la réponse
26.11.2012 - 10:53DROPS Design answered:
Bonjour Cactusjoe, vous tricotez 1 m lis au point mousse de chaque côté jusqu'à la fin. Bon tricot !
26.11.2012 - 11:48
|
|||||||||||||||||||||||||
White Bliss |
|||||||||||||||||||||||||
 |
 |
||||||||||||||||||||||||
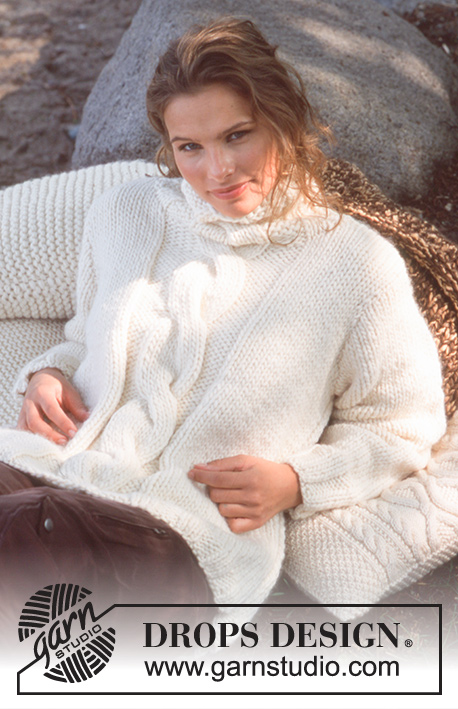
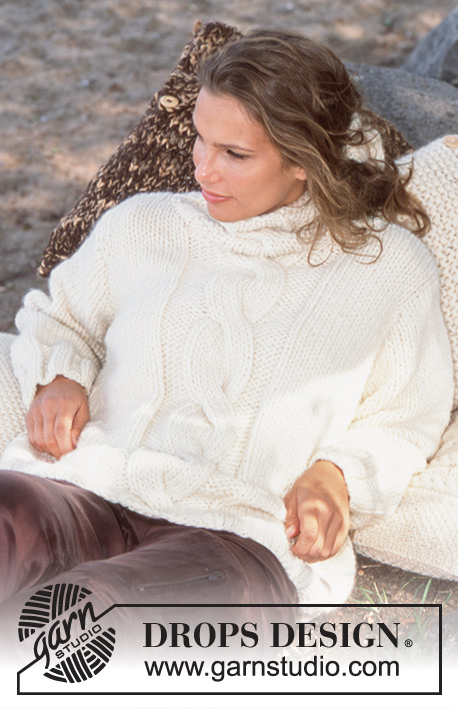
DROPS Pullover in Snow and 4 Pillows
DROPS 80-23 |
|||||||||||||||||||||||||
|
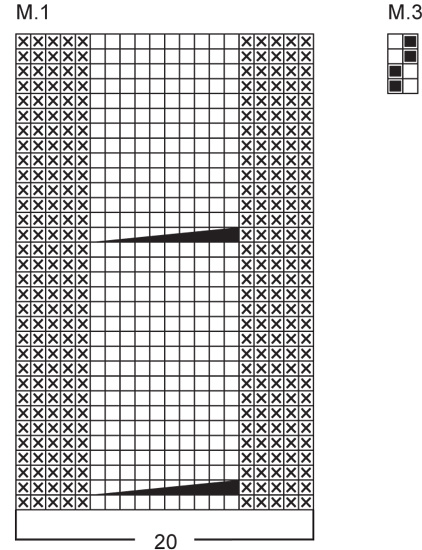
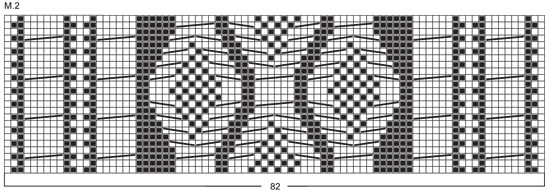
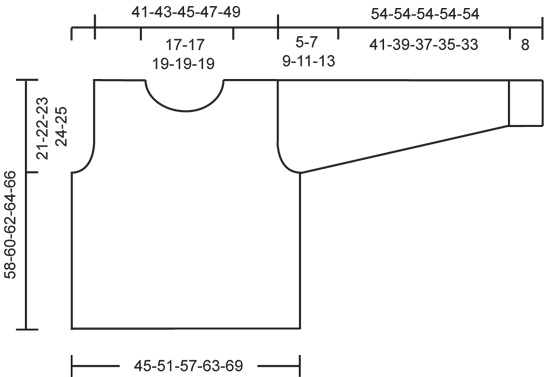
PULLOVER: Gauge: 10 sts x 14 rows on larger needles in stockinette st = 10 x 10 cm. Rib: * K 3, P 3 *, repeat from * - *. Pattern: See chart. The pattern is seen from the right side. Front: Cast on 49-55-61-67-73 sts on smaller needles. Knit rib as follows Row 1 (right side): Size XS: K 1 (edge st knit in garter st), * K 3, P 3 *, repeat from * - * 2 times, K 3, P 5, K 7, P 5, K 3, * P 3, K 3 *, repeat from * - * 2 times, K 1 (edge st knit in garter st). Size S/M: K 1 (edge st knit in garter st), * P 3, K 3 *, repeat from * - * 3 times, P 5, K 7, P 5, * K 3, P 3 *, repeat from * - * 3 times, K 1 (edge st knit in garter st). Size M/L: K 1 (edge st knit in garter st), * K 3, P 3 *, repeat from * - * 3 times, K 3, P 5, K 7, P 5, K 3, * P 3, K 3 *, repeat from * - * 3 times, K 1 (edge st knit in garter st). Size XL: K 1 (edge st knit in garter st), * P 3, K 3 *, repeat from * - * 4 times, P 5, K 7, P 5, * K 3, P 3 *, repeat from * - * 4 times, K 1 (edge st knit in garter st). Size XXL: K 1 (edge st knit in garter st), * K 3, P 3 *, repeat from * - * 4 times, K 3, P 5, K 7, P 5, K 3, * P 3, K 3 *, repeat from * - * 4 times, K 1 (edge st knit in garter st). Row 2 (wrong side): Size XS: K 1 (edge st knit in garter st), * P 3, K 3 *, repeat from * - * 2 times, P 3, K 5, P 7, K 5, P 3, * K 3, P 3 *, repeat from * - * 2 times, K 1 (edge st knit in garter st). Size S/M: K 1 (edge st knit in garter st), * K 3, P 3 *, repeat from * - * 3 times, K 5, P 7, K 5, * P 3, K 3 *, repeat from * - * 3 times, K 1 (edge st knit in garter st). Size M/L: K 1 (edge st knit in garter st), * P 3, K 3 *, repeat from * - * 3 times, P 3, K 5, P 7, K 5, P 3, * K 3, P 3 *, repeat from * - * 3 times, K 1 (edge st knit in garter st). Size XL: K 1 (edge st knit in garter st), * K 3, P 3 *, repeat from * - * 4 times, K 5, P 7, K 5, * P 3, K 3 *, repeat from * - * 4 times, K 1 (edge st knit in garter st). Size XXL: K 1 (edge st knit in garter st), * P 3, K 3 *, repeat from * - * 4 times, P 3, K 5, P 7, K 5, P 3, * K 3, P 3 *, repeat from * - * 4 times, K 1 (edge st knit in garter st). After 6 rows rib change to larger needles and establish pattern as follows: K 1 (edge st knit in garter st), 15-18-21-24-27 sts stockinette st, P 5, then inc 3 sts in the K 7 in the center – inc by pulling up a st from previous the row every other st and knit (= K 10), P 5, 15-18-21-24-27 sts stockinette st and K1 (edge st knit in garter st). There are now 52-58-64-70-76 sts. Continue with stockinette st and Pattern 1 over the center 20 sts to finished measurements. Note: the 1st row of Pattern 1 is a wrong side row. When the piece measures 37-38-39-40-41 cm bind off for armhole at each side every other row: 3 sts 0-0-1-1-1 time, 2 sts 1-1-1-1-2 times and 1 st 1-3-2-4-4 times = 46-48-50-52-54 sts. When the piece measures 51-53-55-57-59 cm put the center 20 sts on a st holder for the neck. Then dec 1 st at each neck edge every other row 1-1-2-2-2 times = 12-13-13-14-15 sts remain on each shoulder. Bind off when the piece measures 58-60-62-64-66 cm. Back: Cast on 47-53-59-65-71 sts on smaller needles and knit rib as follows: Row 1 (right side): Sizes XS, M/L and XXL: K 1 (edge st knit in garter st), and begin with P 3, end with K 1 (edge st knit in garter st). Sizes S/M and XL: K 1 (edge st knit in garter st), and start with K 3, end with K 1 (edge st knit in garter st). Row 2 (wrong side): Sizes XS, M/L and XXL: K 1 (edge st knit in garter st), and begin with K 3, end with K 1 (edge st knit in garter st). Sizes S/M and XL: K 1 (edge st knit in garter st), and start with P 3, end with K 1 (edge st knit in garter st). After 6 rows rib change to larger needles and stockinette st over all sts. Bind off for armholes as on front = 41-43-45-47-49 sts. When the piece measures 55-57-59-61-63 cm bind off the center 15-15-17-17-17 sts for the neck. On the next row dec 1 st at each neck edge = 12-13-13-14-15 sts remain on each shoulder. Bind off when the piece measures 58-60-62-64-66 cm. Sleeve: Cast on 26-26-32-32-32 sts on smaller needles and knit rib, keeping 1 st at each side in garter st, for 8 cm. Change to larger needles and stockinette st, and inc 1 st at each side every 6.5-5-7-5.5-4 cm a total of 7-8-6-7-8 times = 40-42-44-46-48 sts. When sleeve measures 49-47-45-43-41 cm bind off for sleeve cap at each side every other row: 4 sts 1 time, 2 sts 1-2-2-2-2 times and 1 st 0-0-0-3-4 times, then bind off 2 sts at each side until the piece measures 54 cm. Bind off the remaining sts. Assembly: Sew right shoulder. Collar: Pick up 53 or 59 sts around the neck (incl. sts on st holder) on larger needles and knit as follows: the 20 sts at center front continue in Pattern and the remaining sts knit in rib so that there will be K 3 at each side of Pattern. When the collar measures approx. 14 cm (you need at least 5 rows stockinette st over the last cable at center front) K 2 tog across the 10 sts over the cable = 48 or 54 sts. On the next row bind off all sts in rib. Sew left shoulder and up along the collar. Sew in sleeves. Sew sleeve and side seams using edge sts as a seam allowance. GARTER STITCH PILLOW IN SNOW: Measurement: 45 x 45 cm The pillow can be knit with 1 or 2 strands. If you knit with 1 strand follow the numbers before ( ), if you knit with 2 strands follow the numbers inside ( ). Materials: Garnstudio SNOW from Garnstudio 350 (450) gr nr 01, natural DROPS 9 mm (12 mm) needles, or size needed to obtain correct gauge. 5 DROPS Light wood button, nr 502 Gauge: 1 strand: 10 sts x 20 rows in garter st on smaller needles = 10x 10 cm. 2 strands: 7 sts x 16 rows in garter st on larger needles = 10 x 10 cm Pillow: Cast on loosely 43 (31) sts on appropriate needles with 1 (2) strands. Knit garter st. If you do not want the flap, bind off when the piece measures 84 cm. If you want the flap, continue until the piece measures 98 cm, then make 5 buttonholes evenly distributed (1 buttonhole = K 2 tog and yo, on the next row, twist and knit the yo so the buttonhole will not be too large. Knit 4 rows garter st after the buttonholes and then bind off. Assembly: Pillow without flap: Fold pillow in half and sew side seams. Insert pillow form and sew top seam, then sew on 5 buttons as decoration 8 cm below top seam. Pillow with flap: Fold the bottom 84 cm of pillow in half (flap = approx. 16 cm), sew side seams. Fold flap over pillow, and sew on buttons to match up with the buttonholes. PILLOW IN ULL-FLAMÉ AND SNOW: Measurement: 45 x 45 cm Materials: DROPS SNOW from Garnstudio 250 gr nr 03, brown and use: DROPS ULL-FLAMÉ from Garnstudio 250 gr nr 19, camel DROPS 12 mm needles, or size needed to obtain correct gauge. DROPS 7 mm crochet hook, or size needed to obtain correct gauge. 2 DROPS Light wood button, nr 502 Gauge: 7 sts x 11 rows with 1 strand Snow + 1 strand Ull-Flamé in stockinette st = 10 x 10 cm. Pillow: Cast on loosely 31 sts with 1 strand of each yarn. Knit garter st for 4 rows, then knit stockinette st until the piece measures 98 cm, then knit 4 rows garter st and bind off. Fold bottom 84 cm in half and sew side seams. The flap measures approx. 16 cm. Button loops: Crochet 1 buttonhole loop at each side of flap with 1 strand of each yarn. 1 loop = start with 1 sc in 2nd st from edge, ch 4, skip over 1 st (in from st with sc) and fasten with a sl st in the next st. Repeat at other side of flap. Tassels: Make 2 tassels. 1 tassel = 10 strands of each yarn 30 cm long. Ch 14 ch with 1 strand of each yarn. Fold strands of yarn over the ch and make tassel. Fasten ch with a sl st 6 ch from hook. Sew the ch-band to the top of each side of pillow. Fasten 1 tassel on the other side. Sew on buttons. CABLED PILLOW IN ALASKA: Finished measurement: 50 x 50 cm Materials: DROPS ALASKA from Garnstudio 500 gr nr 02, natural DROPS 5 mm needles, or size needed to obtain correct gauge. 6 DROPS wood buttons nr 511 Gauge: 17 sts x 22 rows in stockinette st = 10 x 10 cm. Pattern: See chart. The pattern is seen from the right side. Pillow: Cast on 86 sts and knit 2 rows garter st, increasing 24 sts evenly distributed over the center 58 sts on the 2nd row = 110 sts. Establish pattern on the next row as follows; K 2 (edge sts knit in garter st), 12 sts in Pattern 3, Pattern 2 (82 sts), 12 sts in Pattern 3, and K 2 (edge sts knit in garter st). Continue in pattern as established until the piece measures 45 cm, then knit 2 rows garter st over all sts (= folding edge), decreasing 24 sts evenly distributed over the center 62 sts on the 1st row = 86 sts. Then knit Pattern 3 over all sts keeping 2 sts in garter st at each side. When the piece measures 90 cm place a marker. When the piece measures 102 cm make 6 buttonholes as follows: K 2 (edge sts in garter st), 5 sts in Pattern 3, bind off 2 sts for buttonhole, * 12 sts in Pattern 3, bind off 2 sts for buttonhole *, repeat from * - * 5 times, 7 sts remain, 5 sts in Pattern 3 and K 2 (edge sts in garter st). Cast on 2 new sts over the bound off sts on the next row, and then knit Pattern 3 over all sts, keeping 2 edge sts in garter st at each side until the piece measures 104 cm. Knit 2 rows garter st and bind off. The piece measures approx. 105 cm. Fold piece at garter st rows and at the marker so that the buttonholes are on the outside of the pillow. Sew side seams using 1 edge st at each side as seam allowance, and sew on buttons. |
|||||||||||||||||||||||||
Diagram explanations |
|||||||||||||||||||||||||
|
|||||||||||||||||||||||||
 |
|||||||||||||||||||||||||
 |
|||||||||||||||||||||||||
 |
|||||||||||||||||||||||||
Have you finished this pattern?Tag your pictures with #dropspattern or submit them to the #dropsfan gallery. Do you need help with this pattern?You'll find 18 tutorial videos, a Comments/Questions area and more by visiting the pattern on garnstudio.com. © 1982-2026 DROPS Design A/S. We reserve all rights. This document, including all its sub-sections, has copyrights. Read more about what you can do with our patterns at the bottom of each pattern on our site. |
|||||||||||||||||||||||||


With over 40 years in knitting and crochet design, DROPS Design offers one of the most extensive collections of free patterns on the internet - translated to 17 languages. As of today we count 324 catalogues and 12290 patterns translated into English (UK/cm). 12290
We work hard to bring you the best knitting and crochet have to offer, inspiration and advice as well as great quality yarns at incredible prices! Would you like to use our patterns for other than personal use? You can read what you are allowed to do in the Copyright text at the bottom of all our patterns. Happy crafting!
Post a comment to pattern DROPS 80-23
We would love to hear what you have to say about this pattern!
If you want to leave a question, please make sure you select the correct category in the form below, to speed up the answering process. Required fields are marked *.