
Popular categories
Looking for a yarn?


Comments / Questions (7)
![]() SusanneVandt wrote:
SusanneVandt wrote:
Ang DROPS 257-26 Jeg forstår ikke opskriften på den hæklede kant. Kanten består af 3 hæklede rækker, men den første række forstår jeg slet ikke. Har I mulighed for at lave en lille video ? Vh Susanne
09.04.2025 - 15:27DROPS Design answered:
Hej Susanne, du starter med at sætte tråden fast midt under ærmet, hækl 1 luftmaske, 3 luftmasker, 1 fastmaske ca 1,5 cm fra der hvor du startede, 3 lm, 1 fm , 3lm, 1 fm osv. Næste omgang starter med 1 luftmaske, kædemasker frem til først lm bue, 1 fastm om luftmaskebuen, så symbolet med 3lm, 1 halvst, osv :)
10.04.2025 - 08:50
![]() Janni wrote:
Janni wrote:
Hvorfor er der aldrig fotos af ryggen? ( det gælder alle jeres beklædnings opskrifter) Det kunne være rart og nogle gange også behjælpeligt at kunne se begge sider
01.04.2025 - 00:22DROPS Design answered:
Hei Janni. Vi har mange plagg med bilder av ryggen, men når ryggen er lik forstykket vil vi ofte bare vise forstykket. mvh DROPS Design
07.04.2025 - 08:39
![]() Estelle-Marie Lesault wrote:
Estelle-Marie Lesault wrote:
It does help, Thank you!
27.02.2025 - 18:21
![]() Estelle Lesault wrote:
Estelle Lesault wrote:
Thank you for your response! I’m not sure what you mean by 1+16 +1 +30 for example. You count 16 stitches and put the marker on the 16th stitch. Where is this 1 mentioned ? Why not 17 then?
27.02.2025 - 16:55DROPS Design answered:
Dear Mrs Lesault, just add the markers in designed stitch, ie insert the 1st marker in the first stitch, count 16 sts, insert the marker in the next stitch, count 30 sts, insert the marker in the next stitch, count 16 sts, insert the marker in the next stitch, there should be now 30 sts after last marker so that you have: 1 st with a marker + 16 sts for sleeve + 1 st with a marker + 30 sts for front piece + 1 st with a marker + 16 sts for sleeve + 1 st with a marker + 30 sts for back piece. Can this help?
27.02.2025 - 17:13
![]() Estelle-Marie Lesault wrote:
Estelle-Marie Lesault wrote:
Hi! So there's a total of 96 stitches at first but when inserting the markers that only includes 92 stitches, is this normal and does it mean a side will be slightly bigger than the other?
27.02.2025 - 11:22DROPS Design answered:
Dear Mrs Lesault, note that each of the 4 markers should be inserted in one stitch, and not between stitches, you then have 96 sts in S: 1+16+1+30+1+16+1+30=96 sts. Which side is biggern than which other one? Not sure to understand what you mean here, can you give us more info so that we can check? Thanks for your comprehension.
27.02.2025 - 16:42
![]() Denise Lavonne Houghtaling wrote:
Denise Lavonne Houghtaling wrote:
I would lied this pattermws
25.02.2025 - 20:56
![]() Anna wrote:
Anna wrote:
Hello. To start the project where it is written to work 3 rounds in A1, does it mean to work 3 rounds only or to work 3 times A1 which would make 6 rounds in total? Thank you.
22.02.2025 - 14:08DROPS Design answered:
Dear Anna, you work 3 rounds with A.1 (so round 1, round 2 and round 1 of A.1 again). Happy knitting!
24.02.2025 - 00:15
|
||||||||||||||||||||||||||||||||||
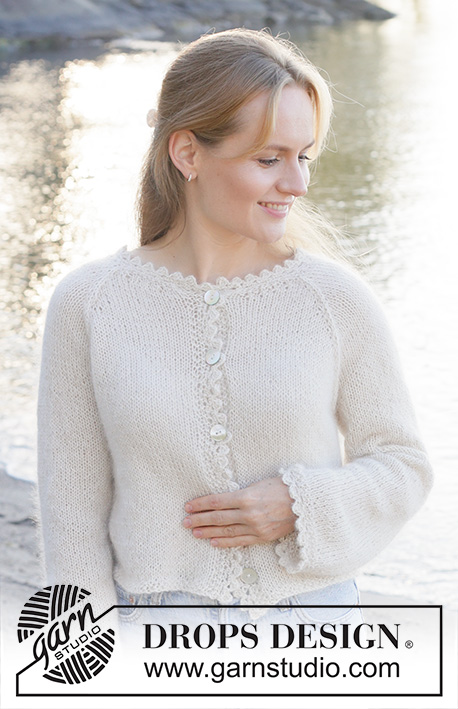
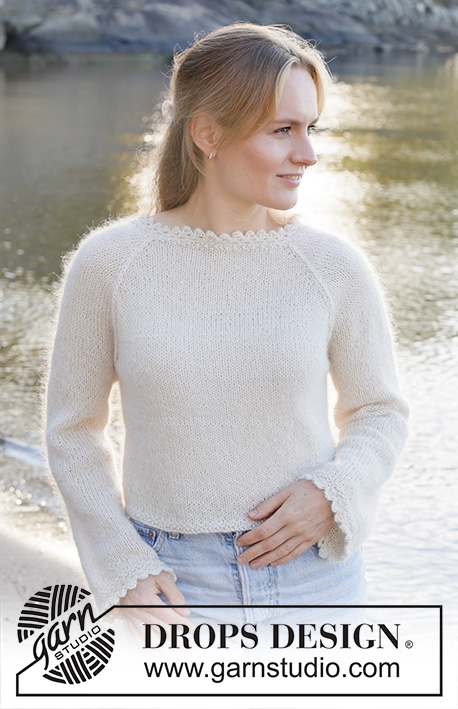
White Cascade#whitecascadesweater |
||||||||||||||||||||||||||||||||||
 |
 |
|||||||||||||||||||||||||||||||||
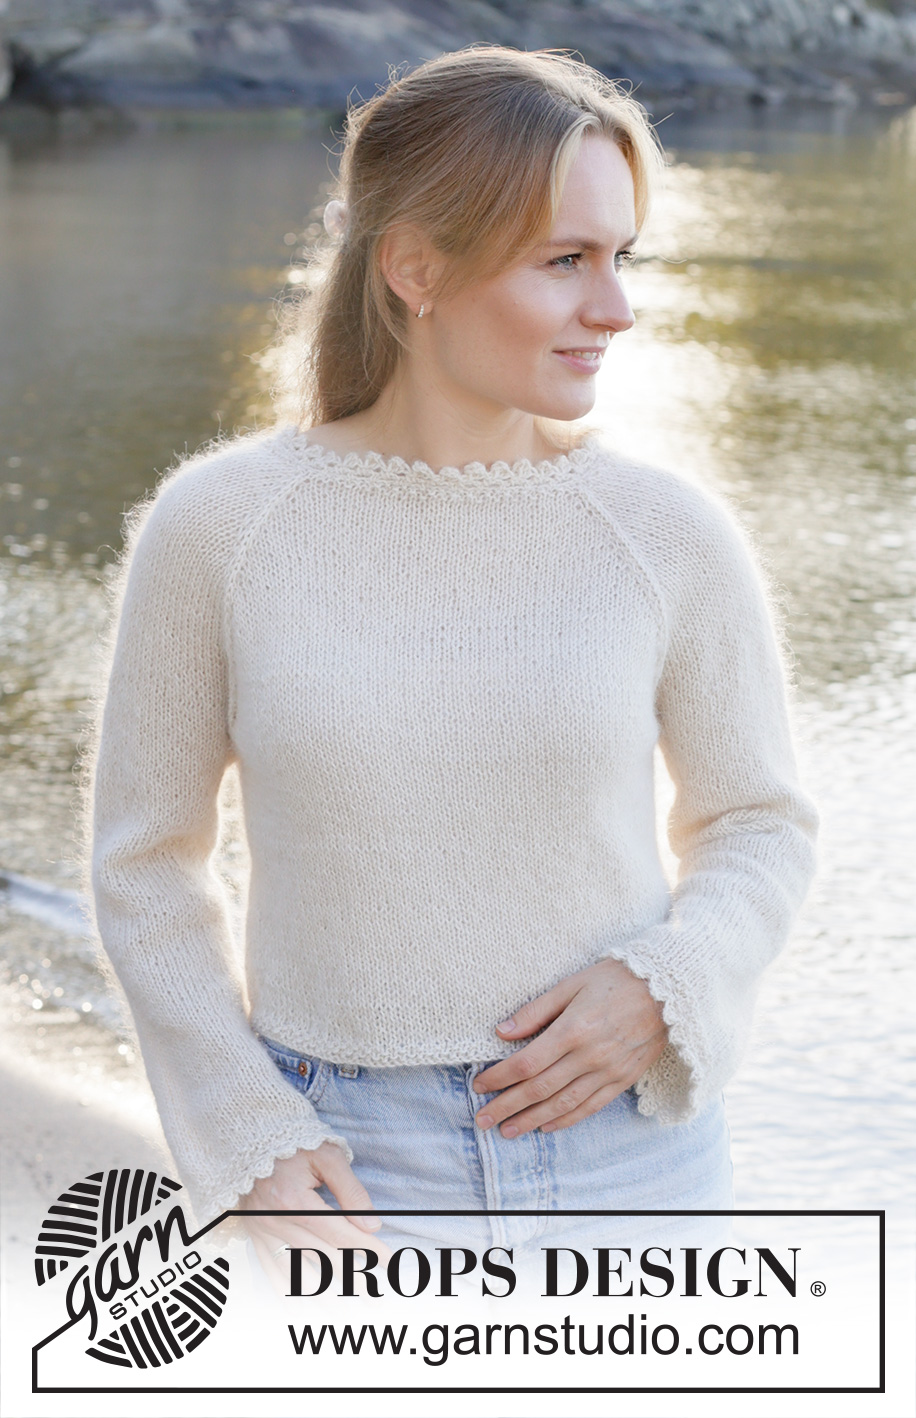
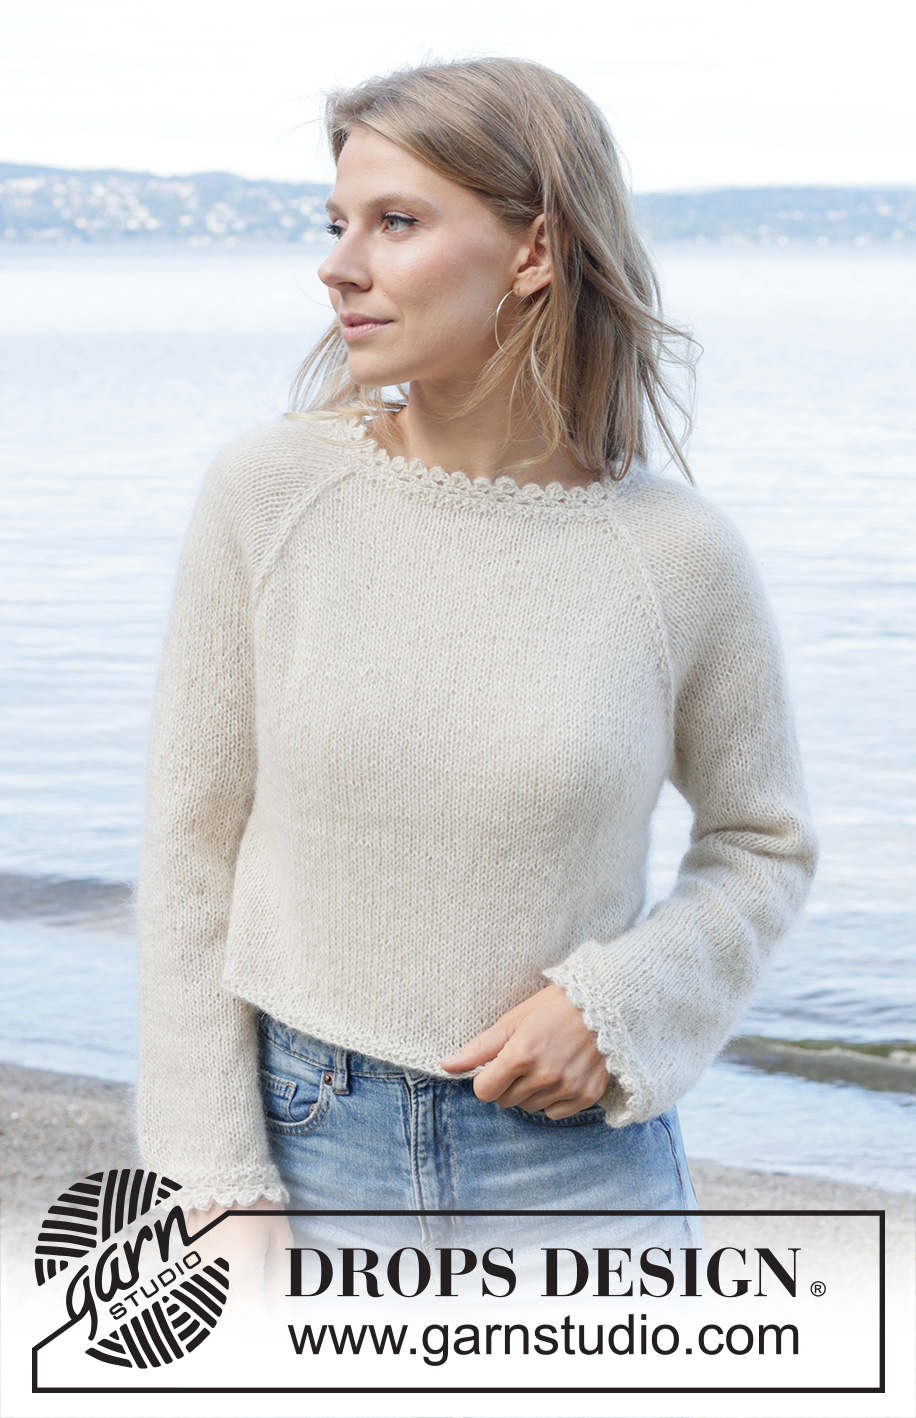
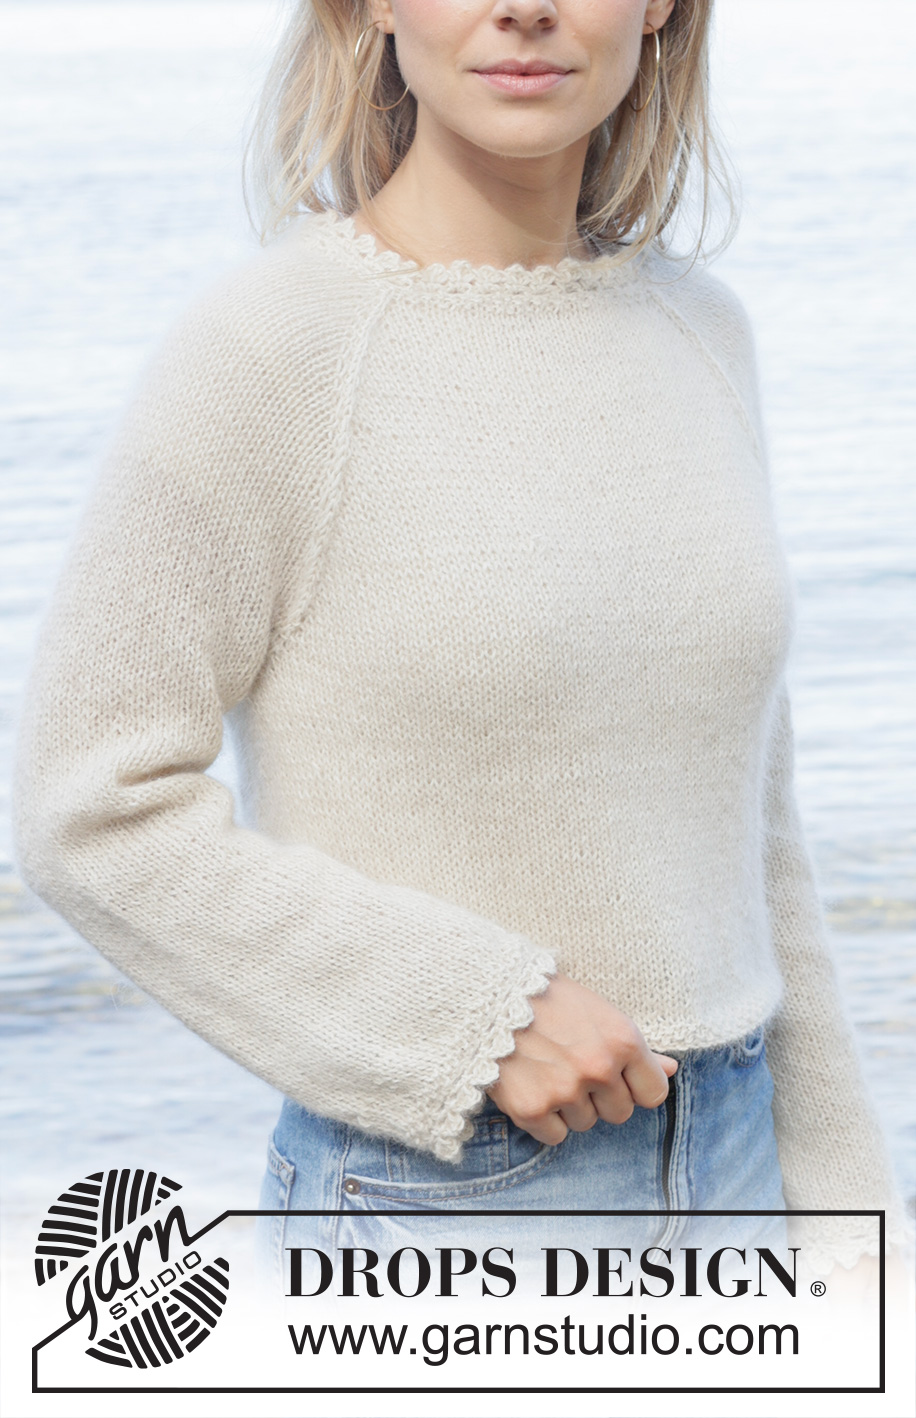
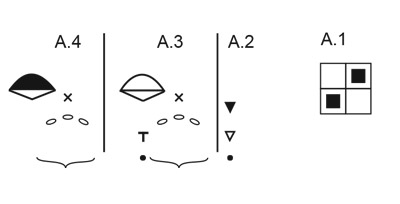
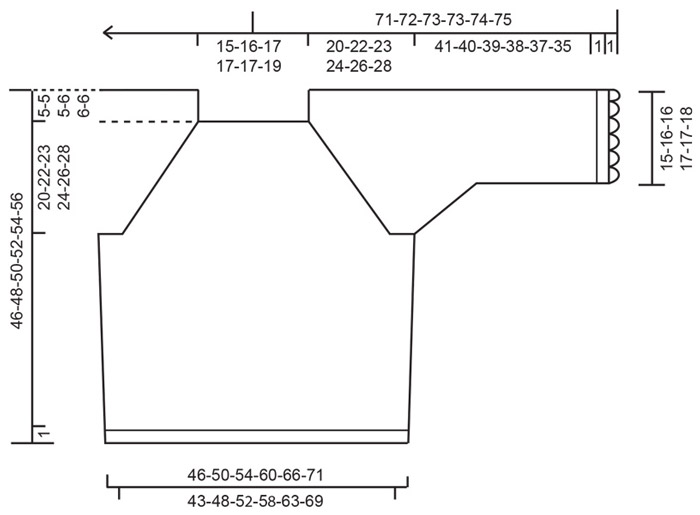
Knitted jumper in 1 strand DROPS Alpaca or DROPS Nord and 1 strand DROPS Kid-Silk. Piece is knitted top down in stocking stitch with raglan and crochet edges. Size: S - XXXL.
DROPS 257-26 |
||||||||||||||||||||||||||||||||||
|
---------------------------------------------------------- EXPLANATION FOR THE PATTERN: ---------------------------------------------------------- PATTERN: See diagram A.1. CROCHET EDGES: See diagrams A.2 to A.4. RAGLAN: Increase 1 stitch by making 1 yarn over as explained below: INCREASE 1 STITCH TOWARDS THE RIGHT BEFORE MARKER: Make 1 yarn over around right needle by placing the yarn over right needle from behind and forwards, on next round knit yarn over in front loop of stitch. Then work the new stitches in stocking stitch. INCREASE 1 STITCH TOWARDS THE LEFT AFTER MARKER: Make 1 yarn over around right needle by placing the yarn in front of needle and then pulling the yarn backwards, on next round knit yarn over twisted in back loop of stitch. Then work the new stitches in stocking stitch. DECREASE TIP: Decrease 1 stitch on each side of marker thread as follows: Work until 5 stitches remain before marker thread, knit 2 together, knit 6 (marker thread is in the middle of these 6 stitches), slip 1 stitch knitwise, knit 1, pass slipped stitch over stitch worked (= 2 stitches decreased). SLEEVE TIP: When picking up stitches mid under sleeve, there will be a small hole in the transition between stitches on body and sleeves. The holes can be closed by picking up the strand between two stitches - work this strand twisted together with the first stitch between body and sleeve to close the hole. ---------------------------------------------------------- START THE PIECE HERE: ---------------------------------------------------------- JUMPER - SHORT OVERVIEW OF THE PIECE: In this pattern needles of different length have been used, begin with fitting length for number of stitches and switch as needed. Work neck edge and yoke in the round on circular needle from right shoulder back, and work top down. When yoke is done, divide piece for body and sleeves. Work body downwards in the round on circular needle while putting the sleeves aside. Then work sleeves downwards in the round on needle. Crochet an edge around the neck and around both sleeves. NECK EDGE: Cast on 96-100-104-112-112-116 stitches on circular needle size 3 mm with 1 strand DROPS Alpaca or 1 strand DROPS Nord together with 1 strand DROPS Kid-Silk (= 2 strands). Work PATTERN - read explanation above, i.e. work 3 rounds with A.1. Beginning of round is at right shoulder at the back. Insert 1 marker after the first 33-34-35-39-39-40 stitches on round (= approx. mid front), measures piece from this marker. YOKE: Insert 4 markers in piece without working the stitches, insert markers in a stitch and these stitches are called raglan stitches and worked in stocking stitch. Insert 1st marker in first stitch, count 16-16-16-20-20-20 stitches (= sleeve), insert 2nd marker in next stitch, count 30-32-34-34-34-36 stitches (= front piece), insert 3rd marker in next stitch, count 16-16-16-20-20-20 stitches (= sleeve), insert 4th marker in next stitch, 30-32-34-34-34-36 stitches remain after last marker (= back piece). Switch to circular needle size 4.5 mm and work in stocking stitch and increase for RAGLAN - read explanation above, work as follows: ROUND 1: Work in stocking stitch and increase for raglan on each side of the 4 raglan stitches (= 8 stitches increased). ROUND 2: Work in stocking stitch. Work 1st and 2nd ROUND 11-11-14-17-21-18 times (= 22-22-28-34-42-36 rounds have been worked) = 184-188-216-248-280-260 stitches. Remember to follow the knitting tension! Then work and increase as follows: ROUND 1: Work in stocking stitch and increase for raglan on each side of the 4 raglan stitches (= 8 stitches increased). ROUND 2: Work in stocking stitch. ROUND 3: Work in stocking stitch and increase for raglan on front piece and back piece, i.e. increase after 2nd and 4th marker and before 3rd and 1st marker - do not increase stitches on sleeves (= 4 stitches increased). ROUND 4: Work in stocking stitch. Work 1st to 4th ROUND 6-7-7-6-5-8 times in total (= 24-28-28-24-20-32 rounds have been worked = you have increased 6-7-7-6-5-8 times on sleeves and 12-14-14-12-10-16 times on front piece/back piece) = 256-272-300-320-340-356 stitches. All increases for raglan are now done, you have increased 23-25-28-29-31-34 times in total on front piece and back piece and 17-18-21-23-26-26 times on sleeves = 256-272-300-320-340-356 stitches on needle. Work in stocking stitch without increase until piece measures 20-22-23-24-26-28 cm from marker mid front. Now divide yoke for body and sleeves. DIVIDING FOR BODY AND SLEEVES: In sizes S, M and L divide the piece in the middle of raglan lines, in sizes XL, XXL and XXXL divide the piece to that the raglan lines are place a little bit in on front piece/back piece. AT THE SAME TIME as next round is worked divide yoke for body and sleeves as follows: Work 0-0-0-2-4-4 stitches in stocking stitch (these stitches belong to back piece), slip the next 52-54-60-64-66-66 stitches on a thread for sleeve, cast on 6-8-8-12-14-16 new stitches on needle (= in the side mid under sleeve), work 76-82-90-96-104-112 stitches in stocking stitch (= front piece), slip the next 52-54-60-64-66-66 stitches on a thread for sleeve, cast on 6-8-8-12-14-16 new stitches on needle (= in the side mid under sleeve) and work the last 76-82-90-94-100-108 stitches in stocking stitch (= back piece). Finish body and sleeves separately. BODY: = 164-180-196-216-236-256 stitches. Insert 1 marker thread in each side on body, in the middle of the 6-8-8-12-14-16 stitches cast on under each sleeve and move the marker threads when working, use the marker threads when decreasing in the sides on body. Work until first marker thread, round begins here and work in the round in stocking stitch. When piece measures 6 cm from division, decrease 1 stitch on each side of both marker threads - read DECREASE TIP (= 4 stitches decreased). Repeat decrease when piece measures 12 cm from division = 156-172-188-208-228-248 stitches. Work in stocking stitch until piece measures 40-42-44-45-47-49 cm from marker mid front. Switch to circular needle size 3 mm and work 3 rounds with A.1 Cast off with knit over knit and purl over purl. Jumper measures 41-43-45-46-48-50 cm from marker mid front and approx. 46-48-50-52-54-56 cm from the top of shoulder. SLEEVES: Slip 52-54-60-64-66-66 sleeve stitches from one thread on to circular needle size 4.5 mm and pick in addition up 1 stitch in each of the 6-8-8-12-14-16 stitches cast on under sleeve - read SLEEVE TIP = 58-62-68-76-80-82 stitches. Insert 1 marker thread in the middle of the 6-8-8-12-14-16 new stitches under sleeve - round begins at the marker thread. Work in stocking stitch in the round on needle - AT THE SAME TIME when sleeve measures 2 cm from division, decrease mid under sleeve – read DECREASE TIP and decrease as follows: Decrease 2 stitches every 2-2-2-1½-1½-1½ cm 2-3-5-8-9-9 times in total = 54-56-58-60-62-64 stitches. Work until sleeve measures 41-40-39-38-37-35 cm from division. Switch to circular needle size 3 mm and work 3 rounds with A.1 Cast off with knit over knit and purl over purl. Sleeve measures approx. 42-41-40-39-38-36 cm from division. CROCHET EDGES: Use crochet hook 3.5 mm and 1 strand in each quality (= 2 strands), read CROCHET EDGES in explanation above and begin from right side mid under sleeve / at one raglan line in the neck. Work A.2 in first stitch, work A.3 until approx. 1½ cm remain on round, work A.4. Cut and fasten the yarn. |
||||||||||||||||||||||||||||||||||
Diagram explanations |
||||||||||||||||||||||||||||||||||
|
||||||||||||||||||||||||||||||||||
 |
||||||||||||||||||||||||||||||||||
 |
||||||||||||||||||||||||||||||||||
Have you finished this pattern?Tag your pictures with #dropspattern #whitecascadesweater or submit them to the #dropsfan gallery. Do you need help with this pattern?You'll find 32 tutorial videos, a Comments/Questions area and more by visiting the pattern on garnstudio.com. © 1982-2026 DROPS Design A/S. We reserve all rights. This document, including all its sub-sections, has copyrights. Read more about what you can do with our patterns at the bottom of each pattern on our site. |
||||||||||||||||||||||||||||||||||


With over 40 years in knitting and crochet design, DROPS Design offers one of the most extensive collections of free patterns on the internet - translated to 17 languages. As of today we count 324 catalogues and 12290 patterns translated into English (UK/cm). 12290
We work hard to bring you the best knitting and crochet have to offer, inspiration and advice as well as great quality yarns at incredible prices! Would you like to use our patterns for other than personal use? You can read what you are allowed to do in the Copyright text at the bottom of all our patterns. Happy crafting!
Post a comment to pattern DROPS 257-26
We would love to hear what you have to say about this pattern!
If you want to leave a question, please make sure you select the correct category in the form below, to speed up the answering process. Required fields are marked *.