DROPS Nord
DROPS Nord
45% Alpaca, 30% Polyamide, 25% Wool
from 2.95 € /50g
DROPS Kid-Silk
DROPS Kid-Silk
75% Mohair, 25% Silk
from 5.05 € /25g
Get the yarn to make this pattern from 60.20€.

The yarn cost is calculated from the pattern’s smallest size and the yarn’s cheapest product type. Looking for an even better price? You might find it on the DROPS Deals!

DROPS SS24

Winter Owl Sweater

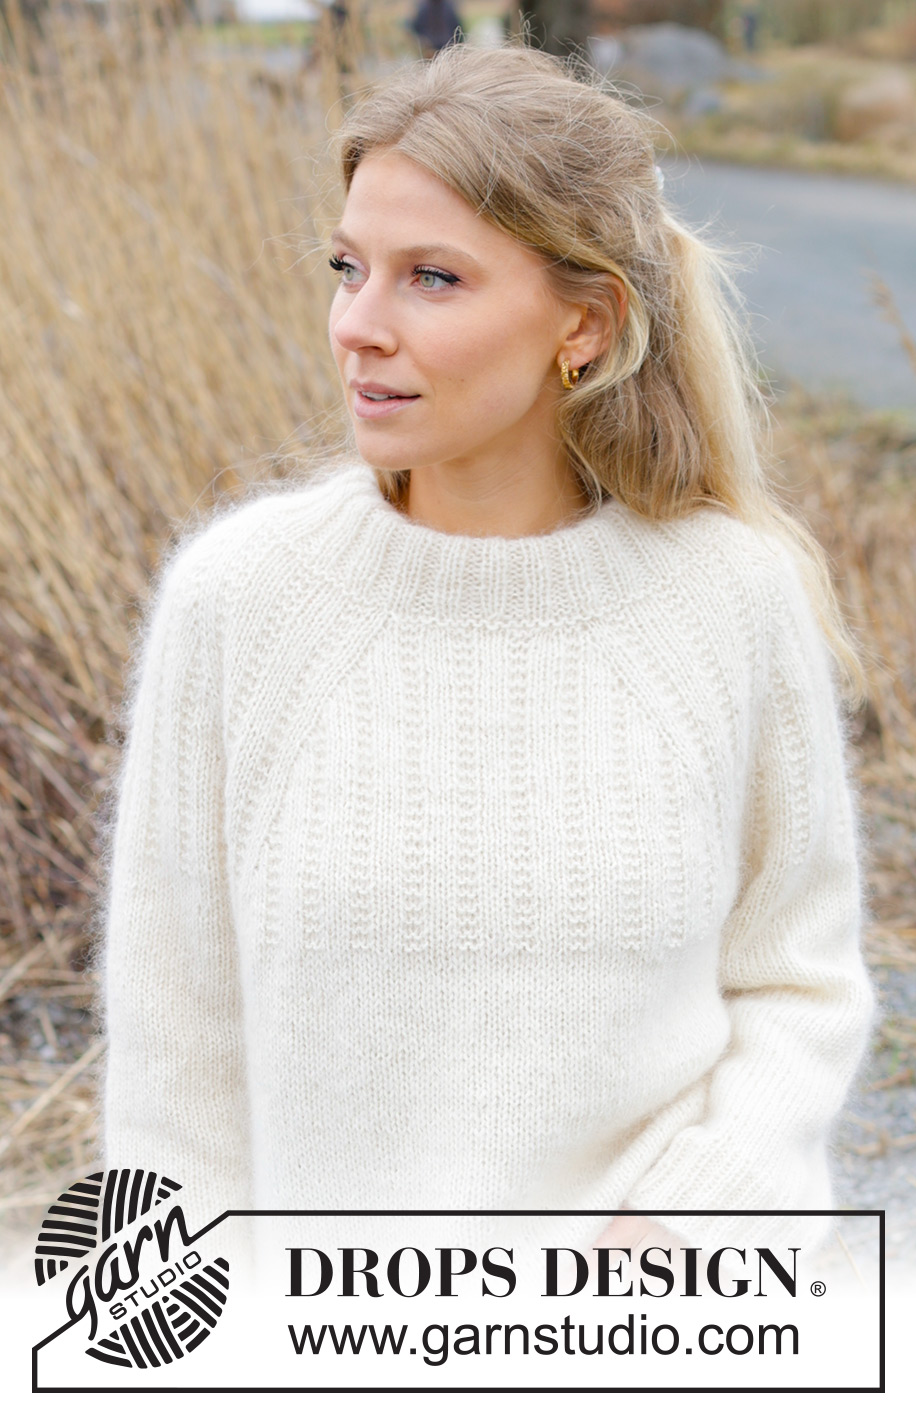
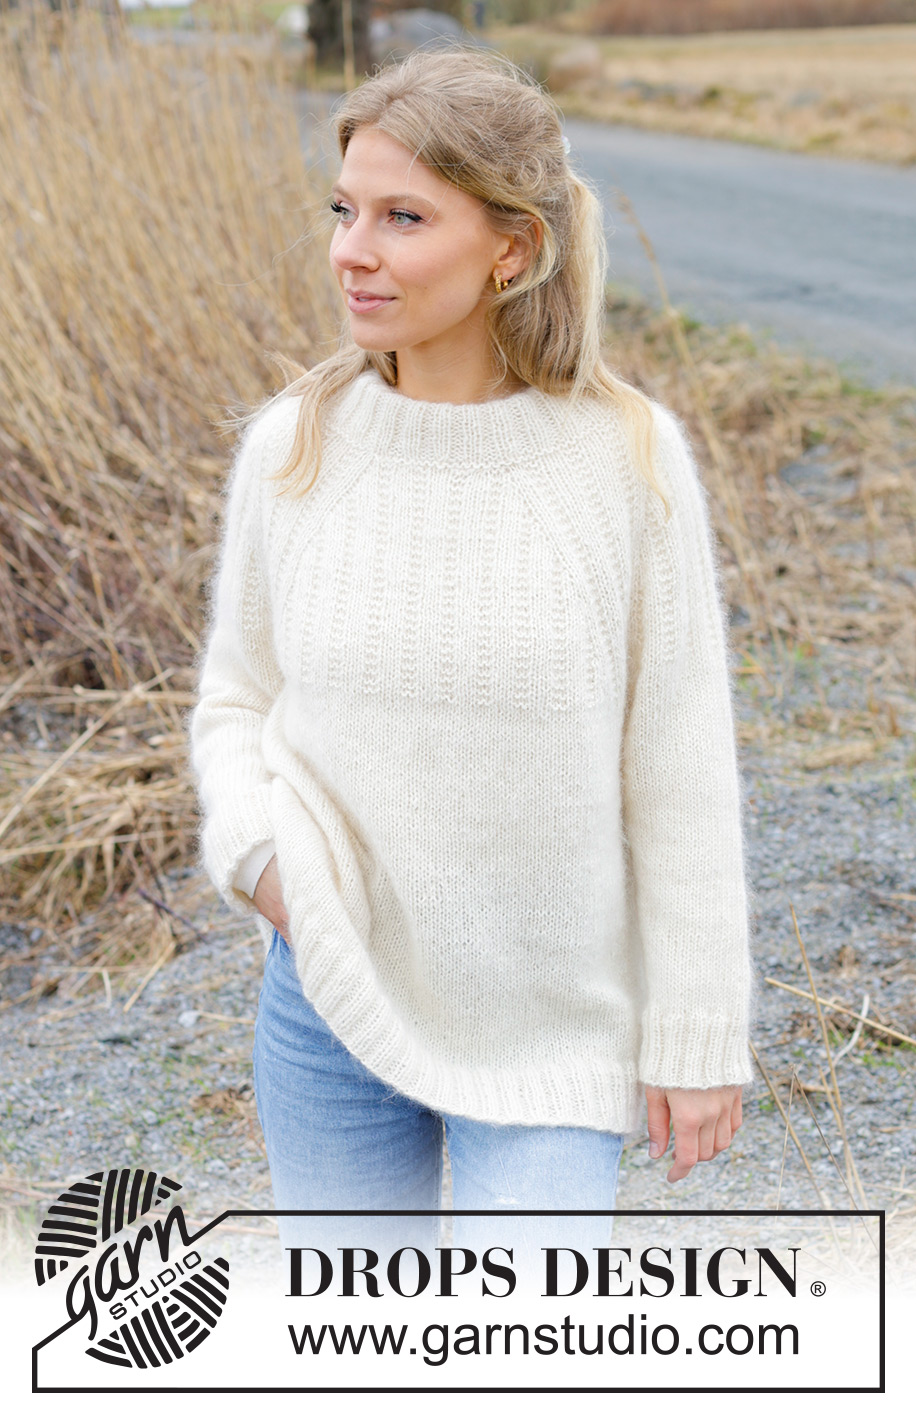
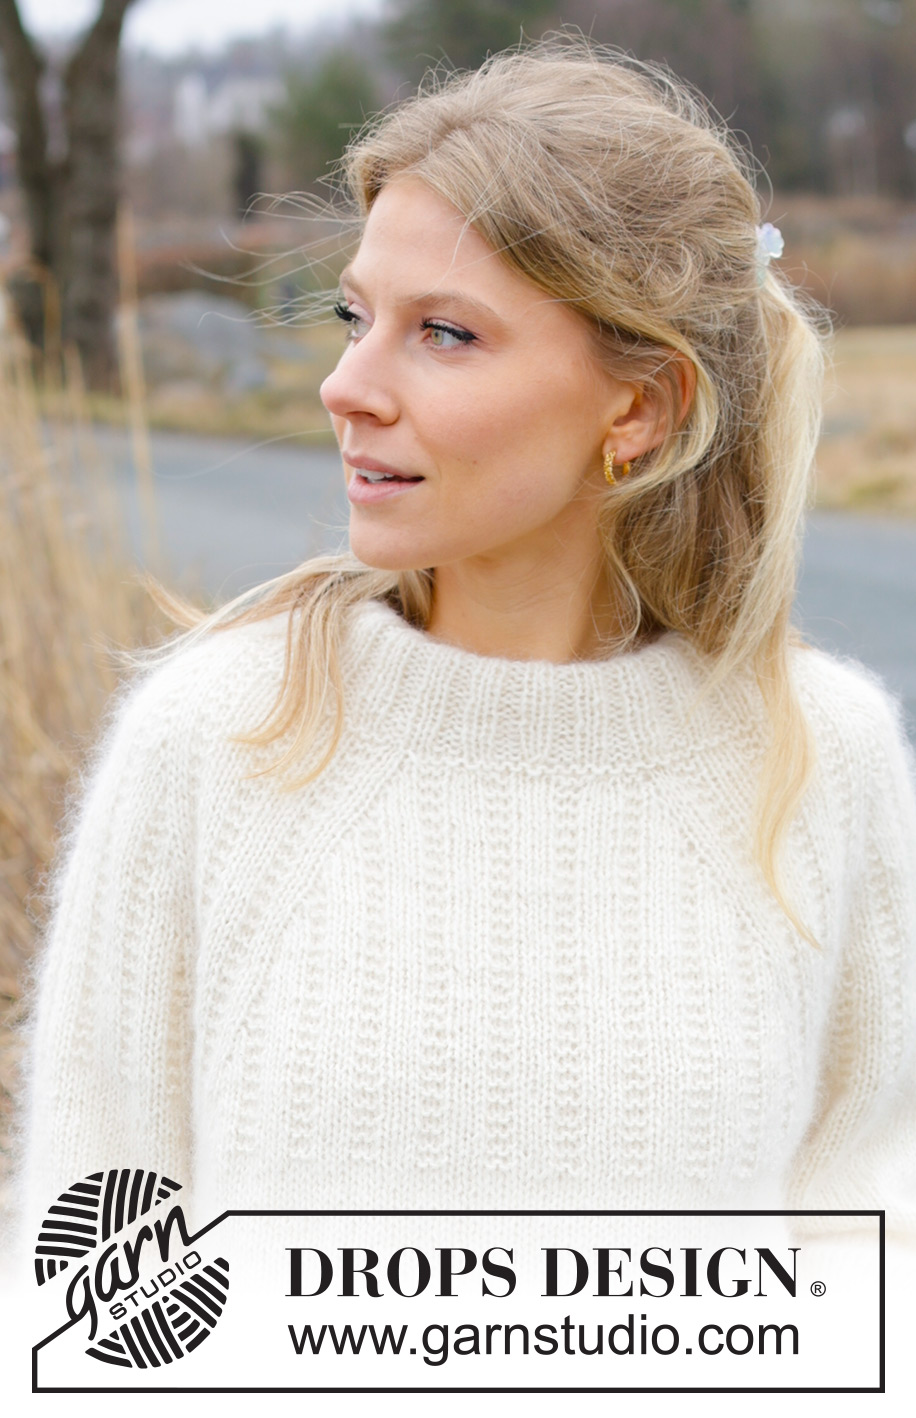
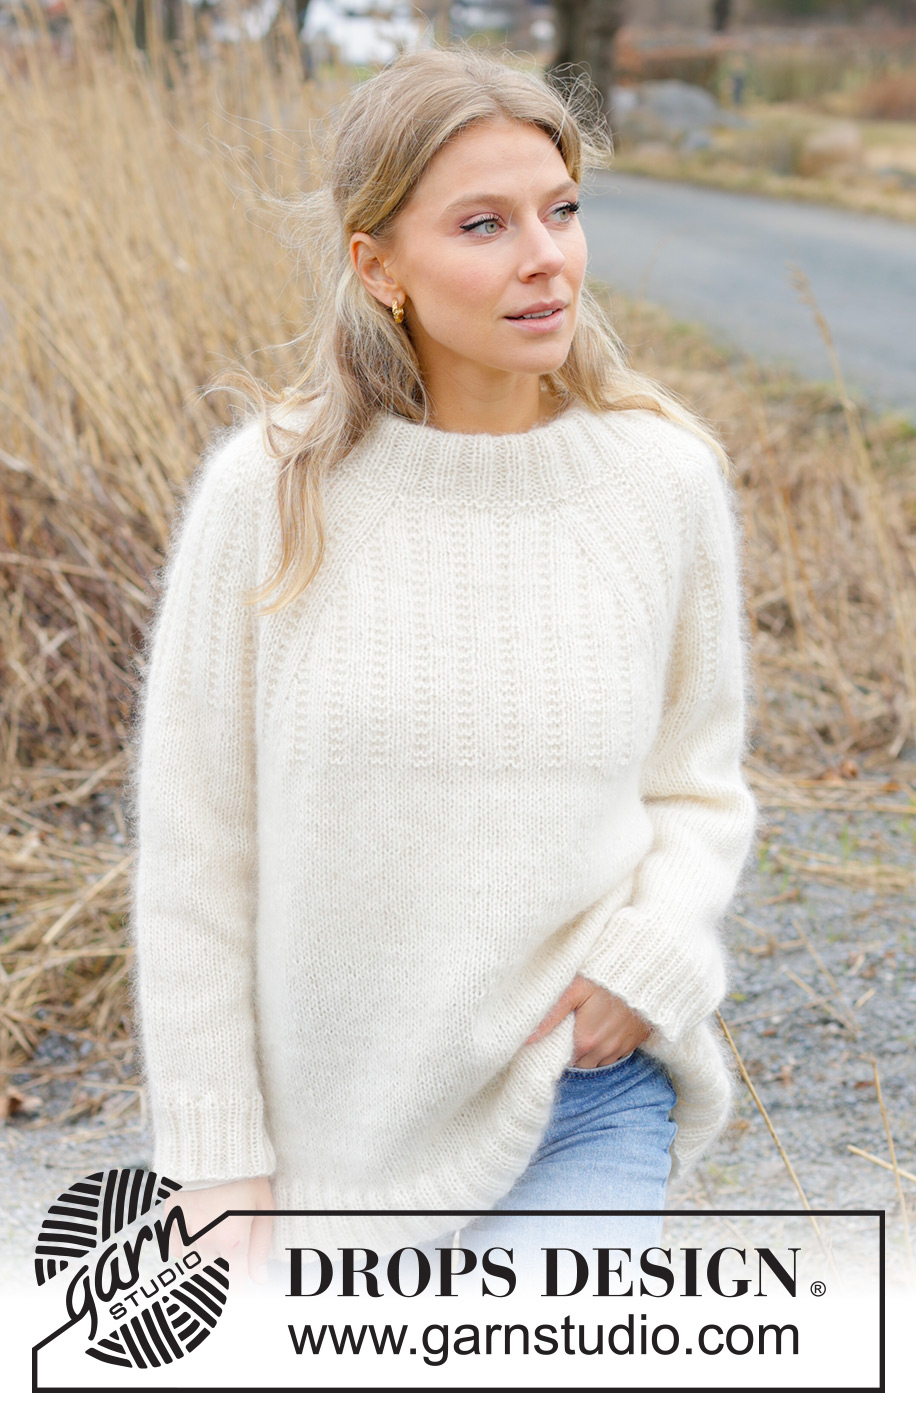
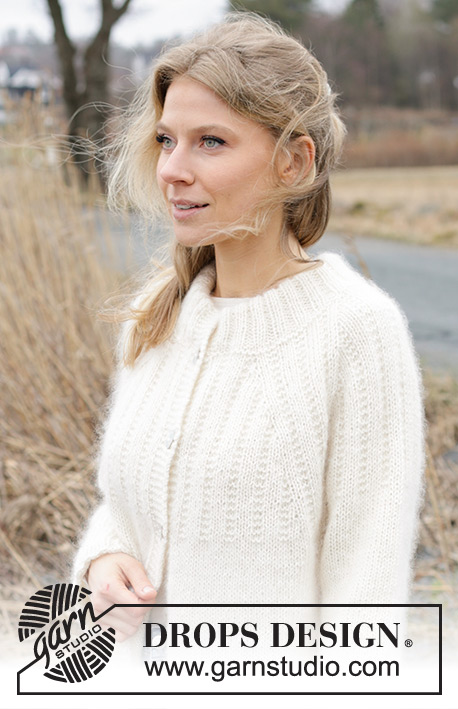
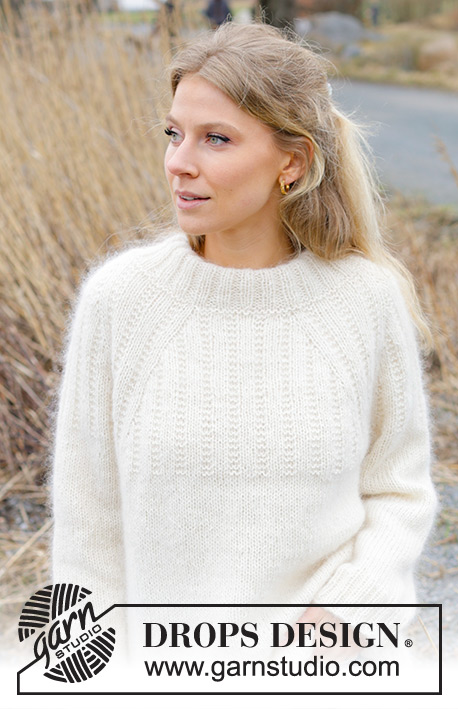
Knitted jumper in DROPS Nord and DROPS Kid-Silk. The piece is worked top down with double neck, raglan and relief-pattern. Sizes S - XXXL.

DROPS 243-1
DROPS Design: Pattern no-075
Yarn group A + A or C
-------------------------------------------------------

SIZES:
S - M - L - XL - XXL - XXXL

YARN:
DROPS NORD from Garnstudio (belongs to yarn group A)
250-300-350-350-400-450 g colour 01, off white
And use:
DROPS KID-SILK from Garnstudio (belongs to yarn group A)
225-225-250-275-300-350 g colour 01, off white

NEEDLES:
DROPS CIRCULAR NEEDLE SIZE 5.5 MM: Length 40 cm and 80 cm.
DROPS CIRCULAR NEEDLE SIZE 4.5 MM: Length 40 cm and 80 cm.
DROPS DOUBLE POINTED NEEDLES SIZE 5.5 MM.
DROPS DOUBLE POINTED NEEDLES SIZE 4.5 MM.
The technique MAGIC LOOP can be used – you then only need 80 cm circular needle in each size.

KNITTING TENSION:
16 stitches in width and 20 rows in height with stocking stitch and 1 strand DROPS Nord + 2 strands DROPS Kid-Silk = 10 x 10 cm.
NOTE: Needle size is only a guide. If you get too many stitches on 10 cm, change to a larger needle size. If you get too few stitches on 10 cm, change to a smaller needle size.

-------------------------------------------------------

Alternative Yarn – See how to change yarns here
Yarn Groups A to F – Use the same pattern and change the yarn here
Yarn usage using an alternative yarn – Use our yarn converter here

-------------------------------------------------------

DROPS Nord
DROPS Nord
45% Alpaca, 30% Polyamide, 25% Wool
from 2.95 € /50g
DROPS Kid-Silk
DROPS Kid-Silk
75% Mohair, 25% Silk
from 5.05 € /25g
Get the yarn to make this pattern from 60.20€.

The yarn cost is calculated from the pattern’s smallest size and the yarn’s cheapest product type. Looking for an even better price? You might find it on the DROPS Deals!

Pattern instructions

-------------------------------------------------------

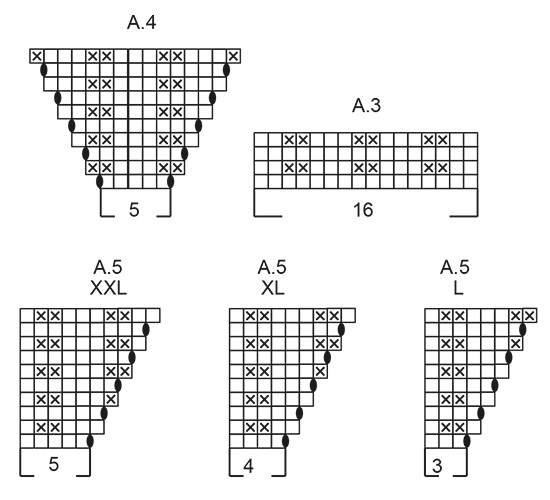
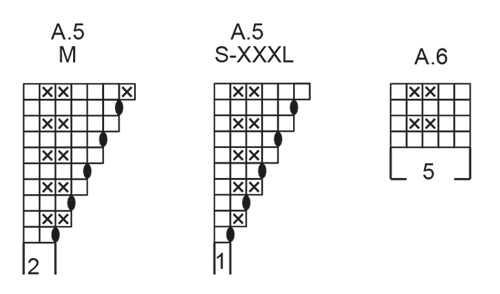
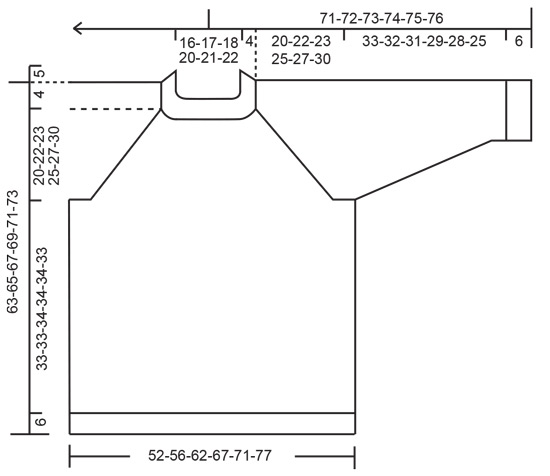
EXPLANATIONS FOR THE PATTERN:

-------------------------------------------------------

PATTERN:
See diagrams A.1 to A.6. Choose diagram for your size (applies to A.2 and A.5).

DECREASE TIP (for sleeves):
Decrease 1 stitch on either side of the marker-thread as follows: Work until there are 3 stitches left before the marker-thread, knit 2 together, knit 2 (marker-thread sits between these 2 stitches), slip 1 stitch knit-wise, knit 1 and pass the slipped stitch over the knitted stitch (2 stitches decreased).

-------------------------------------------------------

START THE PIECE HERE:

-------------------------------------------------------


JUMPER – SHORT OVERVIEW OF THE PIECE:
The neck and yoke are worked in the round with circular needle, from mid back and top down. The yoke is divided for body and sleeves and the body is continued in the round with circular needle. The sleeves are worked in the round with short circular needle/double pointed needles.

DOUBLE NECK:
Cast on 76-80-84-88-92-96 stitches with 1 strand DROPS Nord and 2 strands DROPS Kid-Silk using short circular needles size 4.5 and 5.5 mm held together. Remove the needle size 5.5 mm keeping stitches on the needle size 4.5 mm (this gives you an elastic cast-on edge).
Work rib in the round (knit 2, purl 2) for 10 cm.
Fold the neck double to the inside and work 1 more round of rib, working every 4th stitch together with its corresponding stitch on the cast-on edge.
Knit 1 round and increase 24 stitches evenly spaced = 100-104-108-112-116-120 stitches. Purl 1 round. Insert 1 marker; the yoke is measured from here.

YOKE:
Change to short circular needle size 5.5 mm and work pattern as follows (the start of the round is on the back piece):
Work A.1 over 5-5-5-5-5-10 stitches, A.2 (approx. half the back piece) A.3, A.4, A.3 (sleeve), A.5, A.6 over 11-11-11-11-11-21 stitches, A.2 (front piece), A.3, A.4, A.3 (sleeve), A.5, A.6 over 6-6-6-6-6-11 stitches (rest of back piece).
Continue this pattern and increase as shown in A.2, A.4 and A.5 (i.e., increase towards each repeat of A.3 and 8 increases every 2nd round). The increased stitches are worked twisted into the pattern – no hole.
REMEMBER THE KNITTING TENSION!
Diagrams A.1, A.3 and A.6 are repeated in height. When diagrams A.2, A.4 and A.5 are finished 1 time in height, continue the increases as before and work the stitches twisted as before until you have increased a total of 17-19-23-25-27-30 times (including the increases in A.2, A.4 and A.5) = 236-256-292-312-332-360 stitches. Continue the pattern without further increases until the yoke measures 20-22-23-25-27-30 cm from the marker.
Now divide for the body and sleeves as follows:
Knit 37-39-44-48-51-57 (approx. half back piece), place the next 43-49-57-59-63-65 stitches on a thread), cast on 8-10-10-10-10-8 stitches in side under the sleeve, knit 75-79-89-97-103-115 (front piece), place the next 43-49-57-59-63-65 stitches on a thread), cast on 8-10-10-10-10-8 stitches in side under the sleeve, knit the last 38-40-45-49-52-58 stitches (rest of back piece). Finish the body and sleeves separately.

BODY:
= 166-178-198-214-226-246 stitches.
Continue with stocking stitch in the round for a further 33-33-34-34-34-33 cm. Knit 1 round and increase 26-26-30-30-34-34 stitches evenly spaced = 192-204-228-244-260-280 stitches. Change to circular needle size 4.5 mm. Work rib (knit 2, purl 2) for 6 cm. Cast off with knit over knit and purl over purl.
The piece measures approx. 63-65-67-69-71-73 cm from the shoulder.

SLEEVES:
Place the 43-49-57-59-63-65 stitches from the thread on the one side of the piece on short circular needle/double pointed needles size 5.5 mm and knit up 1 stitch in each of the new stitches cast on under the sleeve = 51-59-67-69-73-73 stitches. Insert a marker-thread in the middle of the new stitches under the sleeve.
Continue stocking stitch in the round.
When the sleeve measures 3-3-3-2-2-2 cm, decrease 1 stitch on each side of the marker-thread – read DECREASE TIP. Decrease like this every 6-4-2½-2½-2-1½ cm a total of 5-7-11-11-13-12 times = 41-45-45-47-47-49 stitches. When the sleeve measures 33-32-31-29-28-25 cm, knit 1 round and increase 7-7-7-9-9-11 stitches evenly spaced = 48-52-52-56-56-60 stitches. Change to double pointed needles size 4.5 mm and work rib (knit 2, purl 2) for 6 cm. Cast off. Sleeve measures approx. 39-38-37-35-34-33 cm from the division.
Work the other sleeve in the same way.

This pattern has been corrected.

Updated online: 13.10.2023
Correction yarn amount and information about tension.
Updated online: 07.12.2023
The diagram A.5 is updated. Correction under yoke in all sizes.
Updated online: 15.01.2024
The pattern is updated. Correction in stitch count at the end of yoke and on body in all sizes.

Diagram

symbols = knit from right side
symbols = purl from right side
symbols = between 2 stitches make 1 yarn over, which is worked twisted on the next round – no hole.
diagram
diagram
diagram
diagram

Each of our patterns has specific tutorial videos to help you.

Do you have a question? See a list of frequently asked questions (FAQ)

Knitting tension is what determines the final measurements of your work, and is usually measured per 10 x 10 cm. It is provided like so: number of stitches in width x number of rows in height - eg: 19 stitches x 26 rows = 10 x 10 cm.

The knitting tension is very individual; some people knit/crochet loosely while others work tightly. You adjust the knitting tension with the needle size, which is why the suggested needle size is only meant as a guide! You need to adjust this (up or down) to ensure that YOUR knitting tension matches the knitting tension provided in the pattern. If you work with a different knitting tension than provided you will have a different yarn consumption, and your work will have different measurements than what the pattern suggests.

The knitting tension also determines which yarns can replace each other. As long as you achieve the same knitting tension you can replace one yarn with another.

See DROPS lesson: How to measure your tension/gauge

See DROPS video: How to make a gauge tension swatch

The required amount of yarn is provided in grams, eg: 450 g. To calculate how many balls you’ll need you first need to know how many grams are in 1 ball (25g, 50g or 100g). This information is available if you click on the individual yarn quality on our pages. Divide the amount required with the amount of each ball. For example, if each ball is 50g (the most common amount), the calculation will be as follows: 450 / 50 = 9 balls.

The important thing when changing from one yarn to another is that the knitting/crochet tension remains the same. This is so that the measurements of the finished piece will be the same as on the sketch provided. It is easier to achieve the same knitting tension using yarns from the same yarn group. It is also possible to work with multiple strands of a thinner yarn to achieve the knitting tension of a thicker one. Please try our yarn converter. We recommend you to always work a test swatch.

Please NOTE: when changing yarn the garment might have a different look and feel to the garment in the photo, due to individual properties and qualities of each yarn.

See DROPS lesson: Can I use a different yarn than the one mentioned in the pattern?

All our yarns are categorised into yarn groups (from A to F) according to thickness and knitting tension – group A contains the thinnest yarns and group F the thickest. This makes it easier for you to find alternative yarns to our patterns, should you wish to switch yarn. All yarns within the same group have a similar knitting tension and can easily replace each other. However, different yarn qualities have different structures and properties which will give the finished work a unique look and feel.

Click here for an overview of the yarns in each yarn group

At the top of all our patterns you’ll find a link to our yarn calculator, which is a helpful tool should you wish to use a different yarn than suggested. By filling in the yarn quality you wish to replace, the amount (in your size) and number of strands, the calculator will present good alternative yarns with the same knitting tension. Additionally it will tell you how much you’ll require in the new qualities and whether you’ll need to work with multiple strands. Most skeins are 50g (some are 25g or 100g).

If the pattern is worked with multiple colours, every colour will have to be calculated separately. Similarly, if the pattern is worked with several strands of different yarns (for example 1 strand Alpaca and 1 strand Kid-Silk) you will have to find alternatives for each, individually.

Click here to see our yarn calculator

Since different yarns have different qualities and textures we have chosen to keep the original yarn in our patterns. However, you can easily find options among our available qualities by using our yarn calculator, or simply pick a yarn from the same yarn group.

It is possible that some retailers still have discontinued yarns in stock, or that someone has a few skeins at home that they would like to find patterns for.

The yarn calculator will provide both alternative yarn as well as required amount in the new quality.

If you think it's hard to decide what size to make, it can be a good idea to measure a garment you own already and like the size of. Then you can pick the size by comparing those measures with the ones available in the pattern's size chart.

You'll find the size chart at the bottom of the pattern.

See DROPS lesson: How to read size chart

The needle size provided in the pattern serves only as a guide, the important thing is to follow the knitting tension. And since knitting tension is very individual, you will have to adjust the needle size to ensure that YOUR tension is the same as in the pattern – maybe you’ll have to adjust 1, or even 2 needle sizes, up or down to achieve the correct tension. For this, we recommend that you work test swatches.

Should you work with a different knitting tension than the one provided, the measurements of the finished garment might deviate from the measurement sketch.

See DROPS lesson: How to measure your tension/gauge

See DROPS video: How to make a tension/gauge swatch

Working a garment top-down provides more flexibility and room for personal adjustment. For example it is easier to try the garment on while working, as well as making adjustments to length of yoke and shoulder caps.

The instructions are carefully explaining every step, in the correct order. Diagrams are adjusted to the knitting direction and are worked as usual.

The diagram depicts all rows/rounds, and every stitch seen from the right side. It is read from bottom to top, from right to left. 1 square = 1 stitch.

When working back and forth, every other row is worked from the right side and every other row is worked from the wrong side. When working from the wrong side, the diagram will have to be worked reversed: from left to right, knit stitches are purled, purl stitches are knit etc.

When working in the round every round is worked from the right side and the diagram are worked from right to left on all rounds.

See DROPS lesson: How to read knitting diagrams

The diagram depicts all rows/rounds, and every stitch seen from the right side. It is worked from bottom to top, from right to left.

When working back and forth every other row is worked from the right side: from right to left and every other row is worked from the wrong side: from left to right.

When working in the round, every row in the diagram are worked from the right side, from right to left.

When working a circular diagram you start in the middle and work your way outwards, counter clockwise, row by row.

The rows usually start with a given number of chain stitches (equivalent to the height of the following stitch), this will either be depicted in the diagram or explained in the pattern.

See DROPS lesson: How to read crochet diagrams

Instructions for working several diagrams after each other on the same row/round, will often be written like so: “work A.1, A.2, A.3 a total of 0-0-2-3-4 times". This means you work A.1 once, then A.2 is worked once, and A.3 is repeated (in width) the number of times provided for your size – in this case like so: S = 0 times, M = 0 times, L=2 times, XL= 3 times and XXL = 4 times.

The diagrams are worked as usual: begin with the first row in A.1, then work the first row in A.2 etc.

See DROPS lesson: How to read knitting diagrams

See DROPS lesson: How to read crochet diagrams

The total width of the garment (from wrist-to-wrist) will be larger in the larger sizes, despite the actual sleeves being shorter. The larger sizes have longer sleeve caps and wider shoulders, so there will be a good fit in all sizes.

The measurement sketch/schematic drawing provides information regarding the full length of the garment. If it’s a jumper or a jacket the length is measured from the highest point on the shoulder closest to the neckline, and straight down to the bottom of the garment. It is NOT measured from the tip of shoulder. Similarly, the length of yoke is measured from the highest point on the shoulder and down to where yoke is split into body and sleeves.

On a jacket measures are never taken along bands, unless specifically stated. Always measure inside band stitches when measuring the length.

See DROPS lesson: How to read a schematic drawing

Diagrams are often repeated on the round or in height. 1 repeat is the diagram the way it appears in the pattern. If it says to work 5 repeats of A.1 in the round, then you work A.1 a total of 5 times after/next to each other in the round. If it says to work 2 repeats of A.1 vertically/in height you work the entire diagram once, then begin again at the start and work the entire diagram one more time.

Chain stitches are slightly narrower than other stitches and to avoid working the cast-on edge too tight, we simply chain more stitches to begin with. The stitch count will be adjusted on the following row to fit the pattern and measurement sketch.

The rib edge is more elastic and will contract slightly compared to, for example, stocking stitch. By increasing before the rib edge, you avoid a visible difference in width between the rib edge and the rest of the body.

It’s very easy to cast off too tightly, and by making yarn overs while casting off (and simultaneously casting these off) you avoid a too tight cast off edge.

See DROPS video: How to bind off with yarn overs (yo)

To achieve an even increase (or decrease) you can increase on, for example: every 3rd and 4th row alternately, like so: work 2 rows and increase on the 3rd row, work 3 rows and increase on the 4th. Repeat this until the increase is complete.

See DROPS lesson: Increase or decrease 1 st on every 3rd and 4th row alternately

Should you prefer to work in the round instead of back and forth, you may of course adjust the pattern. You’ll need to add steeks mid-front (usually 5 stitches), and follow the instructions. When you would normally turn and work from the wrong side, simply work across the steek and continue in the round. At the end you’ll cut the piece open, pick up stitches to work bands, and cover the cut edges.

See DROPS video: How to knit steeks and cut open

Should you prefer to work back and forth instead of in the round, you may of course adjust the pattern so you work the pieces separately and then assemble them at the end. Divide the stitches for the body in 2, add 1 edge stitch in each side (for sewing) and work the front and back pieces separately.

See DROPS lesson: Can I adapt a pattern for circular needles into straight needles?

Pattern repeats can vary slightly in the different sizes, in order to get the correct proportions. If you’re not working the exact same size as the garment in the photo, yours might deviate slightly. This has been carefully developed and adjusted so that the complete impression of the garment is the same in all sizes.

Make sure to follow instructions and diagrams for your size!

If you have found a pattern you like which is available in women’s size it’s not very difficult to convert it to men’s size. The biggest difference will be the length of sleeves and body. Start working on the women size that you think would fit across the chest. The additional length will be worked right before you cast off for the armhole/sleeve cap. If the pattern is worked top-down you can add the length right after the armhole or before the first decrease on sleeve.

Regarding additional yarn amount, this will depend on how much length you add, but it is better with a skein too many than too few.

All yarns will have excess fibres (from production) that might come off as lint or shedding. Brushed yarns (ie hairier yarns) have more of these loose, excess fibres, causing more shedding.

Shedding also depends on what is worn under or over the garment, and whether this pulls at the yarn fibres. It’s therefore not possible to guarantee that there will be no shedding

Below are some tips on how to get the best result when working with hairier yarns:

1. When the garment is finished (before you wash it) shake it vigorously so the looser hairs come off. NOTE: do NOT use a lint roller, brush or any method that pulls at the yarn.

2. Place the garment in a plastic bag and put it in your freezer - the temperature will cause the fibres to become less attached to each other, and excess fibres will come off easier.

3. Leave in the freezer for a few hours before taking it out and shaking it again.

4. Wash the garment according to the instructions on the yarn label.

Pilling is a natural process that happens to even the most exclusive of fibers. It's a natural sign of wear and tear that is hard to avoid, and that is most visible in high friction areas of your garment like a sweater's arms and cuffs.

You can make your garment look as new by removing the pilling, using a fabric comb or a pill/lint remover.

Still can't find the answer you need? Then scroll down and leave your question so one of our experts can try to help you. This will be done normally within 5 to 10 working days.
In the meantime, you can read the questions and answers that others have left to this pattern or join the DROPS Workshop on Facebook to get help from fellow knitters/crocheters!

You might also like...

Post a comment to pattern DROPS 243-1

We would love to hear what you have to say about this pattern!

If you want to leave a question, please make sure you select the correct category in the form below, to speed up the answering process. Required fields are marked *.

Comments / Questions (83)

country flag Elisabeth Kromann wrote:

I den første udgave af opskriften skal der bruges str M 175gr Kids Silk. I den reviderede skal der bruges 225gr. Er det korrekt. Jeg har købt efter første udgave Første udgave skal der tages ud til 106 efter halskant. Den nye 104 Men der skal stadig tages ud til 258 på bærestk. Men når jeg følger diagrammerne ender jeg med 256 Er resten af maskeantallet i opskriften rettet i forhold til, der skal tages ud til 104 og ikke 106,

28.12.2023 - 00:02

DROPS Design answered:

Hej Elisabeth, garnforbruget er rettet i udgaven som er på nettet og det stemmer. Vi skal tjekke om du skal have 256 masker, hold øje her på siden!

02.01.2024 - 09:22

country flag Lene wrote:

Hej I skriver i opskriften at garnforbrug i str. L er henholdsvis 350 og 250 gr. Længere nede har I den 13 oktober 2022 en ændring i garnforbrug - men hvor kan jeg se hvad det er ændret til?

25.12.2023 - 17:07

DROPS Design answered:

Hej Lene, garnforbruget er opdateret i opskriften som ligger på nettet :)

02.01.2024 - 09:27

country flag Tone wrote:

Hei! I str. S ser jeg at man skal ende opp med 238 m på bærestk. Jeg får 236, og dette blir symmetrisk. Tar jeg feil eller er det feil i oppskriften? Jeg ender med 75 m forstk. og 38m bakstk. Hilsen Tone

22.12.2023 - 21:43

DROPS Design answered:

Hej Tone, ... tror du har ret, vi skal se om det egentlig skal være 236 masker... så kommer vi tilbage :)

02.01.2024 - 09:18

country flag Inge wrote:

Problemer med 243-1. Rettelse på A5-L når jeg er godt i gang med mønstret! Under beskrivelsen på bærestykket står: A2 (ca. halvt bagstykke)? Hvor mange masker? A5 og A6 over 11 masker? A5 er der 3m, A6 er der 5m ? Resten af bagstykket, Hvor mange masker? A5 og A6 over 6m (resten af bærestykket) ? Hvor mange masker er det?

22.12.2023 - 11:50

DROPS Design answered:

Hej Inge, Du har 108 masker i str L: Strik A.1 over 5m, A.2=3m (ca halvt bagstykke) A.3=16m, A.4=5m, A.3=16m (ærme), A.5=3m, A.6 over 11m, A.2=3m (forstykke), A.3=16m, A.4=5m, A.3=16m (ærme), A.5=3m, A.6 over 6m (resten af bagstykke). 5+3+16+5+16+3+11+3+16+5+16+3+6=108 masker. Og så tager du 8 masker ud på hver 2. omgang (4m i A.4 + 2m i A.5 + 2m i A.2) - God fornøjelse!

22.12.2023 - 12:44

country flag Elisabeth Kromann wrote:

Tak for svaret I den opskrift, jeg har printet fra jeres hjemmeside, står der, at jeg skal tage 26m ud og skal derefter have 106 masker

20.12.2023 - 12:10

DROPS Design answered:

Elisabeth, det virker ikke som om du vil have hjælp! Du er velkommen tilbage hvis du prøver de tips vi giver dig!

21.12.2023 - 15:37

country flag Elisabeth Kromann wrote:

Nu har jeg igen været på hjemmesiden for at se, om A5M er med i opskriften. Det er den ikke. Har fundet den på den svenske side, men den er ikke på den danske På den svenske side, er der kun 2 masker til at starte med. På den gamle vejledning, var der 3 masker Hvis der kun er 2 m til start, hvordan kommer det til at passe i omgangen, da det passede, da man skulle starte med 3 masker De første 7 pinde passede maskeantallet, når man startede med 3 masker

19.12.2023 - 20:26

DROPS Design answered:

Hej Elisabeth, jo det er nederst til venstre i billedet (det er samme diagram-billede som bliver brugt i alle sprog). Du har 104 masker: Strik A.1 over 5m, A.2=2m (ca halvt bagstykke) A.3=16m, A.4=5m, A.3=16m (ærme), A.5=2m, A.6 over 11m, A.2=2m (forstykke), A.3=16m, A.4=5m, A.3=16m (ærme), A.5=2m, A.6 over 6m (resten af bagstykke). 5+2+16+5+16+2+11+2+16+5+16+2+6=104 masker. Du tager 8 masker ud på hver 2. omgang (4m i A.4 + 2m i A.5 + 2m i A.2)

20.12.2023 - 10:18

country flag Elisabeth Kromann wrote:

Jeg har fået svaret Hej Elisabeth, det er i nederste række til venstre (lige ovenfor måleskitsen) :) Men på den side, jeg kommer ind på, er A5 m ikke på siden. Når jeg trykker på print af opskriften, er A5 m heller ikke på kopierne

19.12.2023 - 16:11

DROPS Design answered:

Hej Elisabeth, prøv at lave en "refresh". Vi kan se diagrammet både på computeren og på mobiltelefonen. Som sagt, det er samme billede med diagrammer vi bruger på samtlige sprog :)

20.12.2023 - 10:46

country flag Elisabeth Kromann wrote:

Hvor finder jeg A5 i str M

18.12.2023 - 21:48

DROPS Design answered:

Hej Elisabeth, det er i nederste række til venstre (lige ovenfor måleskitsen) :)

19.12.2023 - 12:02

country flag Birthe Burghardt wrote:

Hej Jeg er i tvivl om hvordan opskriften med diagrammerne følges. Skal diagrammerne ikke gentages , for der er ikke mange masker i hver diagram ?

17.12.2023 - 19:28

DROPS Design answered:

Hei Birthe. Jo, diagrammene gjentas i høyden, og noen diagram gjentas i bredden, slik at det maskeantallet du har i den str. du strikker etter passer med diagrammene. Denne informasjonen finner du i oppskriften, der står det også hvor mange ganger og hvilken diagram som skal gjentas i de ulike størrelsene. Usikker på hvordan lese en oppskrift med diagram? Gå til TIPS & HJÆLP - Læs en oppskrift - Hvordan læses strikkediagrammer. God fornøyelse. mvh DROPS Design

18.12.2023 - 10:16

country flag Marianne Van Houdt wrote:

Hallo, Ik brei maat L, heb dus bij het begin van de pas 108 steken. Ik ben nu klaar met de 23 meerderingen, en kom dan uit op 292 steken en geen 294 zoals in de handleiding (108 + 23X8 = 292)…???? Kan ik dit nog oplossen?

16.12.2023 - 00:30

DROPS Design answered:

Dag Marianne,

Als ik het zo lees zit er een foutje in het patroon met het aantal steken en moeten het inderdaad 292 zijn in plaats van 294. Bij het verdelen van het werk voor het lijf en de mouwen kun je gewoon de verdeling aanhouden zoals je ook bij het begin van de pas hebt gedaan. 2 steken verschil zul je niet merken.

17.12.2023 - 17:35