
Popular categories
Looking for a yarn?


Comments / Questions (13)
![]() CAROL ANN FLAHERTY wrote:
CAROL ANN FLAHERTY wrote:
Sleeve cap. I did not do the sleeve in the round. I have done 11 increases on each side of sleeve. How is the sleeve cap done?
27.12.2024 - 23:23DROPS Design answered:
Dear Carol, if you work the sleeve back and forth, simply continue back and forth, but remember to mark where the sleeve cap should start so that you can adjust the fitting of the sleeve cap to the body correctly. Happy knitting!
30.12.2024 - 01:01
![]() Gabriela wrote:
Gabriela wrote:
Hola! En el cuello, cuando dice aumentar a cada lado de la pieza en cada hilera por el lado del derecho sería al empezar y al terminar la vuelta?
27.04.2024 - 20:41DROPS Design answered:
Hola Gabriela, en la fila 2 aumentas 1 pt a cada lado. Por lo tanto, tienes que repetir los aumentos de esta fila 5 veces en total. Es decir, trabajas las filas 1 y 2 4 veces más.
28.04.2024 - 23:42
![]() Cecilie wrote:
Cecilie wrote:
Og skal slidsen i ærmes sys sammen når den sys til bunden af ærmegabet?
20.04.2024 - 10:50DROPS Design answered:
Hej igen, nej den skal sys til hver side af de aflukkede masker i ærmegabet :)
23.04.2024 - 13:35
![]() Cecilie wrote:
Cecilie wrote:
Hvordan skal ærmet sys på når maskerne ikke er lukket men sidder på tråd?
20.04.2024 - 10:23DROPS Design answered:
Hej Cecilie, luk maskerne af inden du syr ærmet i ærmegabet :)
23.04.2024 - 13:31
![]() Karen Haugaard Christensen wrote:
Karen Haugaard Christensen wrote:
Jeg er i tvivl om ærmelængden. Er det 44 cm eller 54 cm før der begyndes på ærmekuppel i str XL. Tekst og tegning stemmer ikke overens.
08.03.2024 - 21:49DROPS Design answered:
Hej Karen, jo de sidste 10 cm er dem du bukker op til sidst, det vil sige at nederste kant skal måle 20 cm (10 cm på måleskitsen) :)
13.03.2024 - 15:19
![]() Mari wrote:
Mari wrote:
Det ser ut til at strikkeren deres ikke lagde knappehull? 🤔
25.08.2023 - 15:12
![]() Arleen wrote:
Arleen wrote:
Hi. I am questioning the large number of decreased stitches when you go from the bottom ribbing to the body of the sweater . For the la rge size the decrease is 33 stitches. Normally you would be increasing stitches in this situation. I realize the style of the sweater appears to be straight as opposed to a tighter ribbing but 33 seems to be a large number of stitches to decrease. Thank you for clarifying this for me.
06.07.2023 - 08:12
![]() Arleen wrote:
Arleen wrote:
Hi. I am questioning the large number of decreased stitches when you go from the bottom ribbing to the body of the sweater . For the la rge size the decrease is 33 stitches. Normally you would be increasing stitches in this situation. I realize the style of the sweater appears to be straight as opposed to a tighter ribbing but 33 seems to be a large number of stitches to decrease. Thank you for clarifying this for me.
06.07.2023 - 08:11DROPS Design answered:
Dear Arleen, in order to avoid a tighter ribbing edge at the bottom of the jacket you need more stitches to work ribbing with the smaller needles than pattern with the larger needles, reason why you have then to decrease evenly to get the correct width. Happy knitting!
06.07.2023 - 10:29
![]() Gitte wrote:
Gitte wrote:
Hej Ville cardiganen strikket med 1 tråd Flora og en tråd Kid-Silk eller 1 tråd Brushed Alpaca Silk tage sig godt ud? På forhånd mange tak og venlig hilsen Gitte
09.02.2023 - 18:17DROPS Design answered:
Hej Gitte, ja specielt den variant med 1 tråd DROPS Flora og 1 tråd DROPS Kid-Silk, men det er jo en smags sag og du kan absolut også bruge 1 tråd DROPS Brushed Alpaca Silk, men den vil da få et lidt mere "slapt" udtryk :)
10.02.2023 - 11:46
![]() Sherry Johanson wrote:
Sherry Johanson wrote:
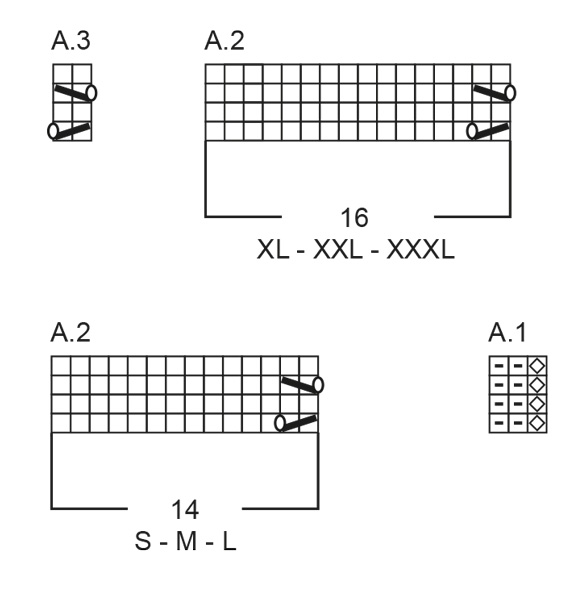
What is the stitch in Diagram A-2 and A-3? I understand the blank spaces are knit but the rest I don't know.
03.02.2023 - 23:17DROPS Design answered:
Dear Sherry, you can see all diagram symbol explanations above the diagrams themselves. Blank square = knit on right side row, purl on wrong side row The diagonal lines represent 2 types of decreases: knit 2 together or slip 1, knit 1, pass slipped stitch over knitted stitch. The 0 like symbol is a yarn over. Happy knitting!
05.02.2023 - 23:58
|
||||||||||||||||||||||
Late Autumn Cardigan#lateautumncardigan |
||||||||||||||||||||||
 |
 |
|||||||||||||||||||||
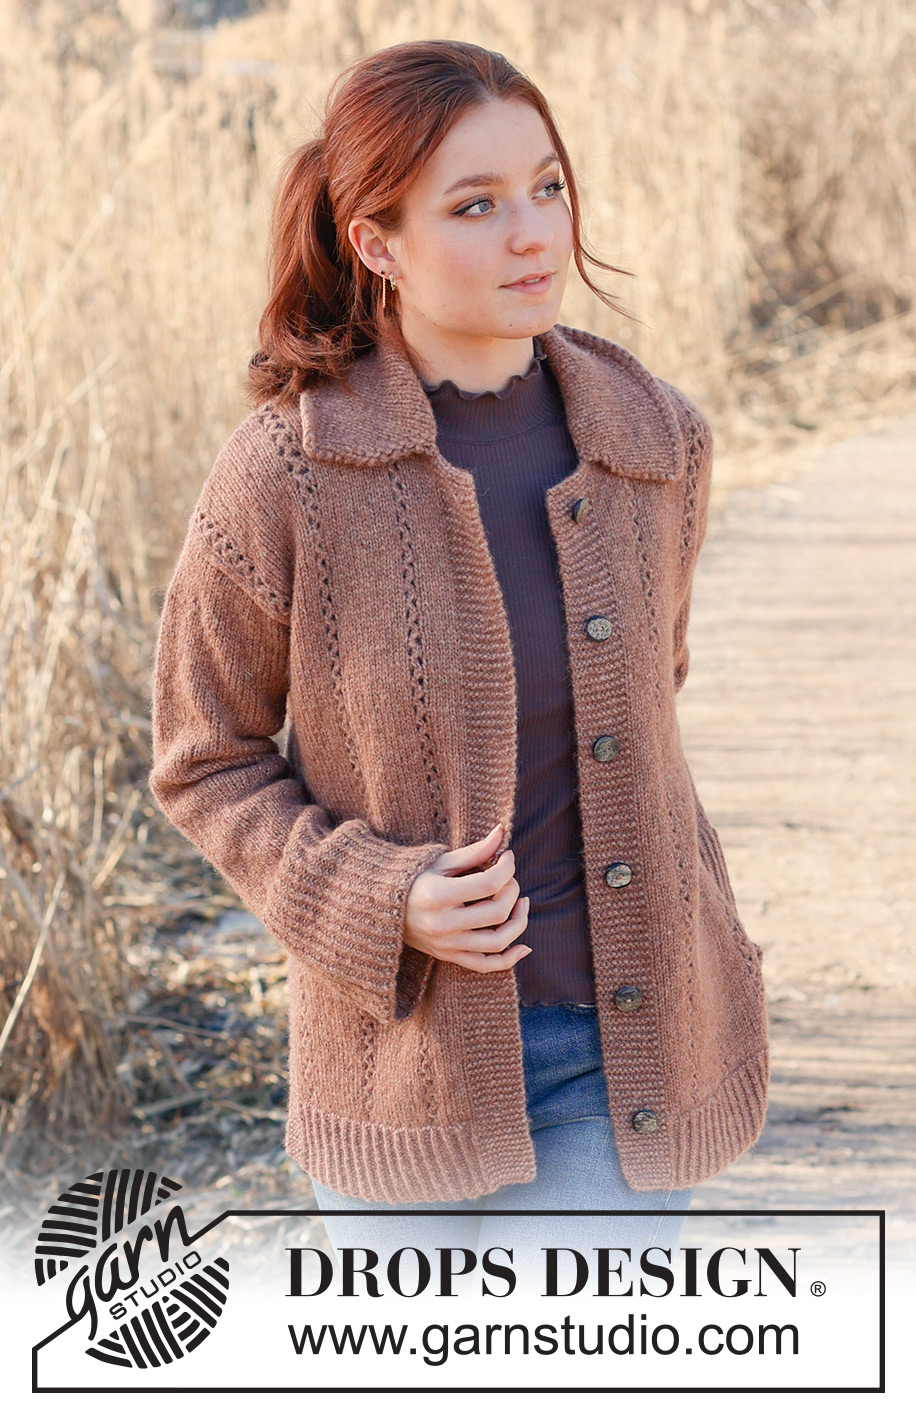
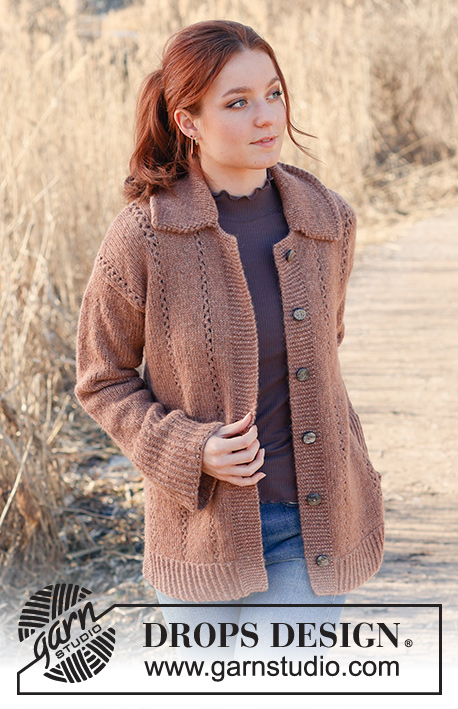
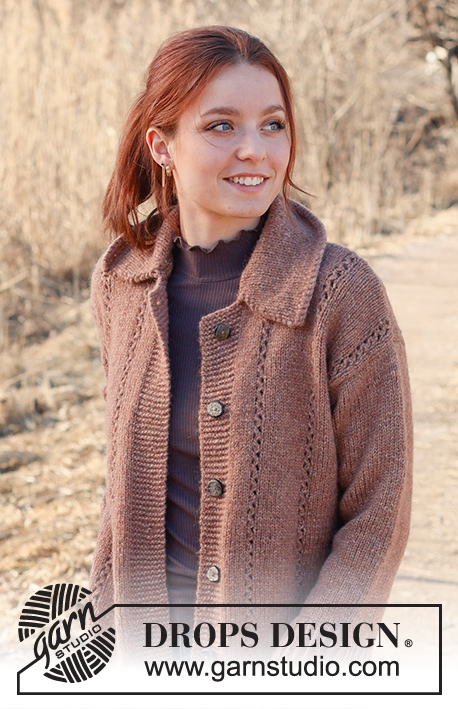
Knitted jacket in DROPS Air. The piece is worked bottom up with lace pattern and collar. Sizes S - XXXL.
DROPS 235-9 |
||||||||||||||||||||||
|
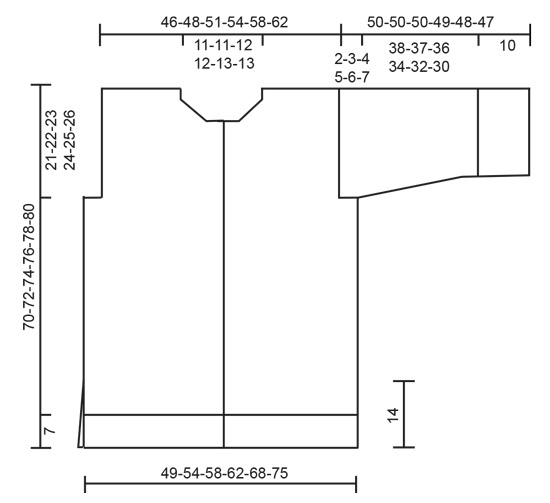
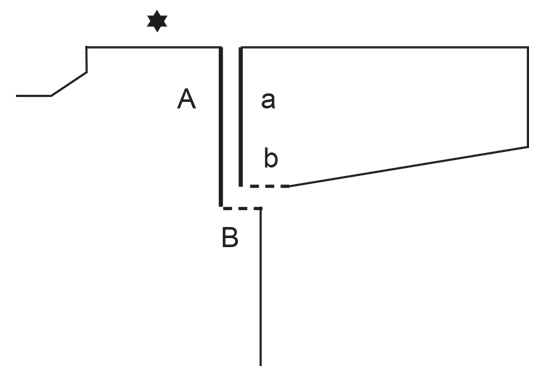
------------------------------------------------------- EXPLANATIONS FOR THE PATTERN: ------------------------------------------------------- RIDGE/GARTER STITCH (worked back and forth): Knit all rows. 1 ridge = knit 2 rows. PATTERN: See diagrams A.1 to A.3. Choose diagram for your size (A.2). The diagrams show all rows in the pattern from the right side. DECREASE/INCREASE TIP (evenly spaced): To work out how to decrease/increase evenly, count the total number of stitches on needle (e.g. 103 stitches), and divide by number of decreases/increases to be made (e.g. 29) = 3.5. In this example, decrease by knitting together alternately each 2nd and 3rd stitch and each 3rd and 4th stitch. When increasing, make 1 yarn over after alternately each 3rd and 4th stitch. On the next row work the yarn overs twisted to avoid holes. INCREASE TIP-1 (for sleeves): Work until there is 1 stitch left before A.3, make 1 yarn over, knit 1, work A.3, knit 1, 1 yarn over (= 2 stitches increased). On the next round knit the yarn overs twisted to avoid holes. Then work the new stitches in stocking stitch. INCREASE TIP-2 (for collar): Work until there is 1 stitch left before the marker, 1 yarn over, knit 2, 1 yarn over (= 2 stitches increased). Repeat at the other marker. On the next row (wrong side) purl the yarn overs twisted to avoid holes. KNITTING TIP: So the collar lies flat when the garment is finished, dampen and then shape it while still wet. BUTTONHOLES: Work the buttonholes on the right band. 1 BUTTONHOLE = knit together the 4th and 5th stitch from the edge and make 1 yarn over. On the next row knit the yarn over to leave a hole. Work the buttonholes when the piece measures: S: 7, 18, 29, 40, 51 and 62 cm M: 6, 18, 29, 41, 52 and 64 cm L: 6, 16, 26, 36, 46, 56 and 66 cm XL: 7, 17, 27, 37, 47, 57 and 67 cm XXL: 6, 17, 27, 38, 49, 59 and 70 cm XXXL: 8, 19, 29, 40, 50, 61 and 71 cm ------------------------------------------------------- START THE PIECE HERE: ------------------------------------------------------- JACKET – SHORT OVERVIEW OF THE PIECE: The piece is worked in sections, then sewn together. The front and back pieces are worked back and forth, the sleeves are worked in the round as far as the sleeve cap, then finished back and forth. The collar is worked to finish. BACK PIECE: Cast on 113-122-131-143-158-173 stitches with circular needle size 4 mm and DROPS Air. Work rib as follows: 5 stitches in GARTER STITCH – read description above, A.1 until there are 6 stitches left, work the first stitch in A.1 and 5 stitches in garter stitch. Continue this rib back and forth for 7 cm. The next row is worked as follows: 5 stitches in garter stitch, knit 103-112-121-133-148-163 and decrease 29-30-33-37-42-45 stitches evenly over these stitches – read DECREASE/INCREASE TIP, 5 stitches in garter stitch = 84-92-98-106-116-128 stitches. Change to circular needle size 5 mm. Purl 1 row with 5 stitches in garter stitch on each side. Now work as follows: 5 stitches in garter stitch, 1-5-8-7-12-18 stitches in stocking stitch, A.2 over the next 70-70-70-80-80-80 stitches (= 5 repeats of 14-14-14-16-16-16 stitches), work the first 2 stitches in A.2, 1-5-8-7-12-18 stitches in stocking stitch and 5 stitches in garter stitch. Continue this pattern back and forth. REMEMBER THE KNITTING TENSION! When the piece measures 14 cm, cast on 1 stitch at the end of the next 2 rows = 86-94-100-108-118-130 stitches. Continue the pattern over the middle 72-72-72-82-82-82 stitches, 1 edge stitch in garter stitch on each side and stocking stitch over the remaining 6-10-13-12-17-23 stitches on each side of the pattern. Continue until the piece measures 49-50-51-52-53-54 cm. At the beginning of the next 2 rows, cast off 4-6-7-8-10-12 stitches for the armholes = 78-82-86-92-98-106 stitches. Continue the pattern with 1 edge stitch in garter stitch on each side. When the piece measures 68-70-72-74-76-78 cm, place the middle 16-16-18-18-20-20 stitches on a thread for the neck and finish each shoulder separately. Cast off 1 stitch on the next row from the neck = 30-32-33-36-38-42 stitches on the shoulder. Continue working until the piece measures 70-72-74-76-78-80 cm. Cast off. Work the other shoulder in the same way. RIGHT FRONT PIECE: Cast on 67-73-76-82-88-97 stitches with circular needle size 4 mm and DROPS Air. Work rib as follows: 10 stitches in garter stitch, A.1 until there are 6 stitches left, work the first stitch in A.1, 5 stitches in garter stitch. Continue this rib back and forth for 7 cm. Remember the BUTTONHOLES on the band – read description above. The next row is worked as follows: 10 band stitches in garter stitch, knit 52-58-61-67-73-82 and decrease 14-16-16-18-19-22 stitches evenly over these stitches, 5 stitches in garter stitch = 53-57-60-64-69-75 stitches. Change to circular needle size 5 mm. Purl 1 row with 5 stitches in garter stitch towards the side and 10 band stitches in garter stitch towards mid-front. Now work pattern as follows: 10 band stitches in garter stitch, 7-7-7-8-8-8 stitches in stocking stitch, A.2 over the next 28-28-28-32-32-32 stitches (= 2 repeats of 14-14-14-16-16-16 stitches), work the first 2 stitches in A.2, 1-5-8-7-12-18 stitches in stocking stitch and 5 stitches in garter stitch. Continue this pattern back and forth. When the piece measures 14 cm, cast on 1 stitch at the end of the next row from the right side = 54-58-61-65-70-76 stitches. Continue the pattern, but now with 1 edge stitch in garter stitch towards the side and 6-10-13-12-17-23 stitches in stocking stitch between the lace pattern and the edge stitch. When the piece measures 49-50-51-52-53-54 cm, cast off 4-6-7-8-10-12 stitches at the beginning of the next row from the wrong side for the armhole = 50-52-54-57-60-64 stitches. Continue the pattern. When the piece measures 64-66-68-70-71-73 cm, cast off the first 10 stitches from the right side for the neck, then subsequently cast off on every row from the neck as follows: 3-3-4-4-4-4 stitches 1 time, 2 stitches 2 times and 1 stitch 3-3-3-3-4-4 times = 30-32-33-36-38-42 stitches on the shoulder. Continue working until the piece measures 70-72-74-76-78-80 cm. Cast off. LEFT FRONT PIECE: Cast on 67-73-76-82-88-97 stitches with circular needle size 4 mm and DROPS Air. Work rib as follows: 5 stitches in garter stitch, A.1 until there are 11 stitches left, work the first stitch in A.1, 10 band stitches in garter stitch. Continue this rib back and forth for 7 cm. The next row is worked as follows from the right side: 5 stitches in garter stitch, knit 52-58-61-67-73-82 and decrease 14-16-16-18-19-22 stitches evenly over these stitches, 10 band stitches in garter stitch = 53-57-60-64-69-75 stitches. Change to circular needle size 5 mm. Purl 1 row with 5 stitches in garter stitch towards the side and 10 band stitches in garter stitch towards mid-front. Now work pattern as follows: 5 stitches in garter stitch, 1-5-8-7-12-18 stitches in stocking stitch, A.2 over the next 28-28-28-32-32-32 stitches (= 2 repeats of 14-14-14-16-16-16 stitches), work the first 2 stitches in A.2, 7-7-7-8-8-8 stitches in stocking stitch, 10 band stitches in garter stitch. Continue this pattern back and forth. When the piece measures 14 cm, cast on 1 stitch at the end of the next row from the wrong side = 54-58-61-65-70-76 stitches. Continue the pattern, but now with 1 edge stitch in garter stitch towards the side and 6-10-13-12-17-23 stitches in stocking stitch between the lace pattern and the edge stitch. When the piece measures 49-50-51-52-53-54 cm, cast off 4-6-7-8-10-12 stitches at the beginning of the next row from the right side for the armhole = 50-52-54-57-60-64 stitches. Continue the pattern. When the piece measures 64-66-68-70-71-73 cm, cast off the first 10 stitches from the wrong side for the neck, then subsequently cast off on every row from the neck as follows: 3-3-4-4-4-4 stitches 1 time, 2 stitches 2 times and 1 stitch 3-3-3-3-4-4 times = 30-32-33-36-38-42 stitches on the shoulder. Continue working until the piece measures 70-72-74-76-78-80 cm. Cast off. SLEEVES: Cast on 75-78-81-84-87-90 stitches with double pointed needles size 5 mm and DROPS Air. Knit 1 round, then change to double pointed needles size 4 mm. Work A.1 in the round for 20 cm. The rib is later folded double to the inside of the sleeve and sewn down. Knit 1 round where you decrease 26-27-29-30-30-32 stitches evenly spaced = 49-51-52-54-57-58 stitches. Change to double pointed needles size 5 mm. Work pattern as follows: A.3 over the first 2 stitches and stocking stitch over the other stitches. When the piece measures 1-1-2-2-2-4 cm from the rib, increase 1 stitch on each side of A.3 – read INCREASE TIP-1. Increase like this every 3½-3-2½-2-2-1½ cm a total of 11-12-13-14-14-15 times = 71-75-78-82-85-88 stitches. When the sleeve measures 58-57-56-54-52-50 cm from the cast-on edge, work the sleeve cap in stocking stitch back and forth from the middle of A.3 until the sleeve measures 60-60-60-59-58-57 cm, i.e. a split of 2-3-4-5-6-7 cm. Cast off. Fold the rib double to the inside of the sleeve and sew it down. To avoid the cuff being tight, it is important that the seam is elastic. ASSEMBLY: Sew the shoulder seams with grafting stitches. Sew the sleeve cap to the armhole, then the split at the top of the sleeve to the bottom of the armhole – see sketch. Sew the side seams inside the 1 edge stitch, as far as the split (= 14 cm left open). Sew the buttons onto the left band. NECK: Knit up from the right side around the neck as follows: Skip the 10 cast-off stitches on the band, knit up 48-48-52-52-56-56 stitches with circular needle size 5 mm (including stitches on the thread) and 1 strand DROPS Air as far as the 10 cast-off stitches on the other band. Purl 1 row from the wrong side, knit 1 row from the right side, purl 1 row from the wrong side, purl 1 row from the right side (= folding-edge), purl 1 row from the wrong side, knit 1 row from the right side, purl 1 row from the wrong side. Cast off. Fold the neck double to the wrong side and sew down neatly. COLLAR: Start from the right side and knit up 1 stitch in each purled stitch in the fold of the neck, using circular needle size 5 mm and 1 strand DROPS Air = 48-48-52-52-56-56 stitches. Continue with 2 strands DROPS Air and circular needle size 6 mm. Knit 1 row from the inside of the neck – this will be the right side of the collar when it is folded down. Insert 1 marker 12-12-13-13-14-14 stitches in from each side (= 24-24-26-26-28-28 stitches between the 2 markers). Continue as follows: ROW 1 (= wrong side): 1 edge stitch in garter stitch, purl until there is 1 stitch left, 1 edge stitch in garter stitch. ROW 2 (= right side): 1 edge stitch in garter stitch, knit 1, 1 yarn over, knit until there are 2 stitches left, 1 yarn over, knit 1, 1 edge stitch in garter stitch (on the next row purl the yarn overs twisted to avoid holes). Continue working like this until you have increased 5 times on each side on every row from the right side = 58-58-62-62-66-66 stitches. Continue and increase the same way on each side on every row from the right side 3 more times, AT THE SAME TIME increase 1 stitch on each side of the 2 markers – read INCREASE TIP-2. Increase like this on every row from the right side a total of 3 times. When all the increases are finished there are 76-76-80-80-84-84 stitches. Work until the collar measures 12 cm or to desired length. Cast off. To give the collar a stiffer edge, crochet with 2 strands DROPS Air and hook size 5.5 mm from the wrong side as follows: Work 1 double crochet in each cast-off stitch along the collar. Cut and fasten the strands. Read KNITTING TIP. |
||||||||||||||||||||||
Diagram explanations |
||||||||||||||||||||||
|
||||||||||||||||||||||
 |
||||||||||||||||||||||
 |
||||||||||||||||||||||
 |
||||||||||||||||||||||
Have you finished this pattern?Tag your pictures with #dropspattern #lateautumncardigan or submit them to the #dropsfan gallery. Do you need help with this pattern?You'll find 38 tutorial videos, a Comments/Questions area and more by visiting the pattern on garnstudio.com. © 1982-2026 DROPS Design A/S. We reserve all rights. This document, including all its sub-sections, has copyrights. Read more about what you can do with our patterns at the bottom of each pattern on our site. |
||||||||||||||||||||||


With over 40 years in knitting and crochet design, DROPS Design offers one of the most extensive collections of free patterns on the internet - translated to 17 languages. As of today we count 324 catalogues and 12290 patterns translated into English (UK/cm). 12290
We work hard to bring you the best knitting and crochet have to offer, inspiration and advice as well as great quality yarns at incredible prices! Would you like to use our patterns for other than personal use? You can read what you are allowed to do in the Copyright text at the bottom of all our patterns. Happy crafting!
Post a comment to pattern DROPS 235-9
We would love to hear what you have to say about this pattern!
If you want to leave a question, please make sure you select the correct category in the form below, to speed up the answering process. Required fields are marked *.