
Popular categories
Looking for a yarn?


Comments / Questions (24)
![]() Rita wrote:
Rita wrote:
Grazie….era più facile di quel che credevo!
19.01.2026 - 07:16
![]() Rita wrote:
Rita wrote:
Buonasera, nella manica, raggiunti i 47 cm di lunghezza della manica, non riesco proprio a capire come lavorare in piano … potete aiutarmi per favore?
18.01.2026 - 22:13DROPS Design answered:
Buonasera Rita, deve semplicemente lavorare un ferro e alla fine del giro, girare il lavoro e tornare indietro. Buon lavoro!
18.01.2026 - 22:35
![]() Lissa wrote:
Lissa wrote:
Er det korrekt, at der skal tages ind og ikke ud efter ribkanten på for- og bagstykke. Mvh Lissa
09.11.2025 - 16:31DROPS Design answered:
Hei Lissa. Ja, det stemmer. Da blir det en pener overgang mellom rid og bol, og ikke en stram ribekant, som man ofte hadde på -80-tallet. mvh DROPS Design
17.11.2025 - 18:57
![]() Viviane De Dauw wrote:
Viviane De Dauw wrote:
Kan het voor en achterkant pand van dit patroon gebreid worden met 2 breinaalden, ben namelijk niet zo handig met rondbreinaald
08.11.2025 - 23:17DROPS Design answered:
Dag Viviane,
Ja, deze kan ook met rechte naalden gebreid worden.
Om een patroon aan te passen om op rechte naalden te breien hebben we een instructie gemaakt. Deze vind je hier.
09.11.2025 - 20:11
![]() Bita wrote:
Bita wrote:
Bonjour, J'ai deux questions : peut-on tricoter ce pull avec une aiguille circulaire sans les allers retour en partant du col de haut en bas en cercle ? Si oui, comment ? Est-ce que je peux prendre deux laines du groupe C différentes pour faire ce pull ? Par exemple drops nepal (blanc) et drops big merino (rose) pour un même pull ?
06.05.2025 - 17:12DROPS Design answered:
Bonjour Bita, vous trouverez ici des pulls à tricoter en rond, de haut en bas (ajoutez autant de filtres que nécessaire); on tricote ici avec 1 seul fil Air que vous pourrez effectivement remplacer par un autre fil du même groupe, par exemple Nepal ou Big Merino, ou les 2 pour jouer avec les textures, tant que vous avez la même tension. Bon tricot!
07.05.2025 - 09:28
![]() Carmen Perron wrote:
Carmen Perron wrote:
Merci infiniment pour votre reponse tres eclairante.
29.04.2025 - 02:29
![]() Carmen Perron wrote:
Carmen Perron wrote:
S.v.p. c'est quoi tete de manche en aller et retour.
28.04.2025 - 00:52DROPS Design answered:
Bonjour Mme Perron, la tête de manche correspond à la partie haute de la manche = la dernière partie, qui sera ensuite assemblée le long de l'emmanchure. Dans cette vidéo, nous montrons comment on termine ce type de manches, et, dans cette leçon nous montrons comment faire cette couture. Bon tricot!
28.04.2025 - 09:07
![]() Enrica wrote:
Enrica wrote:
Ho capito, grazie
09.03.2025 - 10:42
![]() Enrica wrote:
Enrica wrote:
Buongiorno, non ho capito come si lavora l'arrotondamento della manica in piano
09.03.2025 - 09:42
![]() Elva Bakker wrote:
Elva Bakker wrote:
Por favor pueden indicarme en que consiste la técnica "magic loop". Cuál es la mejor manera de cambiar de color para hacer las franjes, aparte de cortar la lana cada vez que se cambia de color. Muchas gracias.
27.02.2025 - 08:47DROPS Design answered:
Hola Elva, la técnica "magic loop" es una técnica que se utiliza para poder tejer una pieza tubular pequeña con agujas circulares, en vez de usar agujas de doble punta. De este modo, si necesitas agujas de doble punta y agujas circulares del mismo tamaño puedes comprar solo las agujas circulares y aplicar este método, y así sustituyes a las agujas de doble punta. Puedes ver una explicación en vídeo aquí. Puedes ver aquí un video de cómo trabajar las rayas.
02.03.2025 - 19:31
|
||||
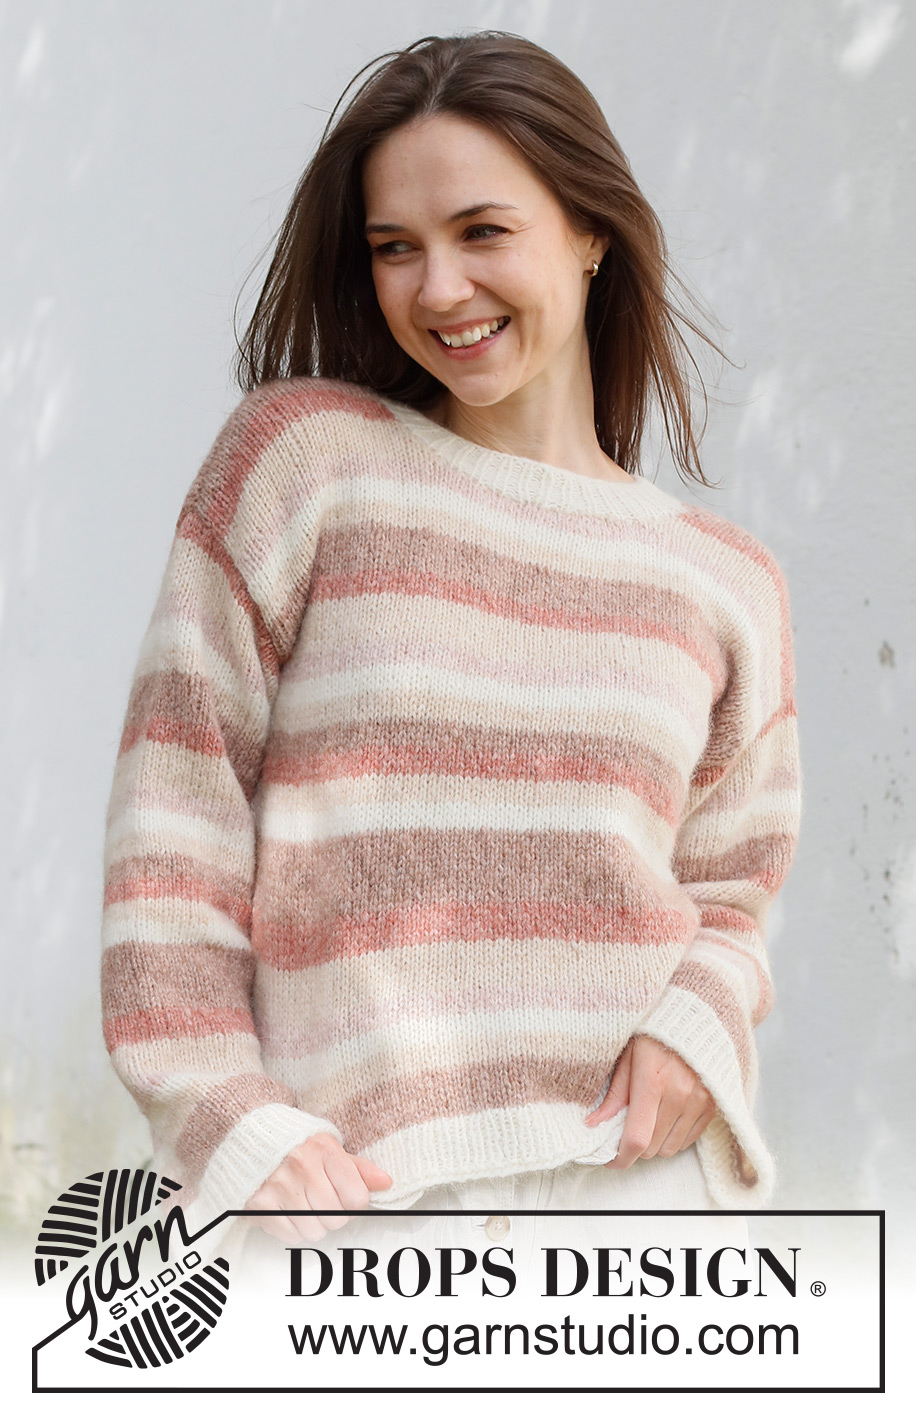
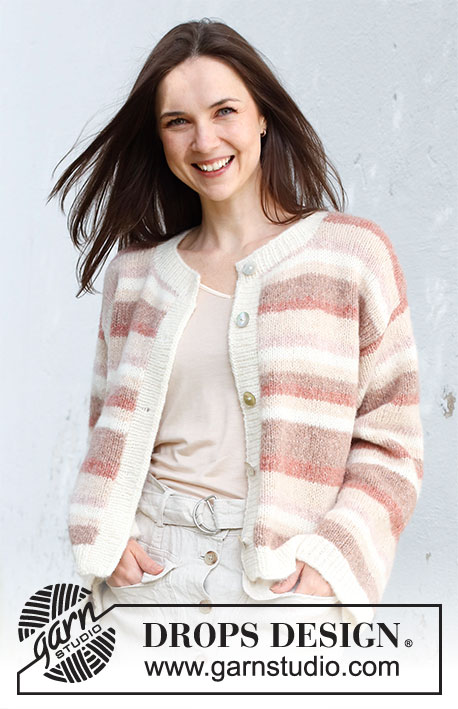
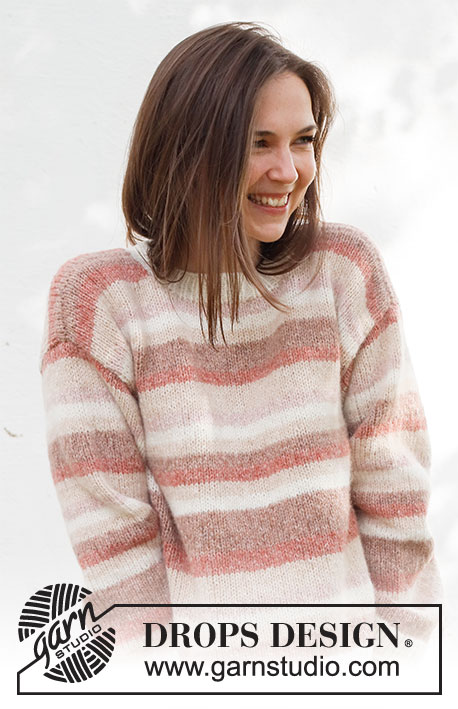
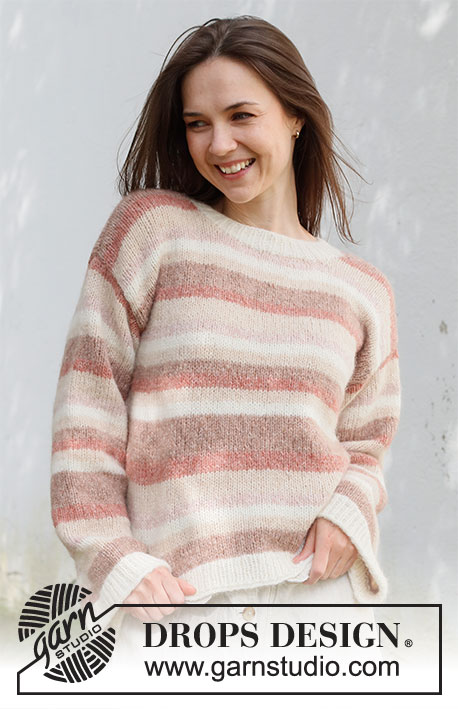
Mars Sunrise Jumper#marssunrisejumper |
||||
 |
 |
|||
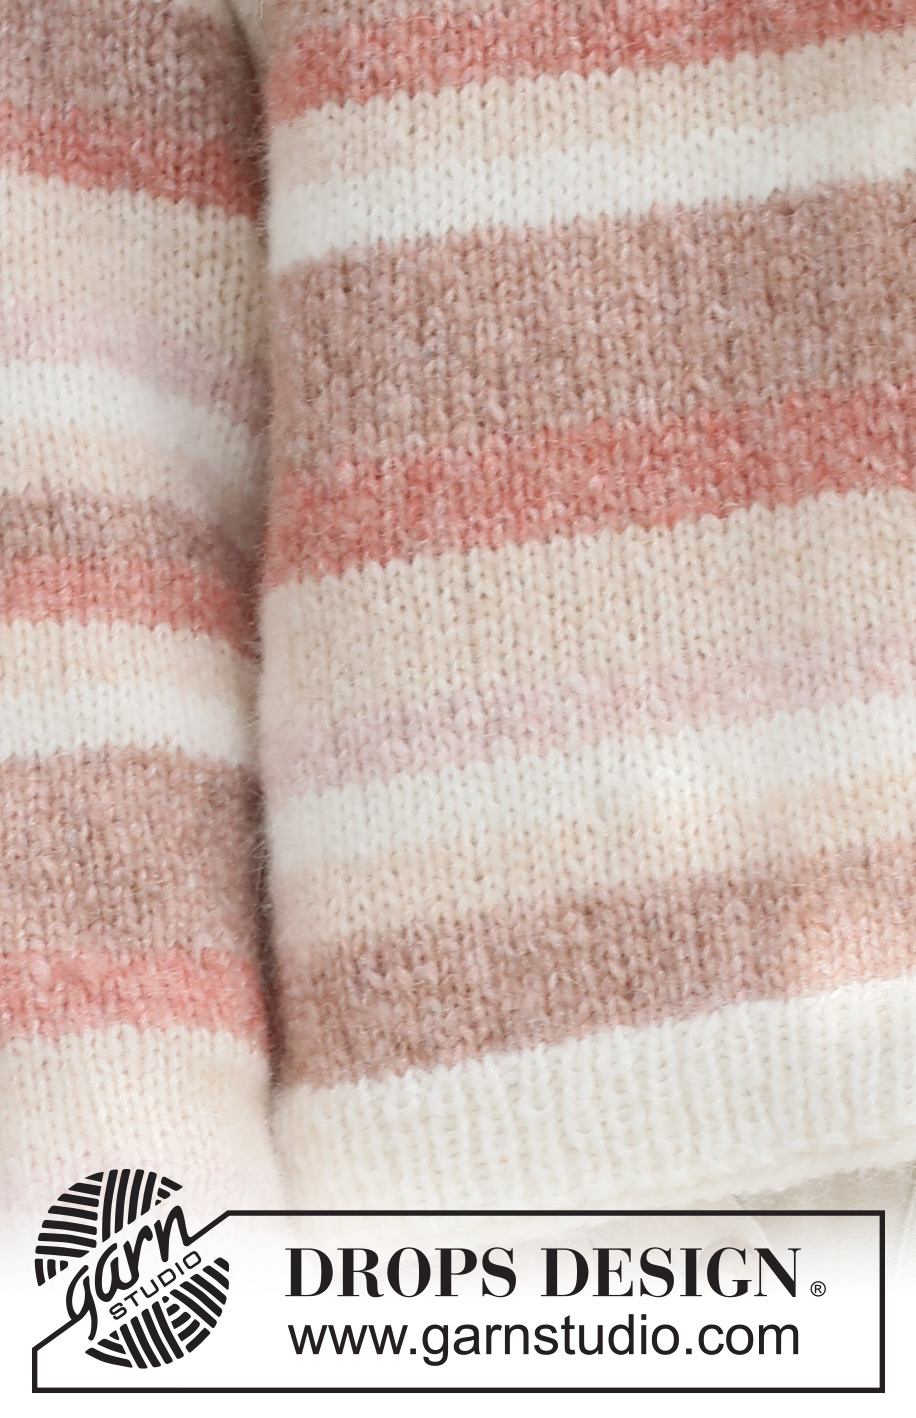
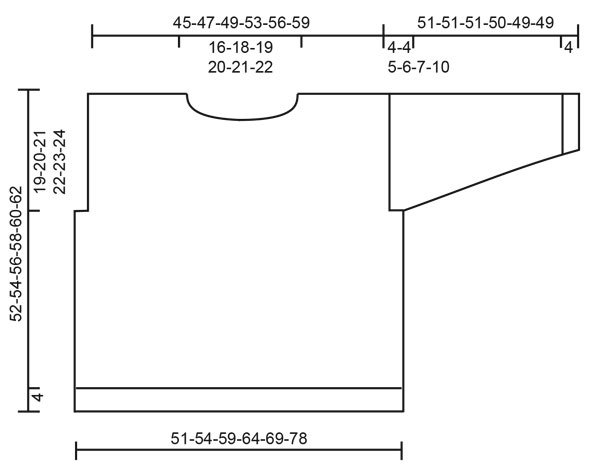
Knitted jumper in DROPS Air. The piece is worked bottom up with stripes. Sizes S - XXXL.
DROPS 232-21 |
||||
|
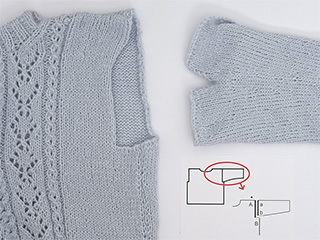
------------------------------------------------------- EXPLANATIONS FOR THE PATTERN: ------------------------------------------------------- RIDGE/GARTER STITCH (worked back and forth): Knit all rows. 1 ridge = knit 2 rows. STRIPES: * 8 rows with colour pink marble, 4 rows with colour wheat, 4 rows with colour off-white, 4 rows with colour pink sand, 8 rows with colour wheat, 6 rows with colour blush, 12 rows with colour pink marble, 4 rows with colour off-white, 4 rows with colour wheat, 4 rows with colour blush, 4 rows with colour pink marble, 4 rows with colour wheat, 4 rows with colour off-white, 4 rows with colour pink sand, 8 rows with colour wheat, 4 rows with colour blush *, repeat from *-*. INCREASE TIP (under sleeves): Work until there are 2 stitches left before the marker, 1 yarn over, knit 4 (marker thread sits between these 4 stitches), 1 yarn over. On the next round knit the yarn overs twisted to avoid holes. Then work the new stitches in stocking stitch. ------------------------------------------------------- START THE PIECE HERE: ------------------------------------------------------- JUMPER - SHORT OVERVIEW OF THE PIECE: The back and front pieces are worked separately, with circular needle back and forth and bottom up. The sleeves are worked in the round with double pointed needles/short circular needle. The piece is sewn together and the neck worked to finish. BACK PIECE: Cast on 105-113-123-133-145-161 stitches with circular needle size 4 mm and colour off-white in DROPS Air. Purl 1 row from the wrong side. Then work rib from the right side as follows: 1 edge stitch in GARTER STITCH – read description above, * knit 1, purl 1 *, work from *-* until there are 2 stitches left, knit 1 and 1 edge stitch in garter stitch. When the rib measures 4 cm, change to circular needle size 5 mm. Continue with stocking stitch, 1 edge stitch in garter stitch on each side and STRIPES – read description above; AT THE SAME TIME on row 1 decrease 17-19-21-23-25-27 stitches evenly spaced = 88-94-102-110-120-134 stitches. REMEMBER THE KNITTING TENSION! When the piece measures 33-34-35-36-37-38 cm, cast off 6-7-9-10-12-17 stitches at the beginning of the next 2 rows for the armholes = 76-80-84-90-96-100 stitches. When the piece measures 50-52-54-56-58-60 cm, cast off the middle 26-28-30-32-34-36 stitches for the neck and finish each shoulder separately. Cast off 1 stitch on the next row from the neck = 24-25-26-28-30-31 stitches on the shoulder. Cast off when the piece measures 52-54-56-58-60-62 cm. Work the other shoulder in the same way. FRONT PIECE: Cast on and work in the same way as the back until the piece measures 46-48-49-51-52-54 cm. Place the middle 20-22-24-26-28-30 stitches on a thread for the neck and finish each shoulder separately. Cast off on each row from the neck as follows: 2 stitches 1 time and 1 stitch 2 times = 24-25-26-28-30-31 stitches on the shoulder. Continue working until the piece measures 52-54-56-58-60-62 cm, cast off. Work the other shoulder in the same way. SLEEVES: Cast on 62-64-66-68-70-72 stitches with double pointed needles size 4 mm and colour off-white. Knit 1 round then work rib in the round (knit 1, purl 1) for 4 cm. Change to double pointed needles size 5 mm. Knit 1 round where you decrease 6 stitches evenly spaced = 56-58-60-62-64-66 stitches. Insert 1 marker at the beginning of the round = mid-under sleeve. Continue with stocking stitch and stripes. When the sleeve measures 8 cm, increase 1 stitch on each side of the marker – read INCREASE TIP. Increase like this every 12-9-7-6½-5-4 cm a total of 4-5-6-6-7-8 times = 64-68-72-74-78-82 stitches. When the sleeve measures 47-47-46-44-42-39 cm, work the sleeve cap back and forth from mid-under the sleeve for 4-4-5-6-7-10 cm. Cast off. Work the other sleeve in the same way. ASSEMBLY: Sew the shoulder seams. Sew the sleeve cap to the armhole, then the split to the bottom of the armhole – see sketch. Sew the side seams inside the 1 edge stitch. NECK: Start at one shoulder seam and knit up 82 to 106 stitches around the neck (including the stitches on the thread) with short circular needle size 4 mm and colour off-white. The number of stitches should be divisible by 2. Work rib in the round (knit 1, purl 1) for 4 cm. Loosely cast off with knit. |
||||
Diagram explanations |
||||
|
||||
 |
||||
 |
||||
Have you finished this pattern?Tag your pictures with #dropspattern #marssunrisejumper or submit them to the #dropsfan gallery. Do you need help with this pattern?You'll find 32 tutorial videos, a Comments/Questions area and more by visiting the pattern on garnstudio.com. © 1982-2026 DROPS Design A/S. We reserve all rights. This document, including all its sub-sections, has copyrights. Read more about what you can do with our patterns at the bottom of each pattern on our site. |
||||


With over 40 years in knitting and crochet design, DROPS Design offers one of the most extensive collections of free patterns on the internet - translated to 17 languages. As of today we count 324 catalogues and 12290 patterns translated into English (UK/cm). 12290
We work hard to bring you the best knitting and crochet have to offer, inspiration and advice as well as great quality yarns at incredible prices! Would you like to use our patterns for other than personal use? You can read what you are allowed to do in the Copyright text at the bottom of all our patterns. Happy crafting!
Post a comment to pattern DROPS 232-21
We would love to hear what you have to say about this pattern!
If you want to leave a question, please make sure you select the correct category in the form below, to speed up the answering process. Required fields are marked *.