
Popular categories
Looking for a yarn?


Comments / Questions (28)
![]() Amapola Duncan wrote:
Amapola Duncan wrote:
The stitch count after casting off for the BODY (XS-S-M) is incorrect It should say: ... on each side 28-32-36 stitches. Bind off the last 28-38-46 stitches on the next row.
22.02.2026 - 03:59
![]() Amapola wrote:
Amapola wrote:
Regarding the knitting gauge, is it supposed to be on the smaller (3mm) or larger needle (4mm) size?
18.01.2026 - 00:26DROPS Design answered:
Hi Amapola, you should use larger needles. Happy knitting!
18.01.2026 - 00:27
![]() Yvonne wrote:
Yvonne wrote:
Gerne möchte ich diesen Pullover in der Grösse L (Rückenlänge 48-50 cm). Können Sie mir dafür die Anleitung zusenden? Vielen Dank
27.12.2025 - 23:16DROPS Design answered:
Hi Yvonne, all our patterns are available for free from our website in several language versions. The German version is available HERE. Happy knitting!
28.12.2025 - 10:47
![]() Hana wrote:
Hana wrote:
Jaký je tedy správný vzor na A.5? děkuji
25.10.2025 - 16:20DROPS Design answered:
Dobrý den, Hano, správné schéma je to, které vidíte aktuálně na webu u návodu. Hodně zdaru! Hana
28.10.2025 - 19:39
![]() Marilyn wrote:
Marilyn wrote:
Thank you
30.09.2025 - 07:43
![]() Marilyn wrote:
Marilyn wrote:
On the A3 pattern P2 / P2 when you work into the second st then the first st then slip both off. Do you work it as a 2 knitting stitches or 2 purl stitches ?? Thank you.
29.09.2025 - 07:23DROPS Design answered:
Hi Marilyn, The stitches are knitted. Regards, Drops team.
30.09.2025 - 06:57
![]() Marilyn wrote:
Marilyn wrote:
How do you follow the pattern ? Is the whole box of 1A One row ? or is one line in box equal to 1 row ?
17.07.2025 - 10:10DROPS Design answered:
Hi Marylin, one line is one row. How to read the knitting patterns you will find HERE. Happy knitting!
17.07.2025 - 10:16
![]() Marilyn wrote:
Marilyn wrote:
In the pattern box A1. I’m only counting up in the pattern 80 stitches. I’m doing the med size which has 92 stitches , what do I do with the other 10 stitches left on my needle. It’s not adding up. Please advise.
17.07.2025 - 09:17
![]() Marilyn wrote:
Marilyn wrote:
Started on 92 stitches and did the first row in A1. I have 10 stitches left over Now what to do
17.07.2025 - 02:52DROPS Design answered:
Hi Marylin, you have 92 sts at the beginning. You are making 1st row like this from the right side: 1 edge stitch in GARTER STITCH – read description above, A.1 over the next 90 stitches (= -9 repeats of 10 stitches), 1 edge stitch in garter stitch. > 1+90+1=92 sts. Continue this pattern for 8 cm. Happy knitting!
17.07.2025 - 09:05
![]() Elena wrote:
Elena wrote:
Hola, Estoy tejiendo la talla S. Mi pregunta es cómo tejer las partes por separado? Qué patrón tengo que seguir. Por ejemplo el pieza del frente 1, que son 11 puntos más orillo. Sigo el grafico A2 haciendo 11 puntos? o que gráfico tendría que seguir en cada parte? Muchas gracias
13.01.2025 - 14:06DROPS Design answered:
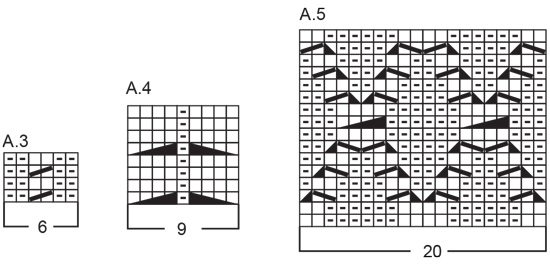
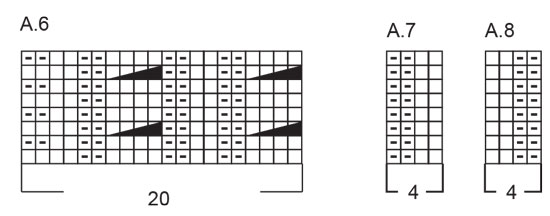
Hola Elena, en el canesú tenías: 20 pts de A.2, 6 pts de A.3, 9 pts de A.4, 6 pts de A.3, 20 pts de A.5, 6 pts de A.3, 9 pts de A.4, 6 pts de A.3, 20 pts de A.6. Ahora divides la labor para los dos delanteros y la espalda en una fila por el lado revés. El delantero-2 se trabaja sobre los primeros 6 pts de A.6 (desde la izquierda), los siguientes 80 pts de la espalda son A.6, A.3, A.4, A.3, A.5, A.3, A.4, A.3 y los primeros 9 pts de A.2 desde la izquierda y los 11 pts restantes de A.2 son sobre los que trabajas el delantero-1. Por lo tanto, sigues con el pt orillo (no incluido en el diagrama) y con A.2, asegurándote de trabajar solo sobre los 11 primeros pts del diagrama.
19.01.2025 - 13:33
|
||||||||||||||||||||||
Snowy Trails#snowytrailsdogsweater |
||||||||||||||||||||||
 |
 |
|||||||||||||||||||||
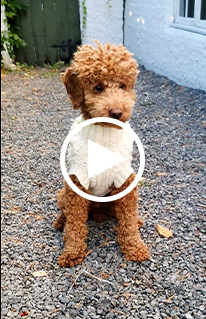
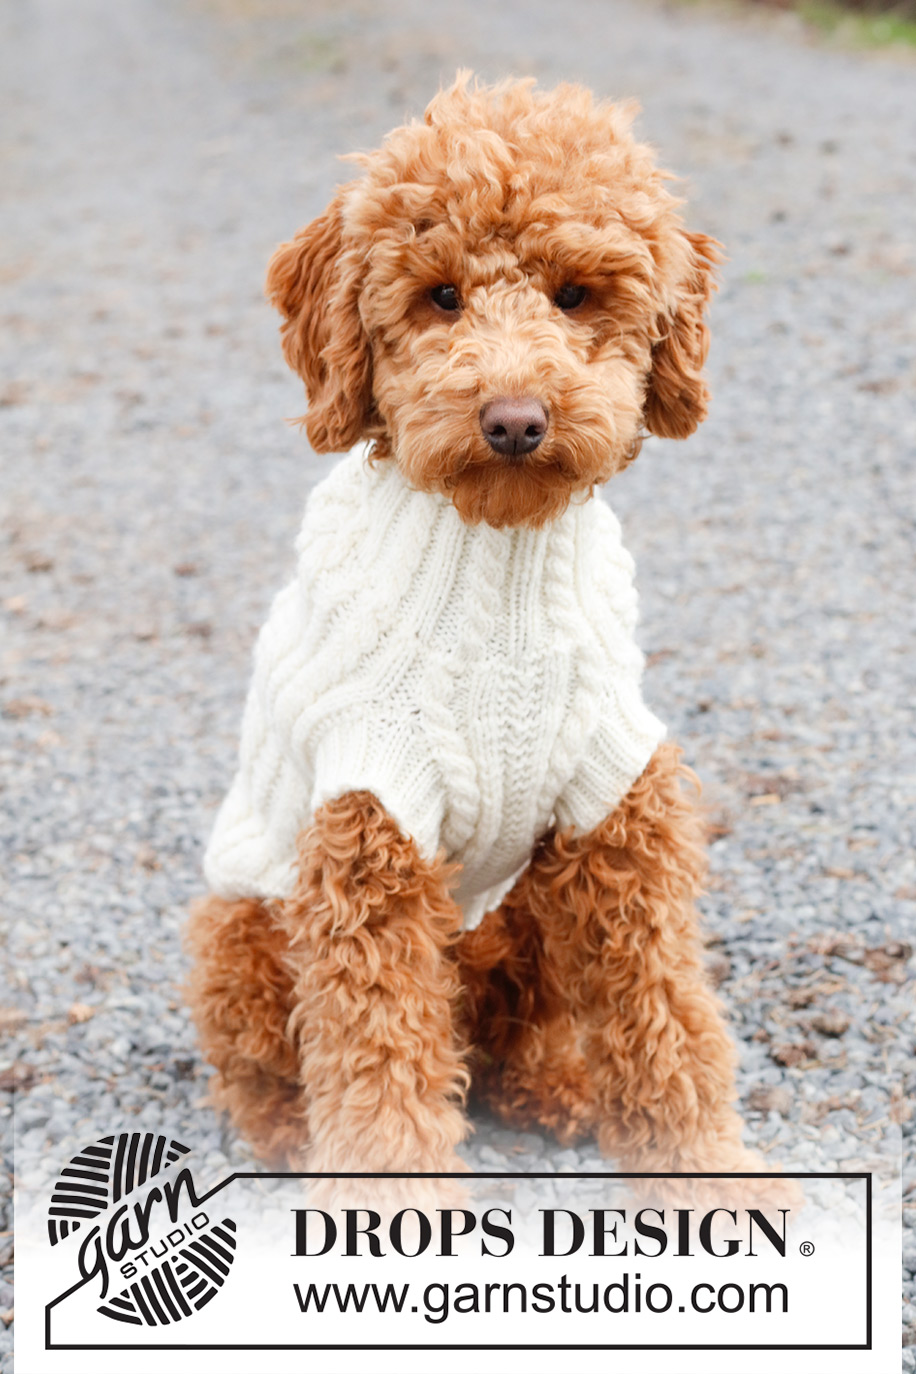
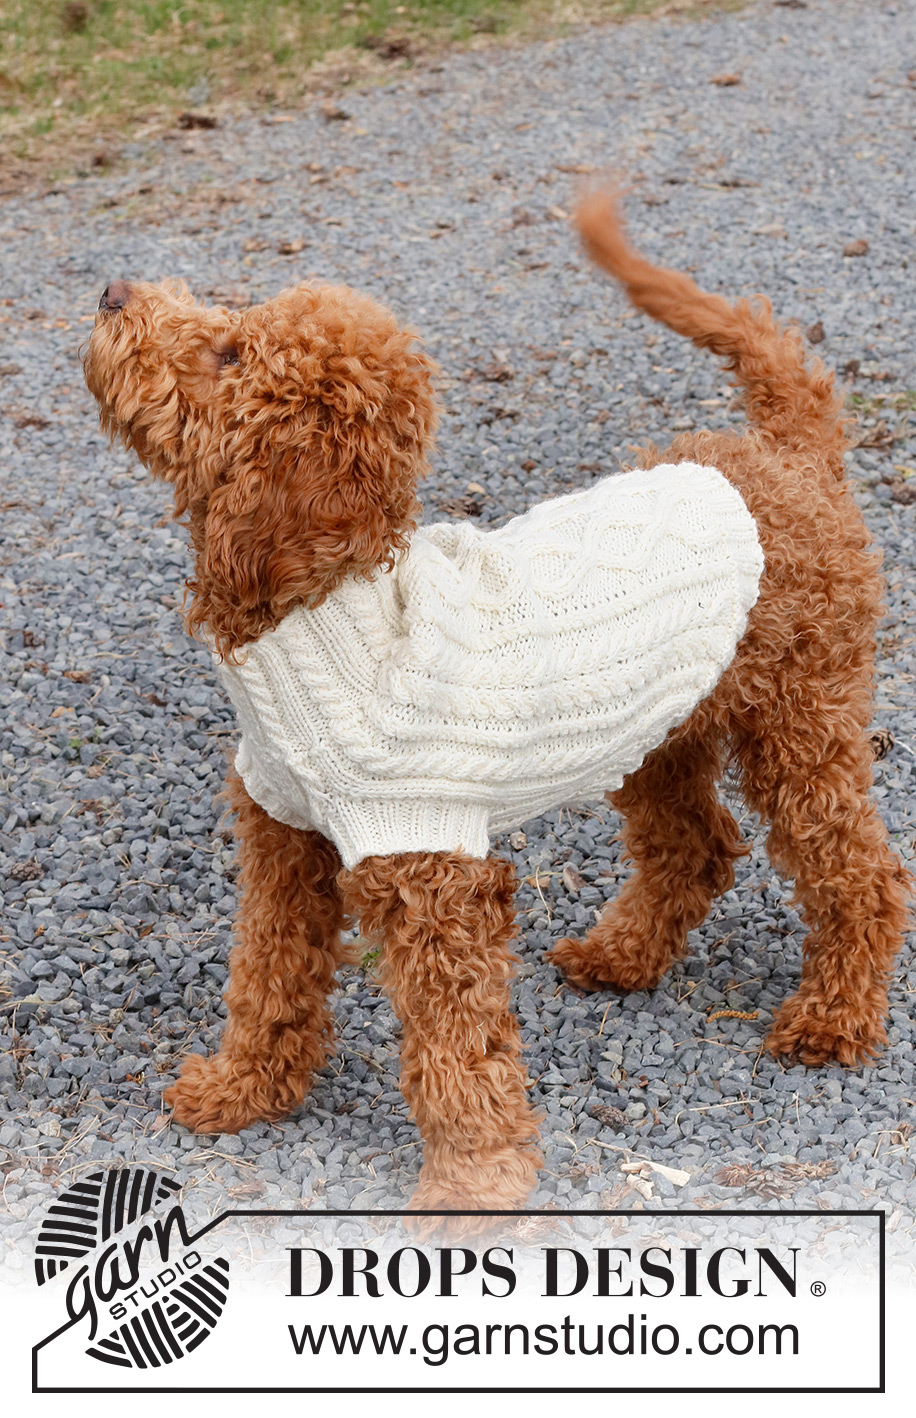
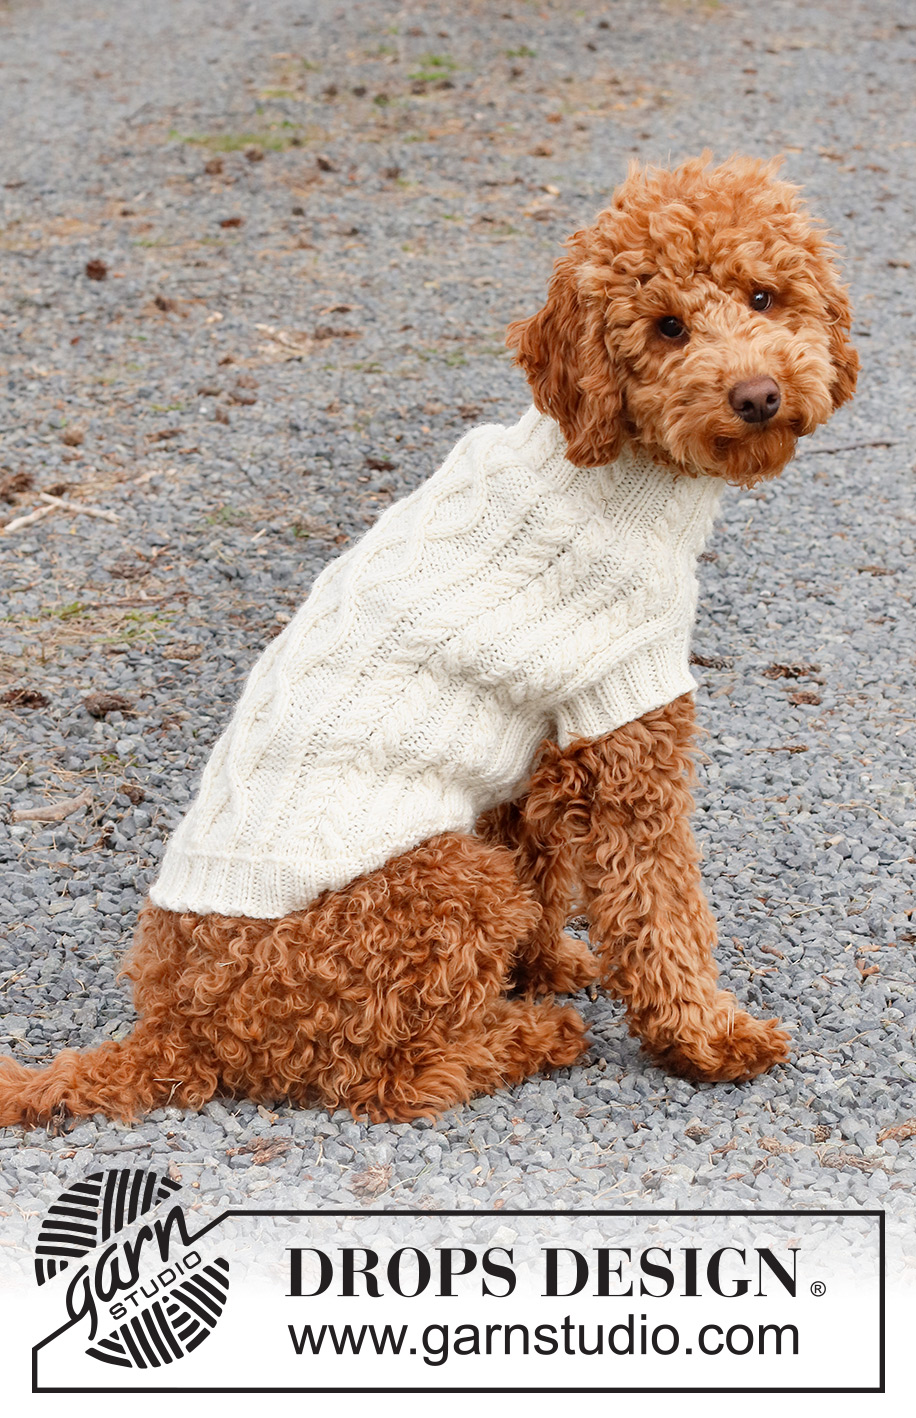
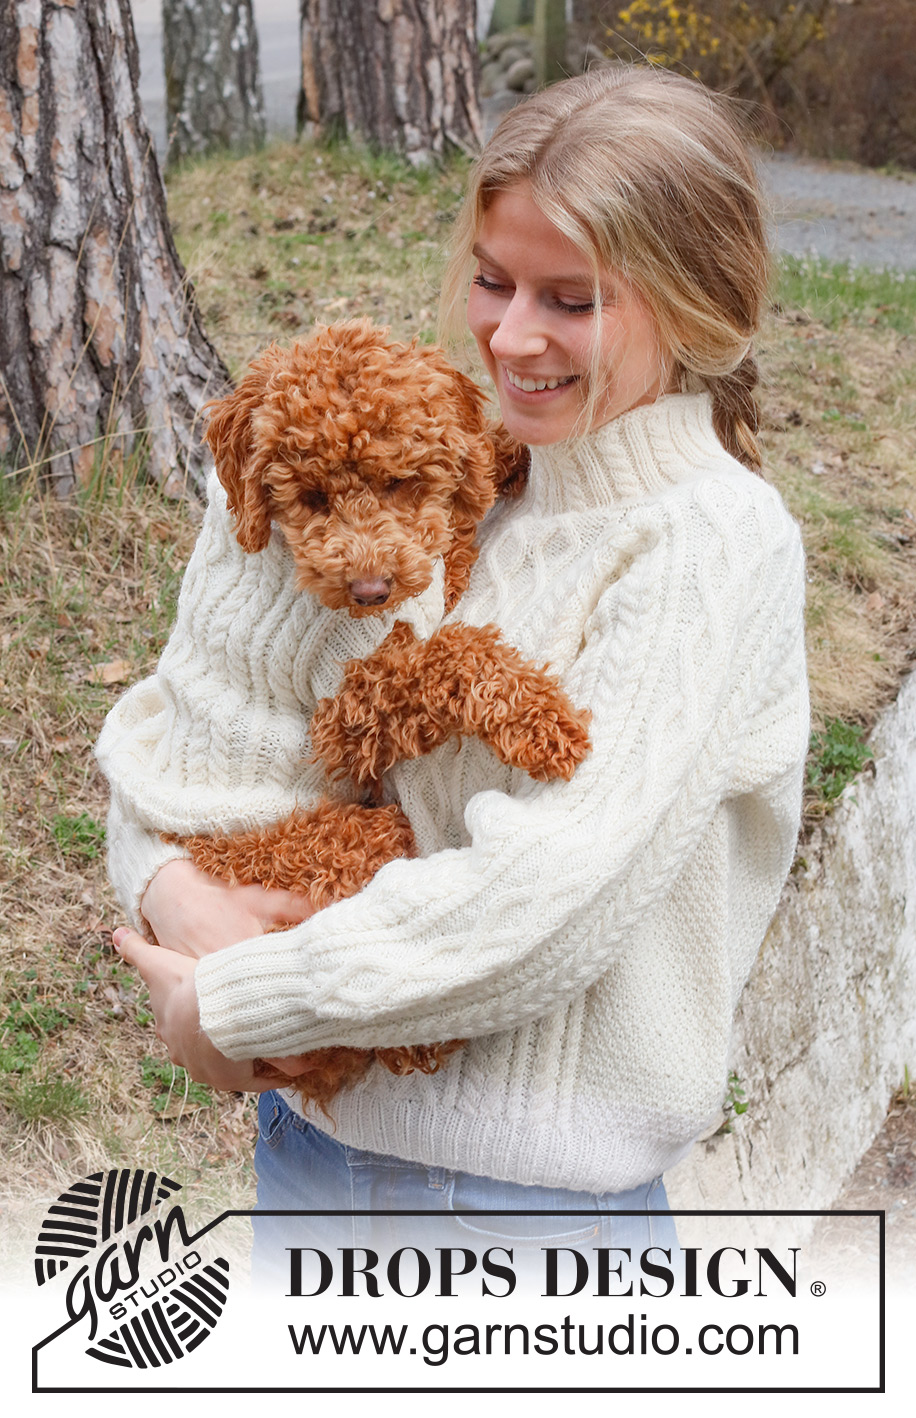
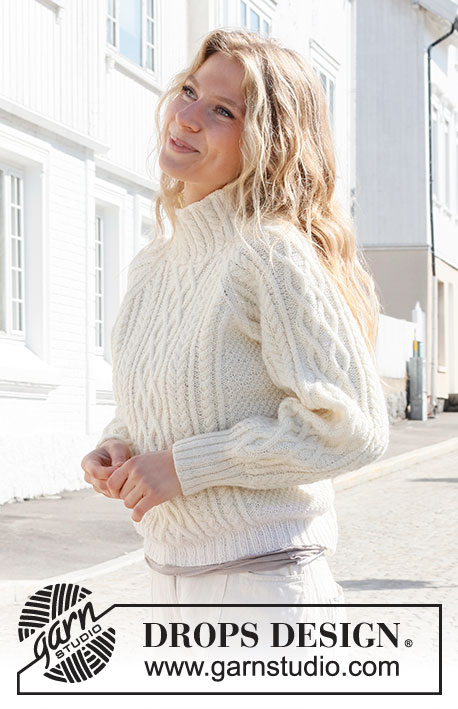
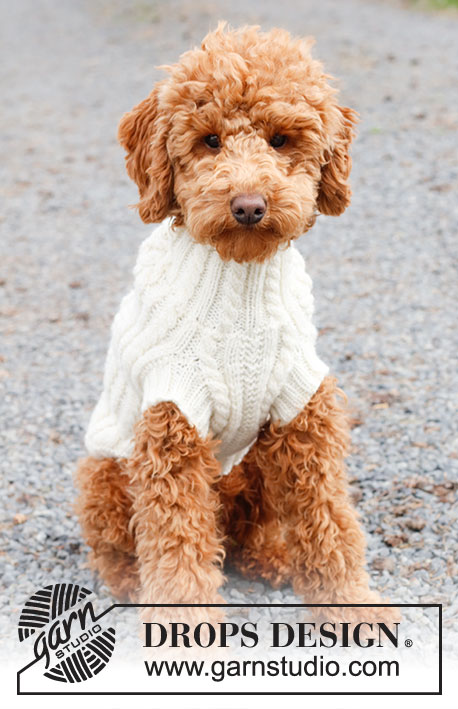
Knitted jumper for dogs with cables in DROPS Karisma. Sizes XS - M.
DROPS 228-52 |
||||||||||||||||||||||
|
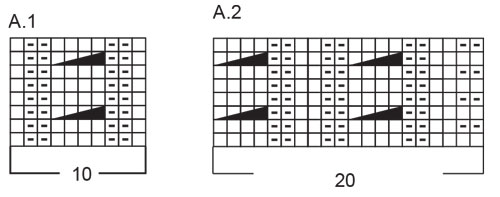
------------------------------------------------------- EXPLANATIONS FOR THE PATTERN: ------------------------------------------------------- RIDGE/GARTER STITCH (worked back and forth): Knit all rows. 1 ridge = knit 2 rows. PATTERN: See diagrams A.1 to A.5. The diagrams show all rows in the pattern from the right side. INCREASE TIP (evenly spaced): To work out how to increase evenly, count the total number of stitches on the needle (e.g. 82 stitches) and divide by the number of increases to be made (e.g. 12) = 6.8. In this example, increase by making 1 yarn over after approx. each 7th stitch. On the next row work the yarn overs twisted to avoid holes. CASTING-OFF TIP: To avoid the cast-off edge being tight you can cast off with a larger size needle. If the edge is still tight, make 1 yarn over after approx. each 4th stitch at the same time as casting off; the yarn overs are cast off as normal stitches. ------------------------------------------------------- START THE PIECE HERE: ------------------------------------------------------- JUMPER FOR DOGS – SHORT OVERVIEW OF THE PIECE: The jumper is worked back and forth, top down with an opening underneath which is sewn together to finish. The piece is then divided to make holes for the front legs. The sections are joined again and continued back and forth. Edges are worked around the holes for the legs and around the opening (= bottom of front and back pieces). The jumper is sewn together underneath to finish. NECK: Cast on 72-82-92 stitches with circular needle size 3 mm and DROPS Karisma. Purl 1 row from the wrong side, then work as follows from the right side: 1 edge stitch in GARTER STITCH – read description above, A.1 over the next 70-80-90 stitches (= 7-8-9 repeats of 10 stitches), 1 edge stitch in garter stitch. Continue this pattern for 8 cm. Knit 1 row from the right side where you increase 12-20-26 stitches evenly spaced – read INCREASE TIP in explanations above = 84-102-118 stitches. Knit 1 row from the wrong side. Change to circular needle size 4 mm. Insert a marker at the beginning of the row; the piece is measured from here. YOKE: Continue the different sizes as follows: XS: From the right side: A.2 (= 20 stitches), A.3 over the next 12 stitches (= 2 repeats of 6 stitches), A.5 (= 20 stitches), A.3 over the next 12 stitches, A.6 (= 20 stitches). S: From the right side: A.2 (= 20 stitches), A.3 (= 6 stitches), A.4 (= 9 stitches), A.3, A.5 (= 20 stitches), A.3 (= 6 stitches), A.4 (= 9 stitches), A.3, A.6 (= 20 stitches). M: From the right side: A.2 (= 20 stitches), A.3 (= 6 stitches), A.7 (= 4 stitches), A.4 (= 9 stitches), A.8 (= 4 stitches), A.3, A.5 (= 20 stitches), A.3, A.7, A.4, A.8, A.3, A.6 (= 20 stitches). Work this pattern back and forth until the piece measures 2-4-7 cm from the marker – adjust so the next row is worked from the wrong side and as follows: Work pattern as before over the first 11-11-15 stitches and place these stitches on a thread (= front piece-2), work as before over the next 62-80-88 and place them on a thread (= back piece), work the last 11-11-15 stitches (= front piece-1). Each piece is continued separately: FRONT PIECE-1: Start from the right side, working as before and cast on 1 stitch at the end of the first row from the right side (edge stitch worked in garter stitch) = 12-12-16 stitches. Continue the pattern until the piece measures 9-11-13 cm from the division – finish with a row from the wrong side where you cast off the edge stitch at the beginning of this row (opening for the leg) = 11-11-15 stitches. Cut the strand and lay the piece to one side. FRONT PIECE-2: Place the stitches back on needle size 4 mm. Start from the right side, working pattern as before, and cast on 1 edge stitch at the end of the first row from the wrong side (edge stitch worked in garter stitch) = 12-12-16 stitches. Work pattern until the piece measures 9-11-13 cm from the division – finish on the same row as the other front piece and cast off the edge stitch (towards the opening for the leg) at the beginning of the next-to-last row = 11-11-15 stitches. Cut the strand and lay the piece to one side. BACK PIECE: Place the stitches back on needle size 4 mm. Start from the right side, continue the pattern and cast on 1 edge stitch at the end of the first 2 rows (edge stitches worked in garter stitch) = 64-82-90 stitches. Work until the piece measures 9-11-13 cm from the division – finish after the same row as the front pieces and cast off the edge stitches at the beginning of the last 2 rows. BODY: Place the front and back pieces on the same needle = 84-102-118 stitches. Work the first row from the right side and continue the pattern until the piece measures 14-19-28 cm from the marker. There is approx. 3 cm left under the tummy and 10-12-12 cm along the back. Try the jumper on and work to desired length. Continue the pattern. AT THE SAME TIME cast off at the beginning of each row as follows: 11-11-15 stitches 1 time, 3 stitches 1 time, 2 stitches 2-3-3 times, 1 stitch 3 times, 2 stitches 2-3-3 times and 3 stitches 1 time on each side = 28-38-46 stitches. Cast off the last 28-38-54 stitches on the next row. The piece measures approx. 21-29-37 cm from the marker. EDGING AROUND THE LEGS: With double pointed needles size 3 mm, knit up 48 to 68 stitches around the front leg opening, inside the 1 edge stitch. The number of stitches should be divisible by 4. Work rib (knit 2, purl 2) in the round for 3 cm. Cast off with knit over knit and purl over purl - read CASTING-OFF TIP. Work around the other leg in the same way. EDGING AROUND THE BODY: Work an edge along the sides underneath the body. Start from the right side, using circular needle size 3 mm and knit up 98 to 122 stitches. The number of stitches should be divisible by 4 + 2. Knit 1 row from the wrong side. Work rib from the right side as follows: 2 edge stitches in garter stitch, * knit 2, purl 2 *, work from *-* until there are 2 stitches left, 2 edge stitches in garter stitch. Work garter stitch over garter stitch, knit over knit and purl over purl for 3 cm. Cast off with knit over knit and purl over purl – remember CASTING-OFF TIP. ASSEMBLY: Sew the jumper together underneath, sewing in the outermost loop of the outermost stitch so the seam is flat. |
||||||||||||||||||||||
Diagram explanations |
||||||||||||||||||||||
|
||||||||||||||||||||||
 |
||||||||||||||||||||||
 |
||||||||||||||||||||||
 |
||||||||||||||||||||||
Have you finished this pattern?Tag your pictures with #dropspattern #snowytrailsdogsweater or submit them to the #dropsfan gallery. Do you need help with this pattern?You'll find 26 tutorial videos, a Comments/Questions area and more by visiting the pattern on garnstudio.com. © 1982-2026 DROPS Design A/S. We reserve all rights. This document, including all its sub-sections, has copyrights. Read more about what you can do with our patterns at the bottom of each pattern on our site. |
||||||||||||||||||||||


With over 40 years in knitting and crochet design, DROPS Design offers one of the most extensive collections of free patterns on the internet - translated to 17 languages. As of today we count 324 catalogues and 12290 patterns translated into English (UK/cm). 12290
We work hard to bring you the best knitting and crochet have to offer, inspiration and advice as well as great quality yarns at incredible prices! Would you like to use our patterns for other than personal use? You can read what you are allowed to do in the Copyright text at the bottom of all our patterns. Happy crafting!
Post a comment to pattern DROPS 228-52
We would love to hear what you have to say about this pattern!
If you want to leave a question, please make sure you select the correct category in the form below, to speed up the answering process. Required fields are marked *.