
Categorías populares
¿Buscas un hilo?


Comentarios / Preguntas (99)
![]() Yannick escribió:
Yannick escribió:
Bonjour (modèle petronella top - laine muskat) je ne comprends pas comment faire les augmentations du raglan en même temps que le motif A1 merci de m'expliquer - en effet je fais un jeté une maille endroit - une maille endroit et un jeté pour le motif A1 de la manche - comment puis-je alors faire une augmentation pour le raglan ?
24.08.2017 - 09:47DROPS Design respondió:
Bonjour Yannick, vous n'allez pas augmenter pour le devant/le dos et les manches en même temps, par ex en taille S, on augmente 12x tous les 2 tours et 7x tous les 4 tours pour le devant/le dos mais 18x tous les 2 tours et 4 x tous les 4 tours pour les manches. Ainsi, les 12 premières augmentations seront sur chaque pièce (= manches + dos/devant), mais par la suite, vous augmenterez soit uniquement sur les manches (4 augm par tour), soit partout (8 augm par tour). Comment augmenter mailles pour le reglan tandis que l’on fait le schemat A.1 sur les manches, consulter la partie apres les fournitures entitulee REGLAN. Bon tricot!
24.08.2017 - 09:58Genevieve escribió:
Hi. I've read some of the questions and answers and have figured out the pattern and increases. 😉
16.08.2017 - 04:06Genevieve escribió:
And for chart A.2, for the 2nd row of k2together followed by 1 yarn over, for the increase round, I've started with marker thread, k1, yarn over followed by k2together, yarn over (8 times) and left with 1 stitch. Which means after the pattern yo, I yarn over again followed by k1 marker thread?
14.08.2017 - 07:24Genevieve escribió:
I don't quite get the instruction for chart A.1 and A.2. I'm knitting for S size and I need to do the increase for sleeves 23 times. I worked chart A.1 1 time in height is 6 rows and chart A.2 in height is 8 rows. After that do I just knit all around till I reached the 23rd increases? Or I continue with A.2?
14.08.2017 - 00:46DROPS Design respondió:
Hello Genevieve. You continue working A.2 during all the increases. Please remember that after the next to last increase on the sleeve (there are 4 rounds left), you must work the stitches on each sleeve in garter stitch. Happy knitting!
20.08.2017 - 18:08Genevieve escribió:
I'm now at the beginning raglan increase and I'm stuck on the sleeves increase instruction. I've started with knit till 1 stitch before 1st marker thread, I've also made the yarn over, knit 1 and marker thread. After that I'll follow A.1 which is purl 10 for sleeves? If yes, how do I increase stitches on the sleeves now?
12.08.2017 - 06:39DROPS Design respondió:
Hi Genevieve, You also need to increase after the marker - Knit 1, 1 yarn over. Do the same at all markers and you will have increases to raglan both on body and sleeves. On the next round knit all yarn overs so that you get holes. Happy knitting!
12.08.2017 - 07:57Genevieve escribió:
Hi. I've just increased the stitches after the 4th round from the beginning. Do I knit 1 round followed by Raglan increase since the Raglan increase is from 2nd round onwards?
10.08.2017 - 17:44DROPS Design respondió:
Hi Genevieve, Yes you knit 1 round between each round with increases to raglan on the body. On the sleeves you are increasing every 2nd round, but are working A.2 (while increasing alternate rounds). I hope this helps and happy knitting!
11.08.2017 - 07:10
![]() Bodil Jensen escribió:
Bodil Jensen escribió:
Ang. de 20 masker der skal tages ud i halsen. Er det korrekt at der skal tages ud på pind. 4 - dvs. en vrang pind, der efterfølges af ret (første raglan pind)? Hviken teknink tages der ud med? - Jeg har prøvet forskellige og udtagningerne blev desværre meget tydelige på næste pind. Mvh Bodil
29.07.2017 - 10:13DROPS Design respondió:
Hej Bodil, ja du tager ud på 4.omgang som er vrang, her strikker du 2 vrang i samme maske, 1 i forreste maskeled og 1 i bagerste maskeled. God fornøjelse!
17.08.2017 - 15:48
![]() Virginia escribió:
Virginia escribió:
I think my question was not well put. What I see now for RAGLAN increases is that you do one height of A.1 (6 rows) increasing every 2nd row then move on to A.2 and increase every 2nd row until you have reached the number of 2nd row increases (27 times for L). THEN you do the 2nd paragraph - 4th row increases which are listed as Round 1-4 (2 times for L). When do you do the third paragraph "Increase as follows after the marker thread:" showing Rounds 1-4?
28.07.2017 - 18:15DROPS Design respondió:
Dear Virginia, after you have inc every 2nd row, inc every 4th row: after the marking thread (= 3rd paragraph, ie at the beg of the sleeve) and before marking thread (= 2nd paragraph, ie at the end of the sleeve). Happy knitting!
31.07.2017 - 09:15Virginia escribió:
I think my question was not well put. What I see now for RAGLAN increases is that you do one height of A.1 (6 rows) increasing every 2nd row then move on to A.2 and increase every 2nd row until you have reached the number of 2nd row increases (27 times for L). THEN you do the 2nd paragraph - 4th row increases which are listed as Round 1-4 (2 times for L). When do you do the third paragraph "Increase as follows after the marker thread:" showing Rounds 1-4
28.07.2017 - 16:55Virginia escribió:
Thank you regarding A.3. Reading the pattern under RAGLAN in the first paragraph it says to "Increase every 2nd rounds as follows:" (27 times for L) and in the second paragraph it says "Increase every 4th round as follows:" (2 times for L). Then in the 3rd paragraph it says "Increase as follows, after the marker thread:" Is this 3rd paragraph referring to increases after you complete A.1 and A.2 once - 14 rows total? Yes?
28.07.2017 - 13:33DROPS Design respondió:
Dear Virginia, under "RAGLAN" you are explained how to inc every 2nd round: first before the marking thread (at the end of each sleeve/front/back piece) then after the marking thread: at the beg of sleeve/front/back piece. Same when dec every 4th round: first how to inc before the marking thread, then how to inc after the marking thread. When A.1 has been worked 1 time in height, repeat A.2 in height until end of sleeve. Happy knitting!
28.07.2017 - 14:26
|
|||||||||||||
Petronella Top#petronellatop |
|||||||||||||
|
|
|||||||||||||
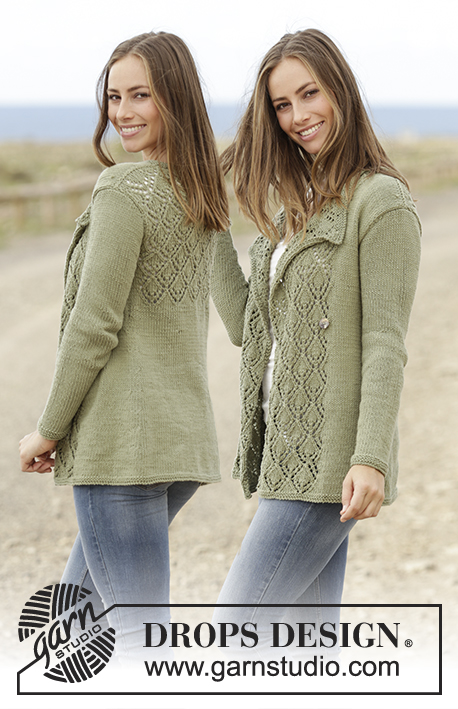
Top de punto con raglán y patrón de calados, tejido de arriba abajo en DROPS Muskat. Tallas S - XXXL.
DROPS 175-32 |
|||||||||||||
|
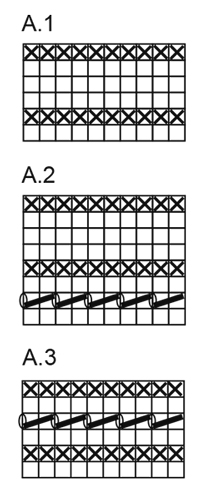
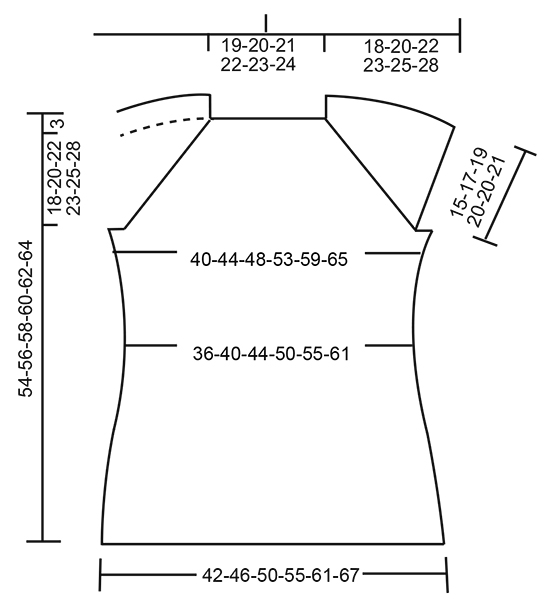
PLIEGUE/PUNTO MUSGO (en redondo): 1 pliegue = 2 vueltas. 1 vuelta de derecho y 1 vuelta de revés. PATRÓN: Ver los diagramas A.1, A.2 y A.3. Los diagramas muestran todas las filas del patrón visto por el lado derecho. RAGLÁN: Aumentar cada 2ª vuelta como sigue: Aumentar como sigue antes del marcapuntos: Comenzar 1 punto antes del marcapuntos: Hacer una hebra, 1 derecho, marcapuntos. Aumentar como sigue después del marcapuntos: Marcapuntos, 1 derecho, hacer una hebra. En la siguiente vuelta trabajar las hebras de derecho para que queden agujeros. Aumentar cada 4ª vuelta como sigue: Aumentar como sigue antes del marcapuntos: VUELTA 1: Comenzar 1 punto antes del marcapuntos: Hacer una hebra, 1 derecho, marcapuntos. VUELTA 2: Las hebras se trabajan de derecho para que queden agujeros. VUELTA 3: Comenzar 3 puntos antes del marcapuntos: 2 puntos juntos de derecho, 1 hebra, 1 derecho, marcapuntos. No hay aumentos pero la fila de agujeros continúa como antes. VUELTA 4: Las hebras se trabajan de derecho para que queden agujeros. Aumentar como sigue después del marcapuntos: VUELTA 1: Marcapuntos, 1 derecho, hacer una hebra. VUELTA 2: Las hebras se trabajan de derecho para que queden agujeros. VUELTA 3: Marcapuntos, 1 derecho, 1 hebra, deslizar 1 punto como de derecho, 1 derecho, pasar el punto deslizado sobre el punto trabajado. No hay aumentos pero la fila de agujeros continúa como antes. VUELTA 4: Las hebras se trabajan de derecho para que queden agujeros. TIP PARA LAS DISMINUCIONES: Comenzar 3 puntos antes del marcapuntos: Trabajar 2 puntos juntos de derecho, 2 derechos (el marcapuntos queda entre estos 2 puntos), deslizar 1 punto como de derecho, 1 derecho, pasar el punto deslizado sobre el punto trabajado = 2 puntos disminuidos. TIP PARA LOS AUMENTOS: Trabajar hasta que quede 1 punto antes del marcapuntos. Hacer 1 hebra, 2 derechos (el marcapuntos queda entre estos 2 puntos), hacer 1 hebra. En la siguiente vuelta trabajar las hebras como derecho retorcido para que no se formen agujeros (los puntos aumentados se trabajan en punto jersey). --------------------------------------------------------- TOP: La labor se trabaja en redondo con aguja circular desde el centro de la espalda, de arriba abajo. CANESÚ: Montar 80-84-88-92-96-100 puntos con aguja circular tamaño 4 mm y Muskat. Trabajar 2 pliegues - ver explicación arriba, en la última vuelta de los pliegues aumentar 20 puntos repartidos en la vuelta = 100-104-108-112-116-120 puntos. Insertar 4 marcapuntos en la labor como sigue: el 1er marcapuntos después de 19-20-21-22-23-24 puntos (= mitad de la espalda), el 2º marcapuntos después de los siguientes 12 puntos (= manga), el 3er marcapuntos después de los siguientes 38-40-42-44-46-48 puntos (= delantero), el 4º marcapuntos después de los siguientes 12 puntos (= manga), quedan 19-20-21-22-23-24 puntos en la aguja después del 4º marcapuntos (= mitad de la espalda). Comenzar con los aumentos para el raglán como se describe arriba y trabajar en punto jersey sobre los puntos de la espalda y el delantero y A.1 sobre los puntos de la manga. LEER TODA ESTA SECCIÓN ANTES DE CONTINUAR. Los aumentos son diferentes en delantero/espalda y las mangas: DELANTERO/ESPALDA: Aumentar cada 2ª vuelta 12-15-17-25-30-35 veces, después cada 4ª vuelta 7-7-7-4-3-2 veces. MANGAS: Aumentar cada 2ª vuelta 18-23-27-29-26-25 veces, después cada 4ª vuelta 4-3-2-2-5-7 veces. Cuando se ha completado A.1 una vez en vertical, repetir A.2 en vertical. Los puntos aumentados en la manga se trabajan dentro del patrón según se avanza. Después del anteúltimo aumento de la manga (quedan 4 vueltas), continuar trabajando en punto musgo en los puntos de cada manga, los puntos de delantero/espalda en punto jersey como antes. RECUERDE MANTENER LA TENSIÓN DEL TEJIDO. Después de completar todos los aumentos del raglán hay 264-296-320-352-372-396 puntos en la aguja. En la siguiente vuelta trabajar como sigue: 38-42-45-51-56-61 puntos (= mitad de la espalda), cerrar los siguientes 56-64-70-74-74-76 puntos, trabajar los siguientes 76-84-90-102-112-122 puntos (= delantero), cerrar los siguientes 56-64-70-74-74-76 puntos, trabajar los siguientes 38-42-45-51-56-61 puntos (= mitad de la espalda). CUERPO: Continuar trabajando como sigue: trabajar la mitad de la espalda, montar 8-8-10-10-12-14 puntos nuevos, trabajar el delantero, montar 8-8-10-10-12-14 puntos nuevos, trabajar la mitad de la espalda. Ahora hay 168-184-200-224-248-272 puntos en el cuerpo. Insertar 1 marcapuntos a cada lado, en el centro de los puntos nuevos, recién montados. LA LABOR SE MIDE AHORA DESDE AQUÍ. Continuar con punto jersey, pero a lo largo de los 8-8-10-10-12-14 puntos nuevos montados a cada lado trabajar 2 pliegues, ahora trabajar en punto jersey a lo largo de todos los puntos. Cuando la labor mida 4 cm disminuir 1 punto a cada lado de los marcapuntos (= 4 puntos disminuidos), disminuir cada 3 cm un total de 4 veces – LEER TIP PARA LAS DISMINUCIONES = 152-168-184-208-232-256 puntos. Cuando la labor mida 19-19-19-18-18-19 cm aumentar 1 punto a cada lado de los marcapuntos (= 4 puntos aumentados), aumentar cada 2 cm un total de 6 veces – LEER TIP PARA LOS AUMENTOS = 176-192-208-232-256-280 puntos. Cuando la labor mida 32-32-32-33-33-32 cm trabajar A.3 a lo largo de todos los puntos. Ahora rematar de derecho, la labor mide aprox. 54-56-58-60-62-64 cm desde el hombro. |
|||||||||||||
Explicaciones del diagrama |
|||||||||||||
|
|||||||||||||
 |
|||||||||||||
 |
|||||||||||||
¿Terminaste este patrón?Entonces, etiqueta tus fotos con #dropspattern #petronellatop o envíalas a la galería #dropsfan. ¿Necesitas ayuda con este patrón?Encontrarás 23 videos tutoriales, un espacio para comentarios/preguntas y más visitando la página del patrón en garnstudio.com © 1982-2026 DROPS Design A/S. Todos los derechos reservados. Este documento, incluyendo todas sus sub-secciones, está protegido por los derechos de autor (copyright). Lee más acerca de lo que puedes hacer con nuestros patrones en la parte de abajo de cada patrón de nuestro sitio. |
|||||||||||||


Con más de 40 años en el diseño de modelos de punto y de ganchillo, DROPS Design ofrece una de las más vastas colecciones de patrones gratuitos en el internet - traducidos en 17 idiomas. Al día de hoy, contamos con 324 catálogos y 12290 patrones - de los cuales 11670 están traducidos en español.
Nosotros trabajamos con mucho esmero para brindarte lo mejor que las labores de punto y ganchillo tienen para ofrecer,inspiración y consejos, así como hilos de magnífica calidad a precios increíbles! Te gustaría usar nuestros patrones para otro fin además del uso personal? Puedes leer acerca de lo que estás permitida a hacer en el texto de Copyright en la parte de abajo de todos nuestros patrones. Felices labores!
Escribe un comentario sobre DROPS 175-32
¡Nos encantaría saber qué piensas acerca de este patrón!
Si quieres escribir una pregunta referente al patrón, por favor asegúrate de elegir la categoría correcta en el formulario debajo, para acelerar el proceso de respuesta. Los campos obligatorios están marcados con un *.