
Categorías populares
¿Buscas un hilo?


Comentarios / Preguntas (267)
![]() Sylvia escribió:
Sylvia escribió:
And what am I doing on the WS? knitting, purling?
22.04.2026 - 02:47DROPS Design respondió:
Dear Sylvia, from the wrong side work the stitches as they should appear as before seen from RS to avoid "breaking" the previous pattern. If your RS rows are (P2, K1) in A.1 you will then purl all stitches from WS. Happy knitting!
22.04.2026 - 08:13
![]() Sylvia escribió:
Sylvia escribió:
Also, I have 90 stitches after finishing an all K row in the pattern. Do I knit the 72 stitches in the PPKPPK etc. pattern because then I won't be doing all knit stitches for the 55 stitches. Or, do I do one round of 90 stitches in the PPKPPK pattern and then knit all 72 stitches before placing a marker and starting row 1 elevated decrease on the right side?
22.04.2026 - 02:47
![]() Sylvia escribió:
Sylvia escribió:
If the 55 stitches starts between A.2 and the right sleeve, there will only be 3 A.2 sequences to do the K3 tog elevated decrease before I have to turn the work to the wrong side. This gives only 3 x 2 stitches = 6 stitches decreased, not 8. Not sure how the total number of stitches decreased is 8.
22.04.2026 - 02:44
![]() Sylvia escribió:
Sylvia escribió:
After the 90 stitches have been worked, if I knit 72 stitches, I end up after A.2 (between the end of A.2 and the right sleeve) and place a marker here. Then I start knitting the 55 stitches. When do I start the K3 tog twisted after A.2. Do I start it here - over the first 3 stitches after the marker - or after the next A.2 sequence (between A.2 and the back)?
22.04.2026 - 02:41DROPS Design respondió:
Dear Sylvia, you will decrease now only on transitions/raglan between sleeves and back piece, not towards front piece anymore so that you decrease 2 sts a total of 4 times= 8 sts per decrease row. Happy knitting!
22.04.2026 - 08:11
![]() Sylvia escribió:
Sylvia escribió:
Where do you work the k3 twisted tog in the neck elevation? Do you still do the k2 tog and ssk for the sleeve and back raglans?
21.04.2026 - 03:38DROPS Design respondió:
Dear Sylvia, when working the short rows only decrease as explained under RAGLAN DEC (ELEVATION): at raglan stitches, don't decrease with K2 tog/ssk as before, you now decrease 2 sts and not only 1. Happy knitting!
21.04.2026 - 09:44
![]() Sylvia escribió:
Sylvia escribió:
I can't find the description of how to work the elevation under "Explanations". I don't see explanations anywhere. Also, after the 90 stitches have been worked, do you do a PPK round and then knit across the 72 stitches. Also, are you continuing the decrease for raglan on the sleeves and the back and also decrease elevation all at the same time?
21.04.2026 - 02:49DROPS Design respondió:
Dear Sylvia, after you have decreased to 90 stitches for raglan, start the short rows as explained just afterwards, work the first 72 sts from RS as before, insert the marker, then start working the short rows alternately from RS and from WS as explained for your size remember to decrease as explained above under RAGLAN DEC (ELEVATION):. Happy knitting!
21.04.2026 - 09:42
![]() Lin escribió:
Lin escribió:
I have knitted the swatch and while the length is 10cm, the width is 8cm because it is a rib. On the needle the width is 10cm. Please advise .
05.04.2026 - 21:46DROPS Design respondió:
Hi Lin, The knitting tension should be measured while working the ribbed pattern in A.1. So it sounds like your knitting tension is too tight and you need to increase your needle size. Regards, Drops Team.
06.04.2026 - 15:25
![]() Lin escribió:
Lin escribió:
I knitted the swatch and if I measure flat, it is 10 cm by 8 cm underneath but on the needle 10cm. The rib makes a concertina. Can i assume that my swatch is 10 cm by 10 cm?
05.04.2026 - 17:52DROPS Design respondió:
Dear Lin, make sure you get the correct tension otherwise piece might be too narrow/short. Read more about tension here. Happy knitting!
08.04.2026 - 10:39
![]() Jennifer escribió:
Jennifer escribió:
Is the 72 stitches being knit at the end of the sweater pattern only knit across the back from right sleeve to left sleeve or is it across the front of the sweater? The description unfortunately is difficult to follow.
23.03.2026 - 21:06DROPS Design respondió:
Hi Jennifer, The 72 stitches are worked in pattern as before, then these stitches wait while you work an elevation back and forth in short rows (also continuing the pattern) at the back of the neck. There is a description of how to work the elevation and continue decreasing for raglan at the top of the pattern, under Explanations. Regards, Drops Team.
24.03.2026 - 06:27
![]() Grenier escribió:
Grenier escribió:
Ou commencent les 72 mailles ?
11.03.2026 - 16:51DROPS Design respondió:
Cf. Réponse précédente = tricotez ces 72 mailles à partir du début des tours précédents (vous allez désormais tricoter en rangs à partir d'ici). Bon tricot!
12.03.2026 - 09:29
|
|||||||
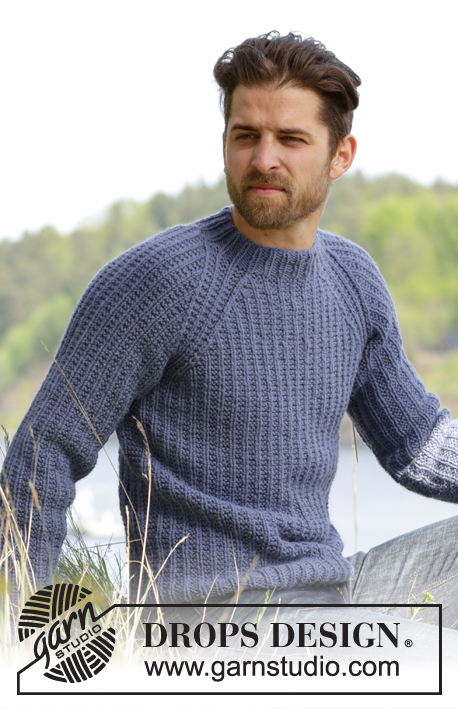
Twin River#twinriversweater |
|||||||
 |
 |
||||||
Jersey de punto para hombre DROPS con patrón de relieve y raglán en Nepal. Talla: S - XXXL.
DROPS 174-14 |
|||||||
|
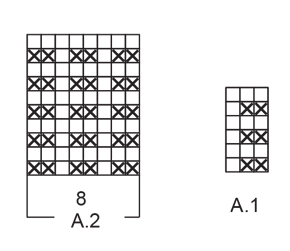
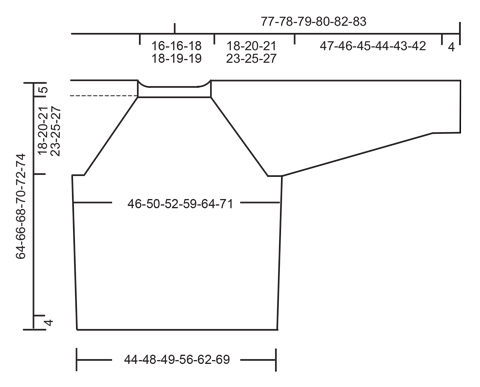
PATRÓN: Ver los diagramas A.1 y A.2. RAGLÁN: Dism como sigue antes de A.2: Trabajar hasta que queden 2 pts antes de A.2, Trabajar juntos de derecho los sig 2 pts. Dism como sigue después de A.2: Desl 1 pt como de derecho, 1 d., pasar el pt desl por encima. TIP PARA LOS AUMENTOS (CUERPO): Aum 4 pts en la vta como sigue: Trabajar hasta que quede 1 pt antes del marcapuntos (MP) en el lado, 1 HEB, trabajar 2 pts en pt musgo, 1 HEB (= 2 pts aumentados). Repetir los aumentos en el otro lado de la labor. En la sig vta trabajar la HEB retorcida para evitar que se formen agujeros. Trabajar los pts nuevos en pt musgo. TIP PARA LOS AUMENTOS (MANGAS): Aum como sigue en el centro bajo la manga: Trabajar hasta que quede 1 pt antes del marcapuntos, 1 HEB, trabajar 2 pts en pt musgo, 1 HEB. En la sig vta trabajar la HEB retorcida para evitar que se formen agujeros. Trabajar los pts aumentados dentro del patrón. ATENCIÓN: trabajar los pts a cada lado del MP en pt musgo. DISMINUCIONES PARA EL RAGLÁN (ELEVACIÓN): ¡Todas las dism se trabajan por el LD! Dism como sigue después de A.2: Trabajar 3 pjd retorcido. Dism como sigue antes de A.2:: Trabajar hasta que queden 3 pts antes de A.2, 3 pjd. ---------------------------------------------------------- JERSEY: Se trabaja en redondo. CUERPO: Mont 150-162-168-192-210-234 pts con Nepal y aguja circular tamaño 5 mm. *1 r., (1 d., 2 r.), repetir de (-) 23-25-26-30-33-37 vcs más, 1 d., 1 r., insertar 1 MP aquí (= lado) *, repetir de *a* 1 vez más. ATENCIÓN: Mover hacia arriba el MP según se avanza. Continuar con pt elástico en redondo de la misma manera hasta que la labor mida 4 cm. Ahora trabajar el patrón A.1 como sigue: Trabajar los últimos 2 pts de A.1, después repetir A.1 en toda la vta hasta que quede 1 pt y trabajar aquí el primer pt de A.1. RECUERDE MANTENER LA MISMA TENSIÓN DEL TEJIDO. Cuando la labor mida 13-13-14-14-15-15 cm, aum 1 pt a cada lado de cada MP – ver TIP PARA LOS AUMENTOS (CUERPO). Repetir los aumentos cuando la labor mida 27-28-29-29-30-30 cm = 158-170-176-200-218-242 pts. Cuando la labor mida 41-41-42-42-42-42 cm (ajustar para que la siguiente vta sea la 2ª vta de A.1), cerrar pts para la sisa como sigue: Cerrar los primeros 5 pts de la vta, trabajar los sig 69-75-78-90-99-111 pts, cerrar los sig 10 pts para la sisa, trabajar los sig 69-75-78-90-99-111 pts, cerrar los 5 pts restantes. Cortar el hilo. Dejar la labor en espera y trabajar las mangas. MANGA: Trabajar las mangas en redondo con ag de doble punta. Mont 42-42-42-48-48-48 pts con Nepal con ag de doble punta tamaño 5 mm. Insertar 1 MP al inicio de la vta = centro bajo la manga. Trabajar el elástico como sigue: 1 r., 1 d., *2 r., 1 d.*, repetir de *a* hasta que quede 1 pt en la vta, 1 r.. Continuar de esta manera en redondo hasta que el elástico mida 4 cm. Ahora trabajar el patrón como sigue: Trabajar los últimos 2 pts de A.1, A.1 hasta que quede 1 pt en la vta, ahora trabajar el primer pt de A.1. Cuando la labor mida 9-8-7-6-10-9 cm, aum 1 pt a cada lado del MP – ver TIP PARA LOS AUMENTOS (MANGA). Aum de esta manera aprox. cada 13ª-9ª-7ª-7ª-6ª-5ª vta un total de 8-11-14-14-14-17 vcs = 58-64-70-76-76-82 pts. Cuando la labor mida 51-50-49-48-47-46 cm - ajustar para que la sig vta sea la 2ª vta de A.1, cerrar los 10 pts centrales bajo la manga (= 5 pts a cada lado del MP) = 48-54-60-66-66-72 pts. Trabajar otra manga de la misma manera. CANESÚ: Desl las mangas a la misma aguja circular tamaño 5 mm donde está el cuerpo, en la parte donde se cerró para las sisas = 234-258-276-312-330-366 pts. Esto se hace sin trabajar los pts. Insertar un MP en cada transición entre las mangas y el cuerpo = 4 MPs. Comenzar la vta en la espalda, 4 pts después del MP situado entre la manga y la espalda. Ahora continuar con el patrón como antes y trabajar adicionalmente A.2 (= 8 pts) en cada transición entre el cuerpo y las mangas (los MPs quedena en el centro de A.2). En la sig vta comenzar las diam para el RAGLÁN – ver explicaciones arriba! ATENCIÓN: Las dism se trabajan de modo diferente en cuerpo y mangas: RAGLAN EN EL CUERPO: Dism cada 2ª vta 21-24-24-24-26-26 vcs y cada vta 0-0-0-6-7-13 vcs (= 21-24-24-30-33-39 vcs en total). RAGLAN MANGAS: Dism cada 4ª vta 6-6-4-3-5-5 vcs y cada vta 9-12-17-21-19-22 vcs (= 15-18-21-24-24-27 vcs en total). Cuando se han completado todas las dism, quedan 90-90-96-96-102-102 pts en la vta (= 144-168-180-216-228-264 pts totales disminuidos). Ahora trabajar el patrón como antes sobre los primeros 72-72-78-78-84-84 pts. Insertar el MP aquí (= entre A.2 y la manga derecha). Ahora trabajar la elevación de la espalda, de ida y vta en la parte del escote y con el patrón como antes AL MISMO TIEMPO disminuir para el raglán cada fila del LD sobre los pts trabajados – LEER LAS DISMINUCIONES PARA EL RAGLÁN (ELEVACIÓN) como sigue: ATENCIÓN: Estira el hilo en cada giro para evitar que se formen agujeros. FILA 1 (= LD): Trabajar 55-55-58-58-61-61 pts (incluyendo los 8 pts disminuidos), FILA 2 (= LR): Girar y trabajar 45-45-48-48-51-51 pts, FILA 3: Girar y trabajar 43-43-46-46-49-49 pts (incluyendo los 8 pts disminuidos), FILA 4: Girar y trabajar 33-33-36-36-39-39 pts. Ahora hay 74-74-80-80-86-86 pts en la vta. Girar y continuar en redondo con pt elástico como sigue: Trabajar derecho sobre derecho y revés sobre los pts en pt musgo hasta que el elástico mida 4 cm. Rematar los pts con derecho sobre derecho y revés sobre revés. El jersey mide 64-66-68-70-72-74 cm desde el borde de montaje hasta el hombro. Asegurar los hilos. TERMINACIÓN: Coser la abertura bajo las mangas. |
|||||||
Explicaciones del diagrama |
|||||||
|
|||||||
 |
|||||||
 |
|||||||
¿Terminaste este patrón?Entonces, etiqueta tus fotos con #dropspattern #twinriversweater o envíalas a la galería #dropsfan. ¿Necesitas ayuda con este patrón?Encontrarás 26 videos tutoriales, un espacio para comentarios/preguntas y más visitando la página del patrón en garnstudio.com © 1982-2026 DROPS Design A/S. Todos los derechos reservados. Este documento, incluyendo todas sus sub-secciones, está protegido por los derechos de autor (copyright). Lee más acerca de lo que puedes hacer con nuestros patrones en la parte de abajo de cada patrón de nuestro sitio. |
|||||||


Con más de 40 años en el diseño de modelos de punto y de ganchillo, DROPS Design ofrece una de las más vastas colecciones de patrones gratuitos en el internet - traducidos en 17 idiomas. Al día de hoy, contamos con 324 catálogos y 12290 patrones - de los cuales 11675 están traducidos en español.
Nosotros trabajamos con mucho esmero para brindarte lo mejor que las labores de punto y ganchillo tienen para ofrecer,inspiración y consejos, así como hilos de magnífica calidad a precios increíbles! Te gustaría usar nuestros patrones para otro fin además del uso personal? Puedes leer acerca de lo que estás permitida a hacer en el texto de Copyright en la parte de abajo de todos nuestros patrones. Felices labores!
Escribe un comentario sobre DROPS 174-14
¡Nos encantaría saber qué piensas acerca de este patrón!
Si quieres escribir una pregunta referente al patrón, por favor asegúrate de elegir la categoría correcta en el formulario debajo, para acelerar el proceso de respuesta. Los campos obligatorios están marcados con un *.