
Categorías populares
¿Buscas un hilo?


Comentarios / Preguntas (98)
![]() Monique Anchelin Flageul escribió:
Monique Anchelin Flageul escribió:
Perdón, hago una rectificación, solo me queda duda por las medidas de las mangas Gracias
22.11.2019 - 22:21
![]() Monique Anchelin Flageul escribió:
Monique Anchelin Flageul escribió:
Tengo bastante confusión con las medidas en cm del patrón para la talla 3 años. Con el cuerpo nos dicen de menguar y dejar en espera la labor a 25 cm total de la labor pero eso no corresponde a los cm del dibujo del patrón.IgIualmente para las mangas, nos dicen de menguar a 29cm de la labor si miramos el dibujo indica 24cm.... Gracias
22.11.2019 - 22:19
![]() Monique Anchelin Flageul escribió:
Monique Anchelin Flageul escribió:
¿Que significa MP en las explicaciones? Gracias
12.11.2019 - 16:47DROPS Design respondió:
Hola Monique. MP significa marcapuntos.
12.11.2019 - 17:33
![]() Brigitte BOSS escribió:
Brigitte BOSS escribió:
Ist das Rapport Muster beidseitig also auch auf dem Rücken
04.11.2019 - 23:11DROPS Design respondió:
Liebe Frau Boss, ja genau, das Muster (= A.1, A.2 und dann A.3) wird auf die mittleren Maschen am Vorder- bzw am Rücktenteil gestrickt. Viel Spaß beim stricken!
05.11.2019 - 08:51
![]() Anonym escribió:
Anonym escribió:
Hei! Jeg forstår ikke hvordan jeg skal felle til hals i denne oppskriften. Skal jeg felle i begynnelsen og slutten av hver pinne eller felle i begynnelsen av pinnen, snu arbeidet og felle i begynnelsen av neste pinne? Hva mener dere med «videre felles til hals på beg av hver p i hver side slik: fell av 2 m 1-1-1-2-2 ganger og 1 m 1-2-2-2-2 ganger» strikker i strl 3/4 år.
16.10.2019 - 12:07DROPS Design respondió:
Hej, ja det stemmer, du feller i begyndelsen af hver pind, altså hver gang du snur arbejdet. Først 2 m 1 gang i hver side og så 1 maske 2 gange i hver side. God fornøjelse!
16.10.2019 - 16:10
![]() Veronique Preston escribió:
Veronique Preston escribió:
For the yoke, after doing the bind offs and have 70sts on needle when changing to 3.5mm needles it says 104 sts... Well from the 70 left on needle + 26 from st holder, I only have 96sts on my needle.. where do I get the additional 8sts? Also, for the raglan it says to do DCs 16 times and then 3 more times consecutively but in order to get the 70 sts at the end I had to do 3 more DCs before reaching the neckline. Please add it to the pattern for future knitters?
14.09.2019 - 23:53DROPS Design respondió:
Dear Mrs Preston, you decrease 8 stitches a total of 16 times on every other round + 3-5 times on every round (= 152-168 sts dec for raglan) and for neck, you slip 26 sts for the neck on a thread + cast off for neck on each side 2 sts 1 time and 1 stitch 2 times (= 26+ 4 sts x 2 sides = 34 sts for neck), there should be 256-272 at the beg of yoke - 152-168 sts dec for raglan - 34-34 sts dec for neck = 70 sts remain for raglan and for neck. You then pick up 34 sts (= the 26 sts from thread + 8 sts on each side) = 104 sts for neck. Happy knitting!
16.09.2019 - 10:02
![]() Tara Schanssema escribió:
Tara Schanssema escribió:
Volgens mij klopt dit patroon niet..ik heb nu een pand gebreid en ziet er anders uit.. ook goed..maar niet hetzlefde
25.08.2019 - 20:20
![]() Seemal escribió:
Seemal escribió:
Can someone post a video on how to start tbe first line of tbe cable design.Its a little confusing.
12.02.2019 - 14:59DROPS Design respondió:
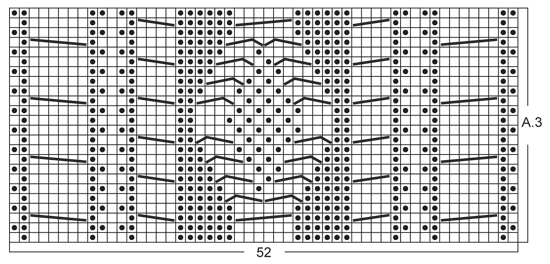
Hi Seemal, I can write the first line for you (row 3 in A.3 which is from the right side and read from right to left): K1, P1, place 3 stitches on cable needle behind piece, K3 and K3 from cable needle, P1, K3, P1, place 2 stitches on cable needle behind piece, K2 and K2 from cable needle, P6, place 3 stitches on cable needle behind piece, K3 and K3 from cable needle, P6, place 2 stitches on cable needle behind piece, K2 and K2 from cable needle, P1, K3, P1, place 3 stitches on cable needle behind piece, K3 and K3 from cable needle, P1, K1. Hope this helps and happy knitting!
13.02.2019 - 08:02
![]() Rushd Nakade escribió:
Rushd Nakade escribió:
Am wondering after joining sleeves with body , how to do back n forth with pattern as after raglan decrease started it will close all opening n it has to be worked on round right? please correct if am doing something wrong
21.01.2019 - 13:24DROPS Design respondió:
Dear Mrs Rushd, after you have slipped the sts from neck on front piece on a thread, jusst continue back and forth (make sure that the cable rows will still be worked from RS) starting rows now from neck and decreasing as before for raglan cast off for neck as explain for the size at the beg of every row both from RS and from WS (= each side of the middle sts for neck). Happy knitting!
21.01.2019 - 16:22
![]() Rushd escribió:
Rushd escribió:
Nice pattern
18.01.2019 - 19:00
|
|||||||||||||||||||||||||||||||
Lucky Jack#luckyjacksweater |
|||||||||||||||||||||||||||||||
 |
 |
||||||||||||||||||||||||||||||
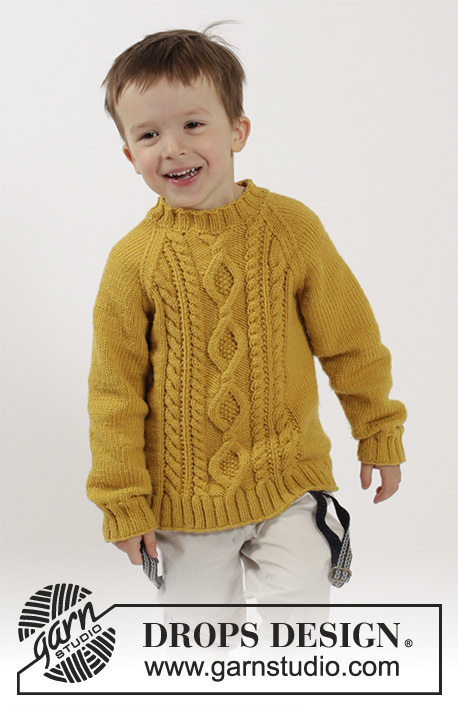
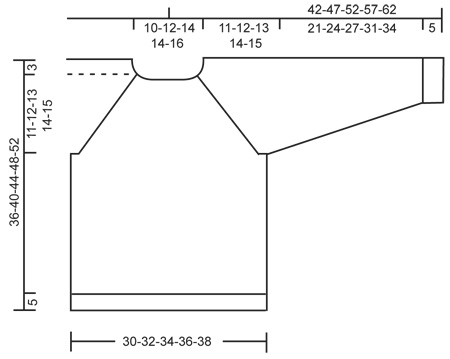
Jersey de punto con raglán y trenzas en DROPS Merino Extra Fine. Talla niños 2-10 años
DROPS Children 26-3 |
|||||||||||||||||||||||||||||||
|
PATRÓN: Ver los diagramas A.1 a A.3. Los diagramas muestran todas las filas del patrón visto por el LD. RAGLÁN: Dism para el raglán a cada lado del MP en cada transición entre las mangas y el cuerpo. DISM COMO SIGUE POR EL LD: Comenzar 3 pts antes del MP y tejer 2 pjd, 2 d. (el MP queda entre estos 2 pts), desl 1 pt como de derecho, 1 d., pasar el pt desl por encima. DISM COMO SIGUE POR EL LR: Comenzar 3 pts antes del MP y tejer 2 pjr retorcido, 2 r. (el MP queda entre estos 2 pts) y 2 pjr (= 2 pts dism). ----------------------------------------------------------------------- CUERPO: Se trabaja en redondo con ag circular. Mont 184-200-208-216-224 pts con ag circular tamaño 3.5 mm y Merino Extra Fine. Trabajar una vta de derecho. Trabajar la sig vta como sigue: TALLA 2 + 3/4 + 7/8 AÑOS: 1 d., *2 r., 2 d.*, repetir de *a* un total de 4-5-6 vcs, trabajar pt elástico según el diagrama A.1 sobre los sig 58 pts (= centro del delantero), *2 d., 2 r.*, repetir de *a* un total de 8-10-12 vcs, 2 d., trabajar pt elástico según el diagrama A.1 sobre los sig 58 pts (= centro de la espalda), *2 d., 2 r.*, repetir de *a* un total de 4-5-6 vcs y finalizar con 1 d. TALLA 5/6 + 9/10 AÑOS: 1 r., *2 d., 2 r.*, repetir de *a* un total de 5-6 vcs, 2 d., trabajar pt elástico según el diagrama A.1 sobre los sig 58 pts (= centro del delantero), *2 d., 2 r.*, repetir de *a* un total de 11-13 vcs, 2 d., trabajar pt elástico según el diagrama A.1 sobre los sig 58 pts (= centro de la espalda), *2 d., 2 r.*, repetir de *a* un total de 5-6 vcs y finalizar con 2 d. y 1 r. Continuar en pt elástico de esta manera hasta que la labor mida 5 cm. Trabajar la sig vta como sigue PARA TODAS LAS TALLAS: trabajar de derecho los primeros 17-21-23-25-27 pts y dism al mismo tiempo 3-5-5-5-5 pts de forma repartida sobre estos pts, trabajar y dism según el diagrama A.2 sobre los sig 58 pts, trabajar de derecho los sig 34-42-46-50-54 pts y dism al mismo tiempo 6-10-10-10-10 pts de forma repartida sobre estos pts, trabajar y dism según el diagrama A.2 sobre los sig 58 pts, trabajar de derecho los últimos 17-21-23-25-27 pts y dism al mismo tiempo 3-5-5-5-5 pts de forma repartida sobre estos pts. Después de A.2, quedan 160-168-176-184-192 pts en la ag. Trabajar la sig vta como sigue: 14-16-18-20-22 pts en pt jersey, trabajar el patrón según A.3 (= 52 pts), 28-32-36-40-44 pts en pt jersey, trabajar el patrón según A.3 (= 52 pts) y finalizar con 14-16-18-20-22 pts en pt jersey. Continuar con el patrón de la misma manera. RECUERDE MANTENER LA MISMA TENSIÓN DEL TEJIDO. Cuando la labor mida 22-25-28-31-34 cm, trabajar la sig vta como sigue: Cerrar 3 pts para la sisa, trabajar los sig 74-78-82-86-90 pts como antes (= delantero), cerrar 6 pts para la sisa, trabajar los sig 74-78-82-86-90 pts como antes (= espalda) y cerrar los últimos 3 pts para la sisa. Dejar la labor en espera y trabajar las mangas. MANGA: Se trabaja en redondo con ag de doble punta. Mont 32-36-40-44-44 pts con ag de doble punta tamaño 3.5 mm y Merino Extra Fine. Trabajar 1 vta de derecho. Después pt elástico = 2 d./ 2 r. hasta que la labor mida 5 cm. Cambiar a ag de doble punta tamaño 4 mm y trabajar en pt jersey. Cuando la labor mida 6-8-8-8-7 cm, aum 2 pts en el centro bajo la manga. Repetir los aum cada 2-2-2½-2½-2½ cm un total de 10-10-10-11-13 vcs = 52-56-60-66-70 pts. Cuando la labor mida 26-29-32-36-39 cm, cerrar los 6 pts centrales bajo la manga = 46-50-54-60-64 pts restantes en la ag. Dejar la labor en espera y trabajar la otra manga. CANESÚ: Desl los pts de las mangas a la misma ag circular del cuerpo donde se cerró para las sisas (sin trabajarlos) = 240-256-272-292-308 pts en la ag. Insertar 1 MP en todas las transiciones entre las mangas y el cuerpo = 4 MPs. Continuar en redondo con pt jersey y el patrón como antes. AL MISMO TIEMPO en la primera vta dism para el RAGLÁN en todas las transiciones entre el cuerpo y las mangas – ver explicación arriba (= 8 pts dism). Repetir las dism para el raglán cada 2ª vta un total de 14-16-16-17-17 vcs y después cada vta un total de 3-3-5-7-9 vcs. AL MISMO TIEMPO cuando la labor mida 32-35-39-42-46 cm, desl los 28-26-26-20-20 pts centrales en el delantero a un gancho aux para el escote (trabajar los pts antes de deslizarlos al gancho aux). Después finalizar la labor de ida y vta con ag circular desde el centro del delantero y cerrar para el escote al inicio de cada fila en cada lado como sigue: Cerrar 2 pts 1-1-1-2-2 vcs y 1 pt 1-2-2-2-2 vcs. Después de las dism del raglán y del escote quedan 70-70-70-68-68 pts en la ag. CENEFA DEL ESCOTE: Recoger aprox. 104-104-104-100-100 pts por el LD con ag circular tamaño 3.5 mm alrededor del escote (incl los pts del gancho aux del delantero). Trabajar 1 vta del revés. Después una vta de derecho y al mismo tiempo dism hasta 60-68-76-80-88 pts. Ahora trabajar pt elástico = 2 d./ 2 r. por 3 cm, y después rematar con derecho sobre derecho y revés sobre revés. TERMINACIÓN: Coser las aberturas bajo las mangas. |
|||||||||||||||||||||||||||||||
Explicaciones del diagrama |
|||||||||||||||||||||||||||||||
|
|||||||||||||||||||||||||||||||
 |
|||||||||||||||||||||||||||||||
 |
|||||||||||||||||||||||||||||||
 |
|||||||||||||||||||||||||||||||
¿Terminaste este patrón?Entonces, etiqueta tus fotos con #dropspattern #luckyjacksweater o envíalas a la galería #dropsfan. ¿Necesitas ayuda con este patrón?Encontrarás 27 videos tutoriales, un espacio para comentarios/preguntas y más visitando la página del patrón en garnstudio.com © 1982-2026 DROPS Design A/S. Todos los derechos reservados. Este documento, incluyendo todas sus sub-secciones, está protegido por los derechos de autor (copyright). Lee más acerca de lo que puedes hacer con nuestros patrones en la parte de abajo de cada patrón de nuestro sitio. |
|||||||||||||||||||||||||||||||


Con más de 40 años en el diseño de modelos de punto y de ganchillo, DROPS Design ofrece una de las más vastas colecciones de patrones gratuitos en el internet - traducidos en 17 idiomas. Al día de hoy, contamos con 324 catálogos y 12284 patrones - de los cuales 11664 están traducidos en español.
Nosotros trabajamos con mucho esmero para brindarte lo mejor que las labores de punto y ganchillo tienen para ofrecer,inspiración y consejos, así como hilos de magnífica calidad a precios increíbles! Te gustaría usar nuestros patrones para otro fin además del uso personal? Puedes leer acerca de lo que estás permitida a hacer en el texto de Copyright en la parte de abajo de todos nuestros patrones. Felices labores!
Escribe un comentario sobre DROPS Children 26-3
¡Nos encantaría saber qué piensas acerca de este patrón!
Si quieres escribir una pregunta referente al patrón, por favor asegúrate de elegir la categoría correcta en el formulario debajo, para acelerar el proceso de respuesta. Los campos obligatorios están marcados con un *.