
Categorías populares
¿Buscas un hilo?


Comentarios / Preguntas (55)
Andrea escribió:
I love this shrug! Although i would like to make it with a little bit longer sleeve. Is this possible by modifying the number of stiches dec and inc? Thank you in advance :)
26.01.2014 - 12:02
![]() Susy escribió:
Susy escribió:
Is there a mistake in the first row of the instructions, after ribbing? The stitches should add to 116 (I'm knitting the small) and they only add to 112, as a result you end up with 4 stitches left. I'm taking care of the problem by P9 instead of P8 four times symmetrically along the row but please rectify. It could save time to someone else. It took me precious time to realize that it wasn't me making a mistake. Thnx
06.01.2014 - 20:45DROPS Design respondió:
Dear Suzy, no of sts match to pattern, in size S you work : P3, M.1 (= 3 sts), P 8, M.2 (=12 sts), P 8, M.1 (=3 sts), P 8, M.3 (=26 sts), P 8, M.4 (=3 sts), P 8, M.5 (= 12 sts), P 8, M.4 (=3 sts), P3 = 116 sts - You then cast off 2 sts each side = 116 - 4 = 112 sts. Happy knitting!
07.01.2014 - 09:25
![]() Anya escribió:
Anya escribió:
Hello, I have a question about the chart. The instructions for the double YO say that on the returning row, "knit only 1 yo and drop the other." But often on the returning row I am purling (for ex. in the second row of M.4 / M.1). So should I PPK or PPP? In other words, are the Double YO instructions correct in saying that on the returning row I should always "knit only 1 yo" or should I rather "work (whether knit or purl) only 1 yo" on the returning row? Thank you so much for clarifying.
09.06.2013 - 07:22DROPS Design respondió:
Dear Anya, after the double yo in M1/M4 you will purl all sts, ie work only 1 yo and drop the 2nd one. Happy knitting!
10.06.2013 - 08:54
![]() Edna escribió:
Edna escribió:
I have never read a chart before. Do you read from right to left and bottom to top? The instructions state knit from RS: P3, M.1 but chart says P from RS and knit from WS. I am confused.
21.02.2013 - 18:30DROPS Design respondió:
Dear Edna, correct, diagram is read from RS from right to the left and from WS from left to the right. When it says : P3, M1, P8-9-10-11-12 (see size),etc... you have to work the 3 sts from diagram M1 bewteen the P3 and P 8-9-10-11-12. Symbol for K from RS is white square, symbol for P from RS is a "-". Happy knitting!
22.02.2013 - 12:04
![]() Edna escribió:
Edna escribió:
I don't understand the M.1, etc. I did the ribbing and I am ready to continue.
21.02.2013 - 16:25DROPS Design respondió:
Dear Edna, M1 is worked on 3 sts :1st row (RS) : K1, K2 tog, double yo. 2nd row (WS) : work P1 in first yo, slip off 2nd yo from needle, P2. 3rd row: K2 tog, double yo, K1. 4th row: P1, work P1 in first yo, slip off 2nd yo from needle, P1. Happy knitting!
21.02.2013 - 16:31
![]() Edna escribió:
Edna escribió:
I don't understand what you mean by M.1, M.2, etc. Could you explain what that means? Thank you.
21.02.2013 - 04:46DROPS Design respondió:
M.1, M.2 etc are the diagrams you find at the bottom of the pattern. When we write you need to knit M.1 you knit the stitches from diagram M.1 etc.
21.02.2013 - 10:02Maria escribió:
In de patroons beschrijving staat niet duidelijk vermeld wanneer men met het motief moet beginnen. Kunt u mij nader uitleg geven aub. Hart. dank!
13.09.2012 - 05:47DROPS Design respondió:
In het patroon staat: Brei vanaf een hoogte van 4 cm door als volgt – op de goede kant: 3 av, M.1, 8-9-10-11-12 av, M.2, etc. M.1, M.2 zijn de motieven.
13.09.2012 - 09:54
![]() Angie Sanyal escribió:
Angie Sanyal escribió:
I love the shrug and am excited to knit it for my daughter. I am confused at the part that says "at the same time when the piece measures 11cm and 21 cm - I am not sure what you mean by these two measurements. Thanks.
14.07.2012 - 11:36DROPS Design respondió:
Dear Mrs Sanyal, these measures are taken from cast on edge = from the start. When whole work measures 11 and 21, you will have to dec as indicated = dec row when piece measures 11 cm and dec row when piece measures 21 cm. Happy knitting !
04.12.2012 - 14:58
![]() Reidun Oddny Holsæker escribió:
Reidun Oddny Holsæker escribió:
Skal eg fortsette med vrangbord langs sidene etter eg har begynt med mønsteret og skal eventuellt dei tre vrang maskene vere innenfor vrangborden?
29.06.2012 - 19:32DROPS Design respondió:
Nej, det skal du ikke. Ved 4 cm står der: 3 vr, M.1, 8-9-10-11-12 vr, M.2, 8-9-10-11-12 vr... osv. Først fra 58 cm skal du strikke vrbord igen
28.12.2012 - 11:15
![]() DROPS Deutsch escribió:
DROPS Deutsch escribió:
Wenn nichts anderes erwähnt ist misst man von der Anschlagskante.
29.08.2011 - 12:45
|
|||||||||||||||||||
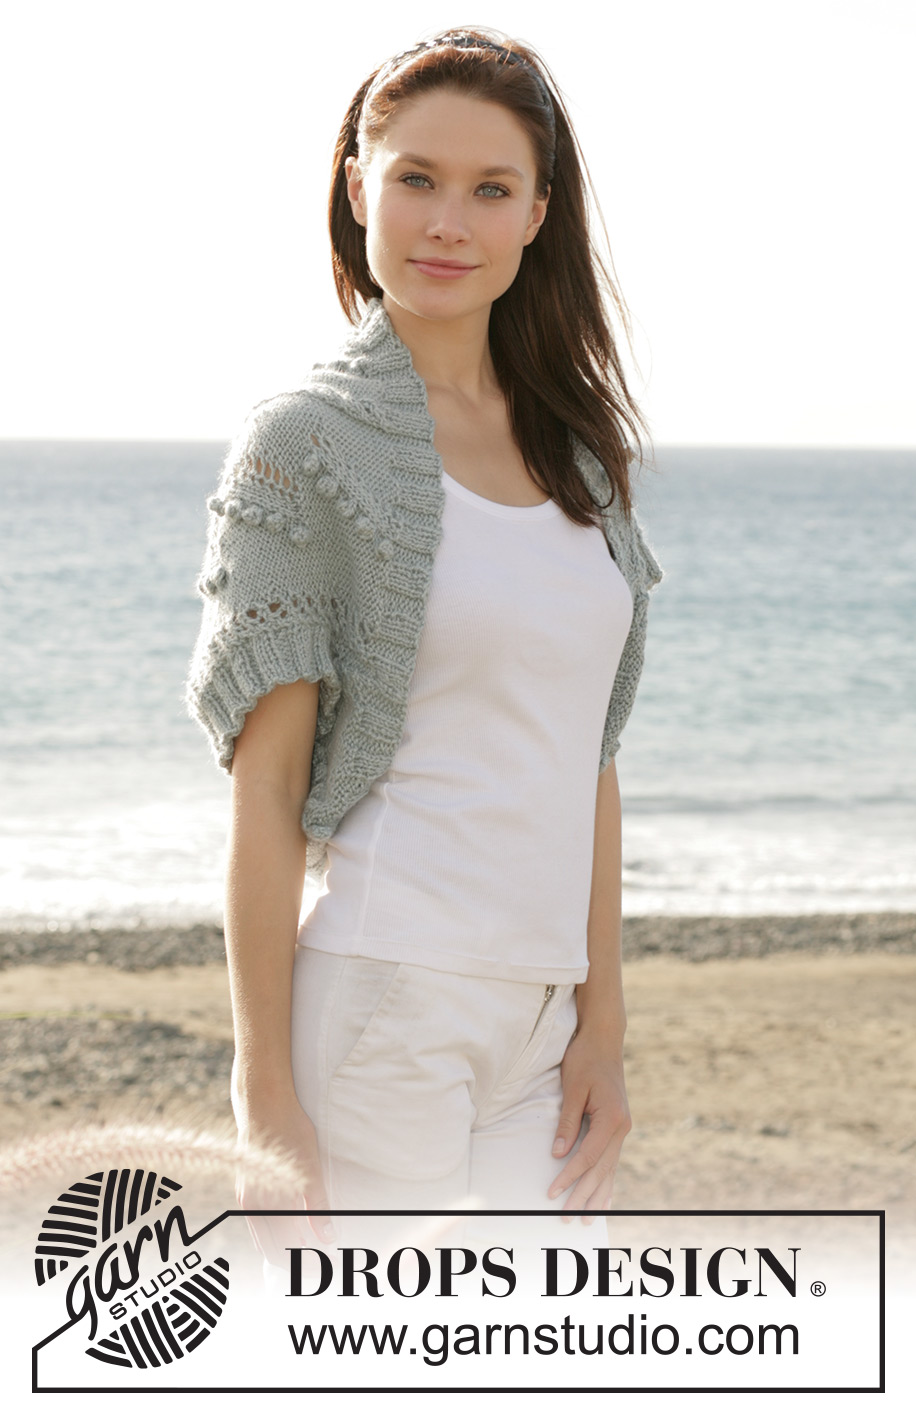
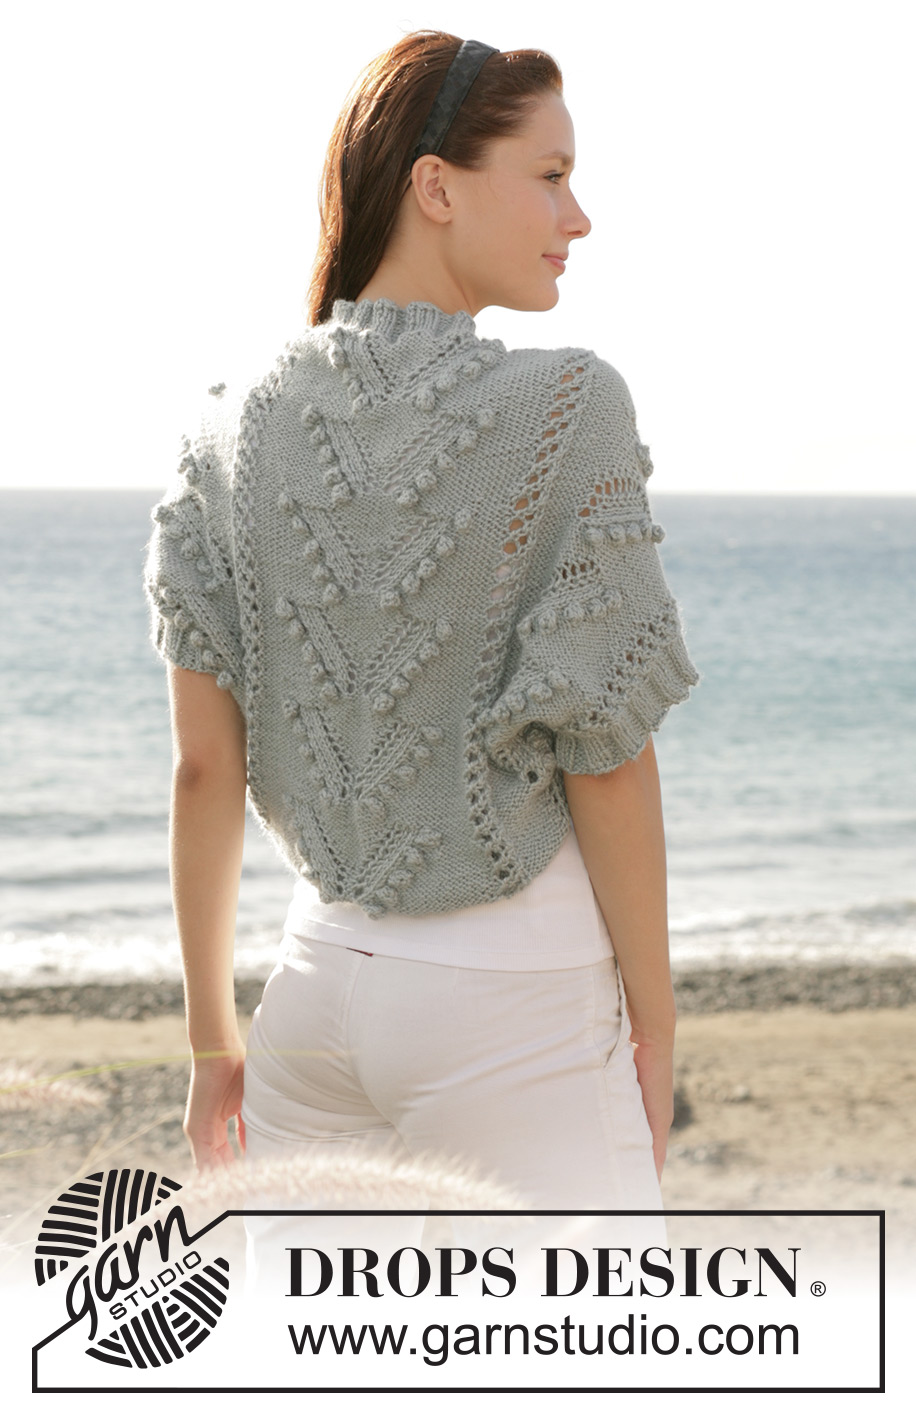
Venetian Romance#venetianromancebolero |
|||||||||||||||||||
 |
 |
||||||||||||||||||
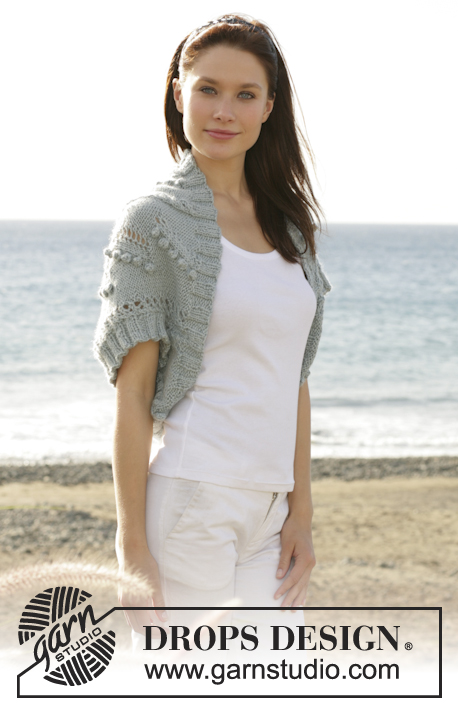
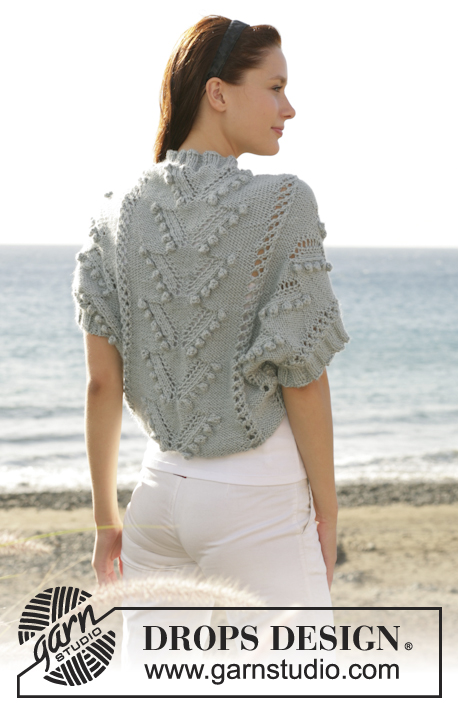
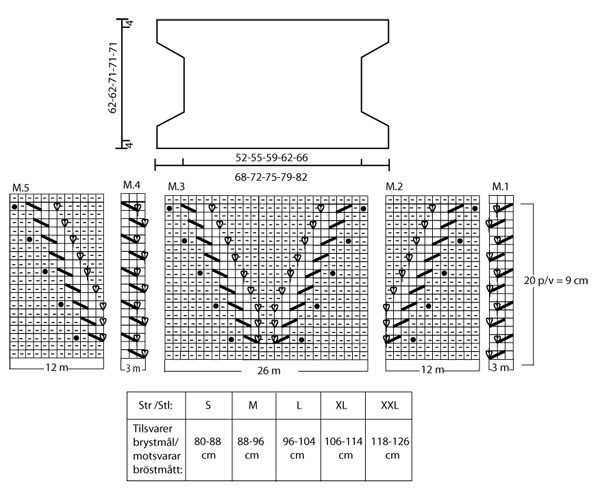
Bolero DROPS tejido en motas y calados con “Silke-Alpaca”. Talla S - XXL
DROPS 101-6 |
|||||||||||||||||||
|
Tensión del tejido: 17 pts x 22 filas con ag tamaño 4.5 mm en pt jersey = 10 x 10 cm Pt elástico: 4-0-2-4-0 r., 3 d., *3 r., 3d.*, repetir de *a* sobre los sig 48-54-54-54-66 pts, 6-3-3-4-2 r., 0-2-4-4-0 d., 0-3-3-4-0 r., *3 d., 3 r.*, repetir de *a* sobre los sig 48-54-54-54-66 pts, 3 d., 4-0-2-4-0 r. Mota: Fila 1: Trabajar 3 pts dentro de 1 pt, girar. Ahora trabajar un total de 6 filas sobre estos 3 pts - no trabajar sobre el resto de pts - como sigue: Fila 2: 2 r., 1 HEB (lazada), 1 r. Fila 3: Todos los pts de revés. Fila 4: Todos los pts de derecho. Fila 5: Todos los pts de revés. Fila 6: Trabajar los pts juntos de derecho de 2 en 2 y pasar el primer pt sobre el 2º pta (queda 1 pt). PATRÓN: Los diagramas se muestran por el LD. TIP PARA LAS DISMINUCIONES Y LOS AUMENTOS: Al trabajar las dism/aum en las secciones de revés NO dism/aum en los 3 pts más externos a cada lado. ----------------------------------------------------------------------- BOLERO: Debido al nº de pts la labor se trabaja de ida y vta en aguja circular. Mont 116-122-128-134-140 pts en ag circular tamaño 4.5 mm con Silke-Alpaca. Trabajar en pt elástico – ver arriba. Cuando la labor mida 4 cm trabajar como sigue por el LD: 3 r., M.1, 8-9-10-11-12 r., M.2, 8-9-10-11-12 r., M.1, 8-9-10-11-12 r., M.3, 8-9-10-11-12 r., M.4, 8-9-10-11-12 r., M.5, 8-9-10-11-12 r., M.4, 3 r. Cuando la labor mida 11-11-13-13-13 cm cerrar 2 pts a cada lado = 112-118-124-130-136 pts. Al mismo tiempo cuando la labor mida 11-11-13-13-13 y 21-21-23-23-23 cm dism 1 pt a cada lado de cada sección de revés ( = 12 dism/fila) – leer tip para las dism/aum = 88-94-100-106-112 pts. Cuando la labor mida 41-41-48-48-48 y 51-51-58-58-58 cm aum 1 pt a cada lado de cada sección de revés (= 12 aum/fila) – leer tip para las dism/aum = 112-118-124-130-136 pts. Al mismo tiempo cuando la labor mida 51-51-58-58-58 cm mont 2 pts nuevos a cada lado y trabajar estos pts nuevos de revés (visto por el LD) = 116-122-128-134-140 pts. Cuando la labor mida aprox. 58-58-67-67-67 cm (ajustar a una repetición completa en vertical) trabajar 4 cm en pt elástico – ver explicación arriba. Rematar flojo con derecho sobre derecho y revés sobre revés, la labor mide aprox. 62-62-71-71-71 cm TERMINACIÓN: Doblar la labor por el lado largo (elástico contra elástico) y coser los 11-11-13-13-13 cm más externos – la abertura resultante = sisa. Recoger aprox. 66 – 78 pts (divisible por 6) con ag de doble punta tamaño 4.5 mm. Trabajar en redondo. Tejer pt elástico: 3 d./3 r. hasta que el elástico mida 4 cm. Rematar con derecho sobre derecho y revés sobre revés. Repetir en la otra sisa. |
|||||||||||||||||||
Explicaciones del diagrama |
|||||||||||||||||||
|
|||||||||||||||||||
 |
|||||||||||||||||||
¿Terminaste este patrón?Entonces, etiqueta tus fotos con #dropspattern #venetianromancebolero o envíalas a la galería #dropsfan. ¿Necesitas ayuda con este patrón?Encontrarás 17 videos tutoriales, un espacio para comentarios/preguntas y más visitando la página del patrón en garnstudio.com © 1982-2026 DROPS Design A/S. Todos los derechos reservados. Este documento, incluyendo todas sus sub-secciones, está protegido por los derechos de autor (copyright). Lee más acerca de lo que puedes hacer con nuestros patrones en la parte de abajo de cada patrón de nuestro sitio. |
|||||||||||||||||||


Con más de 40 años en el diseño de modelos de punto y de ganchillo, DROPS Design ofrece una de las más vastas colecciones de patrones gratuitos en el internet - traducidos en 17 idiomas. Al día de hoy, contamos con 324 catálogos y 12291 patrones - de los cuales 11689 están traducidos en español.
Nosotros trabajamos con mucho esmero para brindarte lo mejor que las labores de punto y ganchillo tienen para ofrecer,inspiración y consejos, así como hilos de magnífica calidad a precios increíbles! Te gustaría usar nuestros patrones para otro fin además del uso personal? Puedes leer acerca de lo que estás permitida a hacer en el texto de Copyright en la parte de abajo de todos nuestros patrones. Felices labores!
Escribe un comentario sobre DROPS 101-6
¡Nos encantaría saber qué piensas acerca de este patrón!
Si quieres escribir una pregunta referente al patrón, por favor asegúrate de elegir la categoría correcta en el formulario debajo, para acelerar el proceso de respuesta. Los campos obligatorios están marcados con un *.