
Categorías populares
¿Buscas un hilo?


Comentarios / Preguntas (58)
![]() Kathy escribió:
Kathy escribió:
Hello again, I apologize for having multiple questions, and I very much appreciate your help. After knitting the central cable portion, I have 207 rows. If I pick up a stitch on every row, I will have a rib consisting of 444 stitches (207 x 2 + 15 cast on edge + 15 cast off edge) for the rib rather than the 342 to 366 called for in the pattern. I could not determine from the pattern if I am supposed to pick up a stitch at each row. Would you please advise me? thank you.
03.04.2023 - 07:36DROPS Design respondió:
Hi Kathy, You do not need to pick up 1 stitch in each row - depending on the size you are working, you pick up approx. 310 to 366 stitches in addition to the cast-on and cast-off edges. This will be approx. pick up on first row, skip 1 row, pick up on 3rd and 4th row, skip 1 row, pick up on 6th and 7th row etc. Hope this helps and happy Easter!
04.04.2023 - 06:51
![]() Kathy escribió:
Kathy escribió:
Hello, Do you recommend blocking the central cable portion before adding the rib? Thank you.
03.04.2023 - 06:42DROPS Design respondió:
Hi Kathy, it is not necessary. Block the piece after completing the whole thing. Happy knitting!
04.04.2023 - 07:50
![]() Kathy escribió:
Kathy escribió:
I am confused by the increases and decreases. I have two questions. (1) does “inside 1 edge st” mean immediately after the first stitch of the row and immediately before the last stitch of the row? why is the increase done with a yarn over, which is used when you want to make a hole (such as lace). the instructions next say to knit into the back of the stitch to avoid a hole. I found the video confusing. Can I use another form of increase, such as Make One Right or Left? Thank you.
01.04.2023 - 04:47DROPS Design respondió:
Dear Kathy, yes, inside the edge stitch is immediately after the first stitch or before the last stitch of the row. You can increase in several different ways; yarn overs are the most basic and easier to work, even though there may be a small gap remaining (take into account that, since it's twisted on the next row, the gap will be smaller than in lace patterns). But of course you can use M1R or M1L for this pattern. Happy knitting!
02.04.2023 - 22:45
![]() Freda Corrigan escribió:
Freda Corrigan escribió:
Greetings, can I knit this neckwear using knit N purl stitching I really love the style but not good with pattern reading Thank you hope to hear from you soon
23.06.2022 - 14:58DROPS Design respondió:
Dear Mrs Corrigan, we only have diagrams to this pattern, but this lesson will explain you how to read a knitting diagram. Happy knitting!
23.06.2022 - 16:15
![]() Tanya escribió:
Tanya escribió:
I am sorry but i am lost on what this means. Could you lease step by step clarify this. "When Rib measures 2 cm inc every other P section to P2. When piece measures 3 cm inc remaining purl sections to P2. When Rib measures 5 cm inc every other purl section from P2 to P3. Cast off on next row in Rib." Thank you
24.11.2019 - 06:59DROPS Design respondió:
Dear Tanya, to beginn with you are knitting a K2, P2 rib. At the first increase (when piece is 2 cm) you knit the row like this: * K1, P1, K1, P1, make 1, * and repeat *-*. In the next oncrease row (piece is 3 cm), you knit *K1, 1 P, make1, K2, P2. * and repeat *-*. For the next increase round (piece is 5 cm, you knit like this: K2, P1, K2, P1, make 1, P1 * and repeat *-*. Casting of in rib means that you cast of knit stitches with knit stitches, and purl stitches with purl stitches. I hope this helps. Happy Knitting!
24.11.2019 - 16:16
![]() Tanya escribió:
Tanya escribió:
Hello: I see this says a sport weight yarn, would that be sport weight in "Canada" too or would it be classified as DK in Canada. I am also a bit confused as in some places that sell your yarn it says it is 4 ply others say 5 ply..
18.11.2019 - 20:31DROPS Design respondió:
Dear Tanya, we are glad to inform you that our yarns are available in Canada - please check retailer list in/to Canada here. Happy knitting!
19.11.2019 - 08:51
![]() Joyce Boatman escribió:
Joyce Boatman escribió:
Name it Beauty as it is Beautiful
17.11.2019 - 01:22Ngaire escribió:
Truly love this. Can this be knitted on straight needles
28.03.2018 - 06:19DROPS Design respondió:
Dear Mrs Ngaire, the main part of the neck warmer can be worked on straight needle, but the edge (ribbingn part) is then worked in the round picking up sts around whole neck warmer. Happy knitting!
28.03.2018 - 15:52
![]() Joana Rodrigues escribió:
Joana Rodrigues escribió:
Só uma pequena nota em relação à tradução para Português: Nas dicas para as diminuições, falta acrescentar que, antes da m/p ourela, deve-se tricotar 2 ms/pts juntamente em liga/tricô enfiando a agulha na alça de trás (m/pt liga/tricô torcida/o)
03.12.2016 - 21:06DROPS Design respondió:
Obrigado pela nota. Vamos editar as explicações. Bom tricô! Boas Festas!
16.12.2016 - 17:06Gwen Schmitt escribió:
I was wondering how much yarn to buy? I have a customer that wants to use a different yarn called Lions Pride Woolspun for this. Can anyone convert it for me and tell me how much to buy?
16.04.2016 - 06:40DROPS Design respondió:
Dear Mrs Schmitt, We are able to provide free patterns thanks to our yarns sold throughout the world. You will therefore understand that we can only recomand you to contact our DROPS Storefor any further help & assistance. Thank you for your comprehension.
18.04.2016 - 09:02
|
|||||||||||||
DROPS 98-1 |
|||||||||||||
|
|
|||||||||||||
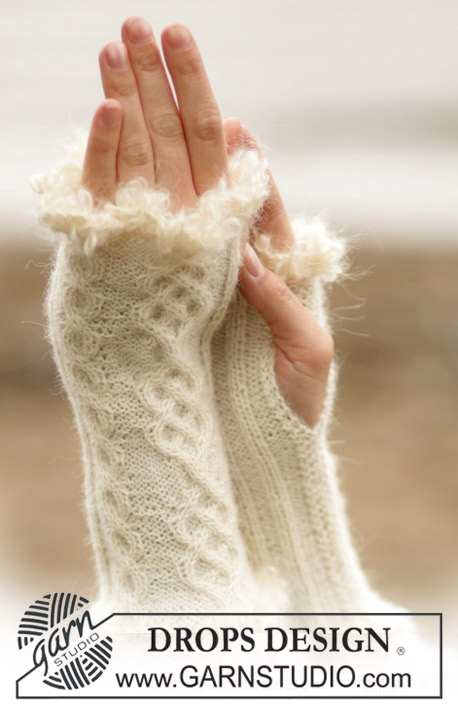
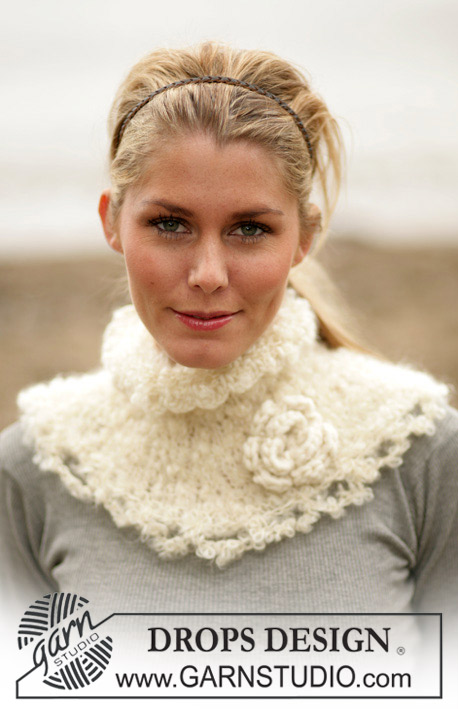
Calentador de cuello y banda para la cabeza DROPS en “Alpaca”
DROPS 98-1 |
|||||||||||||
|
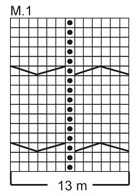
Muestra: 19 pts x 25 vtas en agujas tamaño 4 mm en puntada jersey = 10 x 10 cm. Patrón: Ver diagrama M.1. Las traducciones al Español para las instrucciones de los diagramas se encuentran al final del patrón, y se dan en el orden vertical en que aparecen en el diagrama. Tip para aumento: Aum dentro de 1 pt de orillo por medio de 1 hebra (lazada). En la vta de retorno tejer la lazada por la hebra posterior del pt para evitar un agujero. Tip para disminución: Dism dentro de 1 pt de orillo. Dism como sigue después de 1 pt de orillo: 2 pjr (puntos juntos revés) Dism como sigue antes de 1 pt de orillo: 2 pjr por la hebra posterior del pt. Calentador de cuello: Comenzar por la parte central con el patrón de torsadas, levantar pts alrededor de la pieza y tejer el resorte (elástico). Mon 15 pts en ag tamaño 4 mm con 2 hilos Alpaca (doble hilo). Tejer 2 vtas pt musgo y cont en M.1 (= 13 pts) con 1 pt de orillo a cada lado tejido en pt musgo siempre. Al mismo tiempo aum 1 pt a cada lado en vtas alternas un total de 6 veces – ver tip para aumento = 27 pts – tejer los pts nuevos del derecho por el LR y tejerlos del revés por el LD. Cuando la pieza mida 65 cm dism 1 pt a cada lado en vtas alternas un total de 6 veces – ver tip para disminución = 15 pts. Tejer 2 vtas pt musgo y rem flojo. Resorte: Se teje en redondo. Levantar aprox 342 a 366 pts (múltiplo de 3) alrededor del calentador de cuello en ag circular tamaño 4 mm con 2 hilos Alpaca. Tejer 1 vta del revés, 1 vta del derecho y cont en pt resorte, 2d/1r. Cuando el resorte mida 2 cm aum secciones alternas de puntos reveses a 2r. Cuando la pieza mida 3 cm aum las secciones restantes de puntos reveses a 2r. Cuando el resorte mida 5 cm aum secciones alternas de puntos reveses de 2r a 3r. Rem en la sig vta en pt resorte. Flor de ganchillo: Trabajarla con gancho tamaño 7 mm y Snow como sigue: 4 cad y formar un anillo por medio de 1 punto bajísimo (p.bjs). Vuelta 1: 6 punto alto (p.a.) dentro del anillo y terminar con 1 p.bjs en el primer p.a. Vuelta 2: *4 cad, 1 punto alto doble (p.a.d.) en la 1ª de estas cad, 1 p.a. en el sig p.a.*, repetir de *a* y terminar con 1 p.bjs = 6 hojas. Cortar el hilo. Coser al imperdible y colocar en el calentador de cuello. Banda para la cabeza: Mon 4 pts en ag tamaño 4 mm y 2 hilos Alpaca. Tejer un tubo de la sig manera: *1d, traer la hebra de lana al frente de la labor, desl 1 pt del revés, llevar la hebra de lana detrás de la labor nuevamente*, repetir de *a*. Rem cuando la banda mida aprox 150 cm. |
|||||||||||||
Explicaciones del diagrama |
|||||||||||||
|
|||||||||||||
 |
|||||||||||||
¿Terminaste este patrón?Entonces, etiqueta tus fotos con #dropspattern o envíalas a la galería #dropsfan. ¿Necesitas ayuda con este patrón?Encontrarás 22 videos tutoriales, un espacio para comentarios/preguntas y más visitando la página del patrón en garnstudio.com © 1982-2026 DROPS Design A/S. Todos los derechos reservados. Este documento, incluyendo todas sus sub-secciones, está protegido por los derechos de autor (copyright). Lee más acerca de lo que puedes hacer con nuestros patrones en la parte de abajo de cada patrón de nuestro sitio. |
|||||||||||||


Con más de 40 años en el diseño de modelos de punto y de ganchillo, DROPS Design ofrece una de las más vastas colecciones de patrones gratuitos en el internet - traducidos en 17 idiomas. Al día de hoy, contamos con 324 catálogos y 12290 patrones - de los cuales 11673 están traducidos en español.
Nosotros trabajamos con mucho esmero para brindarte lo mejor que las labores de punto y ganchillo tienen para ofrecer,inspiración y consejos, así como hilos de magnífica calidad a precios increíbles! Te gustaría usar nuestros patrones para otro fin además del uso personal? Puedes leer acerca de lo que estás permitida a hacer en el texto de Copyright en la parte de abajo de todos nuestros patrones. Felices labores!
Escribe un comentario sobre DROPS 98-1
¡Nos encantaría saber qué piensas acerca de este patrón!
Si quieres escribir una pregunta referente al patrón, por favor asegúrate de elegir la categoría correcta en el formulario debajo, para acelerar el proceso de respuesta. Los campos obligatorios están marcados con un *.