
Popular categories
Looking for a yarn?


Comments / Questions (28)
![]() Inger wrote:
Inger wrote:
Stemmer det at rutene ikke er helt firkantet når de er ferdige, men «høyere» i hjørnene? Finnes der bilde av en rute?
03.07.2024 - 23:04DROPS Design answered:
Hej Inger, ruderne bliver firkantede som du ser på tæppet :)
04.07.2024 - 07:38
![]() Diana Sanchez wrote:
Diana Sanchez wrote:
Golden Garden by DROPS Design DROPS 209-3 DROPS Design: Pattern no li-118 What are the stitches for Round 1 of A.3 diagram? They are not shown on the pattern or diagram.
21.11.2022 - 20:00DROPS Design answered:
Dear Diana, A.3 is worked in the transition between squares, so it's worked over the joining of 2 squares. In the first round, you work 3 treble crochets: 1 at the end of a square, one in the transition and the third one at the start of the next square. Happy crocheting!
06.12.2022 - 18:25
![]() Jeanny wrote:
Jeanny wrote:
Wenn man das Bild der Decke genau betrachtet sieht man das nach den Blütenblättern vier Stäbchen in die Luftmaschen gehäkelt wurden. In der Häkelschrift sind es aber nur drei?
13.11.2022 - 21:24
![]() Kristin wrote:
Kristin wrote:
Hei. Jeg har heklet hele teppet, har bare kanten igjen. Men nå vises ikke symbolene eller diagrammene lenger. Har prøvd mange ganger å få dem opp igjen, men det står bare «symbols». Kan jeg bli tilsendt diagram med symbolbeskrivning? Er veldig kjipt å ikke kunne gjøre seg ferdig når man har lagt så mange timer i det.
13.05.2022 - 13:57DROPS Design answered:
Hej Kristin, jo men diagrammet og forklaringerne ligger der stadigvæk... Prøv at vælge et andet sprog og se om det ligger der, gå så tilbage til dit sprog igen :)
13.05.2022 - 14:52
![]() Caroline wrote:
Caroline wrote:
Hej. Detta var helt nya symboler för mig. har ni valt att göra egna symboler eller är dessa vanliga vid virkdiagram?
03.05.2022 - 10:55DROPS Design answered:
Hej Caroline, vi anvender så vidt muligt samme symboler som vi har brugt i tidligere DROPS modeller. Du finder beskrivning på symbolerne lige ovenfor diagrammerne nederst i mønsteret :)
03.05.2022 - 13:34
![]() Kirsti Trodal Engström wrote:
Kirsti Trodal Engström wrote:
Hej, jag har samma fråga som martina craig, vilket ni inte har svarat på. Hur ska jag virka första varvet på kanten enligt diagam 3? Vänligen Kirsti
11.04.2021 - 16:10DROPS Design answered:
Hei Kirsti. Du hekler diagram A.2 langs kanten av diagram A.1 (ruten), mens diagram A.3 hekles kun i overgangen mellom mellom rutene. Så på 1.omgang hekles det ingen masker i overgangen mellom rutene, på 2. omgang hekles det 2 luftmasker og på 3. omgang 3 staver. mvh DROPS design
26.04.2021 - 11:25
![]() Justina wrote:
Justina wrote:
Muchas gracias por su patrón. Me a ayudado mucho. Gracias de nuevo
03.03.2021 - 07:55
![]() Henriette wrote:
Henriette wrote:
Die Wolle Lima sollte man mit der Hand waschen, aber wie wäscht man eine ganze Decke mit der Hand?
07.02.2021 - 08:11DROPS Design answered:
Liebe Henriette, gerne wird Ihnen Ihr DROPS Laden damit weiterhelfen - auch telefonisch oder per E-Mail. Viel Spaß beim häkeln!
08.02.2021 - 09:32
![]() Nora wrote:
Nora wrote:
Hei! I mønsteret står det at på man på runde 5 skal hekle tre staver om luftmaskebuene i gult som ble hekletpå runde 4. Når jeg gjør dette dekker ikke de hvite stavene alle de fem gule luftmaskene. Det er ikke lett å se mønsteret på modellbildet, men der virker det som om hele buen er godt dekker, muligens med 5 staver over noen av de gule buene. Kan dette gjøres for å dekke luftmaskebuen eller finnes det andre måter å gjøre dette på? På forhånd takk!
19.06.2020 - 21:56DROPS Design answered:
Hei Nora. Du kan evnt hekle 4 luftmasker på forrige rad (altså på rad 4 med oker), istedenfor 5 luftmasker. Da vil neste rad med natur dekke litt bedre. Om du ønsker å hekle flere enn de 3 staver for å dekke luftmaskeraden, vil det bli for mange masker på neste omgang og da vil ikke maskeantallet til kanten stemme. mvh DROPS design
29.06.2020 - 14:50
![]() Amanda Davis wrote:
Amanda Davis wrote:
Is there a written out pattern with pictures I can follow? Diagrams are hard for me to understand. Thank you!
07.05.2020 - 12:16DROPS Design answered:
Dear Mrs Davis, there is no tutorial with pictures but you will find how to read crochet diagrams here. Happy crocheting!
07.05.2020 - 12:53
|
|||||||||||||||||||||||||||||||||||||||||||||||||||||||
Golden Garden#goldengardenblanket |
|||||||||||||||||||||||||||||||||||||||||||||||||||||||
 |
 |
||||||||||||||||||||||||||||||||||||||||||||||||||||||
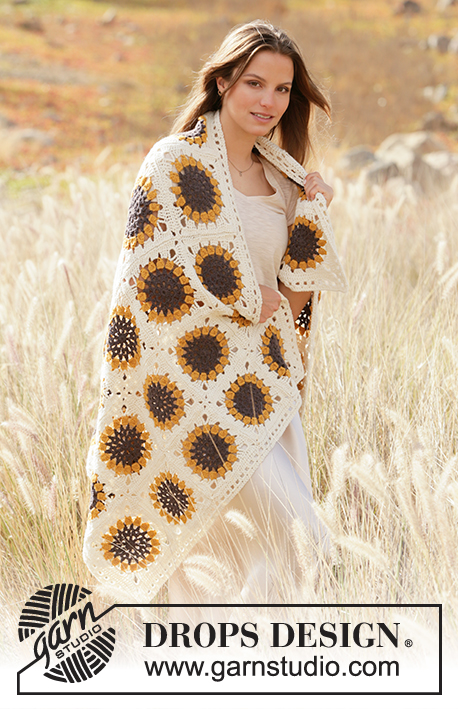
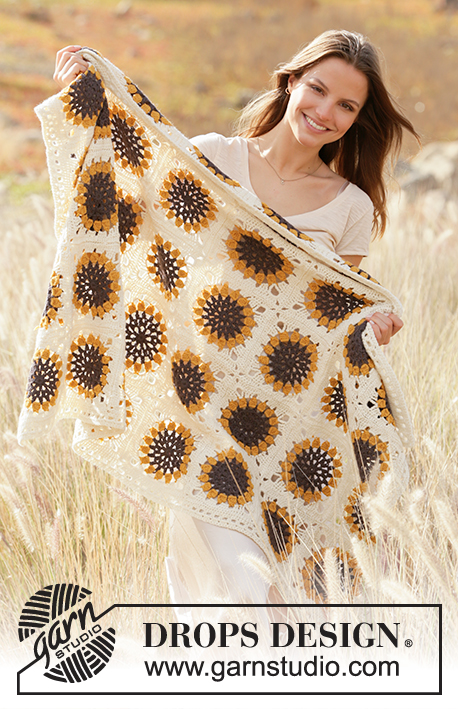
Crochet blanket in squares with sunflower in DROPS Lima.
DROPS 209-3 |
|||||||||||||||||||||||||||||||||||||||||||||||||||||||
|
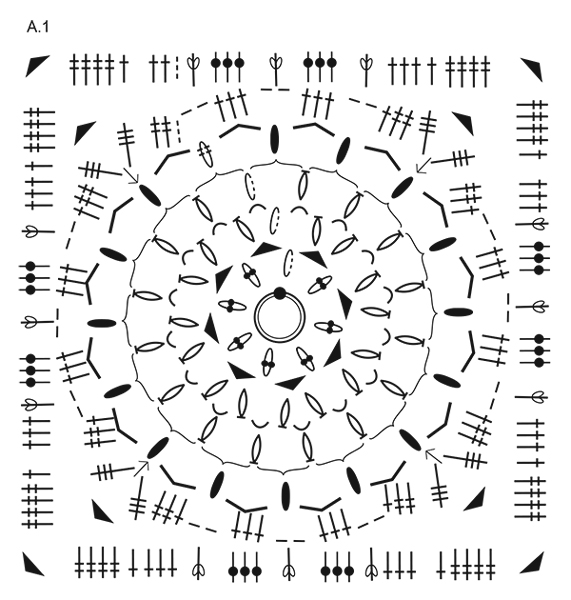
---------------------------------------------------------- EXPLANATION FOR THE PATTERN: ---------------------------------------------------------- PATTERN: See diagrams A.1, A.2, A.3 and A.4. Diagram A.1 shows squares and A.2-A.4 show how edge around the blanket is worked. SQUARE COLOURS: Work squares with 3 colours in the following order: Round 1-3: brown Round 4: goldenrod Round 5-6: off white. COLOUR CHANGE: Crochet last slip stitch on the last round with the new colour to get a nice colour change. CROCHET TIP: If you work at the end of crochet hook the chain stitch will often be too tight. 1 chain stitch should be just as long as 1 double crochet/treble crochet/double treble crochet is wide. CROCHET INFORMATION: When working the edge around the blanket, begin 1st round by fastening the yarn with 1 slip stitch, then work 3 chain stitches. These chain stitches are not shown in diagram and are in addition to stitches shown in diagram. Finish 1st round with 1 slip stitch in 3rd chain stitch. On the next 2 rounds begin each round with 3 chain stitches (which are in addition to stitches shown) and finish each round with 1 slip stitch in 3rd chain stitch. ---------------------------------------------------------- START THE PIECE HERE: ---------------------------------------------------------- BLANKET - SHORT OVERVIEW OF THE PIECE: Blanket consists of 40 equal squares that are sewn together at the end. Work an edge around the entire blanket. SQUARE: Begin with Lima on hook size 4 mm and read SQUARE COLOURS, COLOUR CHANGE and CROCHET TIP in explanation above and work PATTERN according to diagram A.1. REMEMBER THE CROCHET TENSION! Work 40 squares in total. ASSEMBLY: Place the squares 8 squares in length and 5 squares in width. Make sure all are right side up. Use off white and sew squares together edge to edge with one stitch in every stitch, also sew chain spaces in the corners. Make sure that seam is flat and as invisible as possible. Fasten off. EDGE: Work an edge around the entire blanket, begin by working straight after the first corner. In diagram A.2 last round of A.1 is shown to make it clear which stitches you work in. Use hook size 4 mm and off white. Read CROCHET INFORMATION in explanation above and work as follows: * Work diagram A.2 along the side of diagram A.1. Work diagram A.3 in transition between squares *, work from *-* until 1st corner. Work diagram A.4 around corner. Work from *-* until 2nd corner. Work diagram A.4 around corner. Work from *-* until 3rd corner. Work diagram A.4 around corner. Work from *-* until 4th corner. Work diagram A.4 around corner. When diagrams have been worked 1 time vertically, the edge is done. Cut and fasten the yarn. |
|||||||||||||||||||||||||||||||||||||||||||||||||||||||
Diagram explanations |
|||||||||||||||||||||||||||||||||||||||||||||||||||||||
|
|||||||||||||||||||||||||||||||||||||||||||||||||||||||
 |
|||||||||||||||||||||||||||||||||||||||||||||||||||||||
 |
|||||||||||||||||||||||||||||||||||||||||||||||||||||||
Have you finished this pattern?Tag your pictures with #dropspattern #goldengardenblanket or submit them to the #dropsfan gallery. Do you need help with this pattern?You'll find 15 tutorial videos, a Comments/Questions area and more by visiting the pattern on garnstudio.com. © 1982-2026 DROPS Design A/S. We reserve all rights. This document, including all its sub-sections, has copyrights. Read more about what you can do with our patterns at the bottom of each pattern on our site. |
|||||||||||||||||||||||||||||||||||||||||||||||||||||||


With over 40 years in knitting and crochet design, DROPS Design offers one of the most extensive collections of free patterns on the internet - translated to 17 languages. As of today we count 325 catalogues and 12298 patterns translated into English (UK/cm).
We work hard to bring you the best knitting and crochet have to offer, inspiration and advice as well as great quality yarns at incredible prices! Would you like to use our patterns for other than personal use? You can read what you are allowed to do in the Copyright text at the bottom of all our patterns. Happy crafting!
Post a comment to pattern DROPS 209-3
We would love to hear what you have to say about this pattern!
If you want to leave a question, please make sure you select the correct category in the form below, to speed up the answering process. Required fields are marked *.