
Popular categories
Looking for a yarn?


Comments / Questions (94)
![]() Luise wrote:
Luise wrote:
Ich habe jetzt bei Größe S 38 Maschen proÄrmel und soll die Markierer versetzen.Ich verstehe es nicht. Lasse ich den 1.Markierer an der gleichen Stelle wie vorher, zähle dann 36 M ab und versetze den 2.Markierer 2 Maschen nach innen? Oder versetzt man den 1. und 2. Markierer jeweils eine Masche nach innen, so dass zwischen den Markierern 36 Maschen liegen?
18.01.2021 - 11:45DROPS Design answered:
Liebe Luise, früher waren die Markierungen zwischen Maschen, jetzt müssen Sie in je einer Masche eingesetzt werden, dh so: eine Markierung in die erste der 38 Maschen einsetzen, 36 Maschen stricken, eine Markieurng in die letzte der 38 Maschen einsetzen. Bei der 2. Ärmel wiederholen. Viel Spaß beim stricken!
18.01.2021 - 15:21
![]() Luise wrote:
Luise wrote:
Hallo,ich bin bei Größe S bei den Zunahmen für die Passe.Man soll die markierer so versetzen,dass sie in der äußersten Masche am Ärmel sitzt.Das verstehe ich nicht.Ich habe jetzt pro Ärmel 37 Maschen.muss ich den 1.markierer eine Masche nach innen oder außen setzen?und beim 2.? Ich habe übrigens 198 statt 200 Gesamtmaschen.LG
17.01.2021 - 18:35DROPS Design answered:
Liebe Luise, es sieht so aus, es fehlt 1 Zunahme (= 2 Maschen) bei jeder Ärmel, Es sind 16 M für jeden Ärmel und es wird 11 Mal 2 Maschen zugenommen = 16+22= 38 M für jeden Ärmel. Dann setzen Sie eine Markierung in die erste + in die letzte Masche so: 1 M mir der Markierung, 36 M, 1 M mit der Markierung. Viel Spaß beim Stricken!
18.01.2021 - 10:13
![]() Ina Hames wrote:
Ina Hames wrote:
Bonjour, j'ai tricoté le modèle Urban Forest Drops 219/16 à la lettre et malheureusement le pull fait un vilain pli sous le col devant, encore beaucoup plus que sur la photo du modèle vert dans l'explication. Avez vous une idée ou recommandation comment rattraper le coup au moindre frais de travail ? Question : de détricoter le col et faire une rehausse derrière cela pourrait être une solution ? Merci d'avance Cordialement Ina
08.01.2021 - 18:59DROPS Design answered:
Bonjour Mme Hames, il est un peu compliqué de tricoter une réhausse avec des manches marteau, vous pouvez bloquer le pull en lui donnant la forme souhaitée. Votre magasin aura probablement d'autres idées ou astuces pour vous. Bon tricot!
11.01.2021 - 07:14
![]() Maria S wrote:
Maria S wrote:
I don´t understand the sleeve increasing. I am doing it as it is done in the video, but I dont get the outwards v shape, I am following the line forward from the saddle shoulder as is done in the video, but increasing in a reverse way, but there is still the same shape( the same line as for the shoulder).
23.12.2020 - 17:47
![]() Stephen wrote:
Stephen wrote:
Hello. Please can I check this instruction for changing from neck to yoke? At end of neck rib knit one round making evenly spaced yarn over increases. Then insert markers (without knitting). Next row - change to larger needle AND start shoulder increases AND twist yarn over increases from previous row (to avoid holes). So the YO increases need to placed to avoid the markers? Otherwise you are trying to increase where there is a yarn over... Is this correct? Many thanks.
20.12.2020 - 16:15DROPS Design answered:
Dear Stephen, the increases done after rib should be worked evenly spaced and knitted twisted on next round - when you work first round increasing for shoulders, increase on each side of the markers and knit the yarn over from previous round twisted to avoid holes. Happy knitting!
21.12.2020 - 08:13
![]() Sabine wrote:
Sabine wrote:
Moin moin, die Anleitung ist verlockend, mich irritiert aber die Falte unter dem Kragen. Da staucht sich die Vorderseite. Wie erwartet finde ich auch keine zusätzlichen verkürzten Reihen auf der Rückenseite die den Halsausschnitt vorne etwas tiefer legen würden. Wie kann ich diese zusätzlichen Reihen einfügen?
08.12.2020 - 11:51DROPS Design answered:
Liebe Sabine, es ist etwas schwierig, verkürzten Reihen und Sattelschulter gleichzeitig zu stricken - beim Spannen können Sie den Halsausschnitt den Form geben. Ihr DROPS Laden hat vielleicht auch weitere Ideen oder Tipps für Sie. Viel Spaß beim stricken!
08.12.2020 - 16:46
![]() Eveline wrote:
Eveline wrote:
Hallo ich bin gerade am verzweifeln bei der sattelschulter da steht ja dass ich in jeder Runde 16 maschen zunehmen soll aber ich soll ja je 1 vor und nach zuhnemen das ergibt dann nur 4 ..im video werden auch nur 4 in einer runde zugenommen ..wie soll ich das verstehen ?
07.12.2020 - 21:22DROPS Design answered:
Liebe Eveline, für die Sattelschulter werden je 4 Maschen zugenommen (= 1 vor 1. und 2. Markierer + 1 nach 2. und 4. Markierer) in jeder Runde insgesamt 16 Mal bei der 2. und 3. Grösse = 16 Runden mit je 4 Zunahmen. Hoffentlich ist es deutlicher so. Viel Spaß beim stricken!
08.12.2020 - 08:48
![]() Borck wrote:
Borck wrote:
Wie ist das mit den Znahmen der Maschen vor und nach dem Markierer gemeint? Bei mir verschiebt sich doch durch die Zunahmen die Zahl der Maschen vor den Markierern. Gibt es genau dazu (Modell 219-16) ein Video ?
06.12.2020 - 22:37DROPS Design answered:
Liebe Frau Borck, dieses Video zeigt, wie man Maschen für die Sattelschulter zunimmt, es wird Ihnen sicher weiterhelfen. Viel Spaß beim stricken!
07.12.2020 - 08:49
![]() Kirsten Lynggaard wrote:
Kirsten Lynggaard wrote:
Strikker Urban Forest, hvor der bliver slået 12 masker op under ærmet!! hvis de ikke bliver samlet op til forstykke og ryg, så bliver der et hul under ærmet!! Hvis de bliver samlet op , så bliver for-og bagstykke alt for stor?
12.11.2020 - 10:25
![]() Elisabeth wrote:
Elisabeth wrote:
Hallo! Ich möchte den Pullover gerne mit Drops Karisma stricken! Könnten Sie mir bitte erklären, wie ich das Muster “umrechnen” muss? Vielen herzlichen Dank!
04.11.2020 - 23:10DROPS Design answered:
Liebe Elisabeth, DROPS Karisma gehört zur Garngruppe B und dieses Modell wird mit DROPS Alaska = Garngruppe C gestrickt, dh Karisma ist hier keine Alternativ - benutzen Sie unseren Garnumrechner um Alternativen zu finden - oder schauen Sie mal ein anderes Modell aus der Garngruppe B. Viel Spaß beim stricken!
05.11.2020 - 10:25
|
|||||||||||||
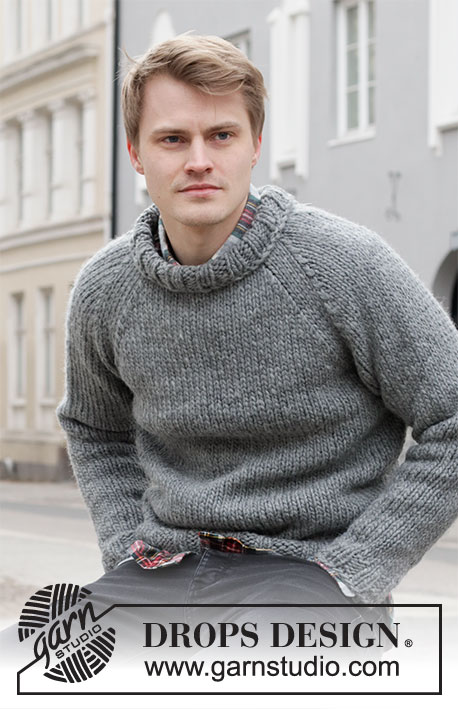
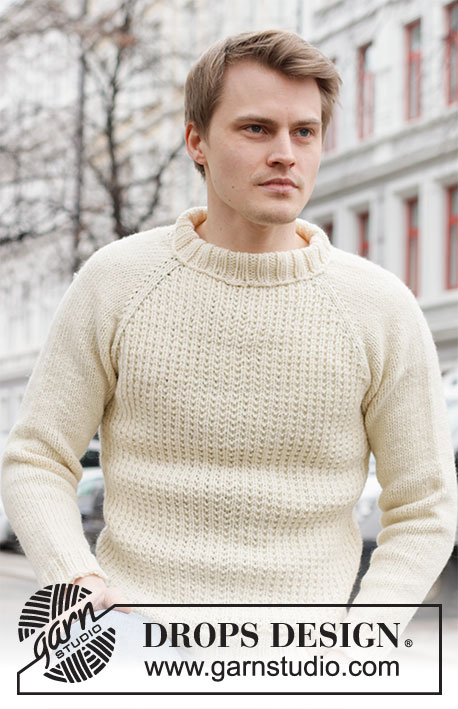
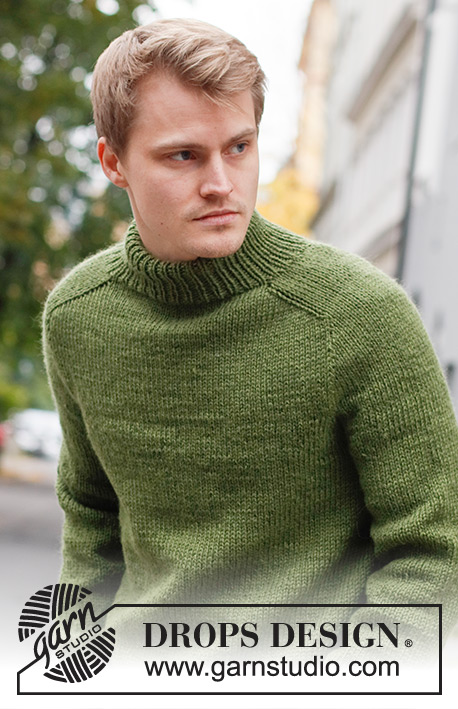
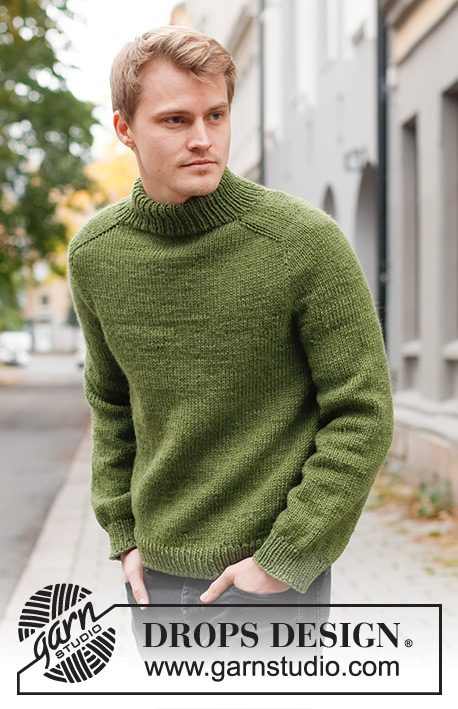
Urban Forest#urbanforestsweater |
|||||||||||||
 |
 |
||||||||||||
Knitted jumper for men in DROPS Alaska. The piece is worked top down, with double neck and saddle shoulders. Sizes S - XXXL.
DROPS 219-16 |
|||||||||||||
|
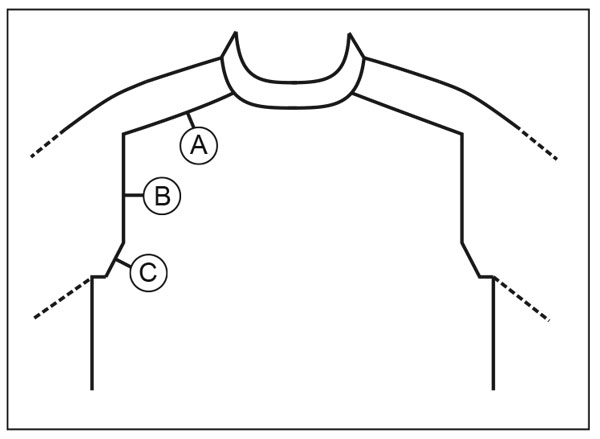
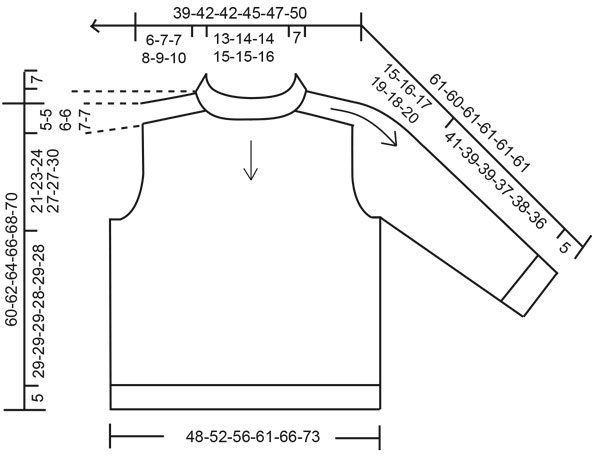
------------------------------------------------------- EXPLANATIONS FOR THE PATTERN: ------------------------------------------------------- INCREASE/DECREASE TIP (evenly spaced): To work out how to increase/decrease evenly, count the total number of stitches on needle (e.g. 78 stitches), and divide by the number of increases/decreases to be made (e.g. 22) = 3.5. In this example, increase by making 1 yarn over after alternately each 3rd and 4th stitch. On the next round work the yarn overs twisted to avoid holes. When decreasing, knit together alternately each 2nd and 3rd stitch and each 3rd and 4th stitch. INCREASE TIP: BEFORE MARKER: The new stitch twists to the right. Use the left needle to pick up the strand between 2 stitches from the previous round; pick up the back strand and knit in the front loop. AFTER MARKER: The new stitch twists to the left. Use the left needle to pick up the strand between 2 stitches from the previous round; pick up the front strand and knit in the back loop. DECREASE TIP (for sleeves): Decrease 1 stitch on either side of the marker thread as follows: Work until there are 3 stitches left before the marker thread, knit 2 together, knit 2 (marker thread sits between these 2 stitches), slip 1 stitch as if to knit, knit 1 and pass the slipped stitch over the knitted stitch. CASTING-OFF TIP: To avoid the cast-off edge being tight you can cast off with a larger size needle. If the edge is still tight, make 1 yarn over after approx. each 4th stitch at the same time as casting off; the yarn overs are cast off as normal stitches. ------------------------------------------------------- START THE PIECE HERE: ------------------------------------------------------- JUMPER – SHORT OVERVIEW OF THE PIECE: The neck and yoke are worked in the round with circular needle, top down from mid back. The yoke is divided for body and sleeves and the body continued in the round with circular needle. The sleeves are worked in the round with short circular needle/double pointed needles, top down. NECK: Cast on 78-82-88-92-98-102 stitches with circular needle size 4 mm and Alaska. Knit 1 round, then work rib (knit 1, purl 1) in the round for 14½ cm. Knit 1 round where you increase 22-22-32-32-34-38 stitches evenly spaced – read INCREASE/DECREASE TIP = 100-104-120-124-132-140 stitches. Change to circular needle size 5 mm. YOKE: Insert a marker at the beginning of the round (= mid-back) – THE PIECE IS MEASURED FROM HERE! In addition, insert 4 new markers as described below – without working the stitches and inserting the markers between 2 stitches. Marker 1: Start mid-back, count 17-18-20-21-21-23 stitches (= ½ back piece), insert marker before the next stitch. Marker 2: Count 16-16-20-20-24-24 stitches from marker 1 (= shoulder), insert marker before the next stitch. Marker 3: Count 34-36-40-42-42-46 stitches from marker 2 (= front piece), insert marker before the next stitch. Marker 4: Count 16-16-20-20-24-24 stitches from marker 3 (= shoulder), insert marker before the next stitch. There are 17-18-20-21-21-23 stitches left on the back piece after marker 4. Allow the markers to follow your work onwards; they are used when increasing for the shoulders. INCREASES FOR SADDLE SHOULDERS: Work stocking stitch in the round. AT THE SAME TIME, on the first round, increase 4 stitches for the shoulders as follows: Increase BEFORE markers 1 and 3 and increase AFTER markers 2 and 4 – read INCREASE TIP. Here you are only increasing on the front and back pieces and the number of shoulder stitches remains the same. Increase like this every round a total of 14-16-16-18-20-22 times = 156-168-184-196-212-228 stitches. REMEMBER THE KNITTING TENSION! After the last increase the piece measures approx. 6-7-7-8-9-10 cm from the marker on the neck. Now increase for the sleeves as follows. INCREASES FOR SLEEVES: Work stocking stitch in the round. AT THE SAME TIME, on the next round, increase 4 stitches for the sleeves as follows: Increase AFTER markers 1 and 3 and increase BEFORE markers 2 and 4 – remember INCREASE TIP. Here you are only increasing on the shoulders and the number of stitches on the front and back pieces remains the same. Increase like this every 2nd round a total of 11-13-13-15-12-12 times = 200-220-236-256-260-276 stitches. The piece should now measure 16-19-19-22-20-21 cm from the marker on the neck. In size S continue working until the piece measures 17 cm. If the length is shorter than the above in sizes M, L, XL, XXL and XXXL, continue to the correct length without further increases. Now increase for the yoke as described below. INCREASES FOR YOKE: Move the 4 markers so each marker sits in the outermost sleeve stitches on each side. There are 36-40-44-48-46-46 stitches between the marker-stitches on each sleeve. On the next round, increase 8 stitches for the yoke by increasing on both sides of all 4 marker-stitches – remember INCREASE TIP. Here you increase on the front and back pieces and on the sleeves; the increased stitches are worked in stocking stitch. Increase like this every 2nd round a total of 4-4-6-6-8-10 times = 232-252-284-304-324-356 stitches. When all the increases are finished, the piece should measure 21-23-24-27-27-30 cm. If the length is shorter than this, continue working to the correct length without further increases. Now divide the yoke for the body and sleeves on the next round as follows: Work the first 35-38-42-45-49-55 stitches (= ½ back piece), place the next 46-50-58-62-64-68 stitches on a thread for the sleeve, cast on 12-12-12-14-14-14 new stitches on the needle (= in side under sleeve), work the next 70-76-84-90-98-110 stitches (= front piece), place the next 46-50-58-62-64-68 stitches on a thread for the sleeve, cast on 12-12-12-14-14-14 new stitches on the needle (= in side under sleeve) and work the last 35-38-42-45-49-55 stitches (= ½ back piece). Body and sleeves are finished separately. THE PIECE IS NOW MEASURED FROM HERE. BODY: = 164-176-192-208-224-248 stitches. Work stocking stitch in the round. When the piece measures 29-29-29-28-29-28 cm from the division, increase 16-18-20-20-22-26 stitches evenly spaced = 180-194-212-228-246-274 stitches. Change to circular needle size 4 mm and work rib (knit 1, purl 1) for 5 cm. Cast off with knit over knit and purl over purl – read CASTING-OFF TIP. The jumper measures approx. 60-62-64-66-68-70 cm from the shoulder down. SLEEVE: Place the 46-50-58-62-64-68 stitches from the thread on the one side of the piece on double pointed needles/short circular needle size 5 mm and knit up 1 stitch in each of the 12-12-12-14-14-14 stitches cast on under the sleeve = 58-62-70-76-78-82 stitches. Insert a marker in the middle of the new stitches under the sleeve. Work stocking stitch in the round. When the sleeve measures 4 cm from the division, decrease 1 stitch on each side of the marker – read DECREASE TIP. Decrease like this every 11-6-3½-3-3-2½ cm a total of 4-6-9-11-11-13 times = 50-50-52-54-56-56 stitches. Continue working until the sleeve measures 41-39-39-37-38-36 cm from the division. Knit 1 round where you decrease 10-8-8-8-10-8 stitches evenly spaced = 40-42-44-46-46-48 stitches. Change to double pointed needles size 4 mm and work rib (knit 1, purl 1) for 5 cm. Cast off with knit over knit and purl over purl – remember CASTING-OFF TIP. Work the other sleeve in the same way. ASSEMBLY: Fold the neck double to the wrong side and sew down. To avoid the neck being tight and rolling outwards, it is important the seam is elastic. |
|||||||||||||
Diagram explanations |
|||||||||||||
|
|||||||||||||
 |
|||||||||||||
 |
|||||||||||||
Have you finished this pattern?Tag your pictures with #dropspattern #urbanforestsweater or submit them to the #dropsfan gallery. Do you need help with this pattern?You'll find 28 tutorial videos, a Comments/Questions area and more by visiting the pattern on garnstudio.com. © 1982-2026 DROPS Design A/S. We reserve all rights. This document, including all its sub-sections, has copyrights. Read more about what you can do with our patterns at the bottom of each pattern on our site. |
|||||||||||||


With over 40 years in knitting and crochet design, DROPS Design offers one of the most extensive collections of free patterns on the internet - translated to 17 languages. As of today we count 325 catalogues and 12298 patterns translated into English (UK/cm).
We work hard to bring you the best knitting and crochet have to offer, inspiration and advice as well as great quality yarns at incredible prices! Would you like to use our patterns for other than personal use? You can read what you are allowed to do in the Copyright text at the bottom of all our patterns. Happy crafting!
Post a comment to pattern DROPS 219-16
We would love to hear what you have to say about this pattern!
If you want to leave a question, please make sure you select the correct category in the form below, to speed up the answering process. Required fields are marked *.