
Popular categories
Looking for a yarn?


Comments / Questions (35)
![]() Yasmina Achitouv wrote:
Yasmina Achitouv wrote:
Que veut dire à partir du rang de montage merci
09.01.2021 - 21:43DROPS Design answered:
Bonjour Jasmina, cela veut dire à partir du debut de l'ouvrage (la ou vous avez monte les mailles). Bon tricot!
10.01.2021 - 21:19
![]() Helene U wrote:
Helene U wrote:
Bonjour Ma fille est tombée amoureuse de ce modèle mais elle aimerait un col V. Pouvez-vous m'indiquer comment faire? Existe t il une technique pour calculer l'échancrure, etc. ? Par avance merci de vos réponses, Hélène
25.12.2020 - 18:02DROPS Design answered:
Bonjour Helene, prenez comme modele le modele DROPS 210-35. nous ne sommes malheureusement pas en mesure de pouvoir ajuster chacun de nos modèles à chaque demande individuelle. Pour toute assistance complémentaire, vous pouvez vous adresser à votre magasin DROPS (meme par email or telephone) qui saura vous conseiller et vous renseigner. Bon tricot!
25.12.2020 - 20:15
![]() Ingrid wrote:
Ingrid wrote:
Hej, er der en fejl i strikkefastheden? Iflg. opskriften er 23 m og 45 p 10x10 cm - iflg bandarolen er 23 m og 30 p 10x10 cm. Jeg kan ikke se hvordan man kan få 23 m og 45 p til at måle 10x10 cm, uanset hvilket størrelse pinde der bruges 🤔
14.11.2020 - 17:00DROPS Design answered:
Hej Ingrid. Strikkefastheten i oppskriften är i retstrik men strickfastheten på bandarolen är i glatstrik. Mvh DROPS Design
17.11.2020 - 07:35
![]() Nathalie wrote:
Nathalie wrote:
Hebben jullie de beschrijving ook voor gewone rechte naalden ipv rondbreinaalden?
29.10.2020 - 22:57DROPS Design answered:
Dag Nathalie,
We hebben hier niet een apart beschrijving voor, maar we hebben wel een instructie gemaakt hoe je een patroon aanpast om met rechte naalden te kunnen breien. Deze vind je hier.
30.10.2020 - 12:26
![]() Françoise DECOURT wrote:
Françoise DECOURT wrote:
Un grand merci pour votre réponse rapide, j'avais mal interprêté les explications ! Là tout est clair pour moi je vais pouvoir poursuivre 😀
22.10.2020 - 11:33
![]() Françoise DECOURT wrote:
Françoise DECOURT wrote:
Bonjour pourriez vous m'expliquer ou m'indiquer une vidéo concernant les augmentations réparties sur un rang de point fantaisie car je ne vois pas comment le point bicolore va être fait ensuite Il s'agit des 3 augmentations réparties tous les 10,5 cm dans le dos D'avance merci pour votre réponse
22.10.2020 - 10:14DROPS Design answered:
Bonjour Mme Decourt, les augmentations à répéter tous les 10,5 cm ne sont pas réparties sur le rang mais se font de chaque côté: on augmente 1m au début du rang + 1 m à la fin du rang en tricotant 2 fois la première maille et la dernière maille (= on augmente 2 mailles à chaque rang d'augmentations)., comme dans cette vidéo (mais tricotez bien 2 fois la 1ère et la 2ème maille comme indiqué dans les explications de ce modèle). Bon tricot!
22.10.2020 - 10:42
![]() Anita Fjeldstad wrote:
Anita Fjeldstad wrote:
Hei igjen :-) hadde vært fint med en respons, da jeg er superklar for å begynne på vesten som jeg har kjøpt tråde til :-)
30.09.2020 - 20:39
![]() Anita Fjeldstad wrote:
Anita Fjeldstad wrote:
Jeg mener det er en feil i oppskriften her; BAKSTYKKE: Legg opp 142 masker ...Deretter strikkes det vrangbord med start fra vrangen slik: 1 kantmaske i RILLE, 1 rett, * 2 vrang, 2 rett *, strikk fra *-* til det gjenstår 4 masker strikk 2 vrang, 1 rett og 1 kantmaske i rille. jeg har 142 masker - trekk vekk den første til rille - da har vi 141 masker - trekk fra de 4 siste, så har man 137 masker, som ikke lar seg dele på 4.
28.09.2020 - 10:40DROPS Design answered:
Hej Anita. Du stickar 1 kantmaska rille, 1 rett. 142-2=140. Trekk fra de 4 sista så får du 136, vilket är delbart på 4. Mvh DROPS Design
01.10.2020 - 09:38
![]() Hanne wrote:
Hanne wrote:
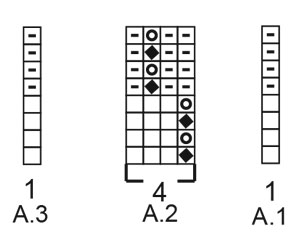
I forklaringen til diagrammet er de to nederste symbolers forklaringer helt identiske, kan det passe? Mvh Hanne
10.09.2020 - 18:20DROPS Design answered:
Hej Hanne. Tack för info, detta är nu rättat! Mvh DROPS Design
11.09.2020 - 07:17
![]() Erna wrote:
Erna wrote:
Na het bekijken van de video over de Pepita steek denk ik dat er een fout staat in de beschrijving van het telpatroon. Bij de onderste lijn staat : (cirkeltje in vierkantje)= haal 1 steek averecht af, zorg ervoor dat de draad waarmee u breit op de verkeerde kant is (van u af als u aan de verkeerde kant breit). Moet dat niet zijn ... naar u toe als u aan de verkeerde kant breit ?
10.09.2020 - 14:38
|
|||||||||||||
Back to School#backtoschoolvest |
|||||||||||||
 |
 |
||||||||||||
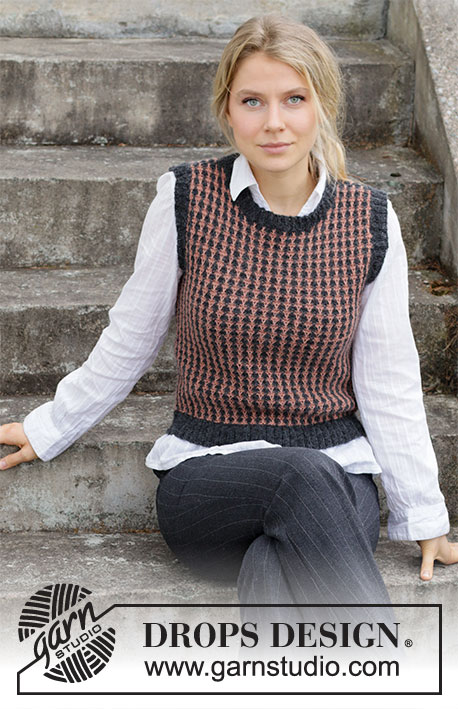
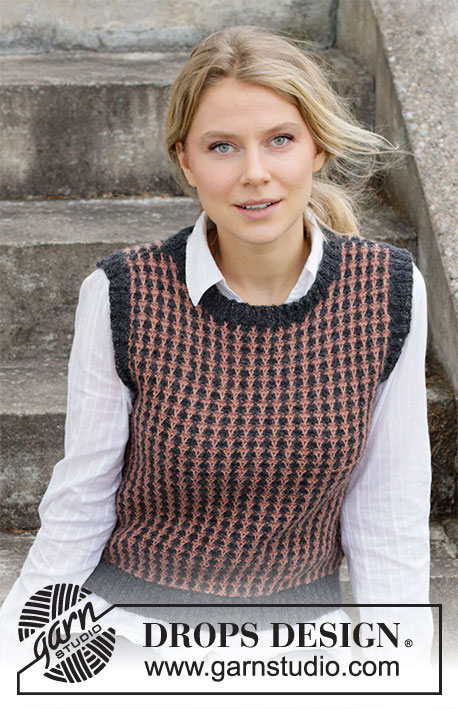
Knitted vest / slipover with Pepita pattern in DROPS Alpaca. Sizes S - XXXL.
DROPS 218-22 |
|||||||||||||
|
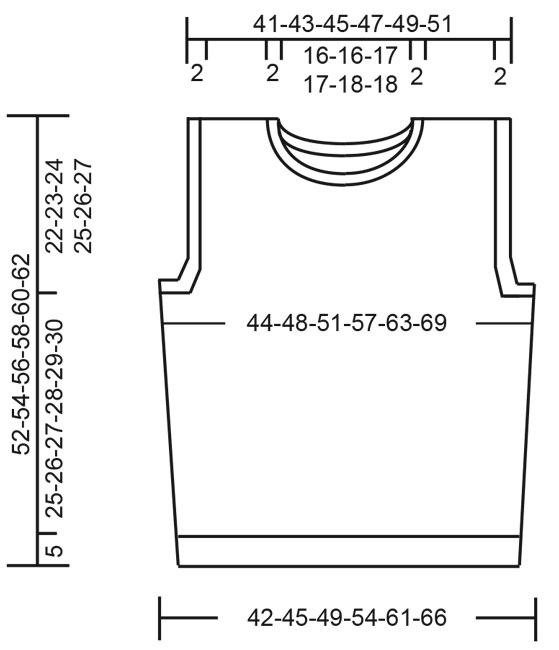
------------------------------------------------------- EXPLANATIONS FOR THE PATTERN: ------------------------------------------------------- RIDGE/GARTER STITCH (worked back and forth): Knit all rows. 1 ridge in height = Knit 2 rows. PATTERN: See diagrams A.1, A.2 and A.3. The diagrams show all rows in the pattern from the right side. DECREASE TIP (evenly spaced): To work out how to decrease evenly, count the total number of stitches on needle (e.g. 118 stitches) and divide by number of decreases to be made (e.g. 20) = 5.9. In this example decrease by knitting approx. each 5th and 6th stitch together. INCREASE TIP (for sides of body): Increase 1 stitch inside 1 edge stitch by making 1 yarn over; on the next row work the yarn over twisted to avoid a hole. The increased stitches are worked into the pattern as you go. KNITTING TIP: When increasing in the side the pattern continues upwards as before, the same applies when decreasing for the armholes and neck. If the outermost stitch in the sides or neck is a stitch which should be slipped, replace it with a knitted stitch in the colour the row is being worked in. ------------------------------------------------------- START THE PIECE HERE: ------------------------------------------------------- VEST – SHORT OVERVIEW OF THE PIECE: The back and front pieces are worked back and forth separately, bottom up. The shoulders and sides are sewn, then the neck and sleeve edges are worked in the round to finish. BACK PIECE: Cast on 118-130-142-154-170-186 stitches with circular needle size 3 mm and dark grey. Knit 1 row from the right side. Then work rib starting from the wrong side as follows: 1 edge stitch in GARTER STITCH, knit 1, * purl 2, knit 2 *, work from *-* until there are 4 stitches left, purl 2, knit 1 and 1 edge stitch in garter stitch. Continue with knit over knit, purl over purl and garter stitch over garter stitch until the rib measures 5 cm in all sizes. Change to circular needle size 3.5 mm, knit 1 row from the right side and decrease 20-24-28-28-28-32 stitches evenly spaced – read DECREASE TIP in the explanations above = 98-106-114-126-142-154 stitches. Knit 1 row from the wrong side. Now continue according to diagrams A.1, A.2 and A.3 as follows from the right side: Work A.1, then work A.2 until there is 1 stitch left on the row and finally A.3. Continue this pattern until the piece measures approx. 8 cm from the cast-on edge in all sizes. REMEMBER THE KNITTING TENSION! Read KNITTING TIP and INCREASE TIP in explanations above! On the next row increase 1 stitch on each side by working 2 stitches in both of the outermost stitches (the increased stitches are worked into the pattern). Repeat the increase every 9-9½-10-10½-11-11½ cm a total of 3 times in all sizes = 104-112-120-132-148-160 stitches. Continue the pattern until the piece measures 30-31-32-33-34-35 cm from the cast-on edge. Cast off 5-6-7-9-11-14 stitches on each side for the armholes, then cast off 1 stitch at the beginning of each row a total of 4-4-5-7-10-11 times = 86-92-96-100-106-110 stitches. Continue the pattern until the piece measures 50-52-54-56-58-60 cm from the cast-on edge, then on the next row from the right side work as follows: Work the first 22-24-26-27-29-31 stitches as before (= right shoulder), and place these stitches on a thread. Cast off the next 42-44-44-46-48-48 stitches for the neck, work the last 22-24-26-27-29-31 stitches as before. Each shoulder is finished separately. LEFT SHOULDER (back piece): Start from the wrong side and cast off 1 stitch at the beginning of the next row from the right side = 21-23-25-26-28-30 stitches. Work until the piece measures 52-54-56-58-60-62 cm from the cast-on edge, cast off with knit in the same colour as the previous row. Cut and fasten the strands. RIGHT SHOULDER (back piece): Place the 22-24-26-27-29-31 stitches from the threadback on circular needle size 3.5 mm. The first rowis worked from the wrong side and cast off 1 stitch at the beginning of thefirst row = 21-23-25-26-28-30 stitches. Work until the piece measures 52-54-56-58-60-62cm from the cast-on edge (making sure the two shoulders match), cast off with knit in the same colour as the previousrow. Cutand fasten the strands. FRONT PIECE: Cast on 118-130-142-154-170-186 stitches with circular needle size 3 mm and dark grey. Knit 1 row from the right side. Then work rib starting from the wrong side as follows: 1 edge stitch in garter stitch, knit 1, * purl 2, knit 2 *, work from *-* until there are 4 stitches left, purl 2, knit 1 and 1 edge stitch in garter stitch. Continue with knit over knit, purl over purl and garter stitch over garter stitch until the rib measures 5 cm in all sizes. Change to circular needle size 3.5 mm, knit 1 row from the right side and decrease 20-24-28-28-28-32 stitches evenly spaced = 98-106-114-126-142-154 stitches. Knit 1 row from the wrong side. Now continue according to diagrams A.1, A.2 and A.3 as follows from the right side: Work A.1, then work A.2 until there is 1 stitch left on the row and finally A.3. Continue this pattern until the piece measures approx. 8 cm from the cast-on edge in all sizes. On the next row increase 1 stitch on each side by working 2 stitches in both of the outermost stitches (the increased stitches are worked into the pattern). Repeat the increase every 9-9½-10-10½-11-11½ cm a total of 3 times in all sizes = 104-112-120-132-148-160 stitches. Continue the pattern until the piece measures 30-31-32-33-34-35 cm from the cast-on edge. Cast off 5-6-7-9-11-14 stitches on each side for the armholes, then cast off 1 stitch at the beginning of each row a total of 4-4-5-7-10-11 times = 86-92-96-100-106-110 stitches. Continue the pattern until the piece measures 42-44-45-47-48-50 cm from the cast-on edge, then on the next row from the right side work as follows: Work the first 30-33-34-36-38-40 stitches as before (= left shoulder) and place these stitches on a thread. Cast off the next 26-26-28-28-30-30 stitches for the neck and work the last 30-33-34-36-38-40 stitches as before (= right shoulder). Each shoulder is finished separately. RIGHT SHOULDER (front piece): = 30-33-34-36-38-40 stitches. Continue with the pattern (the first row is from the wrong side) and cast off for the neck at the beginning of each row from the right side: 3 stitches 1 time, 2 stitches 1-2-2-2-2-2 times and 1 stitch 4-3-2-3-3-3 times = 21-23-25-26-28-30 stitches. Continue the pattern until the piece measures 52-54-56-58-60-62 cm from the cast-on, cast off with knit in the same colour as the previous row and the same colour as on the back piece. Cut and fasten the strands. LEFT SHOULDER (front piece): Place the 30-33-34-36-38-40 stitches from the thread back on circular needle size 3.5 mm. Start from the wrong side and cast off at the beginning of each row from the wrong side: 3 stitches 1 time, 2 stitches 1-2-2-2-2-2 times and 1 stitch 4-3-2-3-3-3 times = 21-23-25-26-28-30 stitches. Continue with the pattern until the piece measures 52-54-56-58-60-62 cm from the cast-on edge (make sure the two shoulders match), cast off with knit in the same colour as the previous row and the same colour as on the back piece. Cut and fasten the strands. ASSEMBLY: Sew the shoulder seams with the same colour you used to cast off with. Sew the side seams, starting where stitches were cast off for the armholes and sewing inside 1 stitch. NECK: Using circular needle size 3 mm and dark grey, start from the right side at the shoulder seam and knit up approx. 144-160 stitches inside 1 stitch around the whole neck. Purl 1 round and adjust the number of stitches so it is divisible by 4. Then work rib (2 knit 2, purl 2) in the round for 2 cm. Cast off with knit over knit and purl over purl. Cut and fasten the strand. SLEEVE EDGES: Using circular needle size 3 mm and dark grey, start from the right side at the side seam and knit up approx. 124-180 stitches inside 1 stitch around the whole armhole. Purl 1 round and adjust the number of stitches so it is divisible by 4. Then work rib (2 knit 2, purl 2) in the round for 2 cm. Cast off with knit over knit and purl over purl. Work the other sleeve-edge in the same way. |
|||||||||||||
Diagram explanations |
|||||||||||||
|
|||||||||||||
 |
|||||||||||||
 |
|||||||||||||
Have you finished this pattern?Tag your pictures with #dropspattern #backtoschoolvest or submit them to the #dropsfan gallery. Do you need help with this pattern?You'll find 26 tutorial videos, a Comments/Questions area and more by visiting the pattern on garnstudio.com. © 1982-2026 DROPS Design A/S. We reserve all rights. This document, including all its sub-sections, has copyrights. Read more about what you can do with our patterns at the bottom of each pattern on our site. |
|||||||||||||


With over 40 years in knitting and crochet design, DROPS Design offers one of the most extensive collections of free patterns on the internet - translated to 17 languages. As of today we count 324 catalogues and 12291 patterns translated into English (UK/cm).
We work hard to bring you the best knitting and crochet have to offer, inspiration and advice as well as great quality yarns at incredible prices! Would you like to use our patterns for other than personal use? You can read what you are allowed to do in the Copyright text at the bottom of all our patterns. Happy crafting!
Post a comment to pattern DROPS 218-22
We would love to hear what you have to say about this pattern!
If you want to leave a question, please make sure you select the correct category in the form below, to speed up the answering process. Required fields are marked *.