
Popular categories
Looking for a yarn?


Comments / Questions (12)
![]() Sandra wrote:
Sandra wrote:
Thankyou
12.03.2025 - 20:10
![]() Sandra wrote:
Sandra wrote:
Where do you find out how much wool to buy?
12.03.2025 - 09:59DROPS Design answered:
Hi Sandra, The yarn amounts are at the top of the pattern, under MATERIALS. You will need 250-250-300-350-350-400 g of Drops Alpaca, which is sold in 50 g balls. Happy crafting!
12.03.2025 - 18:42
![]() Spela wrote:
Spela wrote:
I am knitting this vest in size S. Should be marker thred placed in the middle of first 10 stiches and in the midle of 10 stiches of stocking stich after 109 stich (2nd marker thred)? Now it is placed at the beggining of these 10 stiches knitted in stocking stich. I casted off stiches for armholes and it looks like the armholes are not in the middle of these 10 stches of stocking stich. And the pattern A1 wont fit on sholder when it all be knitted. Please let me know if you can help me.
18.01.2025 - 08:30DROPS Design answered:
Dear Spela, the first marker thread is right before the very first stitch. Then, from this stitch, count 109 stitches and insert the marker thread after it. The next round after inserting the markers you should have: Marker thread - first 10 stitches, A.1, A.2, A.3 7 times, A.1, 10 sts in stocking stitch - Marker thread - 10 stitches in stocking stitch, A.1, A.2, A.3 7 times, A.1, 10 sts in stocking stitch. So the markers should be right between 2 groups of 10 stitches in stocking stitch, and this should match with the center of the piece (since it's symmetrical on both sides of each marker. Happy knitting!
19.01.2025 - 19:35
![]() Carina Richard wrote:
Carina Richard wrote:
Hej Jag har problem med avmaskningarna till ärmhålen .Är det meningen att alla 16 maskorna på var sida ska bort. Och en annan fundering när man sen stickar bak-o-framstycke för sej hur blir det på avigan ? Hoppas ni kan hjälpa mej Carina
11.03.2023 - 16:41DROPS Design answered:
Hei Carina. Du strikker 16 masker i 2 RILLER i hver side, mens på første omgang etter de 2 rillene felles kun de 8 midterste maskene av de 16. Du har da felt 8 masker midt under hver ermhull. Når du strikker mønster frem og tilbake, husk å lese forklaringen på hvordan maskene skal strikkes under Diagram. Mønstret skal bli likt selv om det nå strikkes frem og tilbake. mvh DROPS Design
13.03.2023 - 11:57
![]() Rainbow wrote:
Rainbow wrote:
I would like to confirm if my interpretation of the first few rounds are correct , and I'm a bit confused with Round 7-8 : Round 1 : knit -> Round 2 : knit (as beginning of the rib) -> Round 3 : purl -> Round 4 : knit -> Round 5 : purl -> Round 6 : knit -> Round 7 : knit and decrease evenly -> Round 8 : start the pattern Should I start start the pattern as on the right side or wrong side ? Or have I interpreted the previous rounds wrongly ?
15.07.2022 - 21:14DROPS Design answered:
Dear Rainbow, you have to knit like this: Round 1 : knit -> Round 2-6 : knit rib *K1, P1*, *- * repeat for whole round -> Round 7 : knit and decrease evenly -> Round 8 : start the pattern. Since the piece is worked in the round, it is still worked from RS. Happy knitting!
18.07.2022 - 15:36
![]() Ina wrote:
Ina wrote:
Hej! Ska det verkligen möstret stickas A1 (12 m), A2 (9 m) A3 (antal m enl storlek) och sedan A1 igen men inte A2? Ska det vara så? Sidorna blir inte lika utan A2 skulle jag säga, men kanske jag har fel. Tacksam för snabbt svar för jag håller på och stickar denna väst just nu. Tackar!
13.09.2021 - 15:47DROPS Design answered:
Hej Ina. Jo det stämmer att A2 inte stickas igen, sidorna blir lika om du gör som det står i mönstret. Mvh DROPS Design
14.09.2021 - 08:34
![]() Christina wrote:
Christina wrote:
Tyvärr finns det ingen beskrivning hur jag stickar mönster A1.Beskrivs hur jag stickar de 4 maskor aviga men sedan hur stickas "alptoppen" (4 maskor) och därefter stickar jag 4 aviga igen. Tråkigt att detta händer ganska ofta i era beskrivningar. Beror det på dålig översättning eller slarv.
13.03.2021 - 13:20DROPS Design answered:
Hej Christina. Det som du kallar för "alptoppen" är de två sista ikonerna bredvid varandra. Mvh DROPS Design
14.09.2021 - 08:38
![]() Liz wrote:
Liz wrote:
Hello, Please can you assist me with the casting off for the stitches for the arm holes. Which is before the front and back split into separate pieces? I have tried this section multiple ways and I can not seem to get the hang of it. Could you explain this in more detail?
15.12.2020 - 01:18DROPS Design answered:
Hi Liz, You are casting off equally on each side of both marker threads, casting off with knit after the 2 ridges. So half the first armhole is cast off at the beginning of the round, work to the other side of the body and cast off on both sides of marker 2, then cast off the last stitches on the round. This splits the front and back pieces which are continued back and forth. Hope this helps and happy knitting!
15.12.2020 - 06:52
![]() Helena wrote:
Helena wrote:
Jag kan inte se garnmängd för de respektive storlekarna?
30.09.2020 - 14:47DROPS Design answered:
Hej Helena. Tack för info, nu är det tillagt även på den svenska översättningen. Mvh DROPS Design
01.10.2020 - 13:59
![]() Charlaine wrote:
Charlaine wrote:
Un modèle qui change des pulls sans manches avec élégance
17.06.2020 - 21:14
|
|||||||||||||||||||||||||||||||
Raspberry Rose#raspberryrosevest |
|||||||||||||||||||||||||||||||
 |
 |
||||||||||||||||||||||||||||||
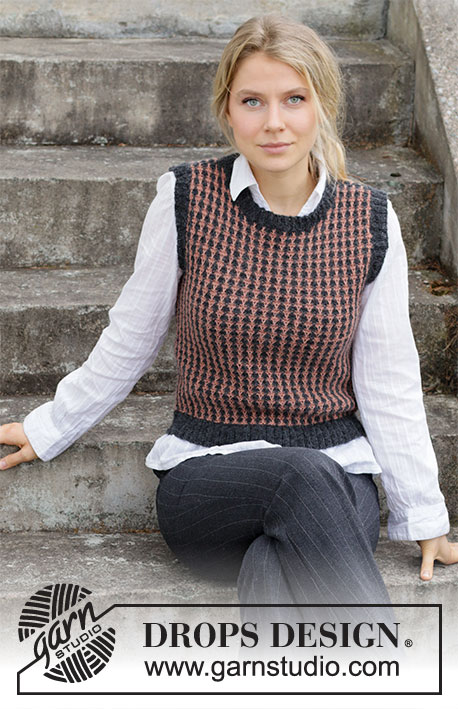
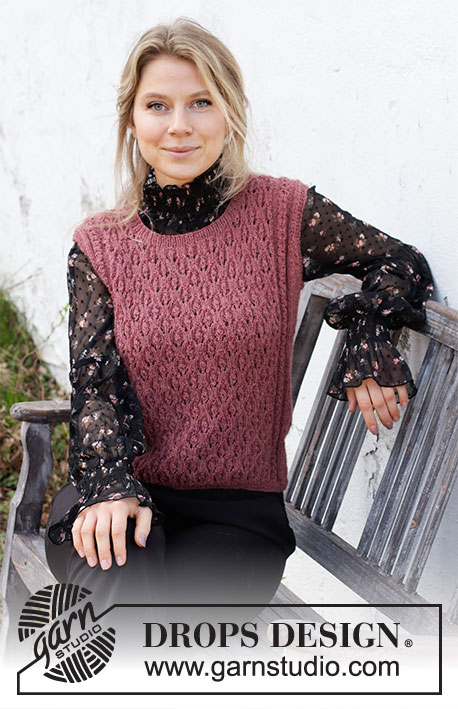
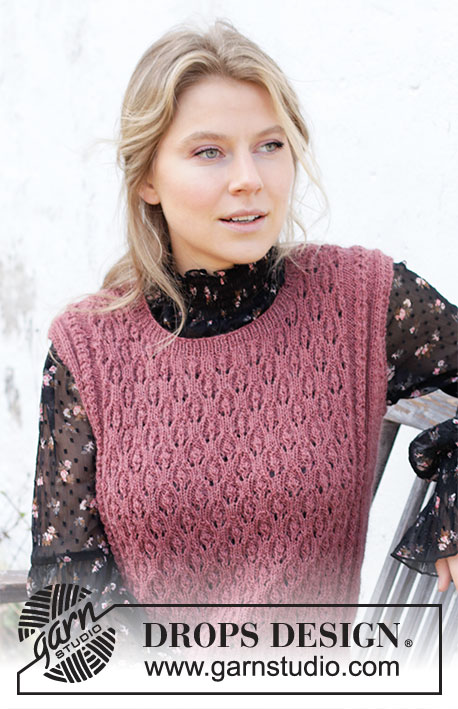
Knitted vest / slipover in DROPS Alpaca. The piece is worked with lace pattern, small cables and round neck. Sizes S - XXXL.
DROPS 218-17 |
|||||||||||||||||||||||||||||||
|
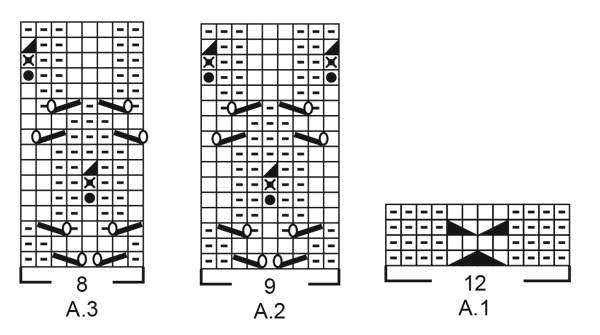
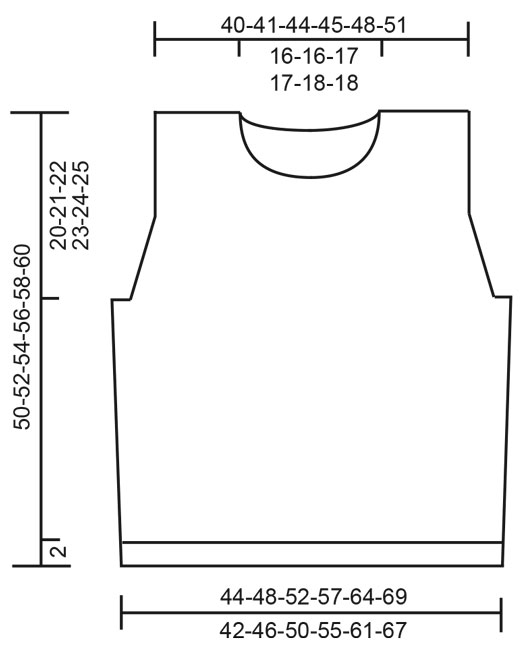
------------------------------------------------------- EXPLANATIONS FOR THE PATTERN: ------------------------------------------------------- RIDGE/GARTER STITCH (worked in the round): 1 ridge in height = 2 rounds; Knit 1 round and purl 1 round. RIDGE/GARTER STITCH (worked back and forth): Knit all rows. 1 ridge in height = Knit 2 rows. PATTERN: See diagrams A.1 to A.3. The diagrams show all the rows from the right side. DECREASE TIP-1 (evenly spaced): To work out how to decrease evenly, count the total number of stitches on the needle (e.g. 242 stitches) and divide by the number of decreases to be made (e.g. 24) = 10.1. In this example, decrease by knitting together each 9th and 10th stitch (approx.). DECREASE TIP-2 (for armholes): All decreases are worked from the right side! Decrease after the 4 edge stitches as follows: Slip 1 stitch as if to knit, knit 1 and pass the slipped stitch over the knitted stitch (= 1 stitch decreased). Decrease before the 4 edge stitches as follows: Work until there are 2 stitches left before the 4 edge stitches and knit 2 together (= 1 stitch decreased). INCREASE TIP (for sides of body): Work until there are 3 stitches left before the marker thread, make 1 yarn over, knit 6 (marker thread sits between these 6 stitches) make 1 yarn over (= 2 stitches increased at each marker thread; 4 stitches increased on round). On the next round knit the yarn overs twisted to avoid holes. Then work the new stitches in stocking stitch. ------------------------------------------------------- START THE PIECE HERE: ------------------------------------------------------- VEST – SHORT OVERVIEW OF THE PIECE: The body is worked in the round with circular needle, bottom up, as far as the armholes. Then the front and back pieces are finished separately, back and forth with circular needle. The neck is worked to finish. BODY: Cast on 242-264-286-312-348-378 stitches with circular needle size 2.5 mm and Alpaca. Knit 1 round, then work rib (= knit 1, purl 1) for 5 rounds. Knit 1 round where you decrease 24-26-28-30-34-36 stitches evenly spaced – read DECREASE TIP-1 = 218-238-258-282-314-342 stitches. Change to circular needle size 3 mm and insert 1 marker thread at the beginning of the round and 1 marker thread after 109-119-129-141-157-171 stitches (= sides of body). Allow the threads to follow your work onwards; they will be used when increasing in the sides. The next round is worked as follows: * 10-15-16-22-26-29 stitches in stocking stitch, work A.1 (= 12 stitches), A.2 (= 9 stitches), A.3 over the next 56-56-64-64-72-80 stitches (= 7-7-8-8-9-10 repeats of 8 stitches), A.1 (= 12 stitches) and work 10-15-16-22-26-29 stitches in stocking stitch * (marker thread here). Work from *-* 1 more time. Continue this pattern. REMEMBER THE KNITTING TENSION! AT THE SAME TIME when the piece measures 8 cm in all sizes, increase 1 stitch on each side of both marker threads – read INCREASE TIP (= 4 stitches increased). Increase like this every 7-8-8-8-9-9 cm a total of 3 times = 230-250-270-294-326-354 stitches. Continue working until the piece measures 28-29-30-31-32-33 cm. Work 2 RIDGES – read description above, over the middle 14-16-16-18-20-22 stitches on each side (i.e. 7-8-8-9-10-11 stitches on each side of both marker threads – the other stitches are worked as before). On the first round after the ridges, cast off stitches on each side for the armholes as follows: Cast off 3-4-4-5-6-7 stitches, work as before until there are 3-4-4-5-6-7 stitches left before the marker thread, cast off 6-8-8-10-12-14 stitches, work as before until there are 3-4-4-5-6-7 stitches left on the round; cast off these stitches. Cut the strand. The back and front pieces are finished separately. BACK PIECE: = 109-117-127-137-151-163 stitches. Continue the pattern back and forth; the 4 outermost stitches in each side are worked in garter stitch. AT THE SAME TIME on the first row from the right side decrease 1 stitch for each armhole – read DECREASE TIP-2. Decrease like this every 2nd row (i.e. every row from the right side) a total of 1-3-3-7-13-15 times and then every 4th row (i.e. every other row from the right side) a total of 2-3-4-4-1-1 times = 103-105-113-115-123-131 stitches. Continue as follows: 4 edge stitches in garter stitch, 3-4-4-5-5-5 stitches in stocking stitch, A.1 (= 12 stitches), A.2 (= 9 stitches), A.3 over the next 56-56-64-64-72-80 stitches (= 7-7-8-8-9-10 repeats of 8 stitches), A.1 (= 12 stitches), work 3-4-4-5-5-5 stitches in stocking stitch and finish with 4 edge stitches in garter stitch. Continue this pattern. When the piece measures 47-49-51-53-55-57 cm, cast off the middle 37-37-41-41-43-43 stitches for the neck and each shoulder is finished separately. Continue as before and cast off 2 stitches on the next row from the neck = 31-32-34-35-38-42 stitches on the shoulder. Work until there are 2 rows left before the piece measures 50-52-54-56-58-60 cm. Knit 1 row from the right side where you decrease 1 stitch over the cable in A.1 = 30-31-33-34-37-41 stitches left. Knit 1 row from the wrong side and cast off with knit from the right side. Work the other shoulder in the same way. The piece measures 50-52-54-56-58-60 cm from the shoulder down. FRONT PIECE: = 109-117-127-137-151-163 stitches. Continue the pattern back and forth; the 4 outermost stitches in each side are worked in garter stitch. AT THE SAME TIME on the first row from the right side decrease 1 stitch for each armhole. Decrease like this every 2nd row (i.e. every row from the right side) a total of 1-3-3-7-13-15 times and then every 4th row (i.e. every other row from the right side) a total of 2-3-4-4-1-1 times = 103-105-113-115-123-131 stitches. Continue as follows: 4 edge stitches in garter stitch, 3-4-4-5-5-5 stitches in stocking stitch, A.1 (= 12 stitches), A.2 (= 9 stitches), work A.3 over the next 56-56-64-64-72-80 stitches (= 7-7-8-8-9-10 repeats of 8 stitches), A.1 (= 12 stitches), 3-4-4-5-5-5 stitches in stocking stitch and finish with 4 edge stitches in garter stitch. Continue this pattern. When the piece measures 41-42-44-45-47-48 cm, place the middle 17-17-21-21-23-23 stitches on 1 thread for the neck and each shoulder is finished separately. Continue the pattern and cast off for the neck at the beginning of each row from the neck as follows: Cast off 2 stitches 4 times and 1 stitch 4 times = 31-32-34-35-38-42 stitches on the shoulder. Work until there are 2 rows left before the piece measures 50-52-54-56-58-60 cm. Knit 1 row from the right side where you decrease 1 stitch over the cable in A.1 = 30-31-33-34-37-41 stitches left. Knit 1 row from the wrong side and cast off with knit from the right side. Work the other shoulder in the same way. The piece measures 50-52-54-56-58-60 cm from the shoulder down. ASSEMBLY: Sew the shoulder seams inside the cast-off edge. NECK: Start on the right side by the one shoulder seam, using short circular needle size 2.5 mm, and knit up approx. 118 to 140 stitches, including the stitches from the thread in front (the number of stitches must be divisible by 2). Work 6 rounds of rib (= knit 1, purl 1). Cast off with knit over knit and purl over purl. |
|||||||||||||||||||||||||||||||
Diagram explanations |
|||||||||||||||||||||||||||||||
|
|||||||||||||||||||||||||||||||
|
|||||||||||||||||||||||||||||||
|
|||||||||||||||||||||||||||||||
Have you finished this pattern?Tag your pictures with #dropspattern #raspberryrosevest or submit them to the #dropsfan gallery. Do you need help with this pattern?You'll find 31 tutorial videos, a Comments/Questions area and more by visiting the pattern on garnstudio.com. © 1982-2025 DROPS Design A/S. We reserve all rights. This document, including all its sub-sections, has copyrights. Read more about what you can do with our patterns at the bottom of each pattern on our site. |
|||||||||||||||||||||||||||||||


With over 40 years in knitting and crochet design, DROPS Design offers one of the most extensive collections of free patterns on the internet - translated to 17 languages. As of today we count 314 catalogues and 11822 patterns translated into English (UK/cm).
We work hard to bring you the best knitting and crochet have to offer, inspiration and advice as well as great quality yarns at incredible prices! Would you like to use our patterns for other than personal use? You can read what you are allowed to do in the Copyright text at the bottom of all our patterns. Happy crafting!
Post a comment to pattern DROPS 218-17
We would love to hear what you have to say about this pattern!
If you want to leave a question, please make sure you select the correct category in the form below, to speed up the answering process. Required fields are marked *.