
Popular categories
Looking for a yarn?


Comments / Questions (9)
![]() Inga wrote:
Inga wrote:
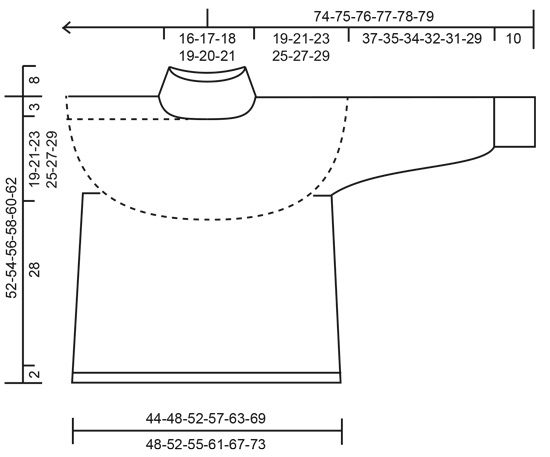
Hejsa. Er det mig der ikke kan finde målene på blusen i forhold til hvilken størrelse man skal strikke??
28.12.2024 - 21:47DROPS Design answered:
Hei Inga. Alle mål til genseren finner du på målskissen. Målskissen finner du helt nederst på oppskriften. mvh DROPS Design
06.01.2025 - 13:11
![]() Olga Terekhov wrote:
Olga Terekhov wrote:
25 x 5=125 200+125=325 ( not 300) Should I make only 4 out of 1 ( in 25st))?
18.12.2024 - 12:15DROPS Design answered:
Dear Mrs Terekhov, you have 200 sts on needle and repeat the 4 sts in A.2 a total of 50 times; then you increase 4 sts in every other repeat of A.2/in every other knitted stitches from fisherman's rib; so that you will increase 4 sts x 25 times (= in half of the repeats) = 100 sts + the previous 200 sts on needle are 300 - that's for first size, do I misundertand the size you are working on?
19.12.2024 - 08:58
![]() Olga Terekhov wrote:
Olga Terekhov wrote:
Hello When I increase in every second fishermen st by making 5 st out of 1 I am getting 325 not 300 If I am making 4 out of 1 ...Yes I am getting 300 Can you please let me know how many st should I make from one in fishermen st Thanks
17.12.2024 - 20:53
![]() Olga Terekhov wrote:
Olga Terekhov wrote:
I checked/ calculated increase for other sizes...and it's only matching with what number of st should be after increase in every second fishermen st, when making 4 out of 1 Will appreciate if you explain where I am mistaken Thanks
17.12.2024 - 20:45DROPS Design answered:
Dear Mrs Terekhov, when working A.2 you repeat the 4 sts in A.2 a total of 50 times over the 200 stitches; when increasing in every other stitch in Fisherman's rib (in every other repeat of A.2) you will increase only 25 sts. Happy knitting!
18.12.2024 - 08:51
![]() Valentina wrote:
Valentina wrote:
In effetti, forse non serve con il legaccio ...
03.10.2023 - 11:55
![]() Valentina wrote:
Valentina wrote:
Quando si passa dal lavoro in circolare a quello avanti e indietro per il davanti/dietro, è utile aggiungere una maglia di vivagno per lato? Grazie
02.10.2023 - 15:46DROPS Design answered:
Buonasera Valentina, se non indicato, non è necessario aggiungere maglie di vivagno. Buon lavoro!
03.10.2023 - 22:19
![]() Andrea wrote:
Andrea wrote:
Hej, Är det möjligt att sticka bålen på rundstickor istället för att dela upp det i fram- och bakstycke? Självklart skulle ökningarna från instruktionerna för framstyckes läggas in. Eller finns det någon speciell anledning till att bålen delas i fram- och bakstycke? Mvh, Andrea
14.12.2021 - 19:32DROPS Design answered:
Hej Andrea. Ja jag kan inte se någon anledning till att du inte ska kunna göra det. Jag tror att vi har valt att sticka den fram och tillbaka för att slippa sticka några aviga varv när det stickas rätstickning. Mvh DROPS Design
15.12.2021 - 11:22
![]() Marie-lise Marcon wrote:
Marie-lise Marcon wrote:
Bonjour, Puis-je tricoterle corps de ce modèle ainsi que les manches en rond? Faut-il apporter des modifications? Ou faut-il tout simplement reprendre toutes les mailles: devant , les mailles ajoutées sous les bras et le dos puis procéder en suivant les explications données ? Merci de votre réponse
23.11.2021 - 07:47DROPS Design answered:
Bonjour Mme Marcon, on tricote le dos et le devant séparément en allers et retours car on les tricote au point mousse et qu'il est souvent plus facile de tricoter le point mousse en rangs plutôt qu'en allers et retours, on a ainsi une couture de chaque côté (en rond, vous aurez une démarcation = début des tours, sur un des côtés). Bon tricot!
23.11.2021 - 08:32
![]() Mikke wrote:
Mikke wrote:
Wouw!!
05.06.2020 - 16:20
|
||||||||||
Autumn Days Jumper#autumndaysjumper |
||||||||||
 |
 |
|||||||||
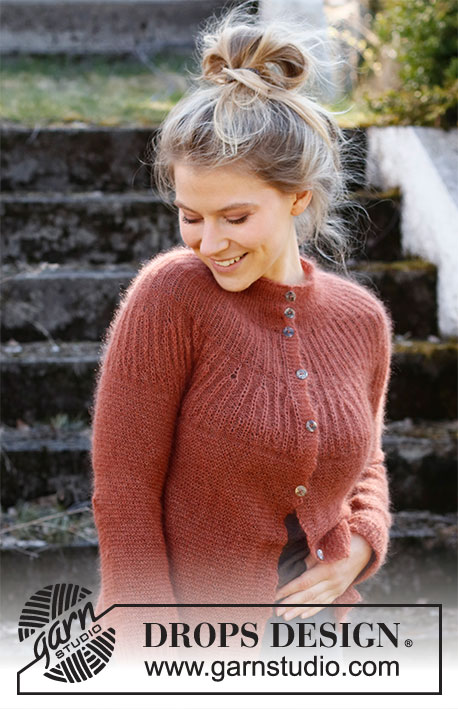
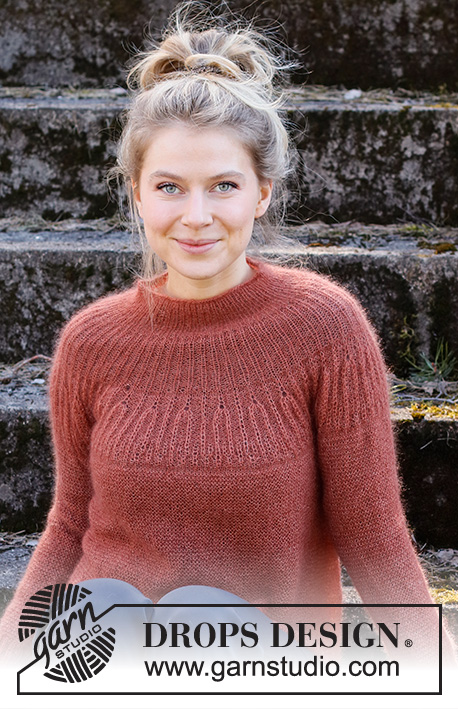
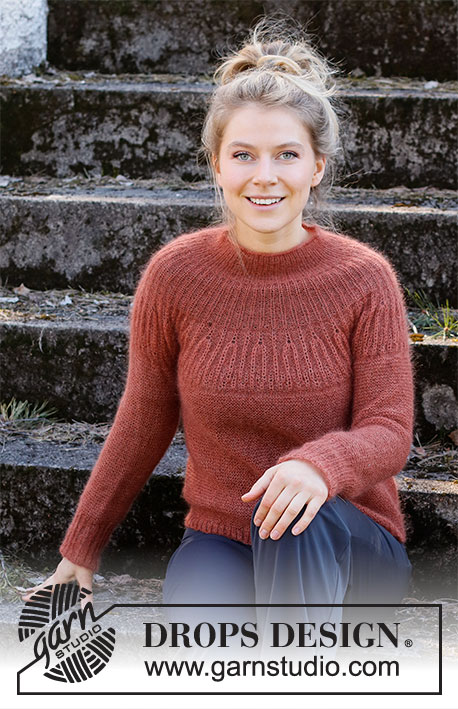
Knitted jumper in DROPS Kid-Silk. The piece is worked top down with round yoke, textured pattern on the yoke and garter stitch on the body and sleeves. Sizes S - XXXL.
DROPS 217-22 |
||||||||||
|
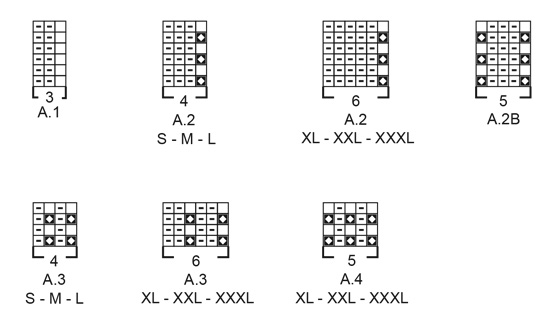
------------------------------------------------------- EXPLANATIONS FOR THE PATTERN: ------------------------------------------------------- RIDGE/GARTER STITCH (worked in the round): 1 ridge in height = 2 rounds; Knit 1 round and purl 1 round. RIDGE/GARTER STITCH (worked back and forth): Knit all rows. 1 ridge in height = Knit 2 rows. PATTERN: See diagrams A.1 to A.4. Choose diagrams for your size (applies to A.2, A.3 and A.4). INCREASE/DECREASE TIP (evenly spaced): To work out how to increase/decrease evenly, count the total number of stitches on the needle (e.g. 300 stitches) and divide by the number of increases/decreases to be made (e.g. 18) = 16.7. In this example, increase by making 1 yarn over after alternately each 16th and 17th stitch. On the next round work the yarn overs twisted to avoid holes. When decreasing, knit together alternately each 15th and 16th and each 16th and 17th stitch. INCREASE TIP-1 (increasing rib on yoke): Increase 1 stitch at the beginning of each purled section by making 1 yarn over. On the next round purl the yarn overs twisted to avoid holes. Then subsequently, purl the new stitches. NOTE: The 3 largest sizes increase 3 times in the purled sections. It is neatest to increase first at the beginning of the purled sections, then at the end and finally at the beginning again. INCREASE TIP-2 (for increases in Fisherman’s rib stitches): Increase 4 stitches in 1 Fisherman’s rib stitch by working 5 stitches in the same stitch as follows. Knit 1 in the stitch under the next stitch, but do not slip this stitch from the left needle, * make 1 yarn over the right needle, knit 1 in the same stitch on the left needle *, work from *-* a total of 2 times, then slip the stitches from the left needle = 5 stitches (i.e. 4 stitches increased). INCREASE TIP-3 (for sides of body): Increase 1 stitch on each side by making 1 yarn over inside the 2 outermost stitches on each side. On the next row work the yarn overs twisted to avoid holes. Then work the new stitches in garter stitch. DECREASE TIP (for each side of sleeve): Decrease as follows after the 1 edge stitch: Slip 1 stitch as if to knit, knit 1 and pass the slipped stitch over the knitted stitch (= 1 stitch decreased). Decrease as follows before the 1 edge stitch: Start 2 stitches before the edge stitch and knit 2 together (= 1 stitch decreased). CASTING-OFF TIP: To avoid the cast-off edge being tight you can cast off with a larger size needle. If the edge is still tight, make 1 yarn over after approx. each 4th stitch at the same time as casting off; the yarn overs are cast off as normal stitches. ------------------------------------------------------- START THE PIECE HERE: ------------------------------------------------------- JUMPER – SHORT OVERVIEW OF THE PIECE: The neck and yoke are worked in the round with circular needle, top down. The yoke is divided for the front and back pieces and for the sleeves. The pieces are worked back and forth down to the rib. The rib is worked in the round to finished length. Finally the sleeve seams, the side seams and the openings under the sleeves are sewn together. NECK: Cast on 100-104-112-116-120-124 stitches with short circular needle size 3.5 mm and 2 strands Kid-Silk. Remove the one strand – the rest of the piece is worked with 1 strand Kid-Silk. Change to short circular needle size 3 mm and knit 1 round. Then work rib in the round (= knit 1, purl 1) for 8 cm. On the next round increase 50-52-56-58-60-62 stitches evenly spaced as follows: * Knit 1, purl 1, make 1 yarn over *, work from *-* to end of round = 150-156-168-174-180-186 stitches. Change to circular needle size 3.5 mm and insert 1 marker in the middle of the round. The yoke will be measured from this marker. YOKE: Work 2 rounds of stocking stitch (the yarn overs are knitted twisted on the first round). Then work A.1 (= 50-52-56-58-60-62 repeats of 3 stitches) – AT THE SAME TIME increase in the purled sections as described below. REMEMBER THE KNITTING TENSION! S, M and L: When A.1 measures 7-8-8 cm, increase all purl 2 to purl 3 by making 1 yarn over between each of the 2 purled stitches = 50-52-56 stitches increased = 200-208-224 stitches. Continue from ALL SIZES. XL, XXL and XXXL: When A.1 measures 3-3-3 cm, increase all purl 2 to purl 3 – read INCREASE TIP-1 = 58-60-62 stitches increased = 232-240-248 stitches. When A.1 measures 6-6-7 cm, increase all purl 3 to purl 4 = 58-60-62 stitches increased = 290-300-310 stitches. When A.1 measures 9-9-10 cm, increase all purl 4 to purl 5 = 58-60-62 stitches increased = 348-360-372 stitches. Continue from ALL SIZES. ALL SIZES: = 200-208-224-348-360-372 stitches. Work 2 rounds of stocking stitch (the yarn overs are knitted twisted on the first round). Then work A.2 in the round (= 50-52-56-58-60-62 repeats of 4-4-4-6-6-6 stitches). Continue this pattern, but when 6 rounds of A.2 have been worked, increase in the Fisherman’s rib stitches as described below – read INCREASE TIP-2: S, M and L: * Increase 4 stitches in the first/next Fisherman’s rib stitch, purl 3, work 1 Fisherman’s rib stitch as before without increasing, purl 3 *, work from *-* to end of round (i.e. increase in every 2nd Fisherman’s rib stitch) = 300-312-336 stitches. Continue from ALL SIZES. XL: Start to increase in the 3rd Fisherman’s rib stitch from the beginning of the round, then increase 4 stitches in every 4th Fisherman’s rib stitch until there are 3 Fisherman’s rib stitches left on the round and finally increase 4 stitches in the last of these Fisherman’s rib stitches (i.e. a total of 15 Fisherman’s rib stitches increased on the round) = 408 stitches. Continue from ALL SIZES. XXL: Start to increase in the 3rd Fisherman’s rib stitch from the beginning of the round and then increase 4 stitches in every 3rd Fisherman’s rib stitch to the end of the round (i.e. a total of 20 Fisherman’s rib stitches increased on the round) = 440 stitches. Continue from ALL SIZES. XXXL: Start increasing in the 3rd Fisherman’s rib stitch from the beginning of the round, then increase 4 stitches in every 3rd Fisherman’s rib stitch until there are 2 Fisherman’s rib stitches left on the round and finally increase 4 stitches in the last of these Fisherman’s rib stitches (i.e. a total of 21 Fisherman’s rib stitches increased on the round) = 456 stitches. Continue from ALL SIZES. ALL SIZES: = 300-312-336-408-440-456 stitches. Continue the pattern as before but where the Fisherman’s rib stitches were increased work the 5 stitches as follows, 1 Fisherman’s rib stitch, purl 3, 1 Fisherman’s rib stitch (see A.2B). When the yoke measures 15-17-17-19-19-21 cm from the marker mid front, work A.3 in the round but in sizes XL, XXL and XXXL work A.4 over A.2B so the pattern fits nicely. Continue this pattern until A.3 measures 3-3-3-5-5-5 cm. The yoke now measures approx. 18-20-20-24-24-26 cm from the marker on the neck. Work 2 rounds of stocking stitch where you increase 18-34-38-6-6-26 stitches evenly spaced on the first round – read INCREASE/DECREASE TIP = 318-346-374-414-446-482 stitches. Work GARTER STITCH in the round – read description above until the yoke measures 19-21-23-25-27-29 cm from the marker on the neck. Now divide the yoke for body and sleeves as follows, making sure the next round is a purled round: Purl 46-51-54-60-66-73 (= ½ back piece), place the next 66-70-78-86-90-94 stitches on 1 thread for the sleeve, cast on 8-8-10-10-12-12 new stitches on the needle (= in side under sleeve), purl 93-103-109-121-133-147 (= front piece), place the next 66-70-78-86-90-94 stitches on 1 thread for the sleeve, cast on 8-8-10-10-12-12 new stitches on the needle (= in side under sleeve) and purl the remaining 47-52-55-61-67-74 stitches (= ½ back piece). Cut the strand. Front and back pieces and the sleeves are finished separately. THE PIECE IS NOW MEASURED FROM HERE! FRONT PIECE: Start from the right side in the middle of the 8-8-10-10-12-12 stitches cast-on on the one side of the piece and knit these 4-4-5-5-6-6 stitches, knit the 93-103-109-121-133-147 on the front piece and knit the next 4-4-5-5-6-6 stitches (half the stitches cast on under the other sleeve) = 101-111-119-131-145-159 stitches on the row; the other stitches (back piece) are left on the needle or placed on a thread. Continue back and forth with GARTER STITCH – read description above until the piece measures 5 cm from the division. Now increase 1 stitch on each side – read INCREASE TIP-3. Increase like this every 6th row a total of 4 times on each side = 109-119-127-139-153-167 stitches. Continue working until the piece measures 28 cm from the division. There is approx. 2 cm left to finished length; you can try the jumper on and work to desired length. Leave the stitches on the needle or place them on a thread while you work the back piece. BACK PIECE: Starting from the right side in the middle of the 8-8-10-10-12-12 stitches cast-on on the one side of the piece, knit the 4-4-5-5-6-6 stitches, knit 93-103-109-121-133-147 and knit the next 4-4-5-5-6-6 stitches (half the stitches cast on under the other sleeve) = 101-111-119-131-145-159 stitches. Work the back piece in the same way as the front piece. Adjust the length to match the front piece. Now work rib in the round over all stitches as described below. RIB: Place the stitches from the front and back pieces on the same circular needle size 3.5 mm = 218-238-254-278-306-334 stitches. Knit 1 round where you increase 52-59-64-70-75-83 stitches evenly spaced – remember INCREASE/DECREASE TIP = 270-297-318-348-381-417 stitches. NOTE: This is done to avoid the rib being tight. Change to circular needle size 3 mm and work rib in the round (= knit 1, purl 2 ) for 2 cm. Loosely cast off with knit over knit and purl over purl – read CASTING-OFF TIP! The jumper measures approx. 52-54-56-58-60-62 cm from the shoulder down. SLEEVE: Cast on 4-4-5-5-6-6 stitches with circular needle size 3.5 mm and Kid-Silk, knit the 66-70-78-86-90-94 stitches from the thread on the one side of the piece and cast on 4-4-5-5-6-6 new stitches at the end of the row = 74-78-88-96-102-106 stitches. Work garter stitch back and forth over all stitches. AT THE SAME TIME when the sleeve measures 2 cm from the division in all sizes, decrease 1 stitch on each side – read DECREASE TIP. Decrease like this every 2½-2½-1½-1½-1-1 cm a total of 7-8-12-15-16-17 times on each side = 60-62-64-66-70-72 stitches. Continue working until the sleeve measures 37-35-34-32-31-29 cm from the division. There is approx. 10 cm left to finished length; you can try the jumper on and work to desired length. NOTE: Shorter measurements in larger sizes due to wider neck and longer yoke. The rest of the sleeve (the rib) is worked in the round with double pointed needles. Divide the stitches between double pointed needles size 3 mm and work 2 rounds of stocking stitch where the number of stitches is adjusted to 60-63-63-66-69-72 stitches on the first round. Then work rib in the round (= knit 1, purl 2) for 10 cm. Loosely cast off with knit over knit and purl over purl – remember CASTING-OFF TIP! The sleeve measures approx. 47-45-44-42-41-39 cm from the division. Work the other sleeve in the same way. ASSEMBLY: Sew the sleeve seams, sewing edge to edge in the outermost loop of the outermost stitch so the seam is flat. Sew the side seams from the armhole down to the rib in the same way. Sew the openings under the sleeves (where stitches were cast on). |
||||||||||
Diagram explanations |
||||||||||
|
||||||||||
 |
||||||||||
 |
||||||||||
Have you finished this pattern?Tag your pictures with #dropspattern #autumndaysjumper or submit them to the #dropsfan gallery. Do you need help with this pattern?You'll find 32 tutorial videos, a Comments/Questions area and more by visiting the pattern on garnstudio.com. © 1982-2026 DROPS Design A/S. We reserve all rights. This document, including all its sub-sections, has copyrights. Read more about what you can do with our patterns at the bottom of each pattern on our site. |
||||||||||


With over 40 years in knitting and crochet design, DROPS Design offers one of the most extensive collections of free patterns on the internet - translated to 17 languages. As of today we count 325 catalogues and 12298 patterns translated into English (UK/cm).
We work hard to bring you the best knitting and crochet have to offer, inspiration and advice as well as great quality yarns at incredible prices! Would you like to use our patterns for other than personal use? You can read what you are allowed to do in the Copyright text at the bottom of all our patterns. Happy crafting!
Post a comment to pattern DROPS 217-22
We would love to hear what you have to say about this pattern!
If you want to leave a question, please make sure you select the correct category in the form below, to speed up the answering process. Required fields are marked *.