
Popular categories
Looking for a yarn?


Comments / Questions (11)
![]() Johanne wrote:
Johanne wrote:
Bonjour. J'aimerais modifier un peu le modèle. Pour le dos, j'aimerais omettre les torsades donc tricoter en jersey seulement. Comment puis-je répartir les augmentations au dos ? Au devant, j'aimerais faire seulement les torsades A1/A3, donc comment puis-je répartir les augmentations au devant ? Merci pour votre réponse. Merci
08.11.2023 - 21:27DROPS Design answered:
Bonjour Johanne, nous ne sommes malheureusement pas en mesure de pouvoir adapter chacun de nos modèles à chaque demande; n'hésitez pas à parcourir les différents modèles de même tension qui pourraient vous inspirer ou vous servir comme base pour vos modifications,; votre magasin pourra fort probablement volontiers vous aider - vous pouvez également demander conseil sur un forum spécialisé si besoin. Merci pour votre compréhension. Bon tricot!
09.11.2023 - 08:24
![]() Nicola Warnants wrote:
Nicola Warnants wrote:
Thanks for your reply, but isn't cable 2 every 6th row?
28.04.2022 - 23:06DROPS Design answered:
Dear Mrs Warnants, you are right sorry, I mistyped yesterday, the cables in diagram A.2 are worked on every 6th row, not on every 5th row. Happy knitting!
29.04.2022 - 08:27
![]() Nicola Warnants wrote:
Nicola Warnants wrote:
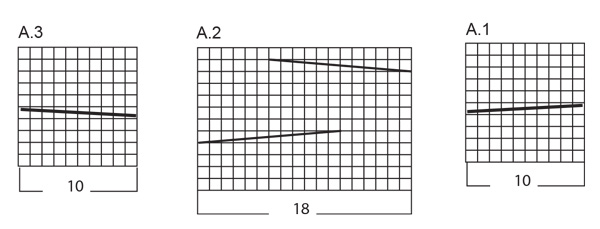
Please can you confirm what method of increasing is appropriate for this garment (swirling smoke jacket), as nowhere seems to say. Also, to work the pattern, do i run the cables in parallel, so that A1 and A3 repeat every 10 rows, and A2 repeats every 12 rows? I guess you'd have to write it down to keep track of where you are on every pattern? Thanks!
28.04.2022 - 09:45DROPS Design answered:
Dear Mrs Warnants, you can use your favorite technique to increase (make 1, yarn over, knit front and back loop...). The cables in A.1 and A.3 will be worked both every 10th row but cables in A.2 are worked on every 5th row. Happy knitting!
28.04.2022 - 11:59
![]() Sara wrote:
Sara wrote:
Hej igen! Ytterligare en fråga - Börjar diagram A2 tidigare än A1 och A3? Eftersom A2 har 12 varv, och A1 och A3 bara har 10?
17.03.2022 - 13:43DROPS Design answered:
Hej Sara. Du börjar diagrammen samtidigt och när diagrammet är färdigt i höjden börjar du från längst ner igen (du kommer alltså börja om på diagram A1 och A3 tidigare än A2). Mvh DROPS Design
17.03.2022 - 14:26
![]() Sara wrote:
Sara wrote:
Hej! Har precis börjat med bakstycket. Jag förstår inte hur jag ska göra A2. Har aldrig följt ett sådant diagram innan och lyckas inte läsa mig till det. Tror att jag redde ut A1, men nu är det två streck i diagrammet och det reder jag inte ut. Går det att förklara i text? I texten för bakstycket ser det också ut som att minskningar och ökningar ska göras varje varv, men det kan väl inte stämma? Tack!
15.03.2022 - 13:48DROPS Design answered:
Hej Sara. Nej minskningar och ökningar gör du bara på första varvet för att få rätt antal maskor. Efter det stickar du diagram och slätstickning som det står i texten. Läs gärna lektionen Hur man läser ett stickdiagram och vi har även flera videor du kan se för att få hjälp, bl.a. annat denna om hur man stickar flätor. Hoppas det kan hjälpa dig vidare! Mvh DROPS Design
16.03.2022 - 09:19
![]() Manuela Schlensok wrote:
Manuela Schlensok wrote:
Nach meiner Rechnung komme ich beim Vorderteil bei grösse M auf 50 M insgesamt aber laut Anleitung müssen es 52 sein
05.02.2021 - 15:56DROPS Design answered:
Liebe Frau Schlensok, bei der 1. Reihe mit Diagram sollen Sie gleichzeitig zu- und abnehmen: 5 M kraus rechts, 2 M glatt rechts, A.1 über die nächsten 6 M und dabei 4 M gleichmäßig verteilt zunehmen (A.1 = 10 M), 6 M glatt rechts, A.2 über die nächsten 10 M und dabei 8 M gleichmäßig verteilt zunehmen (A.2 = 18 M), glatt rechts über die nächsten 11 M und dabei 1 M gleichmäßig verteilt abnehmen (= 10 M glatt rechts), 1 Rand-M kraus rechts = 5+2+10+6+18+10+1= 52M. Viel Spaß beim Stricken!
08.02.2021 - 07:27
![]() Ghislaine Reygnier wrote:
Ghislaine Reygnier wrote:
Bonjour Pour le gilet jersey torsade en L est ce que 7 pelotes de melody c'est bon?Merci
02.02.2021 - 14:15DROPS Design answered:
Bonjour Mme Ghislaine Reygnier, oui c'est bon. Bon tricot!
02.02.2021 - 16:28
![]() Marie-Noëlle wrote:
Marie-Noëlle wrote:
Bonjour, Est-ce que pour éviter les coutures de côté, on peut tricoter en un seul morceau à partir du milieu devant jusqu'aux emmanchures ? Merci de votre réponse
20.10.2020 - 18:00DROPS Design answered:
Bonjour Marie-Noëlle, tout à fait, il vous suffit de monter 1 m en moins de chaque devant et 2 m en moins pour le dos (= lisières) - rappelez-vous d'ajuster au moment de rabattre les mailles des emmanchures. Bon tricot
21.10.2020 - 08:01
![]() Dity Zuidwijk wrote:
Dity Zuidwijk wrote:
Ik zou graag het vest Swirling Smoke Jacket breien, maar dan van een ander garen. Liefst iets minder kwetsbaar en wat niet prikt. Welk garen adviseert u mij?
27.09.2020 - 14:31DROPS Design answered:
Dag Dity,
DROPS Melody heeft toch wel een hele typische look, wat niet makkelijk te vervangen is door een ander garen. Melody is ook het enige garen uit categorie D, maar om dezelfde dikte te krijgen, kun je 2 draden uit categorie B nemen. DROPS Karisma is bijvoorbeeld heel geschikt voor jouw wensen omdat het niet prikt en in de machine wasbaar is. Echter heeft dit niet het pluizige effect. Je zou ook 2 draden DROPS Sky kunnen nemen. Misschien een goed idee om even bij een verkooppunt langs te gaan om de garens te bekijken.
19.11.2020 - 00:15
![]() Moureau wrote:
Moureau wrote:
J'aime
11.07.2020 - 09:11
|
||||||||||||||||
Swirling Smoke Jacket#swirlingsmokejacket |
||||||||||||||||
 |
 |
|||||||||||||||
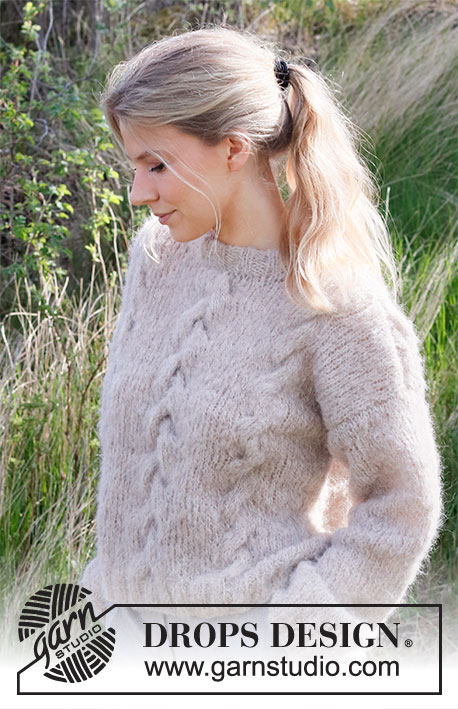
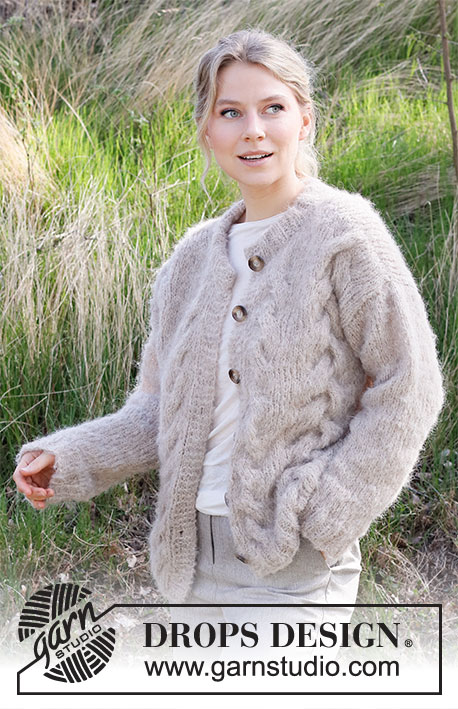
Knitted jacket with stocking stitch and cables in DROPS Melody. Sizes S - XXXL.
DROPS 215-19 |
||||||||||||||||
|
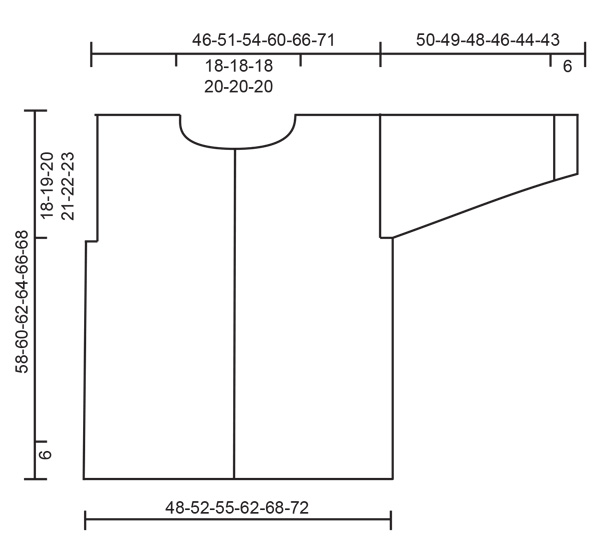
------------------------------------------------------- EXPLANATIONS FOR THE PATTERN: ------------------------------------------------------- RIDGE/GARTER STITCH (worked back and forth): Knit all rows. 1 ridge in height = Knit 2 rows. PATTERN: See diagrams A.1, A.2 and A.3. DECREASE TIP (for sleeves): Decrease 1 stitch on either side of the marker thread as follows: Work until there are 3 stitches left before the marker thread, knit 2 together, knit 2 (marker thread sits between these 2 stitches), slip 1 stitch as if to knit, knit 1 and pass the slipped stitch over the knitted stitch. BUTTONHOLES Work buttonholes on the right band. 1 BUTTONHOLE = knit together 2nd and 3rd stitch from the edge and make 1 yarn over. On the next row knit the yarn over = hole. Work the buttonholes when the piece measures: S: 5, 14, 23, 32, 41 and 51 cm M: 5, 12, 20, 28, 36, 44 and 53 cm L: 5, 12, 20, 28, 37, 46 and 55 cm XL: 6, 13, 21, 30, 39, 48 and 57 cm XXL: 6, 14, 23, 32, 41, 50 and 59 cm XXXL: 6, 14, 23, 32, 41, 51 and 61 cm ------------------------------------------------------- START THE PIECE HERE: ------------------------------------------------------- JACKET – SHORT OVERVIEW OF THE PIECE. The jacket is worked back and forth with circular needle in sections and sewn together to finish. The sleeve-stitches are knitted up around the armhole and the sleeves are worked in the round, top down, with short circular needle/double pointed needles. Neck stitches are knitted up and worked before the neck is folded and sewn down. BACK PIECE: Cast on 66-74-74-82-90-98 stitches with circular needle size 6 mm with Melody. Purl 1 row from the wrong side then work as follows from the right side: 1 edge stitch in GARTER STITCH – see description above, knit 1 * purl 2, knit 2 *, repeat from *-* until there are 4 stitches left on the row, purl 2, knit 1 and finish with 1 edge stitch in garter stitch. Continue this rib for 6 cm. Change to circular needle size 7 mm. The next row is worked as follows from the right side: 1 edge stitch in garter stitch, stocking stitch over the next 11-15-15-19-23-27 stitches, AT THE SAME TIME decrease 1-2-0-0-0-1 stitches evenly over these stitches, A.1 over the next 6 stitches, AT THE SAME TIME increase 4 stitches over these stitches (A.1 = 10 stitches), 10 stitches in stocking stitch, A.2 over the next 10 stitches, AT THE SAME TIME increase 8 stitches evenly over these stitches (A.2 = 18 stitches), stocking stitch over the next 10 stitches, A.3 over the next 6 stitches, AT THE SAME TIME increase 4 stitches over these stitches (A.3 = 10 stitches), stocking stitch over the next 11-15-15-19-23-27 stitches, AT THE SAME TIME decrease 1-2-0-0-0-1 stitches evenly over these stitches and finish with 1 edge stitch in garter stitch = 80-86-90-98-106-112 stitches on the needle. Continue the pattern onwards. NOTE! Insert 1 marker on both sides of each cable; it is easier to position the cables correctly. REMEMBER THE KNITTING TENSION! When the piece measures 40-41-42-43-44-45 cm, cast off 2 stitches in each side (mark the armholes) = 76-82-86-94-102-108 stitches. Continue working until the piece measures 56-58-60-62-64-66 cm. Decrease 8 stitches evenly over the stitches in A.2. Then cast off the middle 22-22-22-24-24-24 stitches for the neck and each shoulder is finished separately. Continue by casting off 1 stitch at the beginning of the next row from the neck = 22-25-27-30-34-37 stitches on the shoulder. Continue working until the piece measures 57-59-61-63-65-67 cm, decrease 4 stitches over A.1/A.3 = 18-21-23-26-30-33 stitches on the shoulder. Work 1 row then cast off the remaining stitches. The piece measures 58-60-62-64-66-68 cm. Work the other shoulder in the same way. RIGHT FRONT PIECE: Cast on 37-41-45-49-53-53 stitches with circular needle size 6 mm with Melody. Purl 1 row from the wrong side then work as follows from the right side: 5 stitches in garter stitch, * purl 2, knit 2*, work from *-* until there are 4 stitches left on the row, purl 2, knit 1 and 1 edge stitch in garter stitch. Work buttonholes on the right band – read BUTTONHOLES. Continue this rib for 6 cm. Change to circular needle size 7 mm. Continue from the right side as follows: 5 stitches in garter stitch, 2 stitches in stocking stitch, A.1 over the next 6 stitches, AT THE SAME TIME increase 4 stitches over these stitches (A.1 = 10 stitches), 6 stitches in stocking stitch, A.2 over the next 10 stitches, AT THE SAME TIME increase 8 stitches evenly over these stitches (A.2 = 18 stitches), stocking stitch over the next 7-11-15-19-23-23 stitches, AT THE SAME TIME decrease 0-1-3-3-3-0 stitches evenly over these stitches and 1 edge stitch in garter stitch = 49-52-54-58-62-65 stitches. Continue this pattern onwards. NOTE! Insert 1 marker on both sides of each cable; it is then easier to position the cables correctly. When the piece measures 40-41-42-43-44-45 cm, cast off 2 stitches at the start of a row from the wrong side (marks the armhole) = 47-50-52-56-60-63 stitches. Continue working until the piece measures 52-54-56-58-60-62 cm. Now cast off and place stitches on thread for neck as follows: start on the same side as band (mid front) as follows: work as before, decrease 4 stitches evenly over the stitches in A.1 – then place the first 13-13-13-14-14-14 stitches from mid front on a thread for the neck. Then cast off on start of each row from mid front as follows: 2 stitches 1 time, 1 stitch 2 times = 26-29-31-34-38-41 stitches left on the shoulder. Continue working until the piece measures 57-59-61-63-65-67 cm, decrease 8 stitches evenly over the stitches in A.2 = 18-21-23-26-30-33 stitches left on the shoulder. Work 1 row then cast off the remaining stitches. The piece measures 58-60-62-64-66-68 cm. LEFT FRONT PIECE: Cast on and work in the same way as the right front piece, but in reverse, and work A.3 instead of A.1 – as follows: Cast on 37-41-45-49-53-53 stitches with circular needle size 6 mm with Melody. Purl 1 row from the wrong side then work as follows from the right side: 1 edge stitch in garter stitch, knit 1, * purl 2, knit 2*, work from *-* until there are 7 stitches left on the row, purl 2 and 5 stitches in garter stitch. Continue this rib for 6 cm. Change to circular needle size 7 mm. Continue from the right side as follows: 1 edge stitch in garter stitch, stocking stitch over the next 7-11-15-19-23-23 stitches, AT THE SAME TIME decrease 0-1-3-3-3-0 stitches evenly over these stitches, A.2 over the next 10 stitches, AT THE SAME TIME increase 8 stitches evenly over these stitches (A.2 = 18 stitches), 6 stitches in stocking stitch, A.3 over the next 6 stitches, AT THE SAME TIME increase 4 stitches evenly over these stitches (A.3 = 10 stitches), 2 stitches in stocking stitch, finish with 5 stitches in garter stitch = 49-52-54-58-62-65 stitches. Continue in the same way as the right front piece, but now cast off for armhole at the start of a row from the right side. ASSEMBLY: Sew the shoulder seams and sew the side seams inside the 1 edge stitch as far as the armholes. LEFT SLEEVE: Start where 2 stitches were cast off for the armhole on the left front piece and knit up 46-50-52-54-58-60 stitches from the right side with Melody and circular needle 7 mm; knit up first along the front piece, then down the back piece to where you started. Work stocking stitch in the round. Insert 1 marker thread at the beginning of the round (mid-under the sleeve). When the piece measures 4 cm, decrease 1 stitch on each side of the marker thread – read DECREASE TIP. Decrease like this every 6-5½-5½-5-4½-4 cm a total of 6-7-7-7-8-8 times = 34-36-38-40-42-44 stitches. When the sleeve measures 44-43-42-40-38-37 cm change to double pointed needles size 6 mm and increase 2-4-2-4-2-4 stitches evenly spaced = 36-40-40-44-44-48 stitches. Work rib (knit 2, purl 2) for 6 cm. Cast off. The sleeve measures approx. 50-49-48-46-44-43 cm. RIGHT SLEEVE: Work in the same way as the left sleeve but when knitting up from the cast-off stitches, work first up the back piece and then down the front piece. NECK: Knit up approx. 64 to 76 stitches along the neck (including the stitches on the threads) with circular needle size 6 mm. Make sure the number of stitches is divisible by 4 + 12. Work as follows from the right side: 5 stitches in garter stitch, work rib (knit 2, purl 2) until there are 7 stitches left on the row, knit 2 and 5 stitches in garter stitch. Work this rib for 8 cm. Cast off with knit over knit and purl over purl ASSEMBLY: Sew the buttons onto the left band. Fold the neck double to the wrong side and sew down. Sew each end of the neck towards mid front. To avoid the neck being tight and rolling outwards, it is important that the seam is elastic. |
||||||||||||||||
Diagram explanations |
||||||||||||||||
|
||||||||||||||||
 |
||||||||||||||||
 |
||||||||||||||||
Have you finished this pattern?Tag your pictures with #dropspattern #swirlingsmokejacket or submit them to the #dropsfan gallery. Do you need help with this pattern?You'll find 27 tutorial videos, a Comments/Questions area and more by visiting the pattern on garnstudio.com. © 1982-2026 DROPS Design A/S. We reserve all rights. This document, including all its sub-sections, has copyrights. Read more about what you can do with our patterns at the bottom of each pattern on our site. |
||||||||||||||||


With over 40 years in knitting and crochet design, DROPS Design offers one of the most extensive collections of free patterns on the internet - translated to 17 languages. As of today we count 324 catalogues and 12290 patterns translated into English (UK/cm).
We work hard to bring you the best knitting and crochet have to offer, inspiration and advice as well as great quality yarns at incredible prices! Would you like to use our patterns for other than personal use? You can read what you are allowed to do in the Copyright text at the bottom of all our patterns. Happy crafting!
Post a comment to pattern DROPS 215-19
We would love to hear what you have to say about this pattern!
If you want to leave a question, please make sure you select the correct category in the form below, to speed up the answering process. Required fields are marked *.