
Popular categories
Looking for a yarn?


Comments / Questions (29)
![]() Käthe Segerström wrote:
Käthe Segerström wrote:
Jag vill veta hur man virkar A1 ,A2 osv?
18.03.2026 - 15:14DROPS Design answered:
Hej Käthe. Se gärna på lektionen Hur man läser virkdiagram för att lära dig hur man läser ett diagram. Vi har även flera videor som nog kan vara till hjälp. Mvh DROPS Design
20.03.2026 - 09:55
![]() Denise wrote:
Denise wrote:
Thank you for your response to my question, I understand about the chain not being tight but no where does it mention to follow a chart, it says cont (these 2 rows) till it measures 8cm so till then you are loosing approx 12 stitches every other row surely this is not correct. Maybe I should just choose a different pattern. Am I the only person that has had this problem? Any extra advice would be very welcome. Thank you
06.10.2025 - 11:39DROPS Design answered:
Dear Denise, yes, after the first row it explains to work the charts. The row where you skip stitches is the first row after the founding chain. Then, it states "Read CROCHET INFORMATION and work in the A.1 to A.3 as follows: Work A.1 over the first stitch, work A.2 until 1 stitch remains on row, finish with A.3 over the last stitch. Continue pattern back and forth like this. REMEMBER THE CROCHET TENSION! " The pattern worked is the one in charts A.1, A.2 and A.3, and you can't alternate between the charts and the row of skipped stitches, otherwise the pattern will get mismatched. So you continue with the pattern/charts only. Happy crochetting!
12.10.2025 - 21:07
![]() Denise wrote:
Denise wrote:
I have started this top 3 times now doing several rows before realising that it is getting smaller. I have re-read the pattern to make sure I am doing it right but I am still finding that each row gets shorter. I have put this down to the fact that in row 1 you do a dc into 6 chains then skip a chain and repeat, when in row 2 there is no increase to replace the missed chains, it is getting smaller. Am I doing something wrong? Can you understand my dilemma? Please help me if possible thank yo
03.10.2025 - 19:26DROPS Design answered:
Dear Denise, we usually make a long initial chain so that the edge of the garment isn't tight. So, in the next round, we skip chain stitches to have the correct number of stitches to actually work the top. So the initial chain should actually be quite loose and the following rows should have the correct width, tightening a bit the initial chain so that the edge doesn't hang too loosely. After the first row you start working the charts, so you won't skip over any chain stitches anymore and the width should remain mostly constant. If it keeps getting tighter and narrower, then the crochetting gauge is not correct. Happy crochetting!
05.10.2025 - 23:27
![]() Mirande wrote:
Mirande wrote:
Bonjour, Je ne comprends pas la lecture des A1 etc. Peut-on faire A1, A2, A3 de façon horizontale ou verticale ? De plus comment faire A1 sur la première maille puis A2 sur le reste et A3 sur la dernière. J'avais compris sur le même rang mais j'ai un doute ! Dans l'attente de votre réponse, je vous remercie, Martine.
24.04.2025 - 18:31DROPS Design answered:
Bonjour Mirande, les diagrammes se lisent à la fois fois à l'horizontale: sur l'endroit, on commence par A.1, on répète ensuite A.2 et on termine par A.3; et à la verticale: sur l'envers, on commence par A.3, on répète A.2 et on termine par A.1. On répète ainsi ces 2 rangs. Retrouvez également ici plus d'infos sur les diagrammes. Bon crochet!
25.04.2025 - 07:32
![]() Farah wrote:
Farah wrote:
Guten Tag, Weshalb wird der Faden am Rücken nach einer gewissen Höhe abgeschnitten und vernäht, um dann mittig weiter zu häkeln? Weshalb nicht einfach weiter nach oben häkeln und an den Seiten so viel wie nötig abnehmen? Danke.
10.11.2024 - 04:36DROPS Design answered:
Liebe Farah, für den Halsausschnitt wird man jede Schulter separat häkeln, so eine nach der andere; wenn die erste Schulter fertig ist, wird man die 2. Schulter häkeln, die Maschen die dazwischen nicht gehäkelt werden, sind dann den Halsausschnitt. Viel Spaß beim Häkeln!
11.11.2024 - 09:00
![]() Furlan Marta wrote:
Furlan Marta wrote:
Chiedo cortesemente dove si trovano i diagrammi ai quali si fa riferimento nelle indicazioni di svolgimento del lavoro. Grazie
03.08.2024 - 14:26DROPS Design answered:
Buonasera Marta, i diagrammi si trovano in fondo alla pagina, prima dello schema delle misure. Buon lavoro!
07.08.2024 - 17:20
![]() Lene Sellæg wrote:
Lene Sellæg wrote:
Hei, jeg forstår ikke hva som menes når det står øk m 1 maske på hver side, øk slik på 7 cm totalt 3 ganger, hva menes med dette? Erdet 7 cm på radrn, eller i høyden? Og hva menes med hver side? Takk.
26.07.2024 - 16:21DROPS Design answered:
Hei Lene, Du øker hver 7. cm i høyden, på begge sider ved å hekle 2 masker i den første masken og 2 masker i den siste masken på raden. God fornøyelse!
29.07.2024 - 06:56
![]() Kaśka wrote:
Kaśka wrote:
Ile włóczki potrzebuję na ten top ?
01.07.2024 - 13:05DROPS Design answered:
Witaj Kasiu, to zależy od rozmiaru: dla rozmiarów S – M – L – XL – XXL – XXXL będziesz potrzebować odpowiednio 250-300-300-350-350-400 g włóczki Paris (czyli 5-6-6-7-7-8 motków). Pozdrawiamy!
01.07.2024 - 13:07
![]() Paula wrote:
Paula wrote:
Olá! Tenho a mesma dúvida que Silvia! Na parte em que faço os gráficos A4-A6, mesmo colocando marcadores para me certificar dos inícios de carreiras, o trabalho fica inviesado. O problema fica mais visível nas cavas. Como devo fazer para evitar esse problema?
31.12.2023 - 13:21
![]() Valerie Salain wrote:
Valerie Salain wrote:
Pourquoi la plateforme Etsy vend ce modèle?
14.05.2023 - 16:24DROPS Design answered:
Bonjour Madame Salain, merci pour votre retour; n'hésitez pas à le signaler à la plateforme Etsy, ce modèle est disponible gratuitement sur notre site. Bon crochet!
16.05.2023 - 14:09
|
||||||||||||||||||||||
White Heat#whiteheattop |
||||||||||||||||||||||
 |
 |
|||||||||||||||||||||
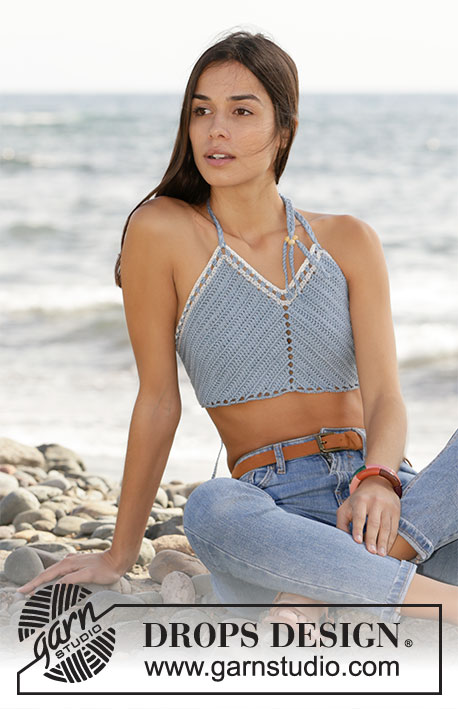
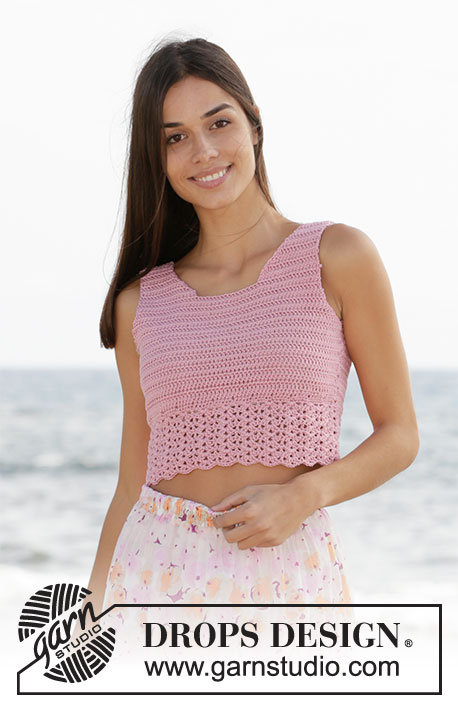
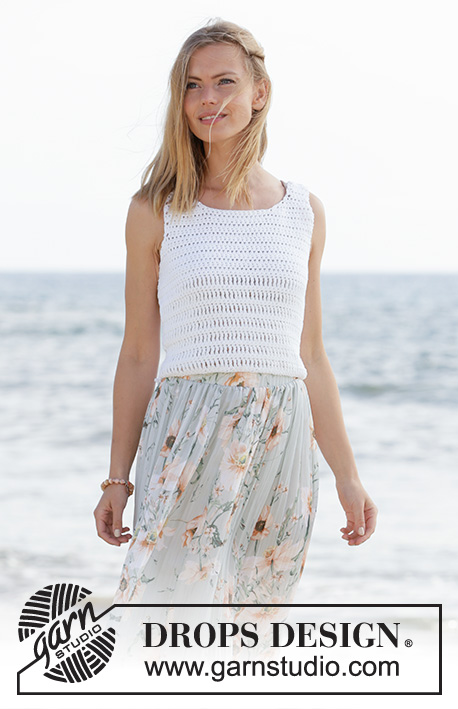
Crocheted top in DROPS Paris. Size: S - XXXL
DROPS 211-6 |
||||||||||||||||||||||
|
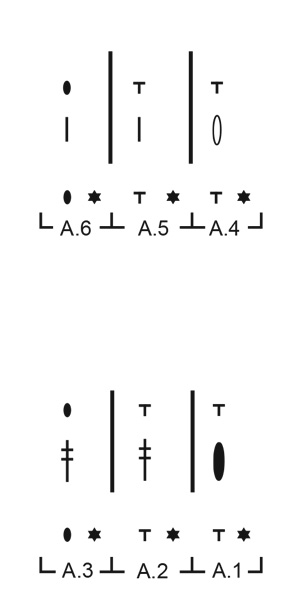
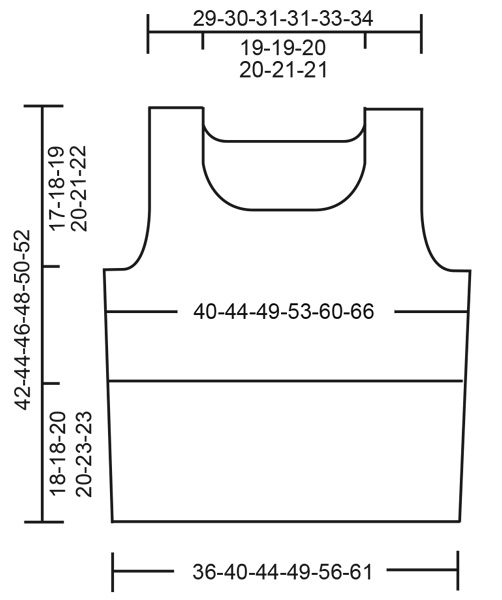
---------------------------------------------------------- EXPLANATION FOR THE PATTERN: ---------------------------------------------------------- CROCHET TIP FOR CHAIN STITCH: If you work at the end of crochet hook the chain stitch will often be too tight. 1 chain stitch should be just as long as 1 double crochet/double treble crochet/half treble crochet is wide. PATTERN. See diagrams A.1 to A.6. CROCHET INFORMATION (applies to A.1, A.3, A.4 and A.6): At the beginning of every row with double crochets, replace first double crochet with 1 chain stitch. At beginning of every row with double treble crochets replace first double treble crochet with 4 chain stitches. At the beginning of every row with half treble crochet replace first half treble crochet with 2 chain stitches. INCREASE TIP (applies to sides on back piece and front piece): Increase 1 stitch by working 2 stitches in same stitch. DECREASE TIP-1 (applies to armholes): At the beginning of row: Replace number of stitches to decrease with 1 slip stitch. At end of row: Do not work over stitches to be decreased. DECREASE TIP-2 (applies to neck at the back): Decrease 1 stitch by working the 2 outermost stitches towards the neck together as follows: Make 1 yarn over, insert hook in next stitch, get the yarn, make 1 yarn over, insert hook in next stitch, get the yarn, make 1 yarn over and pull yarn through all 5 loops on hook (= 1 half treble crochet decreased). DECREASE TIP-3 (applies to neck at the front): Decrease 2 stitches by working the 3 outermost stitches towards the neck together as follows: * Make 1 yarn over, insert hook in next stitch, get the yarn *, work from *-* 3 times in total, make 1 yarn over, and pull strand through all 7 loops on hook (= 2 half treble crochets decreased). ---------------------------------------------------------- START THE PIECE HERE: ---------------------------------------------------------- TOP - SHORT OVERVIEW OF THE PIECE: Work back piece and front piece back and forth separately, bottom up. Then sew piece together on the shoulder and in the sides. BACK PIECE: Read CROCHET TIP FOR CHAIN STITCH and work 58-65-72-79-91-100 chain stitches on hook size 5 mm with Paris. Turn and work 1 double crochet in 3rd chain stitch from hook (equals 2 double crochets), work 1 double crochet in each of the next 6-6-6-6-4-6 chain stitches, * skip 1 chain stitch, work 1 double crochet in each of the next 6 chain stitches *, work from *-* the entire row = 50-56-62-68-78-86 double crochets on row. Read CROCHET INFORMATION and work in the A.1 to A.3 as follows: Work A.1 over the first stitch, work A.2 until 1 stitch remains on row, finish with A.3 over the last stitch. Continue pattern back and forth like this. REMEMBER THE CROCHET TENSION! When piece measures 8 cm, increase 1 stitch each side - read INCREASE TIP. Increase like this every 7-7-8-8-9-9 cm 3 times in total in each side = 56-62-68-74-84-92 stitches. AT THE SAME TIME when piece measures 18-18-20-20-23-23 cm, work A.4 to A.6 as follows: Work A.4 over the first stitch, work A.5 until 1 stitch remains on row, finish with A.6 over last stitch. Continue pattern back and forth like this. Fasten off when piece measures 25-26-27-28-29-30 cm. Now cast off for armholes as explained below. Work A.4 to A.6 as before over the middle 50-56-60-66-74-80 stitches = 3-3-4-4-5-6 stitches in each side for armholes that are not worked. Read DECREASE TIP-1 and cast off for armholes in each side on every row as follows: Cast off 3 stitches 1 time, 2 stitches 1-1-2-3-4-5 times and 1 stitch 0-2-1-2-3-3 times = 40-42-44-44-46-48 stitches remain. Continue to work until piece measures 38-40-42-44-46-48 cm. Now work the shoulder over the first 8-9-9-9-9-10 stitches on row (the next 24-24-26-26-28-28 stitches are for neck, and the last 8-9-9-9-9-10 stitches are for shoulder in the other side). Read DECREASE TIP-2 and decrease 1 stitch for neck on next row with half treble crochets = 7-8-8-8-8-9 stitches remain for shoulder. Continue to work as before over these 7-8-8-8-8-9 stitches until piece measures 42-44-46-48-50-52 cm. Cut and fasten the yarn. Work the other shoulder the same way. FRONT PIECE: Begin the same way as on back piece, and work the same way as on back piece until piece measures 31-33-34-36-37-39 cm. Cut and fasten the yarn. Now work the shoulder over the first 13-14-14-14-14-15 stitches (the next 14-14-16-16-18-18 stitches are for neck, and the last 13-14-14-14-14-15 stitches are for shoulder in the other side). Read DECREASE TIP-2 and decrease 2 stitches for neck on next row with half treble crochets. Decrease like this every row with half treble crochets 3 times in total vertically = 7-8-8-8-8-9 half treble crochets remain for shoulder strap. Continue to work as before over these 7-8-8-8-8-9 stitches until piece measures 42-44-46-48-50-52 cm. Cut and fasten the yarn. Work the other shoulder the same way. ASSEMBLY: Sew the shoulder seams edge to edge with neat little stitches. Sew side seams the same way. |
||||||||||||||||||||||
Diagram explanations |
||||||||||||||||||||||
|
||||||||||||||||||||||
 |
||||||||||||||||||||||
 |
||||||||||||||||||||||
Have you finished this pattern?Tag your pictures with #dropspattern #whiteheattop or submit them to the #dropsfan gallery. Do you need help with this pattern?You'll find 9 tutorial videos, a Comments/Questions area and more by visiting the pattern on garnstudio.com. © 1982-2026 DROPS Design A/S. We reserve all rights. This document, including all its sub-sections, has copyrights. Read more about what you can do with our patterns at the bottom of each pattern on our site. |
||||||||||||||||||||||


With over 40 years in knitting and crochet design, DROPS Design offers one of the most extensive collections of free patterns on the internet - translated to 17 languages. As of today we count 324 catalogues and 12290 patterns translated into English (UK/cm).
We work hard to bring you the best knitting and crochet have to offer, inspiration and advice as well as great quality yarns at incredible prices! Would you like to use our patterns for other than personal use? You can read what you are allowed to do in the Copyright text at the bottom of all our patterns. Happy crafting!
Post a comment to pattern DROPS 211-6
We would love to hear what you have to say about this pattern!
If you want to leave a question, please make sure you select the correct category in the form below, to speed up the answering process. Required fields are marked *.