
Popular categories
Looking for a yarn?


Comments / Questions (40)
![]() Salome wrote:
Salome wrote:
Gibt es eine Anleitung zur Befestigung der Halsblende am Halsausschnitt? Woran erkenne ich die genaue Anzahl der benötigten Maschen für die Halsblende? Vielen Dank für die schöne Anleitung.
27.11.2020 - 19:30DROPS Design answered:
Liebe Sabine, die Maschen aus den Rand werden wie in diesem Video aufgefassen und an der Anschlagskante werden sie wie in diesem Video aufgefassen. Viel Spaß beim stricken!
30.11.2020 - 08:08
![]() Peggy Mendez wrote:
Peggy Mendez wrote:
When it says increase one stitch for the neck inside the stitch at the beginning of each row from the right side a total of 4 times, I'm not sure what that means. Would do 8 more rows then because I'm only increasing when I'm on the right side of the sweater? I'm confused if right side means the opposite of wrong or left. Or would I only do 4 more rows increasing and increase when I get to the end of the row.
24.11.2020 - 20:55DROPS Design answered:
Dear Peggy, yest that is exactly what it means, since you only increase on the RS rows, you have to knit 8 rows to make 4 increases. Happy Knitting!
25.11.2020 - 02:48
![]() Peggy Mendez wrote:
Peggy Mendez wrote:
Two questions: 1) When it says: Cast on 12-13 (14-14-16-17) stitches (including 1 edge stitch on each side). If I'm casting on 13, then do I cast on 15 instead? I don't know what it means by an edge stitch. 2) When it says work back and forth with circular needle, does it mean that you knit one row and then turn the needle around like you do with a regular needle? Or do you pull the stitches across the circular part and then knit ? I'm confused.
21.11.2020 - 20:00DROPS Design answered:
Dear Mrs Mendez, the edge stitches are the stitches for the seam allowance, they are here included, this means you just cast on 13 sts as explained in 2nd size. Working back and forth means working flat, alternately from RS and from WS. Happy knitting!
23.11.2020 - 08:46
![]() Peggy wrote:
Peggy wrote:
When knitting the right shoulder it says to "lay the piece to one side". Does that mean keep it on the needles but don't knit? I don't know how to cast on for the left shoulder if my yarn is still connected. Do I need 2 sets of needles?
19.11.2020 - 01:13DROPS Design answered:
Dear Peggy, it simply means put it aside. You might want to put the stitches on a spare needle, or a piece of yarn, or a stitch holder, or you might leave it on th eneedle, though this could be a bit uncomfortable. The other sleeve knit totally separately. I hope this helps. Happy knitting!
19.11.2020 - 08:00
![]() Salome wrote:
Salome wrote:
Gibt es eine Anleitung zur Befestigung der Halsblende am Halsausschnitt? Woran erkenne ich die genaue Anzahl der benötigten Maschen für die Halsblende? Vielen Dank für die schöne Anleitung.
13.11.2020 - 17:24
![]() Cristina wrote:
Cristina wrote:
Buenas, no entiendo bien cómo se hace el escote.. se hace aparte y luego se une al resto, o cómo es? Y de qué depende que sean entre 40 y 64 puntos? Muchas gracias de antemano!
13.11.2020 - 06:53DROPS Design answered:
Hola Christina! La labor se trabaja en secciones (epalda y delantero), de ida y vuelta, de arriba abajo. Las secciones se cosen juntas. El escote se trabaja en redondo con las agujas doble punta. Tienes que levantar puntos alrededor del escote, mira el video AQUI. Buen trabajo!
19.11.2020 - 11:36
![]() Felicity wrote:
Felicity wrote:
I have a pattern for a knit jacket in Chunky how do I convert to double knit
16.09.2020 - 14:39DROPS Design answered:
Dear Felicity, we are unfortunately not able to adapt every pattern to every single request, please contact the store where you bought the yarn and/or any knitting forum for any individual assistance; Thanks for your comprehension. Happy knitting!
16.09.2020 - 15:36
![]() Allison wrote:
Allison wrote:
Hi, For this pattern do you use the 5.5mm needles for the knitting tension swatch? Thanks
06.05.2020 - 01:46DROPS Design answered:
Hi Allison, Yes, you use needle size 5.5 mm for the swatch. Happy knitting!
06.05.2020 - 08:19
![]() Nathalie wrote:
Nathalie wrote:
Hej. Jag förstår tyvärr inte alls Ordningen på mönstret på Baby Blue Not på detta mönster. Vart ska man börja och i vilken ordning. Ser ut att vara en väldigt lätt tröja men fattar tyvärr inte. Tack på förhand.
20.04.2020 - 11:44DROPS Design answered:
Hej Du börjar med bakstycket där du stickas axlarna var för sig för att sedan sticka ihop dem (men maskor till hals mellan). Sedan stickar du framstycket på motsvarande sätt och till sist stickas ärmarna separat. Sedan monteras delarna ihop och till sist stickas halskanten genom att maskor plockas upp runt halsen. Lycka till!
20.04.2020 - 12:32
![]() Ingrid Borkmann wrote:
Ingrid Borkmann wrote:
Wie bekomme ich einen festen Rand. muss ich die erste Masche abheben und am Ende stricken?
20.03.2020 - 09:33DROPS Design answered:
Liebe Frau Borkmann, Sie können die Rand-Maschen kraus rechts stricken - siehe Video. Viel Spaß beim stricken!
20.03.2020 - 09:51
|
||||
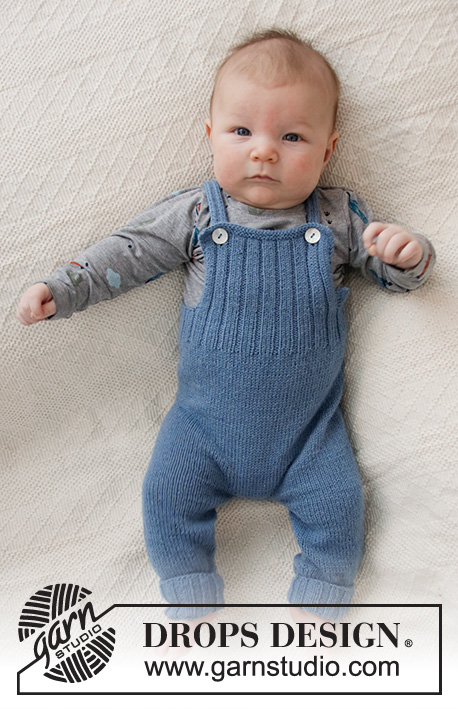
Baby Blue Note#babybluenotesweater |
||||
 |
 |
|||
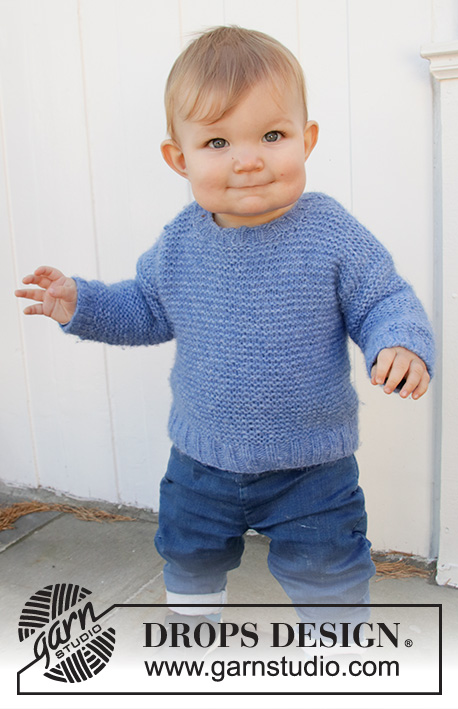
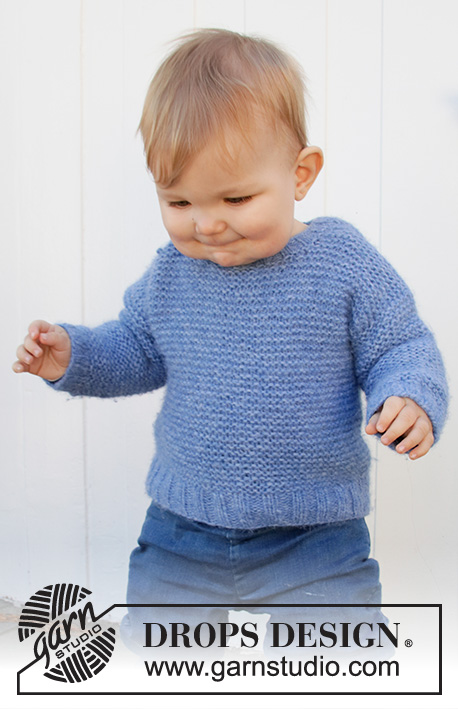
Knitted jumper for babies and children in DROPS Air. The piece is worked top down with garter stitch. Sizes 6 months – 8 years.
DROPS Baby 36-13 |
||||
|
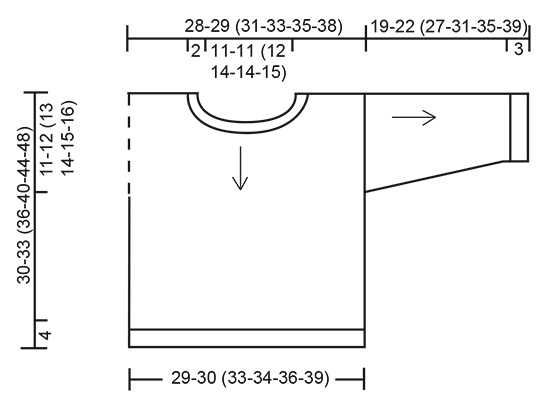
------------------------------------------------------- EXPLANATIONS FOR THE PATTERN: ------------------------------------------------------- RIDGE/GARTER STITCH (worked back and forth): Knit all rows. 1 ridge in height = Knit 2 rows. INCREASE TIP: All increases are worked from the right side! Increase by making 1 yarn over between 2 stitches. The yarn over is worked twisted on the next row. DECREASE TIP (for sleeves): All decreases are worked from the right side. Decrease 1 stitch on each side of the piece as follows: Knit 1, slip 1 stitch as if to knit, knit 1, pass the slipped stitch over the knitted stitch (= 1 stitch decreased), knit until there are 3 stitches left, knit 2 together (= 1 stitch decreased) and knit 1. CASTING-OFF TIP: To avoid the cast-off edge being tight you can cast off with a larger size needle. If the edge is still tight, make 1 yarn over after approx. each 4th stitch at the same time as casting off and the yarn overs are cast off as normal stitches. ------------------------------------------------------- START THE PIECE HERE: ------------------------------------------------------- JUMPER – SHORT OVERVIEW OF THE PIECE: The piece is worked in sections, back and forth with circular needle, top down. The sections are sewn together and the neck is worked in the round to finish. BACK PIECE – SHORT OVERVIEW: Each shoulder is worked separately, stitches are increased for the neck before joining the shoulders by casting on stitches between them. RIGHT SHOULDER: Cast on 12-13 (14-14-16-17) stitches (including 1 edge stitch on each side) with circular needle size 5.5 mm and Air. Work GARTER STITCH – read description above over. When the piece measures 3 cm, increase 1 stitch for the neck inside the 1 stitch at the beginning of the next 2 rows from the right side – read INCREASE TIP = 14-15 (16-16-18-19) stitches. REMEMBER THE KNITTING TENSION! Work the last row from the wrong side. Lay the piece to one side and work the left shoulder. LEFT SHOULDER: Cast on and work as for the right shoulder but increase 1 stitch for the neck inside the 1 stitch at the end of 2 rows from the right side. BACK PIECE: Work the left and right shoulders together from the right side as follows: Work the 14-15 (16-16-18-19) stitches from the left shoulder, cast on 18-18 (20-22-22-24) stitches for the neck and work the 14-15 (16-16-18-19) stitches from the right shoulder = 46-48 (52-54-58-62) stitches. Continue back and forth with garter stitch. When the piece measures 11-12 (13-14-15-16) cm, cast on 1 stitch for the armholes at the end of the next 2 rows = 48-50 (54-56-60-64) stitches. When the piece measures 26-29 (32-36-40-44) cm (there is 4 cm left), increase 8-6 (6-8-8-8) stitches evenly spaced on the next row from the right side = 56-56 (60-64-68-72) stitches. Change to circular needle size 4.5 mm. Work rib from the right side as follows: Work 1 edge stitch in garter stitch, * knit 2, purl 2 *, work from *-* until there are 3 stitches left and finish with knit 2 and 1 edge stitch in garter stitch. Cast off with knit when the rib measures 4 cm – read CASTING-OFF TIP. FRONT PIECE – SHORT OVERVIEW: Each shoulder is worked separately, stitches are increased for the neck before joining the shoulders by casting on stitches between them. LEFT SHOULDER: Cast on 12-13 (14-14-16-17) stitches (including 1 edge stitch on each side) with circular needle size 5.5 mm and Air. Work garter stitch. When the piece measures 3-4 (4-5-5-6) cm, increase 1 stitch for the neck inside the stitch at the beginning of each row from the right side a total of 4 times = 16-17 (18-18-20-21) stitches. Work the last row from the wrong side. The piece measures approx. 5-6 (6-7-7-8) cm. Lay the piece to one side and work the right shoulder. RIGHT SHOULDER: Cast on and work as for the left shoulder but increase1 stitch on the inside of the 1 stitch at the end of 4 rows from the right side. FRONT PIECE: Work the right and left shoulder together from the right side as follows: Work the 16-17 (18-18-20-21) stitches from the right shoulder, cast on 14-14 (16-18-18-20) stitches for the neck and work the 16-17 (18-18-20-21) stitches from the left shoulder = 46-48 (52-54-58-62) stitches. Continue back and forth with garter stitch. When the piece measures 11-12 (13-14-15-16) cm, cast on 1 stitch for the armholes at the end of the next 2 rows = 48-50 (54-56-60-64) stitches. When the piece measures 26-29 (32-36-40-44) cm (there is 4 cm left), increase 8-6 (6-8-8-8) stitches evenly spaced on the next row from the right side = 56-56 (60-64-68-72) stitches. Change to circular needle size 4.5 mm. Work rib from the right side as follows: Work 1 edge stitch in garter stitch, * purl 2, knit 2 *, work from *-* until there are 3 stitches left and finish with purl 2 and 1 edge stitch in garter stitch. Cast off with knit when the rib measures 4 cm – remember CASTING-OFF TIP. SLEEVE: The sleeves are worked back and forth, top down. Cast on 35-38 (42-45-48-51) stitches with circular needle size 5.5 mm and Air. Work garter stitch. When the piece measures 3 cm, decrease 1 stitch on each side of the piece – read DECREASE TIP. Decrease like this every 3-3 (3-4-4-4) cm a total of 4-5 (6-6-7-8) times = 27-28 (30-33-34-35) stitches. When the sleeve measures 16-19 (24-28-32-36) cm (there is 3 cm left), increase 1-0 (2-3-2-1) stitches evenly spaced = 28-28 (32-36-36-36) stitches. Change to circular needle size 4.5 mm and work rib starting from the right side (= knit 2, purl 2). Cast off with knit when the sleeve measures 19-22 (27-31-35-39) cm. Work the other sleeve in the same way. ASSEMBLY: Sew the shoulder seams. Sew in the sleeves inside the 1 edge stitch and sew the sleeve and side seams in one go, inside the 1 edge stitch. NECK: The neck is worked in the round with double pointed needles. Pick up approx. 40 to 64 stitches (make sure the number is divisible by 4) with double pointed needles size 4.5 mm and inside the 1 edge stitch. Purl 1 round, then work rib (= knit 2, purl 2). Cast off with knit when the rib measures 2 cm. |
||||
Diagram explanations |
||||
|
||||
 |
||||
Have you finished this pattern?Tag your pictures with #dropspattern #babybluenotesweater or submit them to the #dropsfan gallery. Do you need help with this pattern?You'll find 25 tutorial videos, a Comments/Questions area and more by visiting the pattern on garnstudio.com. © 1982-2026 DROPS Design A/S. We reserve all rights. This document, including all its sub-sections, has copyrights. Read more about what you can do with our patterns at the bottom of each pattern on our site. |
||||


With over 40 years in knitting and crochet design, DROPS Design offers one of the most extensive collections of free patterns on the internet - translated to 17 languages. As of today we count 324 catalogues and 12290 patterns translated into English (UK/cm).
We work hard to bring you the best knitting and crochet have to offer, inspiration and advice as well as great quality yarns at incredible prices! Would you like to use our patterns for other than personal use? You can read what you are allowed to do in the Copyright text at the bottom of all our patterns. Happy crafting!
Post a comment to pattern DROPS Baby 36-13
We would love to hear what you have to say about this pattern!
If you want to leave a question, please make sure you select the correct category in the form below, to speed up the answering process. Required fields are marked *.