
Popular categories
Looking for a yarn?


Comments / Questions (17)
![]() Siri wrote:
Siri wrote:
Im agreeing with the previous comments regarding the pattern. I have been knitting a lot of different patterns but this was so difficult to follow. I recomend you knitting this pattern only if you have done fishermans rib before.
08.02.2025 - 19:55
![]() Hanna wrote:
Hanna wrote:
Suomenkielisessä ohjeessa on myssyn osalta edelleen virhe mitoissa (eli pituutta mitattaisiin lisämerkistä, jolloin pienimmästäkin koosta tuli lähes 20cm pitkä). Englanninkieliseen versioon tämä ainakin oli korjattu.
16.11.2024 - 18:38
![]() Rachael wrote:
Rachael wrote:
This pattern is confusingly written and impossible to follow… It’s not surprising that every one of the 14 people are asking questions because the pattern makes no sense and critical information is left out…
21.09.2024 - 02:59
![]() Simona Brescacin wrote:
Simona Brescacin wrote:
Salve, sto lavorando il modello nella taglia più piccola, ma non riesco a capire come possa il lavoro misurare in totale 12 cm se questa misura la raggiungo non terminando neanche gli aumenti ( 7 volte ogni 8 ferri). Possibile che ci sia un errore di traduzione all italiano e che le diminuioni.si debbano iniziare subito e non dopo aver terminato gli aumenti? Perché per come è scritto il lavoro, anche in taglia piccola misurerebbe ben più di 20 cm..
26.03.2024 - 12:53DROPS Design answered:
Buonasera Simona, non ci sono errori nelle misure del modello. Buon lavoro!
28.03.2024 - 19:19
![]() Christine Braumandl wrote:
Christine Braumandl wrote:
Leider habe ich schon wieder ein Problem mit der Anleitung. Ich habe die Markierungsfäden gesetzt und die Zunahmen gestrickt bis 113 Maschen. Hier soll man wieder einen Markierungsfaden setzen , die Arbeit wird nun ab hier gemessen. Dann sollen sowohl Zu- wie auch Abnahmen gestrickt werden bis 13 cm ab Markierungsfaden. Die Mütze ist nun ca 23 cm lang. Das ist doch nicht richtig?
05.10.2023 - 10:58DROPS Design answered:
Liebe Frau Braumandl, die deutsche Anleitung wird hier korrigiert, man soll hier keinen Markierungsfaden setzen. Viel Spaß beim stricken!
06.10.2023 - 08:37
![]() Christine Braumandl wrote:
Christine Braumandl wrote:
Hallo, müssen die Abnahmen am 3. und 5. Markierungsfaden immer genau übereinander gemacht werden ( so wie bei den Zunahmen) oder sind diese versetzt. D.h. immer nach dem Markierungsfaden .
04.10.2023 - 13:01DROPS Design answered:
Liebe Frau Braumandl, sie sollen immer übereinander liegen, so nach jeder Abnahmen setzen Sie den Markierungsfaden richtig ein. Viel Spaß beim stricken!
04.10.2023 - 14:05
![]() Isabell wrote:
Isabell wrote:
När jag minskar på mössan sitter stickmarkören ju i maskorna. Ska jag minska efter markören eller är markören någonstans i mitten av de angivna antalet maskor? Ex. minskning vid markör 1, är det alltså maska 3 (med markör), 4, 5 som minskas, eller maska 2, 3, 4? Och samma vid markör 7, är det de tre sista maskorna på varvet eller tre maskor med markör 7 "i mitten"?
09.02.2022 - 23:26DROPS Design answered:
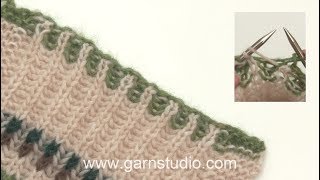
Hei Isabell. Les MINSKNINGSTIPS i begynnelsen av oppskriften. Når du feller pass på at det felles slik at den midterste patentmasken (med merke) kommer under en patentmaske, slik at patentmasken fortsetter som en "strek" nedover luen. Se på bildet (uten baby) og fellingen i høyre bilde, så ser det det godt. mvh DROPS Design
14.02.2022 - 09:43
![]() Guro wrote:
Guro wrote:
Er det riktig at det skal være 11 cm fra merket eller mer? På bildet er det bare fire runder med fellinger og det ser ut som avstanden er mye kortere enn 11 cm. Jeg tror heller ikke det er nok garn til å strikke 11 cm med fellinger og økninger. Er det ikke heller hele lengden på lua som skal være 11 cm?
02.02.2022 - 21:17DROPS Design answered:
Hei Guro. En rettelse fra september 2021 er fjernet (Sett en merketråd her...) og i den minste str. skal arb. måle ca 12 cm før det gjenstår 2 cm av arbeidet. mvh DROPS Design
07.02.2022 - 11:38
![]() Andrea wrote:
Andrea wrote:
Ich möchte die Mütze stricken. Nach dem ich 17 Maschen angeschlagen habe soll die erste Reihe des Vollpatent gestrickt werden. Hier gibt es eine separate Beschreibung. Kann es sein, dass hier etwas vergessen wurde? Müsste es nicht 1 masche rechts, 1 umschlag, eine Masche links abheben und dann den umschlag und die abgehobene masche rechts zusammenstricken sein? Sonst würde ich bereits in der 1 Reihe auf 24 Maschen zunehmen, was mit der weiteren Anleitung nicht zusammenpasst.
19.10.2021 - 15:44DROPS Design answered:
Liebe Andrea, die Umschläge vom Vollpatent werden nicht als Maschen gezählt, sie gehörten zu den jeweiligen abgehobenen Maschen, dh nach der 1. Reihe Vollpatent sind es immer noch 17 M auf der Nadel (einsch. die 7 abgehobenen Maschen und den jeweiligen Umschlag). Viel Spaß beim stricken!
20.10.2021 - 07:36
![]() Dorte wrote:
Dorte wrote:
Hej Jeg har svært ved at se, hvordan indtagningerne kommer til at se ud på huen. På højre side kommer de til at gå mod den midterste udtagning, altså “opad”, mens de på venstre side vil vende den anden vej- altså “ nedad” ???? Er det sådan det skal være? På forhånd tak
20.09.2021 - 22:22
|
|
Baby Plum#babyplumset |
|
 |
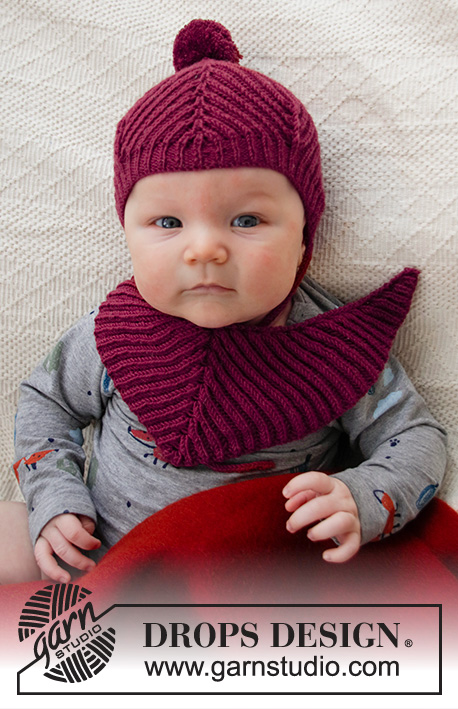 |
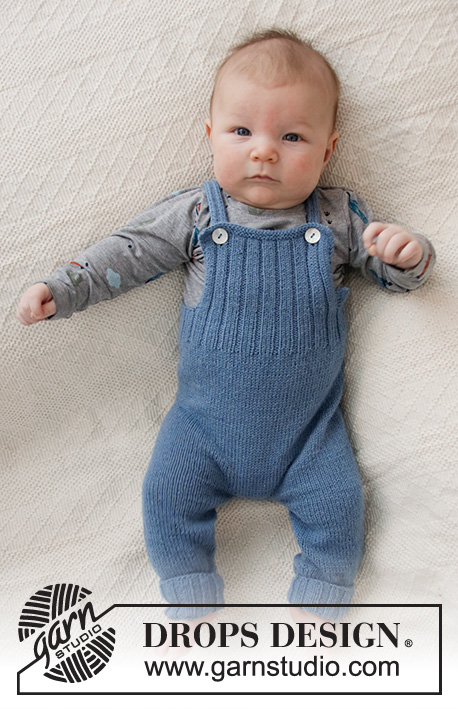
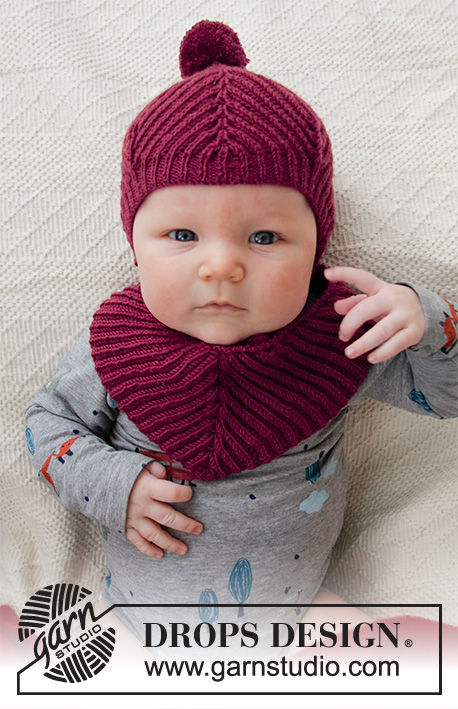
Knitted hat and bib for babies, with English rib in DROPS BabyMerino. Sizes 1 month – 4 years.
DROPS Baby 36-7 |
|
|
------------------------------------------------------- EXPLANATIONS FOR THE PATTERN: ------------------------------------------------------- RIDGE/GARTER STITCH (worked back and forth): Knit all rows. 1 ridge in height = Knit 2 rows. ENGLISH RIB- for bib: ROW 1 (= wrong side): Work 1 stitch in garter stitch, * 1 yarn over, slip 1 stitch as if to purl, knit together the yarn over and slipped stitch *, work from *-* until there are 2 stitches left, 1 yarn over, slip 1 stitch as if to purl, 1 stitch in garter stitch. ROW 2 (= right side): Work 1 stitch in garter stitch, * knit together the yarn over and slipped stitch, 1 yarn over, slip 1 stitch as if to purl *, work from *-* until there is 1 yarn over and 2 stitches left, knit together the yarn over and slipped stitch, 1 stitch in garter stitch. Repeat rows 1 and 2 onwards. INCREASE TIP-1: Work 3 stitches in the stitch and yarn over with marker thread as follows: Knit together the yarn over and slipped stitch, but do not slip them from the needle, make 1 yarn over the right needle and knit together the stitch and yarn over 1 more time, then slip the knitted stitch and yarn over you have worked in off the left needle = 3 stitches (= 2 stitches increased). On the next row (= wrong side) work the new stitches into the English rib, but the stitches are worked without yarn overs. INCREASE TIP-2: Work 5 stitches in the stitch and yarn over with marker thread as follows: Knit together the yarn over and slipped stitch, but do not slip them from the needle, * make 1 yarn over the right needle and knit together the stitch and yarn over 1 more time without slipping them from the left needle *, work from *-* a total of 2 times, then slip the knitted stitch and yarn over you have worked in off the left needle = 5 stitches (= 4 stitches increased). On the next row (= wrong side) work the new stitches into the English rib, but the stitches are worked without yarn overs. ENGLISH RIB – for hat. ROW 1 (= wrong side): Work 1 stitch in garter stitch, * knit 1, make 1 yarn over, slip 1 stitch as if to purl *, work from *-* until there are 2 stitches left, finish with knit 1 and 1 stitch in garter stitch ROW 2 (= right side): Work 1 stitch in garter stitch, * 1 yarn over, slip 1 stitch as if to purl, knit together the yarn over and slipped stitch *, work from *-* until there are 2 stitches left, finish with 1 yarn over, slip 1 stitch as if to purl, 1 stitch in garter stitch. ROW 3 (= wrong side): Work 1 stitch in garter stitch, * knit together the yarn over and slipped stitch, 1 yarn over, slip 1 stitch as if to purl,* work from *-* until there is 1 yarn over and 2 stitches left, knit together the yarn over and slipped stitch, 1 stitch in garter stitch. Repeat rows 2 and 3 onwards. DECREASE TIP: At marker thread 1 decrease as follows: Knit 3 together (yarn overs not counted as stitches, so 2 stitches decreased). At marker thread 7 decrease as follows: Slip 1 stitch, knit the next 2 stitches together, pass the slipped stitch over (yarn overs not counted as stitches, so 2 stitches decreased). At marker threads 3 and 5 decrease as follows: Work together 5 stitches and 3 yarn overs (= a total of 8 stitches) as follows: Slip the first 3 stitches and 2 yarn overs onto the right needle as if to knit together, knit together the next 2 stitches and 1 yarn over, pass the 5 slipped stitches (including yarn overs) from the right needle over the knitted together stitches (4 stitches decreased) ------------------------------------------------------- START THE PIECE HERE: ------------------------------------------------------- BIB – SHORT OVERVIEW OF THE PIECE: The piece is worked back and forth with circular needle, top down. The piece is worked with English rib and stitches are increased on each side and in the middle. BIB: Cast on 7 stitches with circular needle size 2.5 mm and Baby Merino. The first row is worked from the wrong side as follows: 1 edge stitch in garter stitch, 1 yarn over, slip 1 stitch as if to purl, knit 1, 1 yarn over, slip 1 stitch as if to purl, knit 1, 1 yarn over, slip 1 stitch as if to purl, 1 edge stitch in garter stitch. Turn the piece and insert 3 marker threads in the piece as follows (= from the right side): Marker thread 1 in the 2nd stitch, marker thread 2 in the 4th stitch and marker thread 3 in the 6th stitch. Work as follows – from the right side: 1 edge stitch in garter stitch, increase 2 stitches in the next stitch and yarn over – read INCREASE TIP-1, 1 yarn over, slip 1 stitch as if to purl, increase 4 stitches in the next stitch and yarn over – read INCREASE TIP -2, 1 yarn over, slip 1 stitch as if to purl, increase 2 stitches in the next stitch and yarn over – read INCREASE TIP -1, finish with 1 edge stitch in garter stitch = 15 stitches on the needle. After the increase the marker threads are moved; marker thread 1 is inserted in the first English rib stitch on the row (after the edge stitch), marker thread 2 is inserted in the middle stitch (middle of the 5 stitches worked in 1 stitch) and marker thread 3 is inserted in the last English rib stitch (before the edge stitch). On the next row (= wrong side) work ENGLISH RIB – read description above. The increased stitches are worked without yarn overs on the first row. Continue with English rib and increase in the sides every 4th row (marker threads 1 and 3) and every 8th row in the middle (marker thread 2). Move the marker threads after each increase, so you always increase in the middle stitch and in the stitch inside each edge stitch. When the piece measures 10-12 cm (or desired length), cast off. Fasten a button at one end of the bib (the button is buttoned through the first English rib stitch at the other end). ------------------------------------------------------- HAT – SHORT OVERVIEW OF THE PIECE: The piece is worked back and forth with circular needle, top down. HAT: Cast on 17 stitches in all sizes with circular needle size 2.5 mm and Baby Merino. Work the first row in ENGLISH RIB – read description above. Turn the piece and insert 7 marker threads as follows (without working the stitches): Marker thread 1 in the 3rd stitch, marker thread 2 in the 5th stitch, marker thread 3 in the 7th stitch, marker thread 4 in the 9th stitch, marker thread 5 in the 11th stitch, marker thread 6 in the 13th stitch, marker thread 7 in the 15th stitch. You increase in marker threads 2, 4 and 6 and, later, decrease in marker threads 1, 3, 5 and 7. Work row 2 in English rib, AT THE SAME TIME increase 4 stitches at marker threads 2, 4 and 6 – read INCREASE TIP-2 = 29 stitches. After the increases, move the marker threads to the middle of the 5 stitches worked in 1 stitch. Continue with English rib AT THE SAME TIME as you increase at these 3 marker threads. Increase every 8th row a total of 7-8-9-10-11 times = 101-113-125 (137-149) stitches. Continue with English rib but now decrease as well as increase stitches. Decrease 2 stitches at marker threads 1 and 7 and decrease 4 stitches at marker threads 3 and 5– read DECREASE TIP. Decrease and increase every 8th row; the number of stitches remains the same (decrease 12 stitches and increase 12 stitches). Continue with English rib and increases and decreases until the piece measures approx. 12-13-14 (16-17) cm, or to desired length (there is 2 cm left). Work the next row from the right side as follows: 1 edge stitch in garter stitch, * purl 1, knit together the yarn over and slipped stitch *, work from *-* until there is 1 stitch left, 1 edge stitch in garter stitch. Continue with rib (knit 1, purl 1) for 2 cm. Cast off with knit over knit and purl over purl. ASSEMBLY: Thread a strand of yarn and pull it through the cast on edge, tighten together and fasten. Sew the hat together mid-back, inside the 1 edge stitch on each side. TIES: Cast on 4 stitches with needle size 2.5 mm and Baby Merino. Work as follows: * Knit 1, take the strand to the front (towards you), slip 1 stitch as if to purl, take the strand to the back (away from you) *, work from *-* 1 more time and continue like this on all rows. This gives you a round tie. Cast off when the tie measures approx. 20-22-24 (26-28) cm. Work 1 more tie in the same way. Sew a tie to the bottom of each side of the hat. POM POM: Make a pom pom of approx. 4 cm in diameter and fasten to the top of the hat. |
|
Have you finished this pattern?Tag your pictures with #dropspattern #babyplumset or submit them to the #dropsfan gallery. Do you need help with this pattern?You'll find 15 tutorial videos, a Comments/Questions area and more by visiting the pattern on garnstudio.com. © 1982-2025 DROPS Design A/S. We reserve all rights. This document, including all its sub-sections, has copyrights. Read more about what you can do with our patterns at the bottom of each pattern on our site. |
|


With over 40 years in knitting and crochet design, DROPS Design offers one of the most extensive collections of free patterns on the internet - translated to 17 languages. As of today we count 314 catalogues and 11822 patterns translated into English (UK/cm).
We work hard to bring you the best knitting and crochet have to offer, inspiration and advice as well as great quality yarns at incredible prices! Would you like to use our patterns for other than personal use? You can read what you are allowed to do in the Copyright text at the bottom of all our patterns. Happy crafting!
Post a comment to pattern DROPS Baby 36-7
We would love to hear what you have to say about this pattern!
If you want to leave a question, please make sure you select the correct category in the form below, to speed up the answering process. Required fields are marked *.