Comments / Questions (8)
![]() Alain wrote:
Alain wrote:
Bonjour j aimerai savoir pour les diminution comment vous procédez je ne comprends pas pourriez vous m expliquer la marche a suivre merci de votre réponse
26.10.2025 - 10:20DROPS Design answered:
Bonjour Alain, les diminutions après les côtes sont à répartir à intervalles réguliers, diminuez en tricotant 2 mailles ensemble à l'endroit, pour savoir quand diminuer, utilisez la calculette que vous trouvez sous Explications ou bien cliquez sur l'icône à droite, en bas de la page. Bon tricot!
30.10.2025 - 17:33
![]() Susan Lewis-Beeching wrote:
Susan Lewis-Beeching wrote:
Could you please advise the best/ correct way to block a jumper made with Drops Snow? Should I wash in cold water and then reshape whilst damp? Or better to lightly mist or use steam iron?
24.01.2023 - 17:47DROPS Design answered:
Dear Mrs Lewis-Beeching, some knitters are used to block some others don't - but in all cases, remember to follow thoroughly the washing instructions from label/shadecard + extra infos there. Your DROPS Store might have even more advices & tips for you they will share per mail or telephone. Enjoy!
25.01.2023 - 11:33
![]() Emmi wrote:
Emmi wrote:
Hej! När man stickar fram och tillbaka på armen, börjar man i mitten utav de två understa pinnarna, med samma tråd som man använt tidigare. När jag sen maskar av så maskar jag av alla fyra tillsammans, det blev ju då ett stort hål i maskorna mellan fram och baksidan. Har jag gjort fel, eller ska det vara så?
16.01.2022 - 23:37DROPS Design answered:
Hei Emmi. Litt usikker på spørsmålet ditt, men du starter å strikke ermet rundt på settpinner der det økes på ca hver 4.-3½.-3½.-3.-2½.-2½.cm totalt 9-10-10-11-12-12 ganger = 42-44-46-48-50-52 masker. Når økningene er ferdig og ermet er strikket til det måler 47-46-45-43-41-39 cm skal det nå strikkes frem og tilbake (nå kan det strikkes med 2 pinner). Så snu arbeidet og strikk (fremdeles etter A.2) pinnen ut og snu. Strikk til ermet måler 51-50-50-48-49-47 cm, fell nå av over alle masker. mvh DROPS Design
18.01.2022 - 11:24
![]() Berit wrote:
Berit wrote:
Hejsa. Jeg er igang med ærmet og læser, at når arbejdet måler 45 cm strikkes der Frem og Tilbage - godt 5cm? Betyder det at jeg kan erstatte de 4 strømpepinde med 2 pinde? Jeg vil bare være sikker på jeg gør det rigtige og ikke misforstår opskriften. På forhånd tak..
16.11.2020 - 15:38DROPS Design answered:
Hej Berit. Ja när du stickar fram och tillbaka på ärmen så kan du byta till 2 pinde om du vill det. Mvh DROPS Design
17.11.2020 - 07:52
![]() Berit wrote:
Berit wrote:
Hejsa. Jeg er igang med ærmet og læser, at når arbejdet måler 45 cm strikkes der Frem og Tilbage - godt 5cm? Betyder det at jeg kan erstatte de 4 strømpepinde med 2 pinde? Jeg vil bare være sikker på jeg gør det rigtige og ikke misforstår opskriften. På forhånd tak..
12.11.2020 - 22:57
![]() Ella wrote:
Ella wrote:
Halløj. Kan denne strikkes uden halskanten, der er beskrevet til sidst?
05.11.2020 - 14:24DROPS Design answered:
Hei Ella. Ja, det kan den. Men om du stopper å strikke før halskanten, vil den bli ganske vid i halsen. Om du ikke ønsker det, kan du felle masker før en evnt halskant i vrangbord eller riller. God Gornøyelse!
09.11.2020 - 11:10
![]() Cynthia wrote:
Cynthia wrote:
Hallo, C+C ist auch als Möglichkeit angegeben. Wäre auch A+A+A+A möglich bzw. 4 Fäden Alpaca?
21.08.2020 - 10:29DROPS Design answered:
Liebe Cynthia, ja genau, hier lesen Sie mehr über Garnalternative. Viel Spaß beim stricken!
21.08.2020 - 13:09
![]() Lea wrote:
Lea wrote:
Bonjour, ne faut il pas changer d'aiguille pour les manches ? (8>9 après les côtes)? Merci
18.02.2020 - 08:20DROPS Design answered:
Bonjour Lea, fort probablement, nos stylistes vont vérifier les manches, mais après les côtes, vous pouvez continuer avec les aiguilles doubles pointes 9. Bon tricot!
18.02.2020 - 10:26
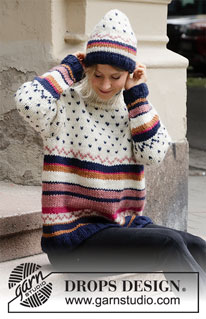
Winter Sunset#wintersunsetsweater |
||||||||||
 |
 |
|||||||||
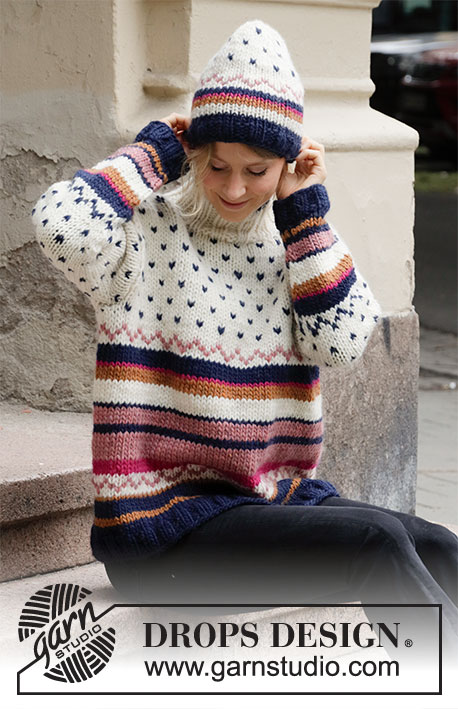
Knitted jumper in DROPS Snow. Piece is knitted with stripes and multicoloured pattern. Size: S - XXXL
DROPS 206-42 |
||||||||||
|
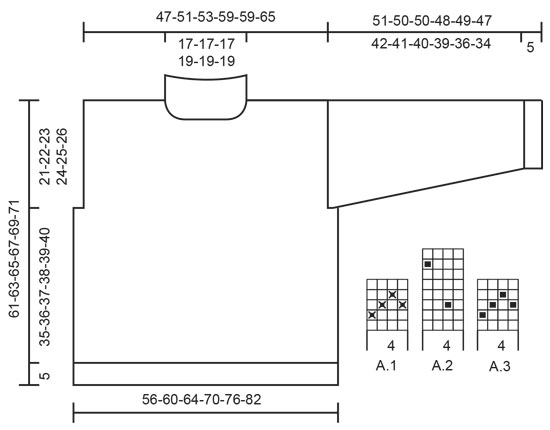
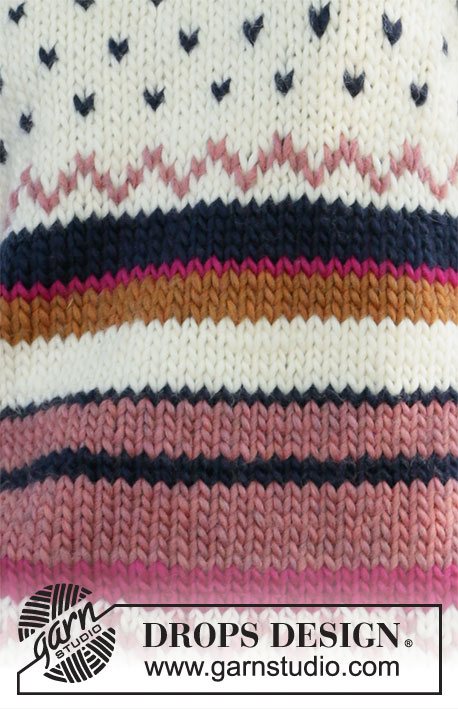
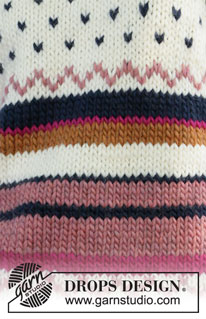
---------------------------------------------------------- EXPLANATION FOR THE PATTERN: ---------------------------------------------------------- GARTER STITCH (back and forth): Knit all rows. 1 ridge vertically = knit 2 rows. PATTERN: See diagrams A.1 to A.3. Work all stiches in diagrams in stocking stitch. DECREASE TIP (evenly): To calculate how to decrease evenly, use the total number of stitches on row (e.g. 136 stitches) and divide stitches by number of decreases to be done (e.g. 24) = 5.6. In this example decrease by knitting alternately every 4th and 5th stitch and every 5th and 6th stitch together. STRIPES BODY: STRIPE 1: Continue with navy blue until piece measures 7-7-8-8-9-9 cm in total from cast-on edge (including rib). STRIPE 2: Work 2 rows with copper. STRIPE 3: Work 4 rows with navy blue. STRIPE 4: Work 1 row with copper. STRIPE 5: Work pattern A.1. STRIPE 6: Work 3 rows with hot pink. STRIPE 7: Work 6 rows with mauve. STRIPE 8: Work 2 rows with navy blue. STRIPE 9: Work 4 rows with mauve. STRIPE 10: Work 1 row with navy blue. STRIPE 11: Work 5 rows with off white. STRIPE 12: Work 3 rows with copper. STRIPE 13: Work 1 row with hot pink. STRIPE 14: Work 4 rows with navy blue. STRIPE 15: Work pattern A.1. STRIPES SLEEVE: STRIPE 1: Continue with navy blue until piece measures 6 cm in total from cast-on edge (including rib at the bottom). STRIPE 2: Work 2 rows with copper. STRIPE 3: Work 2 rows with navy blue. STRIPE 4: Work 4 rows with mauve. STRIPE 5: Work 1 row with navy blue. STRIPE 6: Work 5 rows with off white. STRIPE 7: Work 3 rows with copper. STRIPE 8: Work 1 row with hot pink. STRIPE 9: Work 4 rows with navy blue. STRIPE 10: Work pattern A.3. Work as many stitches in pattern as there is room for on round (i.e. the pattern might not fit under sleeve). STRIPE 11: Work pattern A.2 until finished measurements. Work as many stitches in pattern as there is room for on round (i.e. the pattern might not fit under sleeve). NOTE! The dots should fit above each other vertically every other time, and when increasing stitches under sleeve, work the new stitches into pattern. INCREASE TIP (applies to sleeves): Work until 1 stitch remains before marker thread, make 1 yarn over, knit the next 2 stitches (marker thread is in the of these 2 stitches), make 1 yarn over (= 2 stitches increased). On next round knit yarn overs twisted to avoid holes. ---------------------------------------------------------- START THE PIECE HERE: ---------------------------------------------------------- JUMPER - SHORT OVERVIEW OF THE PIECE: Worked in the round on circular needle up to armhole, then work front and back piece back and forth separately. Work sleeves in the round on double pointed needles/a short circular needle. BODY: Cast on 136-144-156-168-184-196 stitches on circular needle size 8 mm with navy blue. Knit 1 round. Then work rib (= knit 2/purl 2) for 5 cm. Knit 1 round while decreasing 24-24-28-28-32-32 stitches evenly - read DECREASE TIP = 112-120-128-140-152-164 stitches. Switch to circular needle size 9 mm. Now work stocking stitches and STRIPES BODY - read explanation above. REMEMBER THE KNITTING TENSION! When stripes have been worked vertically, work pattern A.2 in the round on round. When piece measures 40-41-42-43-44-45 cm, work next round as follows: Cast off the first 3-3-5-5-7-7 stitches for armhole, work A.2 as before over the next 49-53-55-61-61-67 stitches before slipping them on a stitch holder (= back piece), cast off the next 7-7-9-9-15-15 stitches for armhole, work A.2 as before over the next 49-53-55-61-61-67 stitches (= front piece), cast off the last 4-4-4-4-8-8 stitches on round. Cut the yarn. Then finish front and back piece separately. FRONT PIECE: = 49-53-55-61-61-67 stitches. Continue back and forth with A.2 as before and work 1 edge stitch in GARTER STITCH – read explanation above, in each side. If a dot is inside edge stitch in garter stitch in each side, work this stitch in off white. When piece measures 53-55-56-58-59-61 cm, slip the middle 9-9-9-11-11-11 stitches on a stitch holder for neck and finish each shoulder separately. Then cast off on every row from neck as follows: Cast off 2 stitches 1 time and 1 stitch 2 times = 16-18-19-21-21-24 stitches. Continue to work until piece measures 61-63-65-67-69-71 cm in total (armhole measures approx. 21-22-23-24-25-26 cm from where stitches were cast off) – adjust to finish after a row with off white in diagram. Cast off. Work the other shoulder the same way. BACK PIECE: Slip the 49-53-55-61-61-67 stitches from stitch holder back on circular needle size 9 mm. Continue back and forth with A.2 as before and work 1 edge stitch in garter stitch in each side. If a dot is inside edge stitch in garter stitch in each side, work this stitch in off white. When piece measures 59-61-63-65-67-69 cm, cast off the middle 15-15-15-17-17-17 stitches on needle for neck. Then cast off 1 stitch on next row from the neck = 16-18-19-21-21-24 stitches. Continue to work until piece measures 61-63-65-67-69-71 cm in total (armhole measures approx. 21-22-23-24-25-26 cm from where stitches were cast off) – adjust to finish after a row with off white in diagram. Cast off. Work the other shoulder the same way. SLEEVE: Cast on 28-28-32-32-32-36 stitches on double pointed needles size 8 mm with navy blue. Knit 1 round. Then work rib (= knit 2/purl 2) for 5 cm. Knit 1 round while decreasing 4-4-6-6-6-8 stitches evenly = 24-24-26-26-26-28 stitches. Change to double pointed needles size 9 and insert a marker thread at beginning of round. Work STRIPES SLEEVE - see explanation above. When sleeve measures 11-10-9-9-9-7 cm, increase 1 stitch on each side of marker thread under sleeve – read INCREASE TIP. Increase like this approx. every 4-3½-3½-3-2½-2½ cm 9-10-10-11-12-12 times in total = 42-44-46-48-50-52 stitches. Continue to work until piece measures 47-46-45-43-41-39 cm. Then work sleeve back and forth from mid under sleeve as follows: Work pattern A.2 as before with 1 edge stitch in garter stitch in each side. If a dot is inside edge stitch in garter stitch in each side, work this stitch in off white. When sleeve measures 51-50-50-48-49-47 cm, cast off all stitches. Work the other sleeve the same way. ASSEMBLY: Sew shoulder seams inside cast-off edge. Sew sleeves in body. NECK EDGE: Pick up 52-52-56-56-60-60 stitches around the neck edge (including stitches on stitch holder) on a short circular needle size 8 mm with off white. Work rib (knit 2/purl 2) in the round for 10 cm. Switch to navy blue. Work 1 more round navy blue. Cast off stitches with knit over knit and purl over purl. |
||||||||||
Diagram explanations |
||||||||||
|
||||||||||
 |
||||||||||
Have you finished this pattern?Tag your pictures with #dropspattern #wintersunsetsweater or submit them to the #dropsfan gallery. Do you need help with this pattern?You'll find 31 tutorial videos, a Comments/Questions area and more by visiting the pattern on garnstudio.com. © 1982-2026 DROPS Design A/S. We reserve all rights. This document, including all its sub-sections, has copyrights. Read more about what you can do with our patterns at the bottom of each pattern on our site. |
||||||||||





Post a comment to pattern DROPS 206-42
We would love to hear what you have to say about this pattern!
If you want to leave a question, please make sure you select the correct category in the form below, to speed up the answering process. Required fields are marked *.