
Popular categories
Looking for a yarn?


Comments / Questions (55)
![]() Carine wrote:
Carine wrote:
Bonjour, Je tricote la taille L. Quand je finis une fois en hauteur les A.1 / A.2 / A.3, je me retrouve avec 328 mailles et non 355. Je n'ai pas fait d'erreurs dans les diagrammes. Merci de m'expliquer ou peut être mon erreur.
08.09.2022 - 16:08DROPS Design answered:
Bonjour Claire, lorsque vous avez terminé les diagrammes vous devez avoir 20 m dans A.1 et dans chaque A.2 et 21 m dans A.3, autrement dit vous avez: 7 m de bordure devant + 20 m de A.1 + 15 x 20 m de A.2 (= 300) + 21 m de A.3 + 7 m de bordure devant = 7+20+300+21+7=355 mailles, en espérant que ceci pourra vous aider. Bon tricot!
08.09.2022 - 16:29
![]() Lone wrote:
Lone wrote:
Jeg har et spørgsmål til mønster på bære stykket det ender og begynder med 2 vrang hvis jeg starter forfra der hvor jeg slutter så bliver der 4 vrang men hvis man skal strikke som mønsteret viser så bliver der 2 vrang i hver ende vh Lone tlf 51845653
06.09.2021 - 11:06
![]() Priska wrote:
Priska wrote:
Sind bei der Halsblende alle Rückreihen links zu stricken oder müssen die Maschen gestrickt werden, wie sie erscheinen, also jeweils 1 Masche links, 2 Maschen rechts?
28.07.2021 - 22:02DROPS Design answered:
Liebe Priska, bei den Rückreihen sollen die Maschen der Halsblende gestrickt, wie sie erscheinen, dh die linken Maschen stricken Sie links und die rechten Maschen stricken Sie rechts (= Bündchen wird tatsächlich bei den Rückreihen 1 Masche links, 2 Maschen rechts getrickt bzw aussehen). Viel Spaß beim stricken!
29.07.2021 - 09:12
![]() Kerstin Härlin wrote:
Kerstin Härlin wrote:
Hej igen! Jag trodde att jag löst problemet,men icke!? Jag stickar storlek L och har fastnat på rad 15! Är det fel i mönstret? Ska det vara en svart fylld prick på rad 15 i A1 precis som i A2 och A3? Om inte så får jag inte ihop det och ger upp!!! Det blir fel i rad 16 ,det blir inte 3 maskor mellan mönsterrapporterna!!! Jag ska väl sticka varannan A1 och A2 på varvet?
08.06.2021 - 09:40DROPS Design answered:
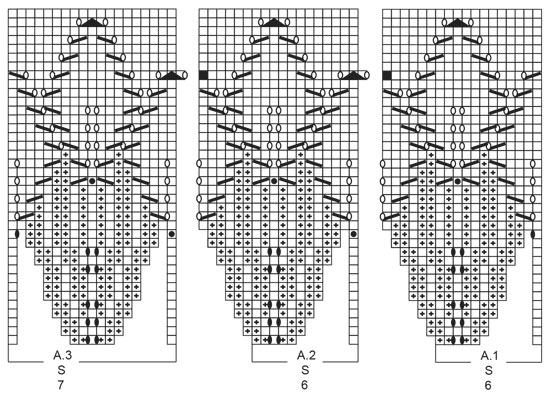
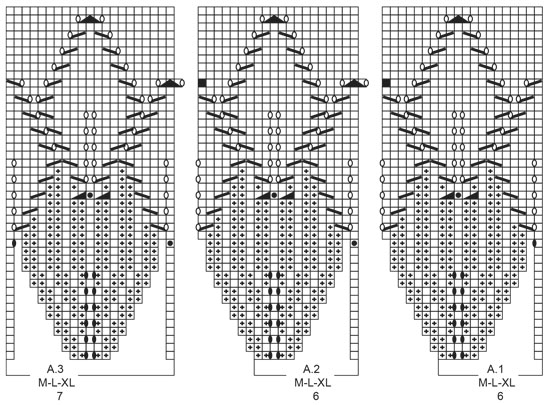
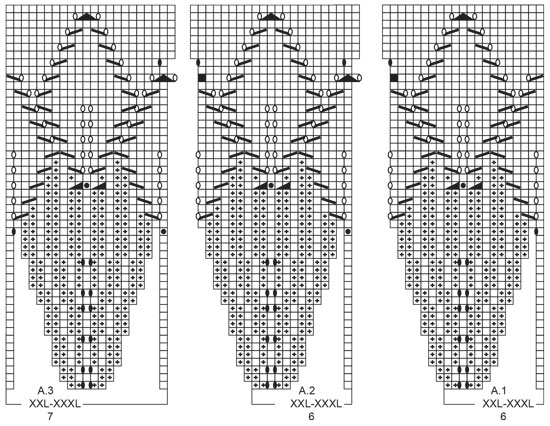
Hej Kerstin, Nej inte varannan A.1 och A.2!!! Du stickar A.1 mot kanten, här ökar du bara 1 m (rad 15). Sedan fortsätter du varvet runt med A.2 och ökar 2 m vid pricken, sist stickar du A.3 där du ökar 2 m på höger sida i diagrammet och 1 m i vänster sida av diagrammet. Du har nu 3 rm mellan varje mønsterrapport som du kan se i diagrammet på varv 16 :)
11.06.2021 - 10:56
![]() Kerstin Härlin wrote:
Kerstin Härlin wrote:
Hej igen! Jag stickar storlek L och på varv 15 i A1 är det ett omslag men i A2 en svart prick som ger 2 nya maskor, men du säger att det blir en ny maska i var sida???
28.05.2021 - 18:48DROPS Design answered:
Hei Kerstin. Ja, om du ser på diagram A.2 og rad 16, ser du at du har 1 maske mer på høyre side av diagrammet og 1 maske mer på venstre side av diagrammet. mvh DROPS design
31.05.2021 - 08:46
![]() Kerstin Härlin wrote:
Kerstin Härlin wrote:
På varv 15 i mönstret ökade mönstret med 2 maskor vid svarta pricken i varannan mönsteromgång och nu får jag inte ihop det på varv 17?! Vad gör jag för fel? Mönstret visar ju inte vad jag skall göra med de ökade maskorna!!!
27.05.2021 - 17:09DROPS Design answered:
Hej Kerstin, de 2 nye masker er tegnet med ind i diagrammet, 1 ny maske i hver side af diagrammet. Hvis du har flere spørgsmål, så husk at skrive hvilken størrelse du strikker, så er det lettere for os at tjekke diagrammet og svare korrekt :)
28.05.2021 - 14:09
![]() Kerstin Härlin wrote:
Kerstin Härlin wrote:
I första varvet på mönsterstickningen finns en blank ruta och den förstår jag,men de svarta strecken som omger den är oklar!? Ska det vara ett omslag före maskan och ett efter alltså totalt 2 omslag? Förklaringen är oklar: mellan 2 maskor görs det 1 omslag
24.05.2021 - 09:43DROPS Design answered:
Hej Kerstin. De svarta avlånga cirklarna är omslag. När det är svart cirkel, blank ruta, svart cirkel så stickar du: omslag, rätmaska (från rätsidan), omslag, dvs 2 omslag precis som du skriver. Mvh DROPS Design
24.05.2021 - 12:03
![]() Solveig B Nistad wrote:
Solveig B Nistad wrote:
Ang mønster: En oval ring mellom to masker som strikkes rett fra retten og vrangt fra vrangen. Hva betyr den ovale ringen? Skråstrek over to rette masker tegnet fra venstre nedre hjørne til høyre øvre hjørne - hva betyr det? Takknemlig for svar.
06.05.2021 - 13:28DROPS Design answered:
Hei Solveig, En åpen ring er å lage 1 kast mellom 2 masker . En strek opp fra venstre til høyre er å strikke 2 masker rett sammen. Forklaring for alle symbolene i diagrammene er ovenfor målskissen. God fornøyelse!
07.05.2021 - 07:43
![]() Monica wrote:
Monica wrote:
Salve, lo schema è pensato per la lavorazione avanti indietro tipica del cardigan? per riuscire a fare il disegno, il ferro di ritorno non dovrebbe avere i punti segnati al contrario? grazie (se a dritto faccio un diritto, al ritorno devo fare un rovescio)
14.04.2021 - 22:40DROPS Design answered:
Buonasera Monica, i diagrammi si leggono dal basso verso l'alto e da destra verso sinistra per i ferri di andata e da sinistra verso destra per quelli di ritorno. Faccia attenzione che alcuni simboli sono lavorati in modo diverso a seconda che si lavori sul diritto o sul rovescio del lavoro. Buon lavoro!
15.04.2021 - 19:31
![]() Brigitte wrote:
Brigitte wrote:
Bonjour, j’ai l’impression que le col est large et je voudrais tricoter une rehausse dos .Pourriez vous me dire où la commencer et la finir ? Merci !
12.04.2021 - 15:13DROPS Design answered:
Bonjour Brigitte, Nous ne sommes malheureusement pas en mesure de pouvoir adapter chacun de nos modèles à chaque demande.; retrouvez les mesures finales pour chaque taille dans le schéma; pour ajouter une ré-hausse, vous pouvez inspirer d'un modèle similaire de même tension, avec réhausse. Votre magasin saura vous aider, même par mail ou téléphone, pour toute assistance complémentaire. Merci pour votre compréhension. Bon tricot!
12.04.2021 - 15:52
|
|||||||||||||||||||||||||||||||
Listen to Nature Jacket#listentonaturejacket |
|||||||||||||||||||||||||||||||
 |
 |
||||||||||||||||||||||||||||||
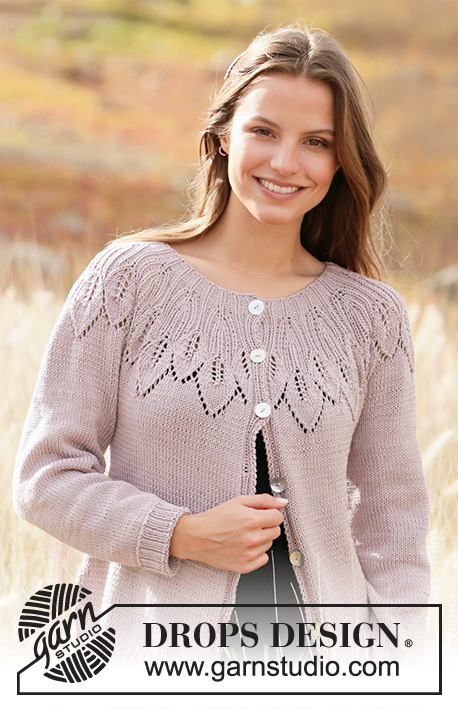
Knitted jacket with round yoke in DROPS Muskat. Piece is knitted top down with leaf pattern and lace pattern. Size: S - XXXL
DROPS 213-2 |
|||||||||||||||||||||||||||||||
|
---------------------------------------------------------- EXPLANATION FOR THE PATTERN: ---------------------------------------------------------- GARTER STITCH (back and forth): Knit all rows. 1 ridge vertically = knit 2 rows. PATTERN: See diagrams A.1 to A.3. Choose diagram for your size. Diagrams show all rows in pattern seen from the right side. INCREASE TIP (applies to sides of body): All increases are done from right side. Work until 2 stitches remain before marker thread, 1 yarn over, knit 4 (marker thread is in the middle of these stitches), 1 yarn over. On next row purl yarn overs twisted to avoid holes. Then work the new stitches in stocking stitch. DECREASE TIP (applies to sleeves): Decrease 1 stitch on each side of marker thread as follows: Work until 3 stitches remain before marker thread and knit 2 together, knit 2 (marker thread is between these stitches), slip 1 stitch knitwise, knit 1, pass slipped stitch over stitch worked. CAST-OFF TIP: To avoid a tight cast-off edge you may use a larger needle. If this also is too tight, make 1 yarn over after approx. every 4th stitch and cast off these as regular stitches. BUTTONHOLES: Decrease for buttonholes on right band (when garment is worn). Decrease from right side when 6 stitches remain on row as follows: Make 1 yarn over, knit the next 2 stitches together and work the last 4 stitches as before. On next row purl yarn over to make holes. Decrease first buttonhole when rib in neck measures approx. 1½-2 cm. Then decrease the next 6-6-6-6-7-7 buttonholes, approx. 7½-7½-8-8½-7½-7½ cm between each. ---------------------------------------------------------- START THE PIECE HERE: ---------------------------------------------------------- JACKET - SHORT OVERVIEW OF THE PIECE: Work neck edge and yoke back and forth on circular needle from mid front, top down. Now divide yoke for body and sleeves. Work body back and forth on circular needle, top down. Work sleeves in the round on double pointed needles, top down. NECK EDGE: Cast on 111-111-117-129-129-135 stitches (including 7 band stitches in each side towards mid front) on circular needle size 3 mm with Muskat. Purl 1 row (= wrong side). Work next row as follows from right side: Work 1 stitch in GARTER STITCH – see explanation above, knit 1, * purl 2, knit 1 *, work from *-* until 4 stitches remain, purl 2, knit 1 and 1 stitch in garter stitch. Decrease for BUTTONHOLES - read explanation above. When piece measures 3 cm, switch to circular needle size 4 mm. Insert 1 marker after band at the beginning of row mid front, measure yoke from this marker! YOKE: Work as follows from right side: Work 1 stitch in garter stitch, knit 1, purl 2, knit 1, purl 2 (= band), A.1 (= 6 stitches), A.2 (= 6 stitches) until 14 stitches remain (= 14-14-15-17-17-18 times in width), A.3 (= 7 stitches), and over band purl 2, knit 1, purl 2, knit 1 and 1 stitch in garter stitch. REMEMBER THE KNITTING TENSION! When A.1 to A.3 have been worked 1 time vertically, there are 303-335-355-395-431-453 stitches on needle. Piece now measures 14-16-16-16-18-18 cm from marker. Work band stitches as before and in stocking stitch over the remaining stitches. When piece measures 19-21-22-24-26-28 cm from marker, divide piece for body and sleeves as follows: Work the 7 band stitches as before, stocking stitch over the next 41-45-49-53-60-64 stitches (= front piece), slip the next 63-69-72-84-89-90 stitches on a stitch holder for sleeve and cast on 6-6-6-6-8-10 new stitches under sleeve, work in stocking stitch over the next 81-93-99-107-119-131 stitches (= back piece), slip the next 63-69-72-84-89-90 stitches on a stitch holder for sleeve and cast on 6-6-6-6-8-10 new stitches under sleeve, work 41-45-49-53-60-64 stitches in stocking stitch, and work 7 band stitches as before (= front piece). BODY: = 189-209-223-239-269-293 stitches. Insert 1 marker thread after 51-55-59-63-71-76 stitches in from each side (= in the side of body). There are 87-99-105-113-127-141 stitches between marker threads on back piece. Move the marker threads upwards when working; they should be used for increase later in the sides. Then work in stocking stitch and the 7 band stitches in each side of piece as before. When piece measures 4 cm from division, increase 1 stitch on each side of every marker thread - read INCREASE TIP (= 4 stitches increased). Increase like this every 4 cm 5-4-4-5-5-5 times in total = 209-225-239-259-289-313 stitches. When piece measures 28-28-29-29-29-29 cm from division, increase 13-12-13-14-14-14 stitches evenly = 222-237-252-273-303-327 stitches. Switch to circular needle size 3 mm and work from right side as follows: Work 1 stitch in garter stitch, work rib (= knit 1/purl 2) until 2 stitches remain, and finish with knit 1 and 1 stitch in garter stitch. Cast off by knitting from right side when rib measures 4 cm - read CAST-OFF TIP. Piece measures 32-32-33-33-33-33 cm from where it was divided. SLEEVES: Slip the 63-69-72-84-89-90 stitches from stitch holder in one side of piece on double pointed needles size 4 mm and pick in addition up 1 stitch in each of the 6-6-6-6-8-10 new stitches cast on under sleeve = 69-75-78-90-97-100 stitches. Insert 1 marker thread in the middle of the 6-6-6-6-8-10 stitches under sleeve. Move the marker upwards when working. Decrease on each side of this marker thread later. Work in stocking stitch in the round. When piece measures 2 cm, decrease 1 stitch on each side of marker thread- read DECREASE TIP (= 2 stitches decreased). Decrease like this every 3-2-2-1½-1-1 cm 11-13-14-19-21-22 times in total = 47-49-50-52-55-56 stitches. When piece measures 38-37-36-34-33-31 cm, increase 1-2-1-2-2-1 stitches evenly on next round= 48-51-51-54-57-57 stitches. Switch to double pointed needles size 3 mm and work rib in the round (= knit 1/purl 2). When rib measures 4 cm, cast off knit over knit and purl over purl. Sleeve measures 42-41-40-38-37-35 cm from division. Work the other sleeve the same way. ASSEMBLY: Sew the buttons on to the left band. |
|||||||||||||||||||||||||||||||
Diagram explanations |
|||||||||||||||||||||||||||||||
|
|||||||||||||||||||||||||||||||
 |
|||||||||||||||||||||||||||||||
 |
|||||||||||||||||||||||||||||||
 |
|||||||||||||||||||||||||||||||
 |
|||||||||||||||||||||||||||||||
Have you finished this pattern?Tag your pictures with #dropspattern #listentonaturejacket or submit them to the #dropsfan gallery. Do you need help with this pattern?You'll find 25 tutorial videos, a Comments/Questions area and more by visiting the pattern on garnstudio.com. © 1982-2026 DROPS Design A/S. We reserve all rights. This document, including all its sub-sections, has copyrights. Read more about what you can do with our patterns at the bottom of each pattern on our site. |
|||||||||||||||||||||||||||||||


With over 40 years in knitting and crochet design, DROPS Design offers one of the most extensive collections of free patterns on the internet - translated to 17 languages. As of today we count 324 catalogues and 12290 patterns translated into English (UK/cm).
We work hard to bring you the best knitting and crochet have to offer, inspiration and advice as well as great quality yarns at incredible prices! Would you like to use our patterns for other than personal use? You can read what you are allowed to do in the Copyright text at the bottom of all our patterns. Happy crafting!
Post a comment to pattern DROPS 213-2
We would love to hear what you have to say about this pattern!
If you want to leave a question, please make sure you select the correct category in the form below, to speed up the answering process. Required fields are marked *.