
Popular categories
Looking for a yarn?


Comments / Questions (55)
![]() Gail wrote:
Gail wrote:
I am working on the medium pattern. When each repeat of line 20 A2 is complete, I have 19 stitches. However. When I go to line 21, each repeat of the same section specifies 21 stitches. However do I resolve this?
25.10.2025 - 09:39
![]() Nathalie wrote:
Nathalie wrote:
Hej jag undrar hur man stickar dom 3 maskorna i samma maska från varv 15 på varv 16 mvh
27.01.2025 - 18:04
![]() Terhi wrote:
Terhi wrote:
Hei. Kuviossa A1 koko L. Rivi 15. Tuleeko kuvioon 1 lisäys? Kun silmukat lisääntyvät 2:lla seuraavalla kierroksella.(Lisäys kukan lehden varren vieressä,lisäys kuvion alussa)
01.04.2024 - 17:56DROPS Design answered:
Hei! Kuvioon tulee kaksi lisäystä. Kun neulot suljettua neuletta ensimmäinen lisäys tehdään piirroksen A.1 mukaan ja toinen lisäys tehdään piirroksen A.2 alussa.
05.04.2024 - 18:10
![]() Caroline wrote:
Caroline wrote:
Hi when I have finished the first row of pattern before last 14 I have 16 repeats including A-1. When I have completed the row I have 17 repeats, is this correct Regards Caroline
30.03.2024 - 08:35DROPS Design answered:
Dear Caroline, could you specify which size are you working?
01.04.2024 - 00:40
![]() Vaux Martine wrote:
Vaux Martine wrote:
Je vous remercie pour vos explications Bonne année à vous Amicalement
08.01.2024 - 12:52
![]() Martine Vaux wrote:
Martine Vaux wrote:
Je tricote le modèle 213 2 Je n arrive pas à commencer le Diagramme Il y a 5 mailles, Mais dans les explications de l empiècement A1 6 mailles Que veut dire les symboles,de ces premières lignes En vous remerciant
07.01.2024 - 18:57DROPS Design answered:
Bonjour Mme Vaux, notez que la 1ère maille de A.1, A.2 et A.3 doit être tricotée exactement comme indiqué dès le début (= à l'endroit, tout comme la dernière maille de A.3), comme on va augmenter au milieu de chaque diagramme, il y a un trou dans le diagramme entre la 1ère maille et les 5 suivantes (dans A.1 et A.2, les 6 suivantes dans A.3), mais vous tricotez bien ces 6 ou 7 mailles d'affilée, comme indiqué. Bon tricot!
08.01.2024 - 10:31
![]() Tineke Van Steinvoorn wrote:
Tineke Van Steinvoorn wrote:
Door elke keer na 1 x patroon een markeerdraad in te voegen wordt het heel overzichtelijk en niet moeilijk. Als je patroon klopt hoef je steken ook niet te tellen want dan heb je automatisch het juiste aantal steken
11.03.2023 - 16:34
![]() Avril wrote:
Avril wrote:
Sorry I meant the extra square on row 16. Thank you
28.02.2023 - 14:24DROPS Design answered:
Yes that's because of the increases worked on row 15 - see 6th symbol (beg of A.1 and end of A.3) and 8th symbol (beg of A.2 and A.3). Happy knitting!
28.02.2023 - 17:49
![]() Avril wrote:
Avril wrote:
Hi. I am having problems with rows 15 and 16. At the beginning of the pattern , row 1, it says to work A1 then A2 until 14 stitches remain then work A3. I have continued to work like this only using A3 for the last repeat. This seems ok but in row 17 there is an extra white square in A2 and I don’t have a corresponding stitch. Please can you advise. Thank you
28.02.2023 - 14:22DROPS Design answered:
Dear Avril, on row 15, start with A.1 and: K1, YO (increase 1 stitch) then work as before - then work (and repeat A.2): starting with work 3 sts in the same stitch (increase 2 sts = 1st of these belong to A.1, next 2 belong to A.2), then work as before to the end of diagram and repeat A.2, then work A.3 starting as A.2 working 3 sts in the same stitch (1st st belong to previous A.2, last 2 sts belong to next A.2/A.3), and increase 1 stitch before the last stitch in diagram. Hope it can help. Happy knitting!
28.02.2023 - 17:48
![]() Avril wrote:
Avril wrote:
Hi. I am really confused with rows 15 and 16. I have looked at some of your replies but I’m still lost. From the instructions at the beginning of the pattern it says to work A1 and A2 until 14 stitches remain and then work A3. So I have continued the pattern working A1 then A2 until the last repeat where I did A3. This seems to be right but when I get to row 17 there is an extra white square at the end of A2 and I do not have a corresponding stitch. Please can you help? Thank you
28.02.2023 - 14:13DROPS Design answered:
Dear Avril, you should work first A.1 then repeat A.2 until 14 sts remain and then work A.3, so that A.1 is the beginning of the pattern and A.3 the end of the pattern. Reason why on this row you will work the last stitch A.1/A.2 together with the first 2 stitches next repeat (A.2 then A.3). Happy knitting!
28.02.2023 - 17:44
|
|||||||||||||||||||||||||||||||
Listen to Nature Jacket#listentonaturejacket |
|||||||||||||||||||||||||||||||
 |
 |
||||||||||||||||||||||||||||||
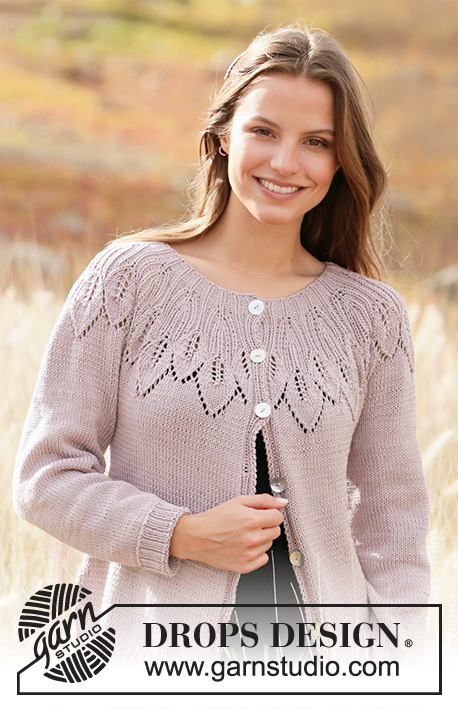
Knitted jacket with round yoke in DROPS Muskat. Piece is knitted top down with leaf pattern and lace pattern. Size: S - XXXL
DROPS 213-2 |
|||||||||||||||||||||||||||||||
|
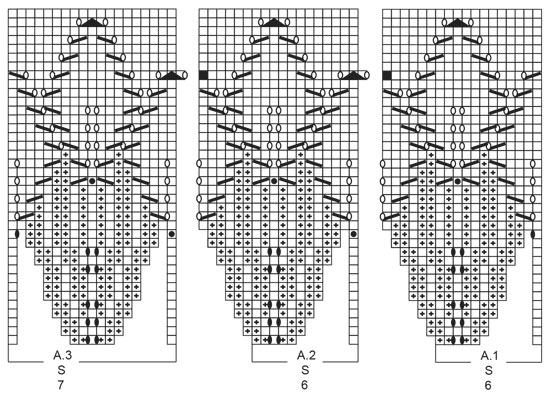
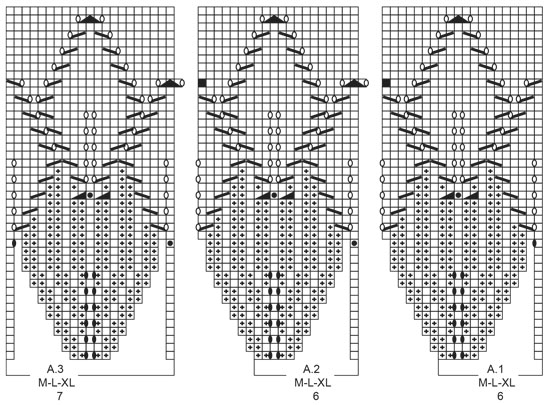
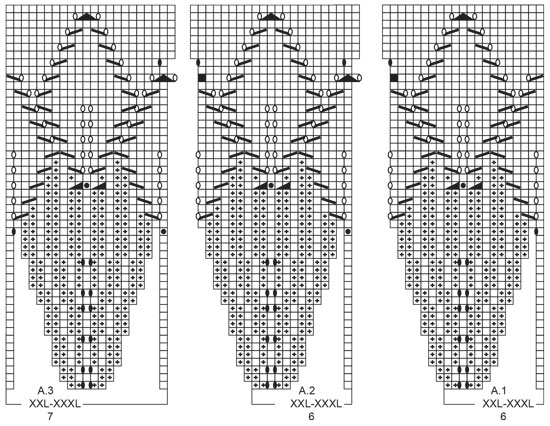
---------------------------------------------------------- EXPLANATION FOR THE PATTERN: ---------------------------------------------------------- GARTER STITCH (back and forth): Knit all rows. 1 ridge vertically = knit 2 rows. PATTERN: See diagrams A.1 to A.3. Choose diagram for your size. Diagrams show all rows in pattern seen from the right side. INCREASE TIP (applies to sides of body): All increases are done from right side. Work until 2 stitches remain before marker thread, 1 yarn over, knit 4 (marker thread is in the middle of these stitches), 1 yarn over. On next row purl yarn overs twisted to avoid holes. Then work the new stitches in stocking stitch. DECREASE TIP (applies to sleeves): Decrease 1 stitch on each side of marker thread as follows: Work until 3 stitches remain before marker thread and knit 2 together, knit 2 (marker thread is between these stitches), slip 1 stitch knitwise, knit 1, pass slipped stitch over stitch worked. CAST-OFF TIP: To avoid a tight cast-off edge you may use a larger needle. If this also is too tight, make 1 yarn over after approx. every 4th stitch and cast off these as regular stitches. BUTTONHOLES: Decrease for buttonholes on right band (when garment is worn). Decrease from right side when 6 stitches remain on row as follows: Make 1 yarn over, knit the next 2 stitches together and work the last 4 stitches as before. On next row purl yarn over to make holes. Decrease first buttonhole when rib in neck measures approx. 1½-2 cm. Then decrease the next 6-6-6-6-7-7 buttonholes, approx. 7½-7½-8-8½-7½-7½ cm between each. ---------------------------------------------------------- START THE PIECE HERE: ---------------------------------------------------------- JACKET - SHORT OVERVIEW OF THE PIECE: Work neck edge and yoke back and forth on circular needle from mid front, top down. Now divide yoke for body and sleeves. Work body back and forth on circular needle, top down. Work sleeves in the round on double pointed needles, top down. NECK EDGE: Cast on 111-111-117-129-129-135 stitches (including 7 band stitches in each side towards mid front) on circular needle size 3 mm with Muskat. Purl 1 row (= wrong side). Work next row as follows from right side: Work 1 stitch in GARTER STITCH – see explanation above, knit 1, * purl 2, knit 1 *, work from *-* until 4 stitches remain, purl 2, knit 1 and 1 stitch in garter stitch. Decrease for BUTTONHOLES - read explanation above. When piece measures 3 cm, switch to circular needle size 4 mm. Insert 1 marker after band at the beginning of row mid front, measure yoke from this marker! YOKE: Work as follows from right side: Work 1 stitch in garter stitch, knit 1, purl 2, knit 1, purl 2 (= band), A.1 (= 6 stitches), A.2 (= 6 stitches) until 14 stitches remain (= 14-14-15-17-17-18 times in width), A.3 (= 7 stitches), and over band purl 2, knit 1, purl 2, knit 1 and 1 stitch in garter stitch. REMEMBER THE KNITTING TENSION! When A.1 to A.3 have been worked 1 time vertically, there are 303-335-355-395-431-453 stitches on needle. Piece now measures 14-16-16-16-18-18 cm from marker. Work band stitches as before and in stocking stitch over the remaining stitches. When piece measures 19-21-22-24-26-28 cm from marker, divide piece for body and sleeves as follows: Work the 7 band stitches as before, stocking stitch over the next 41-45-49-53-60-64 stitches (= front piece), slip the next 63-69-72-84-89-90 stitches on a stitch holder for sleeve and cast on 6-6-6-6-8-10 new stitches under sleeve, work in stocking stitch over the next 81-93-99-107-119-131 stitches (= back piece), slip the next 63-69-72-84-89-90 stitches on a stitch holder for sleeve and cast on 6-6-6-6-8-10 new stitches under sleeve, work 41-45-49-53-60-64 stitches in stocking stitch, and work 7 band stitches as before (= front piece). BODY: = 189-209-223-239-269-293 stitches. Insert 1 marker thread after 51-55-59-63-71-76 stitches in from each side (= in the side of body). There are 87-99-105-113-127-141 stitches between marker threads on back piece. Move the marker threads upwards when working; they should be used for increase later in the sides. Then work in stocking stitch and the 7 band stitches in each side of piece as before. When piece measures 4 cm from division, increase 1 stitch on each side of every marker thread - read INCREASE TIP (= 4 stitches increased). Increase like this every 4 cm 5-4-4-5-5-5 times in total = 209-225-239-259-289-313 stitches. When piece measures 28-28-29-29-29-29 cm from division, increase 13-12-13-14-14-14 stitches evenly = 222-237-252-273-303-327 stitches. Switch to circular needle size 3 mm and work from right side as follows: Work 1 stitch in garter stitch, work rib (= knit 1/purl 2) until 2 stitches remain, and finish with knit 1 and 1 stitch in garter stitch. Cast off by knitting from right side when rib measures 4 cm - read CAST-OFF TIP. Piece measures 32-32-33-33-33-33 cm from where it was divided. SLEEVES: Slip the 63-69-72-84-89-90 stitches from stitch holder in one side of piece on double pointed needles size 4 mm and pick in addition up 1 stitch in each of the 6-6-6-6-8-10 new stitches cast on under sleeve = 69-75-78-90-97-100 stitches. Insert 1 marker thread in the middle of the 6-6-6-6-8-10 stitches under sleeve. Move the marker upwards when working. Decrease on each side of this marker thread later. Work in stocking stitch in the round. When piece measures 2 cm, decrease 1 stitch on each side of marker thread- read DECREASE TIP (= 2 stitches decreased). Decrease like this every 3-2-2-1½-1-1 cm 11-13-14-19-21-22 times in total = 47-49-50-52-55-56 stitches. When piece measures 38-37-36-34-33-31 cm, increase 1-2-1-2-2-1 stitches evenly on next round= 48-51-51-54-57-57 stitches. Switch to double pointed needles size 3 mm and work rib in the round (= knit 1/purl 2). When rib measures 4 cm, cast off knit over knit and purl over purl. Sleeve measures 42-41-40-38-37-35 cm from division. Work the other sleeve the same way. ASSEMBLY: Sew the buttons on to the left band. |
|||||||||||||||||||||||||||||||
Diagram explanations |
|||||||||||||||||||||||||||||||
|
|||||||||||||||||||||||||||||||
 |
|||||||||||||||||||||||||||||||
 |
|||||||||||||||||||||||||||||||
 |
|||||||||||||||||||||||||||||||
 |
|||||||||||||||||||||||||||||||
Have you finished this pattern?Tag your pictures with #dropspattern #listentonaturejacket or submit them to the #dropsfan gallery. Do you need help with this pattern?You'll find 25 tutorial videos, a Comments/Questions area and more by visiting the pattern on garnstudio.com. © 1982-2026 DROPS Design A/S. We reserve all rights. This document, including all its sub-sections, has copyrights. Read more about what you can do with our patterns at the bottom of each pattern on our site. |
|||||||||||||||||||||||||||||||


With over 40 years in knitting and crochet design, DROPS Design offers one of the most extensive collections of free patterns on the internet - translated to 17 languages. As of today we count 324 catalogues and 12290 patterns translated into English (UK/cm).
We work hard to bring you the best knitting and crochet have to offer, inspiration and advice as well as great quality yarns at incredible prices! Would you like to use our patterns for other than personal use? You can read what you are allowed to do in the Copyright text at the bottom of all our patterns. Happy crafting!
Post a comment to pattern DROPS 213-2
We would love to hear what you have to say about this pattern!
If you want to leave a question, please make sure you select the correct category in the form below, to speed up the answering process. Required fields are marked *.