
Popular categories
Looking for a yarn?


Comments / Questions (40)
![]() Johanna wrote:
Johanna wrote:
Ich würde den Pullover so gern stricken, habe aber Größe XS. Könntet ihr die Anleitung auch für diese Größe schreiben?
29.03.2026 - 15:08DROPS Design answered:
Liebe Johanna, hier finden Sie alle unsere Pullover für Größe XS, sicher kann das Ihnen helfen bzw inspirieren. Viel Spaß beim Stricken!
07.04.2026 - 13:06
![]() Agnieszka wrote:
Agnieszka wrote:
Hi, I am trying to use this pattern but I can not get the tension right. I am using all the reccomended yarn. I have done a swatch with 5mm, 4.5mm 4mm and 3.5mm and I can't get close, especially in hight I get too many stitches. Has anyone else found this problem? When using 4.5mm I get fewer than needed on the width and too many on hight. Do I need to block it to see the true tension ?
30.08.2025 - 09:37DROPS Design answered:
Dear Agnieszka, the gauge in width is more important that the gauge in height; most of our patterns will determine each section according to the number of cm worked, and a different gauge in height will just mean to work more rows, but the garment will have the correct shaping. Therefore, you should choose the needle size that best fit the number of stitches in the row (width). Happy knitting!
31.08.2025 - 23:20
![]() Marie-Louise wrote:
Marie-Louise wrote:
Hoe moet ik afkanten een steek links een steek rechts of gewoon rechts afkanten?
19.07.2025 - 08:24
![]() Marie-Louise wrote:
Marie-Louise wrote:
Hoe moet ik afkanten een een links ?
19.07.2025 - 08:12
![]() Andrea wrote:
Andrea wrote:
Hola! Me encanta el proyecto. Estoy por comenzarlo. No entiendo muy bien el patrón. Yo empiezo por el cuello, cambio la aguja y empiezo el canesu desde el cuello hacia abajo. Pero en el diagrama sería desde abajo para arriba verdad? Sino el dibujo me quedaría al revés. Gracias!!
20.05.2025 - 04:01DROPS Design answered:
Hola Andrea, los diagramas se leen de abajo arriba siempre (a no ser que se indique lo contrario en el patrón), y de derecha a izquierda, cuando trabajamos en redondo, por el lado derecho. La labor se trabaja de arriba abajo, desde el cuello.
25.05.2025 - 15:42
![]() Laura wrote:
Laura wrote:
Quería agradecerles por el patrón y comentarles que me quedó precioso. ¿Cómo puedo hacer para enviarles la foto?
18.05.2025 - 19:23
![]() Laura wrote:
Laura wrote:
¿ La muestra de 10 x10 se mide en Jersey común o cuando se empieza el Jacquard del canesú? Porque me dan medidas muy distintas a pesar de que trato de tejer flojo. ¡Muchas gracias!
22.04.2025 - 02:39DROPS Design answered:
Hola Laura, la muestra se trabaja en punto jersey, por separado, antes de empezar a tejer el jersey. Por lo tanto, la tensión que obtienes es solo para el punto jersey ya que en el punto jacquard, debido a los cambios de colores, la tensión acaba variando algo.
26.04.2025 - 20:19
![]() Jeanine wrote:
Jeanine wrote:
Pourquoi faut il diminuer des mailles avant de faire les côtes 1/1 sur les manches ,sur d'autres modèles il faut augmenter .
27.11.2024 - 12:05DROPS Design answered:
Bonjour Jeanine, on doit ici diminuer pour avoir la largeur souhaitée pour les manches. Le bas des manches de ce pull est légèrement bouffant (on le voit sur la 1ère photo). Bon tricot!
27.11.2024 - 13:45
![]() Marina wrote:
Marina wrote:
Hola, efectivamente, la tensión no me dió "20 puntos x 26 filas en punto jersey= 10 x 10 cm", dado que utilicé una lana mas gruesa y, al probar una aguja de menor tamaño, el tejido quedaba muy apretado, con riesgo a que luego termine apelmazándose. Entonces saqué las cuentas de cantidad de puntos de acuerdo a las medidas del patron, usando regla de tres simple, eso está correcto?, o hay otra manera de resolverlo?. Muchas gracias!
14.10.2024 - 14:27DROPS Design answered:
Hola Marina, efectivamente, si tienes una tensión diferente a la del patrón, tienes que usar una regla de tres simple, con las nuevas indicaciones para la tensión y las medidas deseadas de la prenda, y ajustar el patrón según esto.
20.10.2024 - 20:54
![]() Marina wrote:
Marina wrote:
Hola, estoy tejiendo el canesú y estoy por alcanzar los 20 cm donde debería dividir para las mangas, pero aun no termino las guardas, es decir, no terminaré A.1 antes de tener que dividir el trabajo, cómo se hace en ese caso? Gracias!
12.10.2024 - 23:49DROPS Design answered:
Hola Marina, si has mantenido la tensión indicada en filas, "20 puntos x 26 filas en punto jersey= 10 x 10 cm", deberías llegar justo a los 20 cm después de las 51 vueltas del diagrama A.1. Si no llegas significa que la tensión es incorrecta. Ten en cuenta que son 20 cm desde el marcapuntos (es decir, no incluye el cuello, solo las filas de A.1). Si quieres continuar el patrón con la tensión hasta ahora, puedes dividir el patrón para el cuerpo y las mangas y continuar con el diagrama en el cuerpo y mangas.
13.10.2024 - 23:46
|
|||||||||||||||||||
Retro beauty#retrobeautysweater |
|||||||||||||||||||
 |
 |
||||||||||||||||||
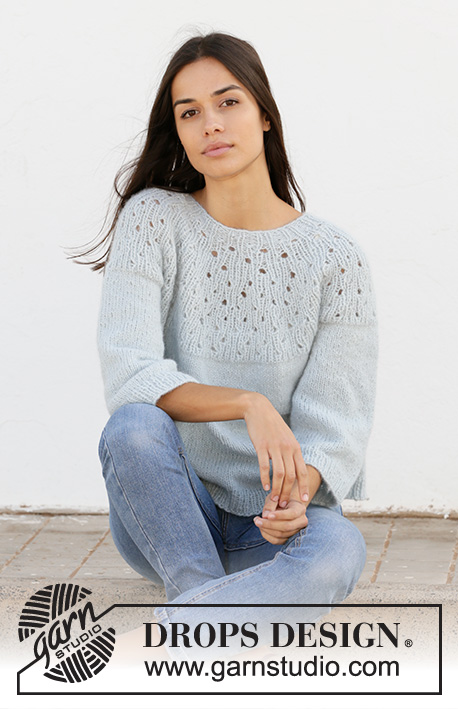
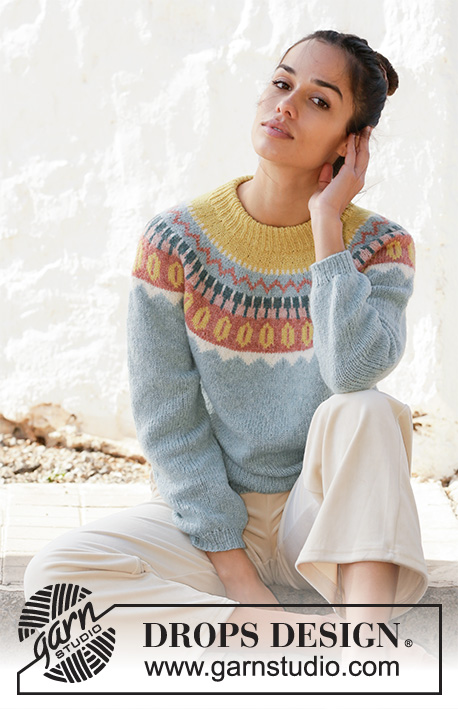
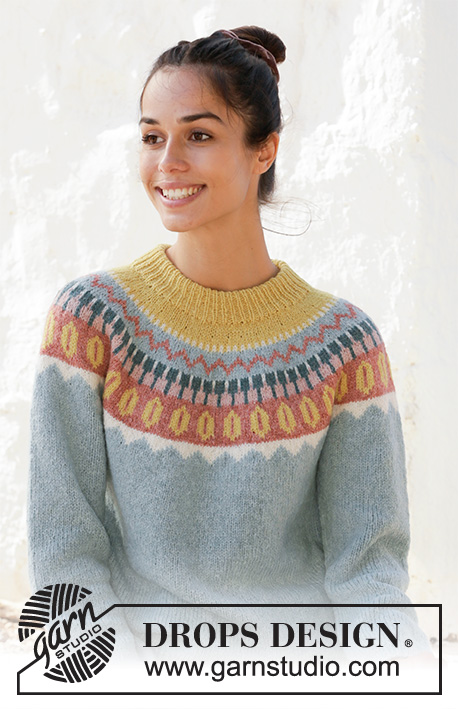
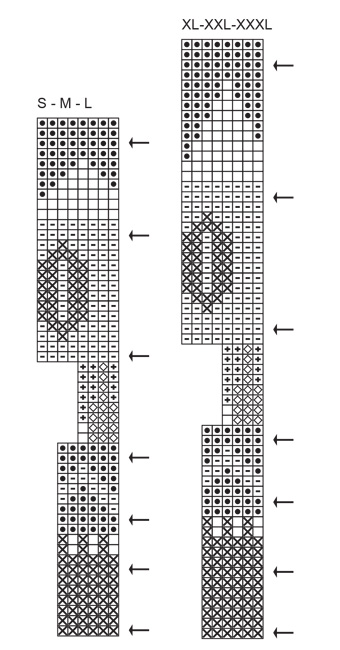
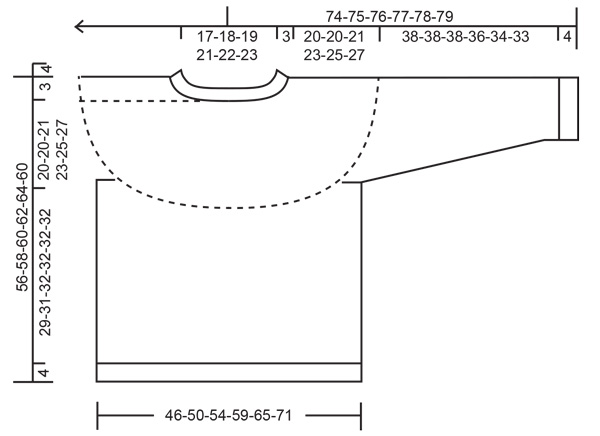
Knitted jumper with round yoke in DROPS Sky. The piece is worked top down with multi-coloured pattern. Sizes S - XXXL.
DROPS 210-6 |
|||||||||||||||||||
|
------------------------------------------------------- EXPLANATIONS FOR THE PATTERN: ------------------------------------------------------- PATTERN: See diagram A.1. The pattern is worked in stocking stitch. See diagram for your size. INCREASE/DECREASE TIP (evenly spaced): To work out how to increase/decrease evenly, count the total number of stitches on needle (e.g. 96 stitches) and divide by the number of increases/decreases to be made (e.g. 36) = 2.6. In this example, increase by making 1 yarn over after alternately each 2nd and 3rd stitch (approx.). On the next row work the yarn overs twisted to avoid holes. When decreasing, work together approx. each 2nd and 3rd stitch. DECREASE TIP (for sleeves): Decrease 1 stitch on each side of the marker thread as follows: Work until there are 3 stitches left before the marker thread, knit 2 together, knit 2 (marker thread sits between these 2 stitches), slip 1 stitch as if to knit, knit 1 and pass the slipped stitch over the knitted stitch. CASTING-OFF TIP: To avoid the cast-off edge being tight you can cast off with a larger size needle. If the edge is still tight, make 1 yarn over after approx. each 4th stitch at the same time as casting off and the yarn overs are cast off as normal stitches. ------------------------------------------------------- START THE PIECE HERE: ------------------------------------------------------- JUMPER – SHORT OVERVIEW OF THE PIECE: The neck and yoke are worked in the round with circular needle, top down from mid back. The yoke is divided for body and sleeves and the body continued in the round with circular needle. The sleeves are worked in the round with short circular needle/double pointed needles, top down. The neck is folded double and sewn down on the inside of the jumper to finish. NECK: Cast on 92-96-100-106-110-116 stitches with circular needle size 3.5 mm and lemon. Knit 1 round, then work rib (knit 1 / purl 1) for 9 cm. Insert 1 marker thread here; the piece is now measured from this thread. YOKE: Change to circular needle size 4.5 mm and continue working according to A.1. Increase evenly spaced on each round with an arrow as follows – read INCREASE/DECREASE TIP. ARROW 1: Increase 34-36-38-44-46-52 stitches = 126-132-138-150-156-168 stitches on the round. ARROW 2: Increase 36-36-36-42-42-48 stitches = 162-168-174-192-198-216 stitches on the round. ARROW 3: Increase 30-30-36-42-42-48 stitches = 192-198-210-234-240-264 stitches on the round. ARROW 4: Increase 24-30-34-38-40-40 stitches = 216-228-244-272-280-304 stitches on the round. ARROW 5: Increase 24-28-36-32-40-40 stitches = 240-256-280-304-320-344 stitches on the round. ARROW 6: Increase 24-24-24-32-32-40 stitches = 264-280-304-336-352-384 stitches on the round. ARROW 7: Increase 16-24-24-28-36-28 stitches = 280-304-328-364-388-412 stitches on the round. When A.1 has been completed 1 time in height, continue with light mint until the piece measures 20-20-21-23-25-27 cm from the marker thread. REMEMBER THE KNITTING TENSION! The next round is worked as follows: Work the first 42-46-49-54-59-64 stitches (= half back piece), place the next 56-60-66-74-76-78 stitches on a thread for the sleeve and cast on 8-8-10-10-12-14 new stitches on the needle (= in side under the sleeve), work the next 84-92-98-108-118-128 stitches (= front piece), place the next 56-60-66-74-76-78 stitches on a thread for the sleeve and cast on 8-8-10-10-12-14 new stitches on the needle (= in side under the sleeve), work the remaining 42-46-49-54-59-64 stitches (= half back piece). Body and sleeves are finished separately. THE PIECE IS NOW MEASURED FROM HERE! BODY: = 184-200-216-236-260-284 stitches. Work stocking stitch in the round with light mint. When the piece measures 29-31-32-32-32-32 cm from the division change to circular needle size 3.5 mm and work rib (= knit 1 / purl 1) for 4 cm. Cast off with knit over knit and purl over purl. Make sure the cast-off edge is not tight – read CASTING-OFF TIP. The jumper measures approx. 56-58-60-62-64-66 cm from the shoulder down. SLEEVE: Place the 56-60-66-74-76-78 stitches from the thread on the one side of the piece on short circular needle/double pointed needles size 4.5 mm and knit up 1 stitch in each of the 8-8-10-10-12-14 stitches cast on under the sleeve = 64-68-76-84-88-92 stitches. Insert a marker thread in the middle of the 8-8-10-10-12-14 stitches under the sleeve and start the round here. Work stocking stitch in the round. When the piece measures 4 cm from the division decrease 2 stitches mid under the sleeve – read DECREASE TIP. Decrease like this every 10-10-5-3-3-3 cm a total of 2-2-4-6-6-6 times = 60-64-68-72-76-80 stitches. Continue working until the piece measures 38-38-38-36-34-33 cm from the division (shorter measurements in larger sizes due to longer yoke). Knit 1 round where you decrease 16-20-20-24-24-24 stitches evenly spaced – read INCREASE/DECREASE TIP = 44-44-48-48-52-56 stitches. Change to double pointed needles size 3.5 mm and work rib (= knit 1 / purl 1) for 4 cm. The sleeve measures approx. 42-42-42-40-38-37 cm from the division. Cast off with knit over knit and purl over purl. Make sure the cast-off edge is not tight – remember CASTING-OFF TIP. ASSEMBLY: Fold the top of the rib to the inside of the neck and fasten down. To avoid the neck being tight or turning outwards, it is important that the seam is elastic and not tight. |
|||||||||||||||||||
Diagram explanations |
|||||||||||||||||||
|
|||||||||||||||||||
 |
|||||||||||||||||||
 |
|||||||||||||||||||
Have you finished this pattern?Tag your pictures with #dropspattern #retrobeautysweater or submit them to the #dropsfan gallery. Do you need help with this pattern?You'll find 25 tutorial videos, a Comments/Questions area and more by visiting the pattern on garnstudio.com. © 1982-2026 DROPS Design A/S. We reserve all rights. This document, including all its sub-sections, has copyrights. Read more about what you can do with our patterns at the bottom of each pattern on our site. |
|||||||||||||||||||


With over 40 years in knitting and crochet design, DROPS Design offers one of the most extensive collections of free patterns on the internet - translated to 17 languages. As of today we count 324 catalogues and 12290 patterns translated into English (UK/cm).
We work hard to bring you the best knitting and crochet have to offer, inspiration and advice as well as great quality yarns at incredible prices! Would you like to use our patterns for other than personal use? You can read what you are allowed to do in the Copyright text at the bottom of all our patterns. Happy crafting!
Post a comment to pattern DROPS 210-6
We would love to hear what you have to say about this pattern!
If you want to leave a question, please make sure you select the correct category in the form below, to speed up the answering process. Required fields are marked *.