
Popular categories
Looking for a yarn?


Comments / Questions (32)
![]() Diana wrote:
Diana wrote:
Hello! is this a mistake " Knit 1 stitch in stitch under next stitch? In the video the tutorial is just " knit 1 in stitch from previous round". Thank you
06.11.2024 - 01:48DROPS Design answered:
Dear Diana, that's just another way to explain how to work this stitch, but you are right, that's the tutorial in video to follow (like a fisherman's rib). Happy knitting!
06.11.2024 - 08:49
![]() Barbara wrote:
Barbara wrote:
I have never made a sweater from the neck down and need some help. My yarn that was suggested gives me 24 sts to 12 cm and I don’t know how to adjust the pattern to make the correct measurements. Right now it is huge. Can you please help me?
31.01.2023 - 19:34DROPS Design answered:
Dear Barbara, you need to calculate the pattern. You could use a rule-of-three and make calculations as described in the following lesson: https://www.garnstudio.com/lesson.php?id=25&cid=19. Happy knitting!
31.01.2023 - 22:56
![]() Carol wrote:
Carol wrote:
Is the yarn supposed to be used double? I've nearly done the small size and got loads of yarn left over. I'm an experienced knitter so know all about guage and that isn't a problem
24.04.2022 - 21:04DROPS Design answered:
Dear Carol, this is only worked with 1 thread and the amount seems to be correct. The average amount of Flora for a sweater size S would be 300 gr (which may increase depending on the length and width of sleeves, the length of the sweater, the pattern on the jumper). Happy knitting!
24.04.2022 - 22:31
![]() Jeri wrote:
Jeri wrote:
How do I change the yarn from an "A" yarn to a "B" yarn? I'd also like to change the sleeves to a short sleeve. How would I do this? Thanks for your help.
16.04.2022 - 05:26DROPS Design answered:
Dear Jeri, to use a group B yarn, you need to work a gauge and recalculate the stitches in the pattern according to your gauge, with cross-multiplication/ rule of three. To make a shorter sleeve, after the decreases of the sleeve you can work the sleeve edge, without increasing to make the trumpet sleeve. You could also work less rounds with increases, so as to have the trumpet form but in a shorter sleeve. Happy knitting!
17.04.2022 - 11:53
![]() Arlen wrote:
Arlen wrote:
Nello schema A1 deve esserci un errore all'inizio del motivo della foglia perché non è possibile fare un gettato formando il buco (pallino chiaro) se poi deve essere lavorata una maglia doppia (ripresa dal ferro sottostante). Viene fuori un pasticcio con un buco enorme che tra l'altro non risulta nemmeno sulla foto del modello. Come fare?
30.11.2021 - 09:15DROPS Design answered:
Buonasera Arlen, il diagramma A.1 è corretto, deve lavorare come indicato. Buon lavoro!
08.12.2021 - 18:27
![]() Sabrina wrote:
Sabrina wrote:
Buongiorno. Nel diagramma c'è una maglia descritta con un rombo pieno in un quadrato, mentre, nel video tutorial viene spiegata la maglia il cui simbolo è un rombo vuoto in un quadrato. Si riferiscono alla stessa tecnica o sono diverse? In cosa differiscono?
25.10.2021 - 01:03DROPS Design answered:
Buonasera Sabrina, deve seguire la legenda del diagramma riportato nel modello. Buon lavoro!
04.11.2021 - 23:43
![]() Małgorzata wrote:
Małgorzata wrote:
Udało się, zrobiłam sweter według tego wzoru. Wszystko bardzo dobrze wyjaśnione , chociaż jak zaczęłam czytać, to bałam się, że nie dam rady. Ale udało się sweter dla córki zrobiony . Dziękuję za wzór
10.03.2021 - 06:50DROPS Design answered:
Witaj Małgosiu, cieszymy się bardzo. Koniecznie zamieść zdjęcie gotowej pracy na naszej grupie DROPS Workshop na facebooku albo prześlij zdjęcie swetra do galerii dropsfan TUTAJ, abyśmy mogli wszyscy go podziwiać. Pozdrawiamy!
11.03.2021 - 08:47
![]() Essie wrote:
Essie wrote:
Ook bij de mouw: "Begin de naald bij de markeerdraad en brei in tricotsteek in de rondte": Als je de 8 steken hebt opgenomen/opgezet met een nieuwe draad, zit je draad al 4 steken voorbij de markeerdraad. Hoe moet je dit doen? (ik heb nu zowel opgenomen als gebreid (dus steek opnemen, gelijk breien, volgende steek opnemen met draad, en breien). Maar voor mijn gevoel is dit zo ingewikkeld dat als dat de bedoeling is, er zeker een video over gemaakt zou zijn. Hoe moet je dit dus doen?
30.06.2020 - 11:38DROPS Design answered:
Dag Essie,
Je hebt dan inderdaad al 4 steken voorbij het midden, waar de markeerdraad moet zitten gebreid. Na de volgende toer is het begin van de naald bij de markeerdraad.
30.06.2020 - 15:53
![]() Essie wrote:
Essie wrote:
2 vragen over het breien van de mouw, ik kan er nergens uitleg of video's over vinden: MOUW: plaats steken van hulpdraad terug, en neem 1 steek op in elk van de 8 opgezette steken onder de mouw. --> ik kan alleen iets vinden over opnemen van steken bij een afgekante rand. Werkt dat hier hetzelfde? met een nieuwe draad, en onder de steek door met je naald? Uitleg is handig, voor alle rondgebreide topdown patronen. Ik heb het zo gedaan, maar krijg wel een groot gat na de 8 opgenomen steken.
30.06.2020 - 11:37DROPS Design answered:
Dag Essie,
Na het breien van de pas heb je het werk verdeeld om eerst het lijf verder te breien. Toen heb je onder de oksel 8 steken opgezet. In deze 8 steken neem je nu weer 8 steken op, dus aan de onderkant van de mouw, in de oksel zeg maar.
30.06.2020 - 15:51
![]() Van Baelen Monique wrote:
Van Baelen Monique wrote:
Ik heb deze trui gebreid en het is een mooie geworden, eerst goed lezen en dan komt het goed. je moet alle instructies goed nalezen voor je begint; Groetjes Monique
13.04.2020 - 10:41
|
|||||||||||||||||||||||||||||||
Quiet Moments#quietmomentssweater |
|||||||||||||||||||||||||||||||
 |
 |
||||||||||||||||||||||||||||||
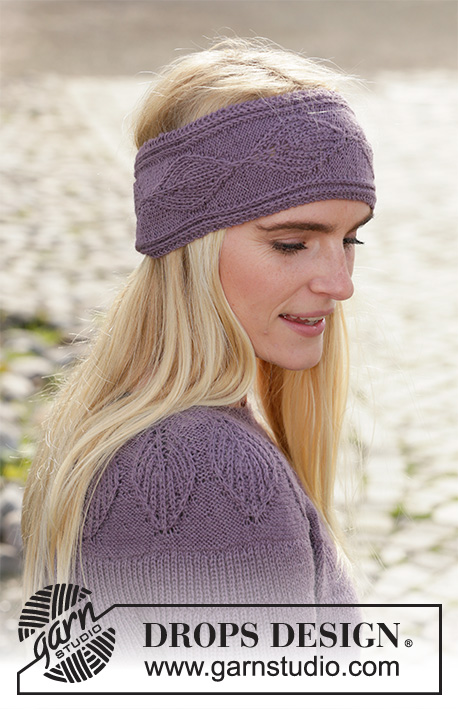
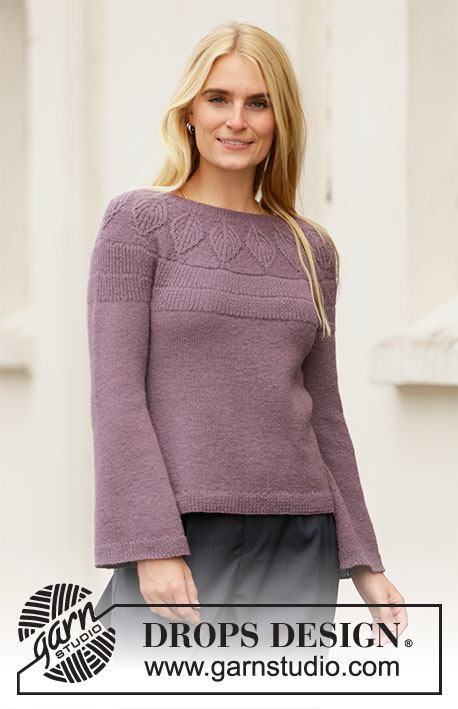
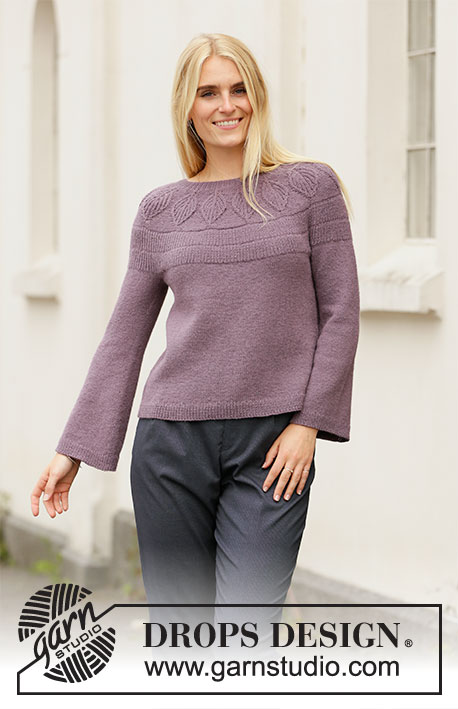
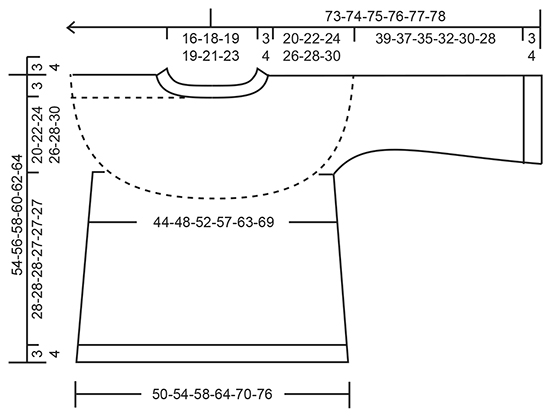
Knitted jumper in DROPS Flora. The piece is worked top down with round yoke and with rib, leaf pattern and false Fisherman’s rib on the yoke. Sizes S - XXXL.
DROPS 206-9 |
|||||||||||||||||||||||||||||||
|
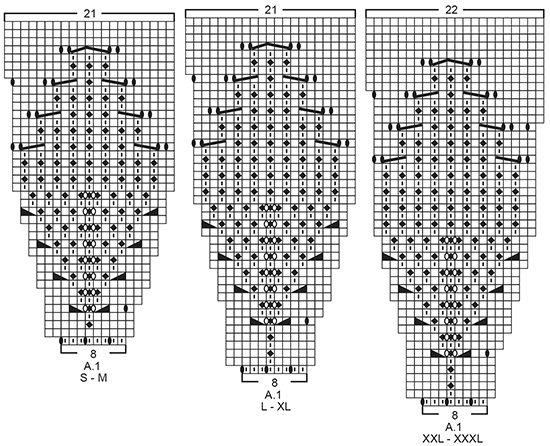
------------------------------------------------------- EXPLANATIONS FOR THE PATTERN: ------------------------------------------------------- PATTERN: See diagram A.1. Choose diagram for your size. INCREASE/DECREASE TIP (evenly spaced): To work out how to increase/decrease evenly, count the total number of stitches on needle (e.g. 273 stitches), and divide by the number of increases/decreases to be made (e.g. 59) = 4.6. In this example, increase by making 1 yarn over after alternately each 4th and 5th stitch. On the next row work the yarn overs twisted to avoid holes. When decreasing, alternately work together each 3rd and 4th stitch and each 4th and 5th stitch. INCREASE TIP (for sides of body and mid under sleeves): Start 2 stitches before the marker thread, 1 yarn over, knit 4 (marker thread sits between these 4 stitches), 1 yarn over. On the next round knit the yarn overs twisted to avoid holes. Then work the new stitches in stocking stitch. DECREASE TIP (for mid under sleeves): Start 3 stitches before the marker thread, knit 2 together, knit 2 (marker thread sits between these 2 stitches), slip 1 stitch as if to knit, knit 1 and pass the slipped stitch over the knitted stitch (= 2 stitches decreased). CASTING-OFF TIP: To avoid the cast-off edge being tight you can cast off with a larger size needle; or make 1 yarn over after approx. each 8th stitch at the same time as casting off (yarn overs cast off as normal stitches). ------------------------------------------------------- START THE PIECE HERE: ------------------------------------------------------- JUMPER – SHORT OVERVIEW OF THE PIECE: The neck and yoke are worked in the round with circular needle, top down. The yoke is divided for the body and sleeves and the body continued in the round with circular needle. The sleeves are worked in the round with double pointed needles/short circular needle, top down. NECK: Cast on 104-112-120-120-128-136 stitches with short circular needle size 2.5 mm and Flora. Knit 1 round, then work rib in the round (= knit 1 / purl 1) for 3-3-3-4-4-4 cm. When the rib is finished insert 1 marker in the middle of the round (= mid-front); the yoke is measured from here! YOKE: Change to circular needle size 3 mm and work A.1 in the round (= 13-14-15-15-16-17 repeats of 8 stitches). Continue this pattern and increase as shown in the diagram. REMEMBER THE KNITTING TENSION! When A.1 has been completed there are 273-294-315-315-352-374 stitches on the needle and the piece measures approx. 11-11-12-12-13-13 cm from the marker on the neck. Work 2 rounds of stocking stitch – AT THE SAME TIME on the last round increase 59-76-81-85-90-106 stitches evenly spaced – read INCREASE/DECREASE TIP = 332-370-396-400-442-480 stitches. Now work rib (= knit 1 / purl 1) for 3-3-4-4-5-5 cm. Then work 2 rounds of stocking stitch – AT THE SAME TIME on the last round increase 36-38-40-42-46-48 stitches evenly spaced = 368-408-436-442-488-528 stitches. Work rib (= knit 1 / purl 1) for 3-3-4-4-5-5 cm. Then knit 1 round where you decrease 46-46-42-16-34-34 stitches evenly spaced – read INCREASE/DECREASE TIP = 322-362-394-426-454-494 stitches. The piece now measures approx. 18-18-21-21-24-24 cm from the marker on the neck. Continue with stocking stitch (without increasing or decreasing), until the piece measures 20-22-24-26-28-30 cm from the marker on the neck. The yoke is now divided for body and sleeves, working the next round as follows: Work 48-53-57-63-69-76 stitches in stocking stitch (= ½ back piece), place the next 64-74-82-86-88-94 stitches on 1 thread for sleeve, cast on 8-8-10-10-12-12 new stitches on the needle (= in side under sleeve), work 97-107-115-127-139-153 stitches in stocking stitch (= front piece), place the next 64-74-82-86-88-94 stitches on 1 thread for sleeve, cast on 8-8-10-10-12-12 new stitches on the needle (= in side under sleeve) and work the remaining 49-54-58-64-70-77 stitches in stocking stitch (= ½ back piece). Cut the strand. Body and sleeves are finished separately. THE PIECE IS NOW MEASURED FROM HERE! BODY: = 210-230-250-274-302-330 stitches. Insert 1 marker thread in the middle of the 8-8-10-10-12-12 stitches under each sleeve and allow them to follow your work onwards; they will be used when increasing in the sides. Work stocking stitch in the round. When the piece measures 3-3-3-4-4-4 cm from the division increase 1 stitch on each side of both marker threads – read INCREASE TIP (= 4 stitches increased). Increase like this every 3½-3½-3½-3-3-3 cm a total of 7-7-7-8-8-8 times in each side = 238-258-278-306-334-362 stitches. Continue working until the piece measures 28-28-28-27-27-27 cm from the division (there is approx. 3-3-3-4-4-4 cm left to finished length; try the jumper on and work to desired length). Knit 1 round where you increase 64-70-74-80-88-96 stitches evenly spaced = 302-328-352-386-422-458 stitches; this is done to avoid the rib being tight. Change to circular needle size 2.5 mm and work rib (= knit 1 / purl 1) for 3-3-3-4-4-4 cm. Cast off with knit over knit and purl over purl – read CASTING-OFF TIP! The jumper measures approx. 54-56-58-60-62-64 cm from the shoulder down. SLEEVE: Place the 64-74-82-86-88-94 stitches from the thread on the one side of the piece on short circular needle size 3 mm and knit up 1 stitch in each of the 8-8-10-10-12-12 stitches cast on under the sleeve = 72-82-92-96-100-106 stitches. Insert a marker thread in the middle of the 8-8-10-10-12-12 stitches under the sleeve (allow the thread to follow your work onwards; it will be used when decreasing and increasing mid under sleeve). Start the round at the marker thread and work stocking stitch in the round. When the sleeve measures 2-2-2-2-1-1 cm from the division decrease 2 stitches under the sleeve – read DECREASE TIP. Decrease like this every 2½-1½-1-1-1-1 cm a total of 5-9-12-12-13-15 times = 62-64-68-72-74-76 stitches. When the sleeve measures 16 cm from the division in all sizes, increase 2 stitches mid under sleeve – read INCREASE TIP. Increase like this every 2-2-1½-1-1-½ cm a total of 10-11-12-12-13-14 times = 82-86-92-96-100-104 stitches. Continue working until the sleeve measures 39-37-35-32-30-28 cm from the division (there is approx. 3-3-3-4-4-4 cm left to finished length; try the jumper on and work to desired length). NOTE: Shorter measurements in larger sizes due to wider neck and longer yoke. Knit 1 round where you increase 24-26-28-28-30-32 stitches evenly spaced = 106-112-120-124-130-136 stitches. Change to short circular needle size 2.5 mm and work rib (= knit 1 / purl 1) for 3-3-3-4-4-4 cm. Cast off with knit over knit and purl over purl– remember CASTING-OFF TIP! The sleeve measures approx. 42-40-38-36-34-32 cm from the division. Work the other sleeve in the same way. |
|||||||||||||||||||||||||||||||
Diagram explanations |
|||||||||||||||||||||||||||||||
|
|||||||||||||||||||||||||||||||
 |
|||||||||||||||||||||||||||||||
 |
|||||||||||||||||||||||||||||||
Have you finished this pattern?Tag your pictures with #dropspattern #quietmomentssweater or submit them to the #dropsfan gallery. Do you need help with this pattern?You'll find 31 tutorial videos, a Comments/Questions area and more by visiting the pattern on garnstudio.com. © 1982-2026 DROPS Design A/S. We reserve all rights. This document, including all its sub-sections, has copyrights. Read more about what you can do with our patterns at the bottom of each pattern on our site. |
|||||||||||||||||||||||||||||||


With over 40 years in knitting and crochet design, DROPS Design offers one of the most extensive collections of free patterns on the internet - translated to 17 languages. As of today we count 324 catalogues and 12290 patterns translated into English (UK/cm).
We work hard to bring you the best knitting and crochet have to offer, inspiration and advice as well as great quality yarns at incredible prices! Would you like to use our patterns for other than personal use? You can read what you are allowed to do in the Copyright text at the bottom of all our patterns. Happy crafting!
Post a comment to pattern DROPS 206-9
We would love to hear what you have to say about this pattern!
If you want to leave a question, please make sure you select the correct category in the form below, to speed up the answering process. Required fields are marked *.