
Popular categories
Looking for a yarn?


Comments / Questions (166)
![]() Laurence wrote:
Laurence wrote:
Pour terminer j ai une question par rapport à l agrandissement des manches , il est noté faire deux jetés symétriques et au tour suivant faire une maille endroit pour éviter les trous mais avec des aiguilles circulaires je ne fais que des mailles endroits et il y a quand même un trou ? comment faire , en vous remerciant d avance
04.10.2020 - 11:18DROPS Design answered:
Bonjour Laurence, pour augmenter au milieu sous la manche, tricotez jusqu'à ce qu'il reste 2 mailles avant le fil marqueur (qui marque le début du tour), faites 1 jeté, tricotez 4 mailles (les 2 dernières m du tour + les 2 premières m du tour) et faites 1 jeté; au tour suivant, tricotez les jetés dans le brin arrière au lieu du brin avant pour que la maille soit torse et qu'il n'y ait pas de trou - veillez à ne pas faire vos jetés trop lâches - si vous avez toujours des trous, vous pouvez choisir d'augmenter avec une autre technique . Bon tricot!
05.10.2020 - 10:46
![]() Laurence wrote:
Laurence wrote:
De plus comment être sûre que je place la manche à l endroit et comme il faut? sur le tuto, la personne place une manche en jersey sur un point mousse , impossible de savoir s il s’agit d un point mousse ou de l envers d un jersey.
04.10.2020 - 11:15DROPS Design answered:
Bonjour Laurence, quand vous placez les mailles des manches sur la même aiguille que le dos et le devant, veillez à ce que toutes les pièces soient bien sur l'endroit (le petit "V" du jersey doit être face à vous). Vous continuez ensuite sur toutes les mailles en diminuant pour le raglan comme indiqué. Bon tricot!
05.10.2020 - 10:42
![]() Laurence wrote:
Laurence wrote:
Bonjour je souhaiterais avoir une précision sur le tricot. lorsqu’on arrive à l empiècement il est noté faire glisser les mailles de la manche sur l aiguille circulaire . faut il réellement les glisser ou les tricoter ? car sur la vidéo/ tuto vous les tricoter.
04.10.2020 - 11:15DROPS Design answered:
Bonjour Laurence, vous pouvez placer les manches sur l'aiguille circulaire, au-dessus des mailles rabattues pour les emmanchures et les tricoter ensuite ou bien les tricoter au 1er tour de l'empiècement, au choix. Bon tricot!
05.10.2020 - 12:00
![]() Maud wrote:
Maud wrote:
Hej! Jag skulle vilja göra en annan halskant än den i mönstret, dvs plocka upp maskor efter att tröjan är klar. Kan jag följa mönstret för V-ringningen ändå? Underlättar det med A2 o A3 om man ska plocka upp maskor i efterhand? Med vänlig hälsning Maud
27.09.2020 - 09:08DROPS Design answered:
Hei Maud. Du kan gjøre en annen halskant, men design avd har dessverre ikke anledning til å lage en utregning på hvor mange masker du skal plukke opp ved halskanten eller hvordan du skal gjøre det foran på V-halsen. mvh DROPS design
28.09.2020 - 17:02
![]() Sara wrote:
Sara wrote:
Buongiorno. Sto finendo il maglione. Devo rimanere con 6 maglie sui ferri davanTI dove ho il collo. Come faccio poi a ferri alterni a diminuire x un totale a lato di 12 maglie.... non le ho neppure 12 . NE HO 6. Grazie x la risposta
13.09.2020 - 17:13DROPS Design answered:
Buongiorno Sara. Per le diminuzioni per lo scollo a V, deve diminuire dopo A2 (quindi dopo le prime 4 maglie), lavora le maglie sul ferro e diminuisce prima di A3 (quindi lavora insieme le 2 m che precedono le maglie di A3). Ripete queste diminuzioni, nella stessa posizione, prima ogni 2 ferri e poi ogni 4. Buon lavoro!
14.09.2020 - 15:34
![]() Ewelina wrote:
Ewelina wrote:
Czy mogę prosić o jaśniejszy opis wykończenia dekoltu? Nic z tego nie rozumiem. Zostało mi 8 oczek na drucie pomocniczym co z nimi dalej? Najlepiej byłoby zamieścić to zakończenie na filmiku. Pozdrawiam, Ewelina Winiarska
22.06.2020 - 21:48DROPS Design answered:
Witaj Ewelino! Widzę w komentarzach, że nie tylko ty masz z tym problem :) Poprosiłam o zamieszczenie stosownego filmiku. Pozdrawiamy!
23.06.2020 - 16:32
![]() Christine wrote:
Christine wrote:
Bonjour Tout d' abord merci pour ce joli modèle Concernant l' encolure V ....après avoir tricoté A1 (2 tours), j' ai fait encore un tour et j' ai coupé le fil au milieu dos, puis j' ai recommencé côté encolure mais je me retrouve ensuite en décalage avec mes augmentations du raglan Doit on vraiment tricoter un tour après A1 (qui se fait sur 2 tours) ? Merci pour votre réponse
20.06.2020 - 14:43DROPS Design answered:
Bonjour Christine, quand le 2ème rang de A.1 est terminé, tricotez jusqu'au milieu dos = terminez le tour jusqu'au milieu dos. Puis joignez le fil en début de rang, côté encolure. Ainsi, vous n'aurez pas de décalage (la formulation a été modifiée pour être plus claire et précise). Bon tricot!
22.06.2020 - 08:10
![]() Suzy wrote:
Suzy wrote:
Bonjour, Je voudrais faire ce pull mais ne trouve plus la laine Lace, est ce normal ? Avez-vous une page qui explique quels combos (types de laines) on peut associer ?
15.06.2020 - 17:37DROPS Design answered:
Bonjour Suzy, ce modèle propose également une version en DROPS Sky, mais si vous voulez tricoter en DROPS Kid-Silk + une alternative à Lace, vous pouvez utiliser notre convertisseur - DROPS BabyAlpaca Silk a la même composition (métrage différent). Pensez toujours à bien tricoter votre échantillon au préalable. Retrouvez ici toutes les infos utiles sur les alternatives. Bon tricot!
16.06.2020 - 09:26
![]() Marie wrote:
Marie wrote:
Bonjour, je tenais à vous remercier pour votre réponse ultra rapide concernant ma question posée hier.Oui la vidéo proposée m'a grandement aidée! Je me répète peut-être, mais vous êtes vraiment un site de tricot génial! merci encore Marie
06.06.2020 - 21:34
![]() Brigitte wrote:
Brigitte wrote:
Liebe Drops, vielen Dank für Eure Unterstützung und diese super Anleitung, der Pullover ist fertig und ein Prachtsexemplar, superschön. Der Kommentar von Cornelia hat mir bei der Halsblende sehr geholfen, gerne würde ich Euch ein Foto schicken.
05.06.2020 - 07:50DROPS Design answered:
Liebe Brigitte, vielen Dank für Ihren Kommentar. Gerne können Sie Ihr Foto mit uns teilen, Senden Sie uns Ihr Link hier und/oder zeigen Sie in der DROPS Workshop. Viel Spaß beim stricken!
05.06.2020 - 07:56
|
||||||||||
December Moon#decembermoonsweater |
||||||||||
 |
 |
|||||||||
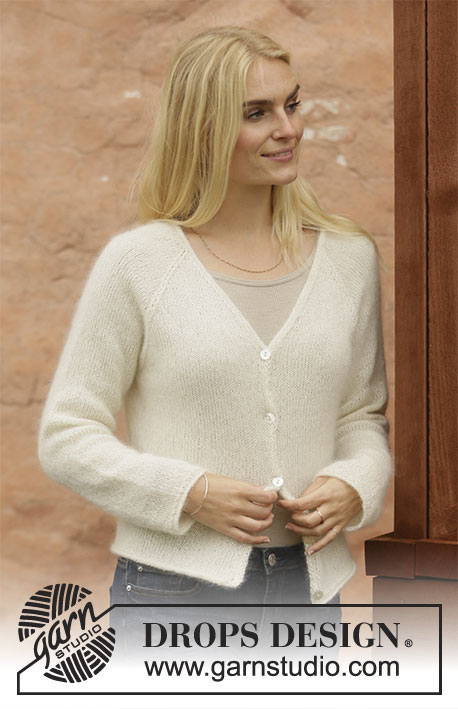
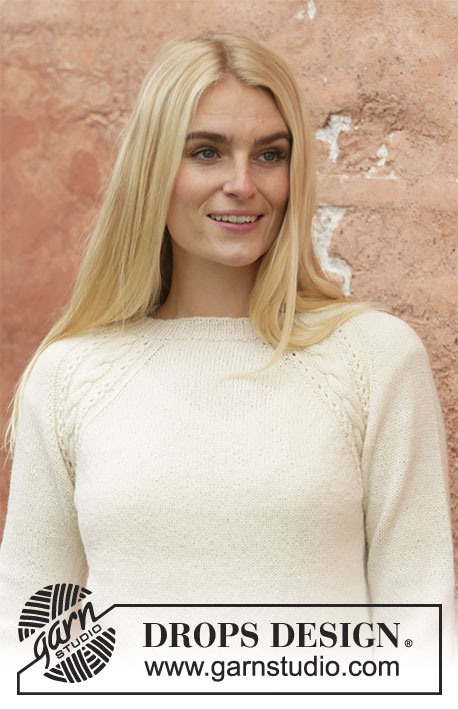
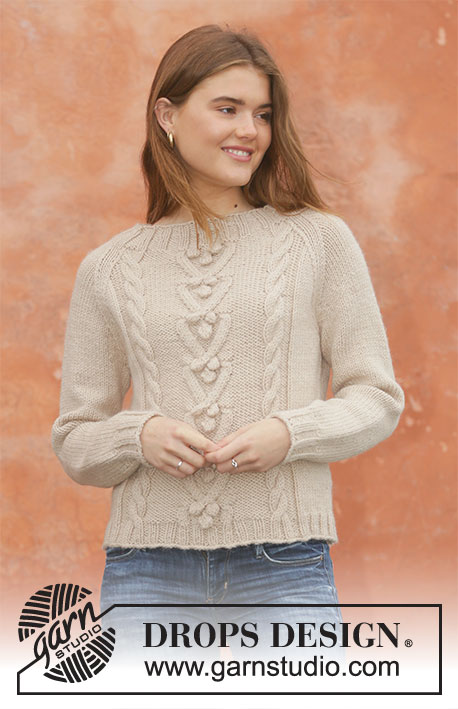
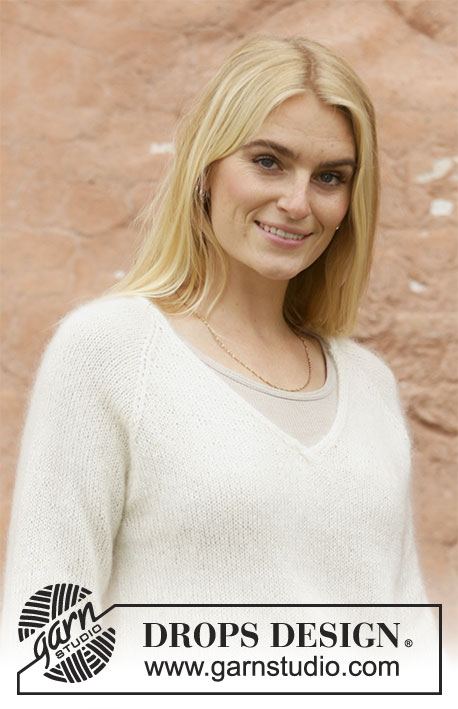
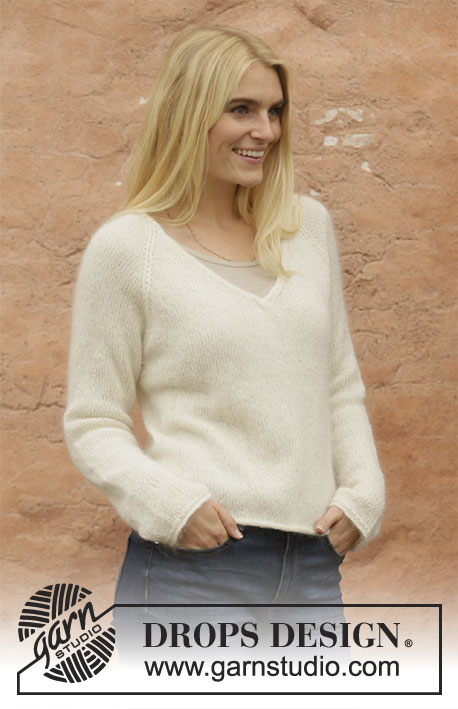
Knitted jumper with raglan and V-neck in DROPS Lace and DROPS Kid-Silk or DROPS Sky. Size: S - XXXL
DROPS 206-12 |
||||||||||
|
---------------------------------------------------------- EXPLANATION FOR THE PATTERN: ---------------------------------------------------------- PATTERN: See diagrams A.1 to A.3. Diagrams show all rows in pattern seen from the right side. INCREASE TIP (applies to sleeves): Work until 2 stitches remain before marker thread, 1 yarn over, knit 4 (marker thread is in the middle of these stitches), 1 yarn over. On next round knit yarn overs twisted to avoid holes. Then work the new stitches in stocking stitch. RAGLAN: All decreases are done from the right side! Decrease 1 stitch on each side of marker thread as follows: Work until 2 stitches remain before marker thread, knit 2 together, marker thread is here, slip 1 stitch knitwise, knit 1, pass slipped stitch over stitch worked. Repeat at each of the remaining marker threads (= 8 stitches decreased). V-NECK: Decrease for V-neck on front piece. All decreases are done from the right side! Decrease as follows after A.2: Slip 1 stitch knitwise, knit 1, pass slipped stitch over (= 1 stitch decreased). Decrease as follows before A.3: Work until 2 stitches remain before A.3, knit the next 2 stitches together (= 1 stitch decreased). ---------------------------------------------------------- START THE PIECE HERE: ---------------------------------------------------------- JUMPER - SHORT OVERVIEW OF THE PIECE: Worked in the round on circular needle up to V-neck, then work back and forth until yoke is done. Finish by working the neck edges. Work sleeves in the round on double pointed needles/a short circular needle. BODY: Cast on 184-200-220-236-260-288 stitches on circular needle size 4.5 mm with 1 strand Lace + 1 strand Kid-Silk (= 2 strands) or 1 strand Sky. Work rolling edge as follows: Knit 1 round. Switch to circular needle size 4 mm and knit 3 rounds. Work next round as follows: * Knit 1, purl 1 *, repeat from *-* the entire round. Now work in stocking stitch in the round. REMEMBER THE KNITTING TENSION! When piece measures 31-31-31-31-30-30 cm, cast off stitches for armholes as in each side as follows: Work the first 42-46-50-54-59-64 stitches on round (= half back piece), cast off the next 8-8-10-10-12-16 stitches for sleeve, work the next 84-92-100-108-118-128 stitches (= front piece), cast off the next 8-8-10-10-12-16 stitches for armhole, work the remaining 42-46-50-54-59-64 stitches. Put piece aside and work the sleeves. SLEEVE: Cast on 50-52-54-56-56-60 stitches on circular needle size 4.5 mm with 1 strand Lace + 1 strand Kid-Silk (= 2 strands) or 1 strand Sky. Work rolling edge as follows: Knit 1 round. Switch to double pointed needles size 4 mm and knit 3 rounds. Work next round as follows: * Knit 1, purl 1 *, repeat from *-* the entire round. Work in stocking stitch in the round. When piece measures 10-10-10-8-9-9 cm, increase 2 stitches under sleeve - read INCREASE TIP! Increase like this every 3½-2½-2-2-1½-1½ cm 10-13-16-17-18-18 times in total = 70-78-86-90-92-96 stitches. When sleeve measures 46-45-44-43-40-39 cm (shorter measurements in the larger sizes because of longer yoke), cast off the middle 8-8-10-10-12-16 stitches under sleeve (= 4-4-5-5-6-8 stitches on each side of marker thread) = 62-70-76-80-80-80 stitches. Put piece aside and knit another sleeve the same way. YOKE: Slip sleeves on to same circular needle as body where armholes were cast off = 292-324-352-376-396-416 stitches. Now insert 4 marker threads in the piece between front piece, back piece and sleeves, but displace marker threads so that there are 1-1-1-2-4-6 stitches in each side of front piece and back piece on each side of sleeves. I.e. there are 82-90-98-104-110-116 stitches for front and back piece, and 64-72-78-84-88-92 stitches for each sleeve. Start round mid back and continue in the round with stocking stitch. AT THE SAME TIME on first round begin decrease for raglan, and when piece measures 6-7-8-9-11-12 cm from where sleeves were slipped onto same circular needle as body, work V-neck on front piece: RAGLAN: Decrease for RAGLAN - read explanation above. Decrease like this every 4th round 2-1-1-1-3-4 times and every other round/row 22-27-30-33-33-34 times (= 24-28-31-34-36-38 times). V-NECK: When yoke measures 6-7-8-9-11-12 cm, work A.1 over the middle 8 stitches on front piece – adjust so that first row in A.1 is worked on a round with decreases (for raglan). When A.1 has been worked vertically, work back to beginning of round mid back. Cut the yarn. Now divide front piece in the middle of A.1, and work back and forth, start from right side, at V-neck on front piece as follows: Work A.2 over the first 4 stitches from division in the middle of front piece, decrease 1 stitch for V-NECK – read explanation above, work stocking stitch (continue decrease for raglan as before) until 6 stitches remain towards division in the middle of front piece in opposite side, decrease 1 stitch – remember V-NECK, work A.3 over the last 4 stitches. Continue back and forth like this, and decrease for V-neck every other row 7-6-7-5-6-6 times and every 4th row 5-6-6-8-8-9 times (= 12-12-13-13-14-15 stitches in total decreased for V-neck in each side). When all decreases for V-neck and raglan are done, there are 76-76-78-78-80-82 stitches on needle. Work next row from right side as follows: Knit the first 3 stitches, purl the next 2 stitches together (= 1 stitch decreased), knit until 5 stitches remain on needle, purl the next 2 stitches together (= 1 stitch decreased), knit the last 3 stitches = 74-74-76-76-78-80 stitches. Work 1 row from wrong side with knit over knit and purl over purl. Jumper measures approx. 54-56-58-60-62-64 cm from shoulder and down. NECK EDGE: Insert a marker thread mid back. Slip the last 4 stitches on needle on a stitch holder, and work back and forth over the first 4 stitches for neck edge, at the same time work neck edge together with the remaining stitch on sleeve and neck line on back piece as follows: Work as follows from right side: ROW 1: Knit the first 3 stitches, knit the next 2 stitches together (= 1 stitch decreased). ROW 2: Turn and purl the 4 stitches. ROW 3: Knit the first 3 stitches, knit the next 3 stitches together (= 2 stitches decreased). ROW 4: Turn and purl the 4 stitches. ROWS 5-8: Work the same way as on 3rd and 4th row. Repeat rows 1-8 until you reach the marker thread mid back in the neck. Cast off the 4 stitches on neck edge. Slip the 4 stitches from stitch holder on 4 mm needles and work from wrong side as follows: ROW 1: Purl the first 3 stitches, purl the next 2 stitches together (= 1 stitch decreased). ROW 2: Turn and knit the 4 stitches. ROW 3: Purl the first 3 stitches, purl the next 3 stitches together (= 2 stitches decreased). ROW 4: Turn and knit the 4 stitches. ROWS 5-8: Work the same way as on 3rd and 4th row. Repeat rows 1-8 until reach the marker thread mid back in the neck. Cast off the 4 stitches on neck edge. Sew cast-off edge together on the 2 neck edges mid back in the neck. Fasten off. |
||||||||||
Diagram explanations |
||||||||||
|
||||||||||
 |
||||||||||
Have you finished this pattern?Tag your pictures with #dropspattern #decembermoonsweater or submit them to the #dropsfan gallery. Do you need help with this pattern?You'll find 31 tutorial videos, a Comments/Questions area and more by visiting the pattern on garnstudio.com. © 1982-2026 DROPS Design A/S. We reserve all rights. This document, including all its sub-sections, has copyrights. Read more about what you can do with our patterns at the bottom of each pattern on our site. |
||||||||||


With over 40 years in knitting and crochet design, DROPS Design offers one of the most extensive collections of free patterns on the internet - translated to 17 languages. As of today we count 324 catalogues and 12290 patterns translated into English (UK/cm).
We work hard to bring you the best knitting and crochet have to offer, inspiration and advice as well as great quality yarns at incredible prices! Would you like to use our patterns for other than personal use? You can read what you are allowed to do in the Copyright text at the bottom of all our patterns. Happy crafting!
Post a comment to pattern DROPS 206-12
We would love to hear what you have to say about this pattern!
If you want to leave a question, please make sure you select the correct category in the form below, to speed up the answering process. Required fields are marked *.