
Popular categories
Looking for a yarn?


Comments / Questions (24)
![]() Deborah Devney wrote:
Deborah Devney wrote:
Kindly add a download button. I don't want to print out pages and pages, it's hard to keep track of, and not particularly eco-friendly. ADD A DOWNLOAD BUTTON.
30.08.2020 - 18:32DROPS Design answered:
Dear Mrs Devney, our patterns can only be printed, but if you want to download them, click on print then choose a virtual printer to save them as a .PDF. Happy knitting!
31.08.2020 - 10:27
![]() Luise Rosa wrote:
Luise Rosa wrote:
Dank für Ihre Antwort-ich gebe nicht auf! nochmals: A1 hat 8Reihen - 1.Rap A1 beginnt mit: über alle Ma stricken, 3.R 1Ma abnehmen-am Ende 4 Ma übrig, 5.R stricken bis 7 Ma übrig, 7.R 2Ma abnehmen, stricken bis 7Ma übrig. OK! Nach der 8.R müsste ich wieder mit A1 beginnen: hin und rück über alle Ma stricken, 11.R 1Ma abnehmen, bis 4 Ma stricken, wenden - 13.R bis 7 Ma stricken usw. ODER - 9.R bis 7 Ma übrig, 11.R bis 7Ma übrig, 13. R??? 15R? in welchen Reihen muss ich dann abnehmen?
17.08.2020 - 09:49DROPS Design answered:
Liebe Luise Rosa, nach der 8. Reihe stricken Sie die verkürzten Reihen weiter wie zuvor, dh immer noch bis 7 M übrig sind (insgesamt 5 Mal bis 7 M übrig sind), dann stricken bis 8 M übrig sind, insgesamt 25 Mal. So stricken Sie 3 Krausrippen (= die 6 ersten Reihen) + 4 Krausrippe (bis 7 mehr M bleiben) + 25 Krausrippen (bis 8 M mehr bleiben) = 32 Krausrippen = 64 Reihen (= 8 Mal die 8 Reihen in A.1 = A.1 wird insegesamt 8 Mal in der Höhe wiederholt) = 8 Mal 3 M abegnommen = 24 M abgenommen. Viel Spaß beim stricken!
17.08.2020 - 11:13
![]() Luise Rosa wrote:
Luise Rosa wrote:
Hallo Drops-Team, trotz Fragen bei Strickexpertinnen verstehe ich/wir die Anleitung (Rapport-Beschreibung) nicht - Rapport 1 besteht aus 8 Reihen, in der 3. und 7. Reihe wird jeweils abgenommen - richtig? Werden verkürzte Reihen in jeder Hinreihe gestrickt? 2) wie wird die 7. Reihe, die 9. Reihe, usw. gestrickt? Verkürzt? Bei wie vielen Maschen muss ich wenden? 3) Wie oft muss ich Rapport 1 stricken? Vielen Dank für die Hilfe Luise
03.08.2020 - 12:29DROPS Design answered:
Liebe Frau Rosa, in jedem Rapport stricken Sie verkürzten Reihen, dh bei dem 3. Reihe (=Hinreihe) stricken Sie bis 4 Maschen übrig sind - dann in jeder 2. Reihe stricken Sie bis 7 M mehr als in der vorherigen Hinriehe übrig war (insgesamt 5 x), dann stricken Sie die verkürzten Reihen bis 8 M mehr als zuvor übrig sind - es wurden 32 Krausrippen gestrickt wenn das 1. Rapport fertig ist. z.B. bei 7. Reihe stricken Sie bis 4 (3. Reihe) + 7 (5.Reihe) + 7 (7. Reihe) = 21 M übrig sind, bei 9. Reihe bis 21+7= 28 M übrig sind, usw. Viel Spaß beim stricken!
03.08.2020 - 13:29
![]() Marianne wrote:
Marianne wrote:
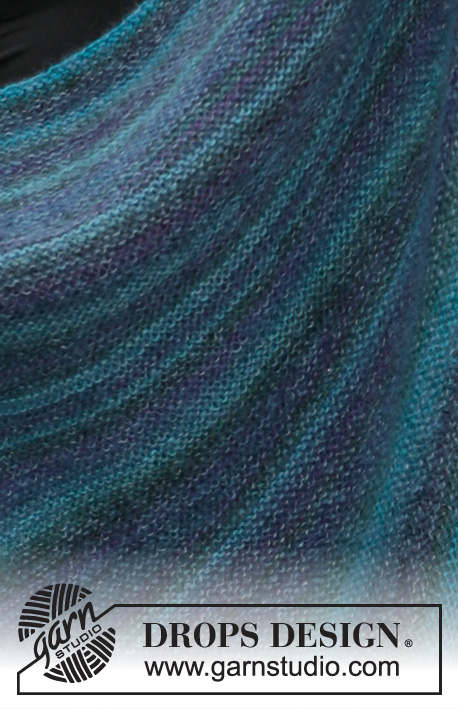
Er det rigtigt, at det ene øverste hjørne bliver meget mindre spidst end det andet, fordi man strikker over alle masker flere gange?
15.05.2020 - 20:04DROPS Design answered:
Hej Marianne, ja det stemmer, det bliver som det du kan se på billedet. God fornøjelse!
22.05.2020 - 12:21
![]() Mijke Stoetzer wrote:
Mijke Stoetzer wrote:
Beste heer/mevrouw, ik heb een vraag over het patroon 203-15. Wat moet ik na naald 6 doen? in de eerste herhaling? Moet ik naald 1 t/m 6 blijven herhalen, tot er 33 ribbels zijn gebreid? Of wordt er iets anders bedoeld? Groetjes Mijke Stoetzer
03.04.2020 - 13:25DROPS Design answered:
Dag Mijke,
Je gaat op dezelfde manier verder, maar je zorgt ervoor dat er steeds 7 steken méér over zijn dan de vorige keer. Dus naald 5 en 6 herhaal je nog 5 keer (in totaal 5 keer). Daarna doe je hetzelfde maar zorg je ervoor dat je 8 steken (in plaats van 7 steken) méér over hebt en dit doe je 25 keer in totaal.
04.04.2020 - 18:47
![]() Myriam wrote:
Myriam wrote:
Merci beaucoup de vos explications, bonne journée.
10.03.2020 - 13:08
![]() Myriam wrote:
Myriam wrote:
Bonjour, je n'arrive pas à comprendre, au rang 5 pour le rang raccourci, on diminue de 7 mailles ou de 7+ 4 mailles de plus? et quand "Continuer ainsi et tricoter encore 4 fois jusqu'à ce qu'il reste 7 mailles de plus", cela veut dire que l'on tricote encore 4 fois la série de 6 rang?svp et pour les 25 fois , c'est quels rangs qu'il faut répéter? merci de votre réponse cela fait 3 jours que je fais et défait
09.03.2020 - 16:44DROPS Design answered:
Bonjour Myriam, effectivement, au rang 5 on tricote jusqu'à ce qu'il reste 4 m + 7 m soit 11 m, puis on va tourner quand il reste 11 + 7 m et ainsi de suite jusqu'à ce qu'on ait tourné 5 fois au total en laissant 7 m de plus (en arrêtant de tricoter quand il reste 7 m de plus que la fois précédente). Ensuite, on continue de la même façon mais en laissant 8 mailles de plus et ce 25 fois au total, et ainsi de suite. en même temps, tricotez A.1 comme avant - cf DIMINUTIONS-1. Bon tricot!
10.03.2020 - 10:12
![]() Jani Zeidler wrote:
Jani Zeidler wrote:
Ich arbeite am Mermaid Wrap Bin beim ersten Rapport. In der Anleitung wird Diagramm A1 angegeben aber nur über 6 Rd. gestrickt. Das Diagramm A1 hat aber 8 Rd angegeben... Bin da grade etwas verwirrt. Danke für eure Hilfe
16.01.2020 - 20:46DROPS Design answered:
Liebe Frau Zeidler, A.1 wird über 8 Reihen gestrickt und so weiterwiederholt, wir beschrieben die 6 ersten Reihen, aber dann stricken Sie weiter wie zuvor ber bis mehr Maschen bleiben (= zuerst 7 Maschen mehr, dann 8 Maschen, usw). Viel Spaß beim stricken!
17.01.2020 - 08:57
![]() Margrit Meyer wrote:
Margrit Meyer wrote:
Ich möchte Drops Delight für einen Schal aus der Fernsehsendung Kaffee oder Tee verstricken. Ich bin äußerst empfindlich gegen Kratzwolle. Ich verhält sich da die Delight?
23.11.2019 - 14:49DROPS Design answered:
Liebe Frau Meyer, nehmen Sie bitte Kontakt mit Ihrem DROPS Laden auf (auch telefonisch oder per Mail), so kann man Ihnen am besten weiterhelfen. Viel Spaß beim stricken!
25.11.2019 - 08:17
![]() Ljerka wrote:
Ljerka wrote:
Where the heart is located, I can't find it? Thank you! Kind regards Ljerka
13.09.2019 - 01:44DROPS Design answered:
Dear Ljerka, you will find the heart after the icon for Comments / FAQ / icon Print. Happy knitting!
13.09.2019 - 08:02
|
|||||||||||||
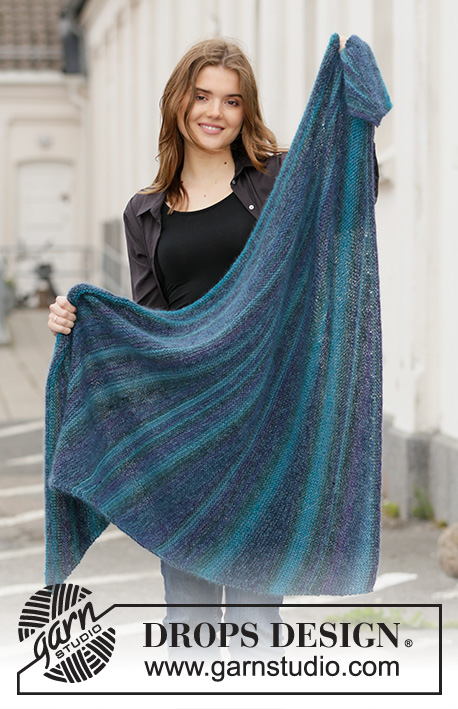
Mermaid Wrap#mermaidwrap |
|||||||||||||
 |
 |
||||||||||||
Knitted shawl with garter stitch and short rows in 1 strand DROPS Delight and 1 strand DROPS Kid-Silk.
DROPS 203-15 |
|||||||||||||
|
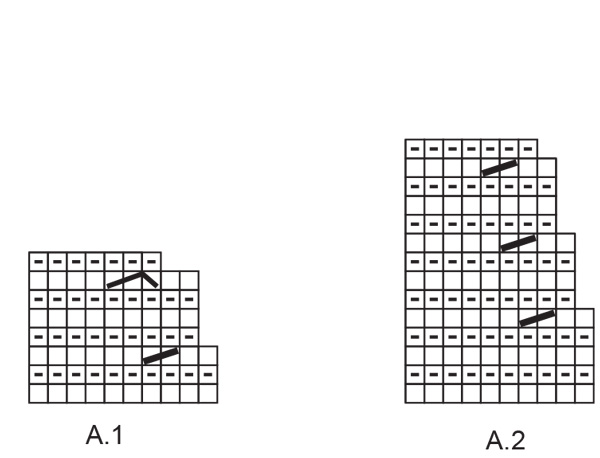
---------------------------------------------------------- EXPLANATION FOR THE PATTERN: ---------------------------------------------------------- GARTER STITCH (back and forth): 1 ridge = knit 2 rows. PATTERN: See diagrams A.1 and A.2. Diagrams show all rows from right side and show how to decrease in the different repetitions. DECREASE TIP-1: Work diagram A.1 over the first stitches on needle (seen from right side). Repeat A.1 vertically 8 times in total (= 24 stitches decreased in repetition). Work short rows and garter stitch for entire repetition. Every time a new repetition with short rows begins decrease starts again. I.e. 24 stitches are decreased in each of the first 3 repetitions. DECREASE TIP-2: Work diagram A.2 over the first stitches on needle (seen from right side). Repeat A.2 vertically 4 times in total, then work the first 6 rows in diagram (= 13 stitches decreased in repetition). Work short rows and garter stitch for entire repetition. Every time a new repetition with short rows begins decrease starts again. I.e. 13 stitches are decreased in each of the last 2 repetitions on shawl. KNITTING TIP: To avoid a big hole when turning on short rows tighten the yarn before continuing. ---------------------------------------------------------- START THE PIECE HERE: ---------------------------------------------------------- SHAWL - SHORT OVERVIEW OF THE PIECE: Work piece back and forth in 5 repetitions with short rows. Work from top of shawl and down towards one bottom edge on shawl. SHAWL: Cast on 272 stitches on circular needle size 5 mm with 1 strand Delight and 1 strand Kid-Silk (= 2 strands). Work 2 ridges in GARTER STITCH - read explanation above. 1ST REPETITION: Work short rows as explained below and decrease at the same time inside 2 stitches in garter stitch at beginning of row from right side - read DECREASE TIP-1 and diagram A.1! Work short rows as follows: ROW 1 (= right side): Knit all stitches, turn. ROW 2: Knit back. ROW 3: Knit until 4 stitches remain, turn – read KNITTING TIP! ROW 4: Knit back. ROW 5: Knit until 7 stitches more remain than on previous row from right side, turn. ROW 6: Knit back. REMEMBER THE KNITTING TENSION! Continue like this and work until 7 stitches more remain than on previous row from right side 4 more times (= 5 times in total), then work until 8 stitches more remain than on previous row from right side 25 times in total. When all short rows have been worked, there are 32 ridges and 24 stitches have been decreased in this repetition= 248 stitches on needle. Knit until 4 stitches remain, turn and knit back. 1st repetition is now done and 33 ridges have been worked. 2ND REPETITION: Work short rows as explained below and decrease at the same time inside 2 stitches in garter stitch at beginning of row from right side - read DECREASE TIP-1 and diagram A.1! Work short rows as follows: ROW 1 (= right side): Knit all stitches, turn. ROW 2: Knit back. ROW 3: Knit until 4 stitches remain, turn – remember KNITTING TIP! ROW 4: Knit back. ROW 5: Knit until 7 stitches more remain than on previous row from right side, turn. ROW 6: Knit back. Continue like this and work until 7 stitches more remain than on previous row from right side 28 more time (= 29 times in total), then work until 8 stitches more than on previous row from right side 1 time in total. When all short rows have been worked, there are 32 ridges and 24 stitches have been decreased in this repetition= 224 stitches on needle. Knit until 4 stitches remain, turn and knit back. 2nd repetition is now done and 33 ridges have been worked. 3RD REPETITION: Work short rows as explained below and decrease at the same time inside 2 stitches in garter stitch at beginning of row from right side - read DECREASE TIP-1 and diagram A.1! Work short rows as follows: ROW 1 (= right side): Knit all stitches, turn. ROW 2: Knit back. ROW 3: Knit until 4 stitches remain, turn – remember KNITTING TIP! ROW 4: Knit back. ROW 5: Knit until 6 stitches more remain than on previous row from right side, turn. ROW 6: Knit back. Continue like this and work until 6 stitches more remain than on previous row from right side 21 more time (= 22 times in total), then work until 7 stitches more than on previous row from right side 8 times in total. When all short rows have been worked, there are 32 ridges and 24 stitches have been decreased in this repetition= 200 stitches on needle. Knit until 4 stitches remain, turn and knit back. 3rd repetition is now done and 33 ridges have been worked. 4TH REPETITION: Work short rows as explained below and decrease at the same time inside 2 stitches in garter stitch at beginning of row from right side - read DECREASE TIP-2 and diagram A.2! Work short rows as follows: ROW 1 (right side): Knit all stitches, turn. ROW 2: Knit back. ROW 3: Knit until 4 stitches remain, turn – remember KNITTING TIP! ROW 4: Knit back. ROW 5: Knit until 5 stitches more remain than on previous row from right side, turn. ROW 6: Knit back. Continue like this and work until 5 stitches more remain than on previous row from right side 3 more times (= 4 times in total), then work until 6 stitches more remain than on previous row from right side 26 times in total. When all short rows have been worked, there are 32 ridges and 13 stitches have been decreased in this repetition= 187 stitches on needle. Knit until 4 stitches remain, turn and knit back. 4th repetition is now done and 33 ridges have been worked. 5TH REPETITION: Work short rows as explained below and decrease at the same time inside 2 stitches in garter stitch at beginning of row from right side - read DECREASE TIP-2 and diagram A.2! Work short rows as follows: ROW 1 (= right side): Knit all stitches, turn. ROW 2: Knit back. ROW 3: Knit until 4 stitches remain, turn – remember KNITTING TIP! ROW 4: Knit back. ROW 5: Knit until 5 stitches more remain than on previous row from right side, turn. ROW 6: Knit back. Continue like this and work until 5 stitches more remain than on previous row from right side 16 more times (= 17 times in total), then work until 6 stitches more remain than on previous row from right side 13 times in total. When all short rows have been worked, there are 32 ridges and 13 stitches have been decreased in this repetition= 174 stitches on needle. Knit until 4 stitches remain, turn and knit back. 5th repetition is now done and 33 ridges have been worked. Work 2 ridges back and forth over all stitches. Cast off, but make sure to avoid a tight cast-off edge by making 1 yarn over after approx. every 5th stitch. Cast off yarn overs as stitches. |
|||||||||||||
Diagram explanations |
|||||||||||||
|
|||||||||||||
 |
|||||||||||||
Have you finished this pattern?Tag your pictures with #dropspattern #mermaidwrap or submit them to the #dropsfan gallery. Do you need help with this pattern?You'll find 12 tutorial videos, a Comments/Questions area and more by visiting the pattern on garnstudio.com. © 1982-2026 DROPS Design A/S. We reserve all rights. This document, including all its sub-sections, has copyrights. Read more about what you can do with our patterns at the bottom of each pattern on our site. |
|||||||||||||


With over 40 years in knitting and crochet design, DROPS Design offers one of the most extensive collections of free patterns on the internet - translated to 17 languages. As of today we count 324 catalogues and 12290 patterns translated into English (UK/cm).
We work hard to bring you the best knitting and crochet have to offer, inspiration and advice as well as great quality yarns at incredible prices! Would you like to use our patterns for other than personal use? You can read what you are allowed to do in the Copyright text at the bottom of all our patterns. Happy crafting!
Post a comment to pattern DROPS 203-15
We would love to hear what you have to say about this pattern!
If you want to leave a question, please make sure you select the correct category in the form below, to speed up the answering process. Required fields are marked *.