Comments / Questions (40)
![]() Jeanne wrote:
Jeanne wrote:
Do you have a written pattern for this piece? I really struggle with diagrams.
31.10.2021 - 13:05DROPS Design answered:
Dear Jeanne, our patterns are made in a mixed format, with both diagrams and written instructions, to cater to all types of people. You can check the following lesson regarding reading diagrams: https://www.garnstudio.com/lesson.php?id=69&cid=19. Happy crochetting!
31.10.2021 - 19:46
![]() Joan Carney wrote:
Joan Carney wrote:
Diagrams make my head spin. Are there written directions for this poncho anywhere?
29.10.2021 - 18:49DROPS Design answered:
Dear Joan, we do not have written out explanations for the pattern, not only because they are available in several languages, but also, because we believe that with diagram you can not only see the very next step (like with written diagrams) but the "bigger picture " as well, like how stitches and rows relate to each other en large. We do have a lesson here on how to read diagrams, and you can always ask for help (in person, or over the phone) in the store you Bought your DROPS yarn from. Happy Stitching!
30.10.2021 - 03:32
![]() Patricia Aillapan wrote:
Patricia Aillapan wrote:
Hola, me encanto este poncho, alguna posibilidad de ver este mismo trabajo pero en video tutorial, porque igual me complica el leerlo, y los tejido que he hecho los veo a través de video, se lo agradecería mucho.
19.04.2021 - 02:08
![]() Marilu wrote:
Marilu wrote:
Buon giorno, non capisco il passaggio seguente nella descrizione del digramma A1a : all’inizio del giro lavorare 1 catenella. Questa catenella non sostituisce la 1° maglia bassa sul giro. Finire il giro con 1 maglia bassissima nella 1° catenella all’inizio del giro, poi lavorare a maglie bassissime fino al centro del 1° arco di catenelle? anche sopra dove dice uguale, non capisco le maglie basissime dove e quante e se si fa nella maglia o a torno? molte grazie!
20.01.2021 - 12:54DROPS Design answered:
Buonasera Marilu, abbiamo sistemato la descrizione del simbolo a crocetta. Ci riscriva se incontra ulteriori difficoltà. Buon lavoro!
20.01.2021 - 19:16
![]() Cécile wrote:
Cécile wrote:
Bonjour. J ai réuni tous les carrés ensemble. Maintenant je compte crocheter le col en gris moyen. Je ne comprends pas bien les consignes. La derniere phrase dit "lorsque A.3a et A.3c ont été crochetés une fois en hauteur..etc" mais il n'est jamais question de A3c avant dans ce paragraphe...que faire ? Merci pour votre aide. Bien cordialement.
17.01.2021 - 16:51DROPS Design answered:
Bonjour Cécile, effectivement, pour le col, on crochète A.3a et A.3b - on doit crocheter 12 rangs ainsi au total (= 3 fois les 4 rangs des diagrammes A.3a et A.3b). En revanche, pour la bordure du bas, on doit crocheter A.3a, puis A.3b et A.3c dans les arceaux des coins. Et on ne crochète qu'une fois les diagrammes en hauteur pour la bordure du bas. Bon crochet!
18.01.2021 - 10:00
![]() Birgit Albrecht wrote:
Birgit Albrecht wrote:
Hallo. Komme hier, Runde 6 A.1a und A.1b nicht weiter. Ich komme doch mit 1 Luftmasche x nicht auf die Höhe der weiteren Doppelmaschen in der 6.Runde und am Ende der Runde soll ich die Kettmasche wieder in die 1.Luftmasche häkeln. Verstehe ich gerade überhaupt nicht. Liebe Grüße und Danke schon im vorraus
09.01.2021 - 23:27DROPS Design answered:
Liebe Frau Albrecht, ich denke, Diagram A.1a sollte hier korrigiert werden, am Anfang der 6. Runde würde ich lieber 4 Luftmaschen häkeln (als bei der 1. Runde). Danke für den Hinweis, unser Designteam wird das noch mal prüfen und korrigieren. Viel Spaß beim häkeln!
11.01.2021 - 09:01
![]() Heather wrote:
Heather wrote:
I finally figured out the squares and got all of them seamed together. However, the neck directions are completely impossible to understand. Any chance someone can write something that is more clear or publish a video? Or maybe someone can suggest an alternative so I can at least wear it?
30.09.2020 - 15:43DROPS Design answered:
Dear Heather, can you please be a little bit more specific? What exactly you don't understand about the neck? Also, do not forget, that you can always ask for help (in person, or over the phone) in the store, where you bought your DROPS yarn. Happy Crafting!
01.10.2020 - 00:18
![]() Heather wrote:
Heather wrote:
This pattern is gorgeous but makes absolutely no sense to me. I’ve been crocheting 8 years and have never seen anything like this. It’s all over the place and doesn’t simply tell you how to make one of the squares. Any chance you could simplify this?
23.09.2020 - 01:39DROPS Design answered:
Dear Heather, read thoroughly the pattern and find how to read crochet diagrams here - the way the pattern is written might be different than you are used to, but just follow the pattern step by step and it should work. Happy crocheting!
23.09.2020 - 08:27
![]() B Van Lang wrote:
B Van Lang wrote:
Ik ben bezig met de hals, moet ik nu midden voor en achter blijven meerderen in alle ronden? Er komt zo'n raar tuitje aan??
30.08.2020 - 22:27DROPS Design answered:
Dag B Van Lang,
Je haakt de hals volgens A.3b waarbij A.3a het begin en einde van de toer laten zien. Volgens mij staat er een foutje in de tekst bij de hals en wordt er bedoeld. 'Als A.3a en A.3b (ipv A.3c) klaar zijn in de hoogte'
31.08.2020 - 08:53
![]() Zaida Sousa wrote:
Zaida Sousa wrote:
Hei, hvor mange lave poeng legger jeg på de 4 kjederingen? Jeg brukte en oversetter fordi jeg ikke kan skrive eller lese på norsk Takk
21.07.2020 - 01:46DROPS Design answered:
Hi Zaida, You can choose amongst a large number of languages for each pattern if you click on the box below the photograph. Happy crafting!
21.07.2020 - 07:24
Serena#serenaponcho |
||||||||||||||||||||||||||||||||||||||||||||||||||||||||||||||||||||||
 |
 |
|||||||||||||||||||||||||||||||||||||||||||||||||||||||||||||||||||||
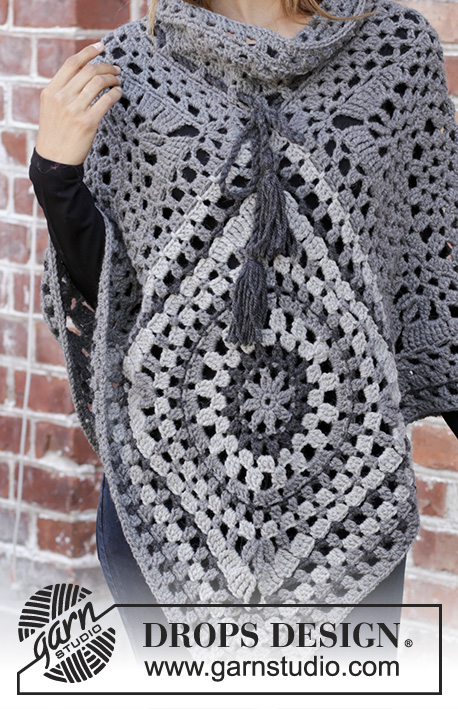
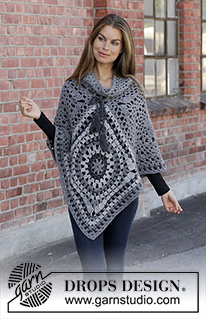
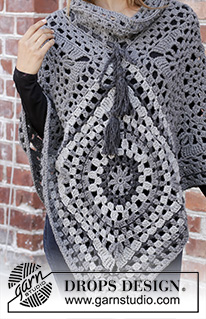
Crocheted poncho in DROPS Nepal. The piece is worked with crochet squares, lace pattern and stripes. Sizes S - XXXL.
DROPS 195-35 |
||||||||||||||||||||||||||||||||||||||||||||||||||||||||||||||||||||||
|
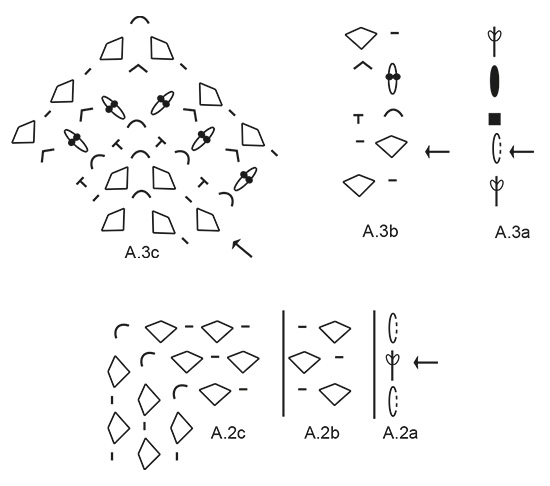
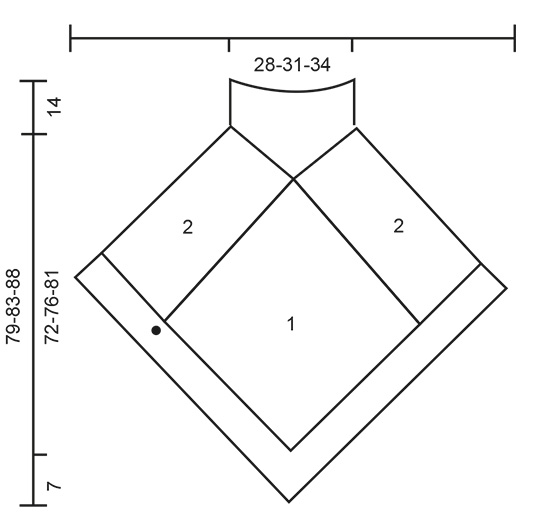
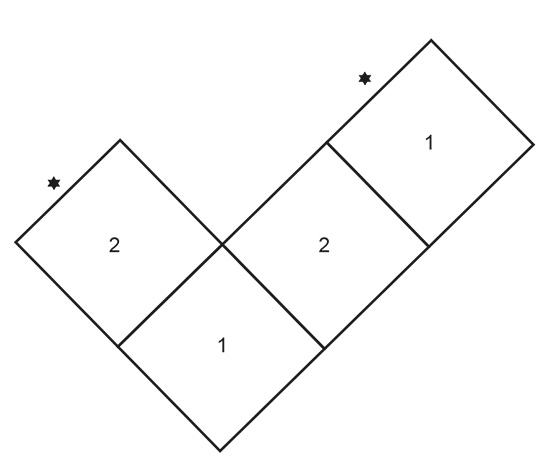
EXPLANATIONS FOR THE PATTERN: ------------------------------------------------------- PATTERN: See diagrams A.1 to A.3. STRIPES-1 (for crochet squares back and front): Chain-stitch ring at beginning of square + ROUNDS 1-2: medium grey. ROUNDS 3-4: dark grey ROUNDS 5-6: grey ROUND 7: medium grey ROUND 8: dark grey ROUND 9: medium grey ROUND 10: grey ROUND 11: medium grey ROUND 12: grey ROUND 13: dark grey ROUND 14: medium grey ROUND 15: grey Size S/M is now finished, for sizes L/XL and XXL/XXXL continue with medium grey. STRIPES-2 (for bottom edge): ROUND 1: medium grey ROUND 2: dark grey ROUND 3: medium grey ROUND 4: medium grey ------------------------------------------------------- START THE PIECE HERE: ------------------------------------------------------- PONCHO - SHORT OVERVIEW OF THE PIECE: 4 crochet squares are worked and sewn together: 2 single-coloured squares and 2 striped squares. An edge is worked at the bottom of the poncho and a neck at the top. CROCHET SQUARE: Work 4 chain stitches with hook size 5.5 mm and medium grey. Form them into a ring with 1 slip stitch in the first chain stitch. Work STRIPES-1- read description above and pattern in the round as follows: Work A.1a – start at arrow - (shows how the rounds start and finish), A.1b a total of 4 times on the round. REMEMBER THE CROCHET TENSION! When the crochet square has been completed, it measures approx. 40 x 40 cm. Size S/M is now finished. For sizes L/XL and XXL/XXXL continue as follows: Work A.2a (shows how the rounds start and finish), * A.2b until there is 1 chain stitch left before the corner. A.2c (= corner) *, work from *-* a total of 4 times on the round, then work A.2b to the end of the round. When you have worked 1 round, size L/XL is finished and the square measures approx. 44 x 44 cm. For size XXL/XXXL work the last round in the diagrams. When the last round has been worked the square measures approx. 48 x 48 cm. Work 1 more square in the same way = 2 crochet squares. Now work 2 single-coloured squares in the same way using medium grey. You have now worked a total of 4 crochet squares. ASSEMBLY: Lay the crochet squares out as shown in the illustration – see below beside the diagrams and sketch. 1 = crochet square with stripes; 2 = single-coloured square. Work the squares together through both layers from the wrong side as follows: 1 double crochet around chain-space in corner, * work 3 chain stitches, skip 3 treble crochets, 1 double crochet around the next chain stitch *, work from *-* along the whole side and finish with 1 double crochet in the next corner. Work the other squares together in the same way. Then finally work together the side marked with a star in the illustration. BOTTOM EDGE: Now work the bottom edge as follows: Start with medium grey in the transition between a single-coloured and a striped square – see black spot on sketch, work STRIPES-2 and pattern in the round as follows: Work A.3a (shows how the rounds start and finish), work A.3b as far as the corner mid front, A.3c around the chain-space in the corner, work A.3b as far as the next corner mid back, A.3c and A.3b to the start of the round. Continue in the round like this until A.3a - A.3c have been completed in height. Cut and fasten the strand. NECK: The whole neck is worked with medium grey. Start with medium grey in the chain-space in the corner of the middle crochet square (= mid back), work A.3a (shows how the rounds start and finish), work A.3b around the same chain-space in the corner, * skip the chain-space in the corner of the next square, work A.3b as far as the next corner, skip the chain-space in the corner, work A.3b around the chain-space in the crochet square mid front *, work from *-* 1 more time on the round, but finish as shown in A.3a. When A.3a and A.3b have been completed in height, repeat the last 4 rounds 2 more times (= a total of 3 times in height). Cut and fasten the strand. Make a twisted cord as follows: TWISTED CORD AND TASSELS Cut 4 strands dark grey, 5 metres in length. Twist them together until they begin to resist, fold them double and they will continue to twist. Tie a knot in each end so that the cord stays twisted. Thread the cord up and down through Round 3 on the neck; start and finish mid front. Make 1 tassel in each end of the cord: 1 tassel = Cut 11 strands dark grey, 24 cm in length. Thread them through the end of the cord and fold them so that all the ends are together (= 24 strand-ends). Cut one more strand, 20 cm in length and wind it around the strands, approx. 1 cm down from the fold and tie a knot. Trim the strands so that they are even at the bottom. Make 1 more tassel in the same way for the other end of the cord. |
||||||||||||||||||||||||||||||||||||||||||||||||||||||||||||||||||||||
Diagram explanations |
||||||||||||||||||||||||||||||||||||||||||||||||||||||||||||||||||||||
|
||||||||||||||||||||||||||||||||||||||||||||||||||||||||||||||||||||||
 |
||||||||||||||||||||||||||||||||||||||||||||||||||||||||||||||||||||||
 |
||||||||||||||||||||||||||||||||||||||||||||||||||||||||||||||||||||||
 |
||||||||||||||||||||||||||||||||||||||||||||||||||||||||||||||||||||||
 |
||||||||||||||||||||||||||||||||||||||||||||||||||||||||||||||||||||||
Have you finished this pattern?Tag your pictures with #dropspattern #serenaponcho or submit them to the #dropsfan gallery. Do you need help with this pattern?You'll find 13 tutorial videos, a Comments/Questions area and more by visiting the pattern on garnstudio.com. © 1982-2026 DROPS Design A/S. We reserve all rights. This document, including all its sub-sections, has copyrights. Read more about what you can do with our patterns at the bottom of each pattern on our site. |
||||||||||||||||||||||||||||||||||||||||||||||||||||||||||||||||||||||





Post a comment to pattern DROPS 195-35
We would love to hear what you have to say about this pattern!
If you want to leave a question, please make sure you select the correct category in the form below, to speed up the answering process. Required fields are marked *.