
Popular categories
Looking for a yarn?


Comments / Questions (38)
![]() Rikke Nerli wrote:
Rikke Nerli wrote:
Hei, I mønster forklaringen står det rett på firkant med svarte sider, og løfte, strikke, løfte når det ikke er sider. Skjønner ikke helt hva som er hva, for jeg ser ingen firkanter uten sider.. Er ny til mønster, og alt jeg prøver ser feil ut... På forhånd takk!
29.12.2018 - 22:31DROPS Design answered:
Hei Rikke. Jeg er litt usikker på om jeg skjønner spørsmålet ditt ordentlig. Det er riktig som du sier: at en tom rute = 1 maske rett. Hver rute i diagrammet tilsvarer 1 maske. Noen av symbolene går over flere masker (her er alle de symbolene fellinger). Feks symbol nummer 4 og 5 fra toppen (en skrå strek, som går over 2 masker) som du finner i diagram A.4, eller symbol nummer 6 (sort trekant, som går over 3 masker). Om du sikter til symbol nummer 5 så løfter du 1 maske over på høyre pinne (uten å strikke den), strikker 1 maske rett og løfter den første masken over siste masken du strikket = 1 maske felt. Håper dette hjelper. God fornøyelse
02.01.2019 - 12:04
![]() Trine wrote:
Trine wrote:
På diagram A3 står det at det skal være 11 masker vrang på rad 2 og 4, og 4 masker rett. på begynnelsen av runden, og 3 på slutten av runden. Når jeg strikker får jeg på rad 4, 5 masker rett, og 9 masker vrang, og så 4 masker rett. Stemmer dette?
30.10.2018 - 19:08DROPS Design answered:
Hei Trine. Det stemmer at det skal være 4 masker rett, 11 vrang og 3 masker rett på omgang 4 også - som vist i diagrammet. Fordi du feller 2 masker over de 11 vrangmaskene, og samtidig øker 1 maske på hver side (over rettmaskene) må du strikke 1 vrangmaske "mer" i hver siden for at det skal fortsette å være 11 masker vrang. Du strikker altså 4 masker rett, 11 masker vrang (den første og siste av disse var rettmasker på 2 omgang omgang) og avslutter med 3 masker rett. God fornøyelse.
31.10.2018 - 11:19
![]() Janne T Eliseussen wrote:
Janne T Eliseussen wrote:
Er det rett at en ikke skal felle noe i mønster A3 ( 18 masker ) str M på bærestykke på genser Golden Fairy?
16.10.2018 - 09:56DROPS Design answered:
Hei Janne. Når diagram A.3 er strikket 1 gang i høyden har du felt 4 masker per rapport av A.3. og det nye masketallet er: 252-280-308-336-336-364. Du feller 2 masker på omgang 15 og 2 masker på omgang 27 - ingen kast på disse omgangene. God fornøyelse
17.10.2018 - 08:38
![]() Saskia wrote:
Saskia wrote:
Hallo, ich habe eine Frage zum Abketten der Armausschnitte beim Rumpf. Wenn ich zunächst 2 Maschen abkette, dann die Maschen des Vorderteils stricke, für den zweiten Armausschnitt 4 Maschen abkette und die Maschen des Rückenteils stricke, habe ich folgendes Problem mit dem Abketten der letzten 2 Maschen: Da beim Abketten eine Masche am Ende übrig bleibt, sitzt diese mittig zwischen den zuerst abgeketteten Maschen im ersten Armausschnitt. Soll das so sein? Oder wie teile ich das besser auf?
15.10.2018 - 16:15DROPS Design answered:
Liebe Saska, genauso stricken Sie diese Reihe, aber dann sollen Sie die 2 letzten Maschen abketten, dh die 2 letzten Maschen der Runde, die genau vor die 2 ersten Maschen die Sie abgekettet haben, dann Faden abschneiden. Viel Spaß beim stricken!
16.10.2018 - 08:45De Roeck Marianne wrote:
Hallo , Ik ben een Belgische wonende in Spanje , heb vele jaren niet gebreid. Kan u misschien zeggen hoe in bereken hoeveel wol ik nodig hen voor dit prachtig model ? Een berekening voor een S of M . Ik Zou het graag maken in kleur en kwaliteit zoals het is afgebeeld , liefst geen irriterende wol . Alvast dank om mij op weg te helpen , Marianne
24.09.2018 - 14:25DROPS Design answered:
Dag De Roeck Marianne, Bovenaan het patroon staat aangegeven hoeveel wol je nodig hebt. 500 gram vaan maat S, 550 gram voor maat M, enz. 1 bol weegt 50 gram, dus bij voorbeeld voor maat S heb je 10 bollen nodig.
06.10.2018 - 10:27
![]() Greta Aurvåg wrote:
Greta Aurvåg wrote:
Venter på mønster
03.08.2018 - 09:32
![]() Giuseppina wrote:
Giuseppina wrote:
Bellissimo ed originale. Anche il colore ...molto bello
06.07.2018 - 15:02
![]() Anette wrote:
Anette wrote:
Glæder mig over så mange smukke opskrifter. Kan ikke vente på opskriften
02.07.2018 - 21:54
|
|||||||||||||||||||
Golden Fairy#goldenfairysweater |
|||||||||||||||||||
 |
 |
||||||||||||||||||
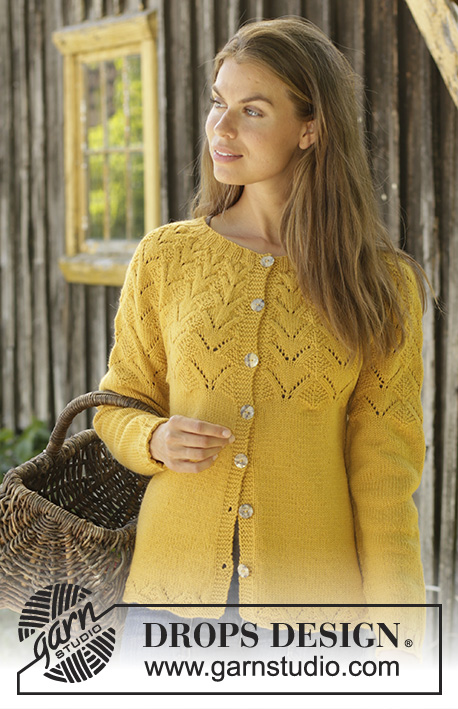
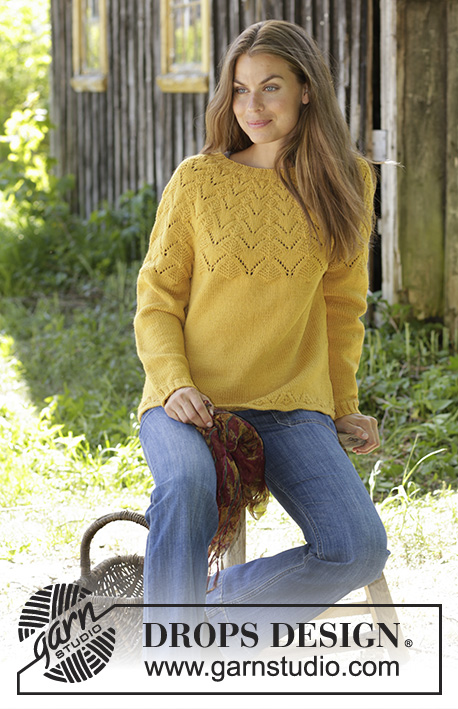
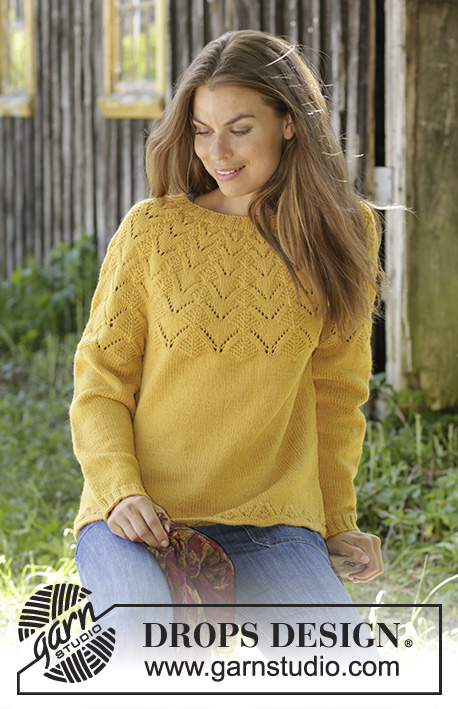
Knitted jumper in DROPS Lima or DROPS Cotton Merino. The piece is worked with round yoke and lace pattern. Sizes S - XXXL.
DROPS 195-22 |
|||||||||||||||||||
|
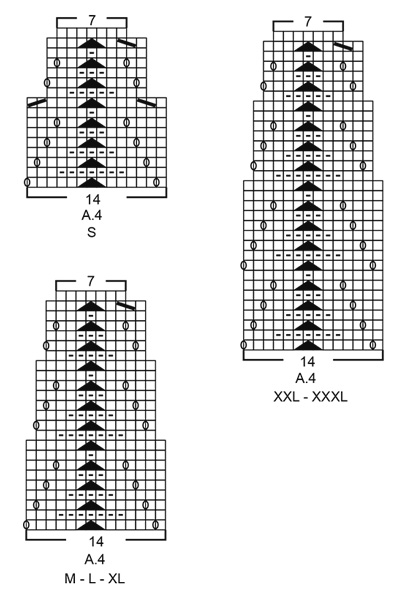
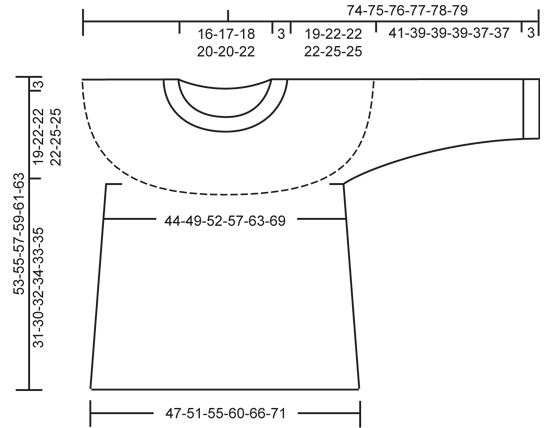
EXPLANATIONS FOR THE PATTERN: ------------------------------------------------------- RIDGE/GARTER STITCH (worked in the round): 1 ridge = 2 rounds. Knit 1 round and purl 1 round. PATTERN: See diagrams A.1 to A.4. Choose diagram for your size (applies to A.1 and A.4). The diagrams show all the rows in the pattern seen from the right side. DECREASE/INCREASE TIP (evenly spaced): To work out how to decrease/increase evenly, count the total number of stitches on the needle (e.g. 216 stitches) and divide by the number of decreases/increases to be made (e.g. 4) = 54. In this example, decrease by knitting together each 53rd and 54th stitch. If increasing, make 1 yarn over after each 54th stitch. On the next round knit the yarn overs twisted to avoid holes. DECREASE TIP (for sides of body): Start 3 stitches before the marker thread in the side, knit 2 together, knit 2 (the marker thread sits in the middle of these 2 stitches), slip 1 stitch as if to knit, knit 1 and pass the slipped stitch over the knitted stitch (= 2 stitches decreased). INCREASE TIP (for mid under sleeve): Start 1 stitch before the marker thread, make 1 yarn over, knit 2 (the marker thread sits in the middle of these 2 stitches), make 1 yarn over (= 2 stitches increased). On the next round knit the yarn overs twisted to avoid holes. Then work the increased stitches in stocking stitch. ------------------------------------------------------- START THE PIECE HERE: ------------------------------------------------------- JUMPER - SHORT OVERVIEW OF THE PIECE: The piece is worked in the round with circular needle, bottom up as far as the armholes. The sleeves are worked in the round with double pointed needles/short circular needle, bottom up. Then the body and sleeves are placed together and the yoke is worked in the round with circular needle to finished length. BODY: Cast on 196-216-238-252-280-300 stitches with circular needle size 4 mm and Lima. Change to circular needle size 3.5 mm and work 2 RIDGES – read description above. Change back to circular needle size 4 mm and work 2 rounds stocking stitch. Then work A.1 in the round (= 14-18-17-21-20-25 repeats of 14-12-14-12-14-12 stitches). Continue this pattern. When A.1 has been completed, continue with stocking stitch. AT THE SAME TIME on the first round decrease 0-0-6-0-4-0 stitches evenly on round – read DECREASE/INCREASE TIP = 196-216-232-252-276-300 stitches REMEMBER THE KNITTING TENSION! When the piece measures 8-8-8-8-10-10 cm insert 1 marker thread at the beginning of the round and 1 marker thread after 98-108-116-126-138-150 stitches (= sides). Allow the marker threads to follow your work upwards; they will be used when you decrease in the sides. On the next round decrease 1 stitch on each side of both marker threads - read DECREASE TIP (= 4 stitches decreased). Decrease like this every 8-8-8-9-9-9 cm a total of 3 times in each side = 184-204-220-240-264-288 stitches. Continue working until the piece measures approx. 31-30-32-34-33-35 cm (measured from the bottom of one of the waves in A.1). The next round is worked as follows: Cast off 2-3-3-3-5-6 stitches for the armhole, knit the next 88-96-104-114-122-132 stitches and increase AT THE SAME TIME 2-12-4-12-4-12 stitches evenly over these stitches – remember DECREASE/INCREASE TIP (= front piece), cast off 4-6-6-6-10-12 stitches for armhole, knit the next 88-96-104-114-122-132 stitches and increase AT THE SAME TIME 2-12-4-12-4-12 stitches evenly over these stitches (= back piece), cast off the remaining 2-3-3-3-5-6 stitches for armhole. There are now 90-108-108-126-126-144 stitches on front and back pieces. Lay the piece to one side and work sleeves as described below. SLEEVE: Cast on 48-52-56-56-60-60 stitches with double pointed needles size 3.5 mm and Lima. Knit 1 round. Then work rib in the round (= knit 2 / purl 2) for 3 cm. Knit 1 round where you decrease 6-8-10-10-10-8 stitches evenly on round = 42-44-46-46-50-52 stitches. Change to double pointed needles size 4 mm and work stocking stitch in the round. When the piece measures 10-8-11-11-9-9 cm insert 1 marker thread at the beginning of the round (= mid under sleeve). This marker thread is used when increasing mid under sleeve. On the next round increase 2 stitches mid under sleeve - read INCREASE TIP. Increase like this every 2½-2½-1½-1½-1½-1½ cm a total of 13-13-19-19-19-19 times = 68-70-84-84-88-90 stitches (change to short circular needle when necessary). Continue working until the sleeve measures 40-38-38-38-36-36 cm (increases mid under sleeve should now be finished and there are shorter measurements for larger sizes due to longer yoke). Knit 1 round where you increase 8-8-12-12-12-12 stitches evenly on round – read DECREASE/INCREASE TIP = 76-78-96-96-100-102 stitches. The next round is worked as follows: Work 2-3-3-3-5-6 stitches stocking stitch, work A.2 over the next 72-72-90-90-90-90 stitches (= 4-4-5-5-5-5 repeats of 18 stitches) and finish with 2-3-3-3-5-6 stitches stocking stitch. Continue this pattern until only the last round in A.2 is left. The last round is worked as follows: cast off 2-3-3-3-5-6 stitches for armhole, work the last row in A.2 over the next 72-72-90-90-90-90 stitches and cast off the remaining 2-3-3-3-5-6 stitches for armhole. The sleeve measures approx. 44-42-42-42-40-40 cm from top down. Lay the piece to one side and work the other sleeve in the same way. YOKE: Place the sleeves on the same circular needle size 4 mm as the body, where you cast off stitches for the armholes (without working the stitches) = 324-360-396-432-432-468 stitches on needle. Work A.3 in the round (= 18-20-22-24-24-26 repeats of 18 stitches). When A.3 has been completed there are 252-280-308-336-336-364 stitches on the needle. Work A.4 in the round (= 18-20-22-24-24-26 repeats of 14 stitches). Continue this pattern. When A.4 has been completed there are 126-140-154-168-168-182 stitches on the needle. Knit 1 round where you decrease 30-40-50-56-56-62 stitches evenly on round = 96-100-104-112-112-120 stitches left on needle. The yoke now measures approx. 19-22-22-22-25-25 cm from where body and sleeves were placed together. Then work neck as described below. NECK: Change to short circular needle size 3.5 mm. Work rib in the round (= knit 2 / purl 2) for 3 cm. Then loosely cast off with knit over knit and purl over purl, but to avoid the cast-off edge being tight you can cast off with needle size 4 mm. The jumper measures approx. 56-58-60-62-64-66 cm from the shoulder down. ASSEMBLY: Sew openings under sleeves. |
|||||||||||||||||||
Diagram explanations |
|||||||||||||||||||
|
|||||||||||||||||||
 |
|||||||||||||||||||
 |
|||||||||||||||||||
 |
|||||||||||||||||||
Have you finished this pattern?Tag your pictures with #dropspattern #goldenfairysweater or submit them to the #dropsfan gallery. Do you need help with this pattern?You'll find 27 tutorial videos, a Comments/Questions area and more by visiting the pattern on garnstudio.com. © 1982-2026 DROPS Design A/S. We reserve all rights. This document, including all its sub-sections, has copyrights. Read more about what you can do with our patterns at the bottom of each pattern on our site. |
|||||||||||||||||||


With over 40 years in knitting and crochet design, DROPS Design offers one of the most extensive collections of free patterns on the internet - translated to 17 languages. As of today we count 324 catalogues and 12290 patterns translated into English (UK/cm).
We work hard to bring you the best knitting and crochet have to offer, inspiration and advice as well as great quality yarns at incredible prices! Would you like to use our patterns for other than personal use? You can read what you are allowed to do in the Copyright text at the bottom of all our patterns. Happy crafting!
Post a comment to pattern DROPS 195-22
We would love to hear what you have to say about this pattern!
If you want to leave a question, please make sure you select the correct category in the form below, to speed up the answering process. Required fields are marked *.